Star News


")


Origami on the New Year theme for children. DIY origami gifts for the new year. How to make origami Christmas items. An original DIY gift for the New Year with photo and video instructions
"Merry gnomes in the winter forest." New Year's crafts in the technique of origami.
Master class with a detailed description.
Berdnik Galina Stanislavovna, teacher primary school KEI KHMAO-Yugra "Lariak boarding school for students with disabilities".
Description: this master class is intended for children of primary school age, teachers of additional education, educators and creative people who love to create beautiful crafts with your own hands.
Purpose: the work can be used as an interior decoration, a gift for a holiday.
Target: Making a collective craft using the origami technique.
Tasks:
1. To consolidate the skills and abilities of working with paper.
2. Cultivate the desire to make the product with your own hands.
3. Cultivate the habit of working independently, carefully, bringing the work begun to its logical conclusion.
4. Develop Creative skills, imagination, fantasy.
5. Develop compositional skills and aesthetic sense.
Materials and tools:
1. Colored paper.
2. A simple pencil, ruler, scissors, glue.
For decor, you may need satin ribbons, beads, you can use ready-made plastic eyes, snowflakes.

Stages of the craft:
This work is made in the technique of origami. In our work we present detailed description gnomes.
1. For one gnome, we will prepare two identical squares with a side of 14 cm.
From one square we will make a head with a cap, from another torso.

2. We bend the two corner sides of the square by about 1 cm.

3. Unfold the workpiece.
Bend the left corner a little further than the middle into an "overlap".

4. Do the same with the right corner. Get a cap.

5. We will issue the beard in the form of a double fold on the bottom white canvas.

6. Bend the tip of the cap to the wrong side.
Here you can add a pom-pom.

7. For the body, we take a square, place it in front of us with the front (colored) side.
Bend the top and bottom sides about 1 cm.

8. Unfold the workpiece. Using the fold method, determine the middle of the figure.
Bend the left edge to the middle and evenly bend.

9. Do the same with the right side.
The result is a rectangle with white stripes at the top and bottom.

10. We straighten the upper part of the figure in the form of a classic collar.

11. Bend the upper part of the figure forward, as shown in the photo.
Get the body of a gnome.

12. We connect the received parts with a drop of glue.

13. Glue eyes and a red bead-nose.

14. Such gnomes can be used separately, as a Christmas tree toy or a souvenir gift for the new year.
Our work was given a New Year's mood,
adding green Christmas trees and white snowflakes.

Thank you all for your interest in our work!
We will be glad of the usefulness of the material provided.
To decorate a house on New Year's holidays, you can use not only special origami patterns. There are quite a few classic models, which are no less good as toys, garlands or postcards. For example, in the homeland of origami - in Japan, it is customary to decorate a Christmas tree with tsuru paper cranes, which bring happiness, health and well-being.

Animals
Funny animals and birds are among the most popular paper models and are especially popular with children. Why not make paper ones for your Christmas tree in turn? These birds, which are considered to be the messengers of spring, will by no means be random "guests" during the winter holidays.
It was customary for the Slavs and ancient Germanic peoples to perform many rituals in December-January, calling out warmth and sun. During this period, everything that could symbolize spring, the flowering of nature, the new harvest and life itself was used to decorate the house. Most often, wreaths were woven from evergreens, supplementing them with ears of wheat, various fruits, and so on. Following an ancient tradition, you can add symbols of spring to the decor of your home.
If cranes seem too exotic in winter, there are many models of polar animals, in the "company" of which it is customary to meet New Year.
Penguin
These charming creatures, only vaguely resembling their relatives - birds, are associated with arctic ice, eternal cold and the kingdom of winter. Meanwhile, there are Galapagos penguins living on the islands of the same name near the equator. They feel good at a temperature of 18 - 28 ° C. It is not surprising, since the ancestors of all Penguins 60 million years ago lived in a temperate climate and only after Antarctica moved to the South Pole, they adapted to the harsh conditions of the ice continent.
adult penguin with chick
You will need a square of paper 15x15 cm white on one side, black or with a pattern on a dark background on the other.

Step-by-step instruction:
- Start folding with the basic kite shape. We outline the diagonal of the square. We bend the outer corners to it.
- right and left side add by dotted lines indicated in the figure.
- Open the right side from the inside.
- We make an oblique fold, as in the diagram.
- We lower the open valve down, forming a penguin wing.
- We repeat the same steps on the left. We bend the sharp corner at the bottom.
- Fold the model in half "mountain".
- It turns out the figure of a standing penguin with a chick. We bend the sharp upper corners along the oblique in one direction, then in the other. Using the reverse fold, we form bird heads.
- We make beaks in the same way.
A touching penguin couple looks good on postcards, gift tags or seating cards.

polar bear
The majestic giant - the second largest land predator after the East Asian combed crocodile, is also considered recognized new year symbol. In the west, he is among the main helpers of Santa Claus, along with elves and riding reindeer. Those who grew up on Soviet cartoons remember the touching white bear cub Umka, who persistently sought friendship with people. The name of this character is not invented. Indigenous peoples of the north call male polar bears Umk.
Using the origami technique, you can make a magical helper of Santa Claus:

Step-by-step instruction:
- We use a 10x10 cm square, which has one side red and the other white. We bend it diagonally from top to bottom and from right to left. We reveal.
- Lower the top point by 1/3.
- Flip the figurine.
- We divide the right and left halves into 3 parts. Fold each side by 1/3.
- We bend the corners to the sides.
- We start the lower point back and lift it up along the central axis.
- We also bend the side valves to the back of the workpiece.
- Upper corners - fold the right and left corners in a zigzag pattern, making the bear's ears.
- Lower the red cap down, and then lift it up with a slight indent.
- We draw a teddy bear muzzle.
The second New Year's model is more reminiscent of Umka, familiar from childhood:

Step-by-step instruction:
- Fold the square in half. We reveal. Fold the top and bottom edges towards the middle.
- We repeat the division into four parts in the transverse direction.
- We fold the right side to the center, at the same time opening the corners to the sides. Flatten and smooth.
- We bend both left corners to the near line. We open the formed "pockets".
- We fold the right perpendicular part along the arrows and the dotted line.
- We bend the figure in half.
- "Close" the model to the left.
- Scroll and "open" to the right.
- Fold the split edge forward with one part, and back with the other. It turns out the body of Umka.
- On a triangular head, we form ears with a zigzag fold and round off their sharp ends.
- The teddy bear is almost ready.
- We turn it over.
- Bend the left side of the head to the side and down.
- Turn the figure over again. We draw her muzzle.
Deer
Each winter wizard - and in different countries they differ not only in name, but also in appearance, they have their own mount. After all, it is difficult to go around all the houses on foot and distribute long-awaited gifts. For example, the Finnish Joulopukki rides on a goat, the German Weinachtsmann rides on a donkey, and the Russian Father Frost prefers a sleigh pulled by three horses. Reindeer carry Santa Claus, popular in the USA and some European countries. In total, there are 9 animals in the team, and it is led by Rudolf, an unusual character with a flaming red nose. It lights up the road as Santa Claus races from town to town through blizzards and blizzards.
The deer is considered an auspicious symbol, besides, it is inextricably linked with the New Year. Well, how not to fold the figurine of this noble animal out of paper:
Father Frost
There are several popular origami assembly schemes. But on New Year's Eve, there are not many main winter wizards. We add lesser-known options to the hand-made piggy bank, allowing you to show off originality.

Step-by-step instruction:
We use a square 15x15 cm, with white and red sides. First we fold the "Kite". Expand it with a white triangle down.
We open the corners as in Figure 3. Fold each valve in half. Fold them over twice until they touch the edges.
Red top - "cap" bend in a zigzag. We divide the lower white part into the face and beard, which must be separated with a fold.
Flip the origami upside down. Fold the "cap" down. We translate to the left and up, bending along the oblique. The sides are slightly “reduced”. Flip the Cases of Frost onto front side, draw his eyes, nose and eyebrows.
She is also a New Year's origami model:
Postcard with a wreath
Origami New Year cards are popular not only among hand-made masters. In Japan, they are factory-produced and sent out by the dozen during the winter holidays. Such messages look concise, elegant and stylish.
Nothing will stop you from doing something similar with your own hands. You can, just like in the Japanese sample, use it for a postcard. The New Year's wreath looks no less interesting:

It is assembled from modules representing the "Windmill" known since childhood.

Step-by-step instruction:
- At the square Green colour 5x5 cm bend the opposite edges to the center.
- We outline the middle of the resulting strip.
- And fold each half in half.
- Open the last fold.
- Stretch the lower part to the sides
- And we flatten.
- Repeat steps 5 and 6 for the top.
- We get the basic form of "Catamaran".
- We turn its corners at an angle of 90 ° clockwise.
We make a New Year's bow using the origami technique as follows.
Handmade Christmas trees are gaining popularity, and with them, New Year's origami toys are becoming more and more popular. Unlike other decorative techniques - decoupage, painting, modeling, paper plastic does not require special talents, knowledge and material investments. Both children and adults can fold the toy according to the finished scheme, and the result will be approximately the same.
For Christmas decorations simple office paper will not work, and even more so notebook sheets, which beginner origamists often use. The material should be truly festive - the effect produced by the decor largely depends on its quality.
Wreaths
Entrance doors for the New Year are decorated with compositions of evergreens. Origamists offer alternative colored paper wreaths. Having slightly reduced, these decorative elements are also used as Christmas decorations. Models may differ from each other in shape, structure and proportions, but they are all assembled from classic Japanese modules. It is advisable to combine several types of paper in one wreath in order to emphasize its individual “pattern”. Music sheets look no less impressive in a similar decor.


Option number 1
The most widely used wreath consists of 8 modules. Each will require a rectangle measuring 4x8 cm. The most convenient way to get the right amount:
- Take a square 16x16 cm, fold in half in both directions.
- Open all folds.
- Fold the top and bottom edges to the center line.
- To uncover.
Cut the square along the fold lines, getting rectangles of the desired size. The paper should be thick enough to hold the folds well and add volume to the New Year's toy.
Step by step instructions for one module:
- Place the rectangle face down. Fold it in half lengthwise.
- Hold the free edge up.
- We bend twice. We fold the corners of the free edge to the opposite side.
- We make 7 more similar modules.

- When folding the figure, the free edge forms two "pockets".
- We insert into them the sharp corners of the next module.
- Here's what that node looks like.
- We continue to collect a wreath.

The finished toy looks very stylish:

From it you can make a Christmas tree pendant or decorate a postcard.

Option number 2
Another 8-piece wreath, shaped like a classic star. Accordingly, the modules for it are not used trapezoidal, but triangular. This is perhaps the simplest New Year's origami toy, although at first glance it does not seem so. The model is recommended for joint creativity with children.
Step by step instructions for the module:
- We fold the square 8x8 cm from left to right and from top to bottom, combining opposite edges.
- We bend three corners to the center, as in the basic “Damn” form.
- We arrange the figure so that the only remaining open square is at the bottom right.
- Bend along the central axis. We get one module. We make 7 more of the same.

We insert the modules into each other, as shown in the diagram:

You can bend the white triangles back so that the wreath takes on a more expressive shape:

Another interesting diagram:

The new role of "Samurai Helmet"
One of the favorite children's models, which is often used as an element New Year's costume, easily turns into a Christmas tree toy. Miniature "Samurai Helmets" in this case are used as modules from which the original suspension is assembled.

You will need:
- sheets of one-sided paper "kami" 15x15 cm;
- decorative cord matching in color;
- beads;
- scissors, glue stick.
Step-by-step instruction:
The toy will require 8 Samurai Helmets. Each of them is formed on the basis of a square. It is most convenient to take ready-made sheets intended for origami. Stationery stickers also have the right format, but they are colored the same on both sides - the toy will not turn out so elegant from them.
Assembly diagram:

- Bend the square diagonally from top to bottom.
- Lower the side corners to the bottom point.
- Then we lift to the top, folding the layer closest to us in half.
- We breed the resulting valves to the sides, bending along the dotted lines indicated in the figure.
- The lower part of the figure has two layers. The top one needs to be raised, folding along the dotted line.
- And then tuck once, aligning with the central axis.
- The module is ready. Need 7 more of the same.
Christmas tree decoration:
- We take two "Helmets", we place opposite each other. We coat the triangular valve of one of them with glue and put it into the "pocket" of the other.
- Repeat the same action for all four pairs.
- When the blanks are glued, we connect them together.
- To do this, insert the remaining free valve into the “pocket” of the element from the next pair.

- We make sure that the smooth sides of the "Helmets" are located side by side.
- Glue them together.
- We fold the twine or dense thread in half and with the help of a needle we stretch it through the center of the toy.
- At the top we tie a loop, at the bottom we string a few different size and type of beads.

New Year's Eve is full of magic. Even the combat "Samurai Helmet" can turn into an amazing one.

And this is not the only transformation. For example, the “Water Bomb”, familiar to everyone since childhood, does not pour water over the holiday, but becomes a miniature gift decorating the Christmas tree. All you need to "change roles" is beautiful wrapping paper and a satin ribbon.
A selection of simple origami toys
New Year's decorations made of paper, first of all, are interesting for children. When the winter weather forces you to spend the whole day at home, folding origami figures successfully replaces the endless “communication” with gadgets and TV. Young origamists under 10 years old, complex models are not suitable. But schemes consisting of 7 - 11 steps are just what you need.
Bow

Step-by-step instruction:
- We fold the square 15x15 cm from right to left and open it.
- We raise the lower edge to the asterisk indicated in the figure.
- We bend the figure along the dotted line.
- We outline the crossed folds, as in the diagram.
- We form a bow along these lines.
- We make the middle from a paper strip of a different color, gluing it into a ring.
- Flip the bow over to the front.
Fawn Rudolf
The unusual red-nosed deer is a popular comic book character about Santa Claus. At a young age, he and his friends won snow queen Stormella, who tried to stop the New Year from coming. After that, Santa Claus made Rudolph the head reindeer in his magical harness. Such a character must be made for holiday tree. It is better to use light brown velvet paper to give the toy texture.

Step-by-step instruction:
- At a square of 15x15 cm, we outline one of the diagonals. We open it.
- Then fold along the second diagonal from top to bottom, with the free edge towards you. We bend along the indicated line and return to its original position.
- We divide the upper part into three equal segments horizontally. Twist it down twice along the fold lines.
- Now we divide the whole figure into 3 equal parts vertically.
- The sides are bent at an angle.
- We fold them again to the center.
- Flip the figure.
- Open the bottom, forming a small rhombus.
- We bend it back half. It turns out the nose.
- Let's skip the very end. You can paint it black, but it is better to glue a red button or half bead. Then the nose will turn out like a real deer Rudolf.
- Glue or draw eyes.
Older children will be interested in the model of the already adult Rudolf. The deer is three-dimensional and is well suited for decorating a Christmas tree, as well as for table compositions. To make it you need a square of 21x21 cm.
star ball
It is enough to take a sheet of wrapping paper for New Year's gifts, add 6 identical modules from it, and then glue them together to get one of the most beautiful origami balls. Its feature is a relief in the form of a star, reminiscent of snow patterns on the windows. For a ball, paper with a pattern is required; in a plain version, it does not look so impressive.

Step-by-step instruction:
- Square 15x15 cm, fold in half in both directions. We reveal.
- We bend the lower and upper edges of the figure to the middle, as in the basic form of the “Door”.
- We also fold the short sides of the workpiece to the center and open it.
- We apply diagonal fold lines, as shown in the figure. Then we open the top and bottom of the figure to the sides of the center line and flatten it.
- We transfer the outer corners of the workpiece in turn to the center. We open each from the inside and flatten into a square. The figure as a whole takes on a similar shape.
- For each of the four small squares, we bend the right and left corners to the middle.
- The resulting triangular "pockets" are opened and flattened.
- We continue until we “go through” all the details.
- We bend the corners of the figure back.
- We get one octagonal module. Let's do 5 more.
- We glue the octagons together with bent corner elements.
Fasten to the Christmas tree toy narrow satin ribbon or twine. The Christmas ball is ready.

Toy with a surprise "Fox Box"
This is not ordinary Christmas decorations, but a box in which you can hide a small gift: candy, jewelry, a note with wishes, and so on. It is not difficult to make a lot of origami with your own hands, but the Fox Box pyramid has several significant advantages:
- depending on the size, it can become a package, decoration or bead for;
- the model is assembled easily and quickly, which will appeal to children;
- in a short time, you can make at least a dozen pyramids, putting a surprise for guests in each, and then organize a quest with the search for "treasures";
- the laconic form of the decor will suit any style of interior and will look harmoniously with other Christmas decorations, both handmade and factory.

The Fox Box pyramid is assembled from 3 parts. For them, it is recommended to use thick paper - with a pattern, metallized or textured. The fold lines must be very precise, so that later the figure turns out to be neat.
The size of the original squares may vary, depending on the purpose of the model. For beads, it is best to take 5x5 cm, for a box - 15x15 cm.
Step-by-step instruction:
- We start with the white side of the sheet.
- Fold the bottom corner over to the top.
- Then right to left.
- Open the last fold.

- Raise up the bottom corners: right and left.
- Add two more squares in the same way.

- For all three modules, open the side corners.
- We fold the workpiece along the central axis.
- Repeat the same step for the rest of the details.

- We insert the free corners of one triangle into the "pockets" of another.
- We continue until we connect all three parts.

It remains only to align the sides of the New Year's pyramid so that it is symmetrical. If necessary, even at the stage of folding, a thread with a knot is inserted inside for attaching to the Christmas tree.


Luxurious bell in technology modular origami will complement the collection of New Year's hand-made toys:
Time inexorably runs forward and now white flies are flying outside the window, slowly sinking to the ground and covering everything around with a snow-white fluffy veil. However, despite the cold, the soul is warm and joyful. And all because suddenly appeared snowflakes herald the onset of the New Year. The most important holiday of the year is already very close, which means it's time to think about New Year's decor, gifts and, of course, crafts.
The days are getting shorter and the evenings are getting colder and longer. What to do with yourself, and even more so with your little fidgets, when for street winter fun is it already too dark? Well, crafts, of course. New Year's crafts can be made from the most unexpected materials: cocktail tubes and much more. But there are also more traditional materials, such as paper. In this article, we have collected for you more than 60 step-by-step master classes for making paper crafts for the New Year. If you still think that only applications can be made from paper, then drop everything and carefully look at our article! Well, for those who are looking for something unusual and know what miracles can be created from ordinary paper, we can only advise you to immediately begin the process of creating New Year's paper crafts according to our schemes and templates.
One of the simplest New Year's paper crafts can rightly be considered a garland. We all remember well from our childhood how they decorated the Christmas tree with such paper garlands not only at home, but at school or kindergarten. Making a paper garland is very simple: colored paper cut into strips of the same width, the first strip is glued into a ring, and each subsequent one is threaded into the previous ring and also glued. This paper craft is perfect for 4-5 year olds.
If the task of entertaining children is not worth it, but you need to decorate the house, then here's another version of a paper garland for your note. It is made even easier than the previous one, but you will need sewing machine. So, to create such a New Year's paper craft, you will need: a lot of circles of different diameters (the number depends on the size of the garland), a sewing machine. Sew circles through the center on a typewriter and hang a garland. From any gust of air, such a garland will “come to life”.

So, if you decide that the issue with garlands is closed and there is nothing else to think of here, we hasten to upset you - this is only the very tip of the iceberg. Simple paper garlands are an activity for beginners. Professionals prefer more complex tasks, for example, voluminous crafts from paper. Below is a master class on making a volumetric garland in the form of light bulbs.

By the way, paper lanterns You can decorate a regular LED garland. Looks like this New Year's craft paper is very cool, especially if you decorate a wall with this garland.

Interested in a garland? Then see more ideas:

New Year is the most beloved holiday associated with miracles and magic. New Year's Eve Celebration festivities and happy meetings. It is impossible not to love this time of the year, when everything around is transformed, and every house or shop window becomes like scenery for a fairy tale. Everyone wants to participate in this transformation, and therefore they try to decorate their homes […]
Since we are talking about the decor of the apartment, it would be strange not to mention Christmas wreaths, or as they are also called New Year's wreaths. Everyone can make such a paper craft, in addition, a New Year's paper wreath is a reusable decoration that will not deteriorate and will not lose its appearance over time.

A very cool paper craft for the New Year is a wreath of roses. You will have to work hard to create such a craft, so if you decide to make yourself such a paper wreath on the door - stock up on patience and mood!

If you're planning a New Year's themed party, say Cuban or Hawaiian style, then you'll definitely need some kind of decoration to set the atmosphere. Here is such a simple, but very original wreath made of paper will come in handy!

Surely your child at school or in the garden was asked to make a Christmas wreath with their parents. Allegedly for a competition, but the main task of this task is to get parents to spend time with their children. But maybe you should not wait for a task from school, but spend time with your child yourself. In addition, with such a New Year's craft, you can decorate the house in a very original way, and most importantly, get a lot of positive emotions!

Need a Christmas wreath? See more ideas:

Preparing for the New Year is sometimes even more pleasant than the celebration itself. The whole family, including the youngest residents, can take part in the process of decorating the interior. You can decorate an apartment or house for the New Year holidays with the most different ways, but recently New Year's wreaths, which we are better known for from romantic Christmas films in Hollywood, have been very popular. However, trendy […]
So, we continue to decorate the apartment. There is a garland, there is a wreath. Something is missing? Oh, of course, Christmas trees! If you prefer to put a big forest beauty on New Year's holidays, it doesn't matter. By the way, read on. Small paper Christmas trees make a great addition to the decor, and they can also be used as small souvenirs for guests!
# 10 New Year's paper crafts with our own hands: we make a Christmas tree toy "Herringbone"
A Christmas tree made of paper does not have to be on the table or somewhere in the house. You can make a craft out of paper, which you can then hang on the Christmas tree itself, and if there is no Christmas tree, then you can simply hang such voluminous paper Christmas trees around the house. The scheme for making a Christmas tree is quite simple, but if you don’t quite understand what the essence is, or you just don’t have time to figure it out, then you can download a ready-made template.

A very cute Christmas tree can be made from corrugated paper. This paper craft looks very realistic, but it is done quickly and easily.

If you are still interested in a paper Christmas tree, but you want to make something unusual, then use this master class.

The tree does not have to be on the floor, it can also be hung from the ceiling. An excellent Christmas garland will turn out from plain paper.

How to distinguish New Year's table from the usual holiday? Everything is correct! According to thematic elements of decor. And how to make a suitable New Year's dessert, see.


Do you want more workshops on making paper Christmas trees? See:

The Christmas tree is, of course, the main attribute of the most important winter holiday. It will not be possible to do without the forest beauty, the atmosphere is not the same, and where does the good grandfather put the gifts? It so happened that a Christmas tree is decorated in the house for the New Year holidays: someone puts a live one, someone prefers an artificial one, and someone paper. A paper Christmas tree can not only replace a Christmas tree […]
#17 Christmas paper crafts: making a movable card with wishes
From paper, you can make not only flat or voluminous crafts, but also movable ones. With our ready-made scheme, you can make a postcard with an encrypted congratulation or message. Such unusual gift will please not only children, but also adults! You can download the finished scheme below.


In winter, wild flowers are not to be found, even in flower shops. But there is nothing to worry about, flowers can be made from paper with your own hands. And our step by step wizard class will help you with this.

A wide variety of flowers can be made from paper, the whole secret is cutting out the ends.


If you want to make a big Christmas star for decorating a wall from paper tubes, then this master class is especially for you!

A very themed New Year craft made of crimped paper. Such a paper cone looks very natural and is quite difficult to distinguish, especially if it is used as a decoration. With our master class, you can easily cope with such paper crafts.

There is another technique for creating paper cones with your own hands. This method is more labor intensive and will take you more time. In addition, to create such a New Year's craft, you will need: paper, foam blank, a lot of safety pins, a ribbon and beads for decoration. However, if you have the time and desire, then pay special attention to this scheme for making a cone, especially if you want to impress.

From paper, you can make very special crafts using the Japanese origami technique. Our step-by-step master class will help you create christmas ball from paper, which can decorate both the room and the Christmas tree.

A step-by-step diagram for creating an origami star with your own hands. You can decorate the top of the Christmas tree with such a star, you can simply create a festive atmosphere in the house, or you can combine it into one big garland.

You can make the base yourself, as in the first picture. Or you can download the finished pentagon blank and, depending on the size of the pentagon, the size of the finished star will change.


At your service step by step diagram making paper snowflakes. Follow the instructions and you will definitely get such a miracle.

#34 We decorate the apartment with cones: do-it-yourself Christmas paper crafts
In continuation of New Year's paper crafts, I would like to offer you another scheme for making paper cones. In addition to paper circles, you will need an oval or round shape, glue and spruce twigs for decoration.

Another great option do-it-yourself apartment decor - a large voluminous snowflake on the wall. A snowflake can be not one, but a whole ensemble. In addition, on such a New Year's background, you will get great photos!

New Year's gift must be in a beautiful package. In my opinion, the gift itself is not so much important as the intrigue around it. After all, it is this intrigue that will remain in the memory, this is a pleasant expectation and unfolding the paper. Use our scheme for making paper flowers with your own hands and decorate gifts for dear and close people.

It is customary to decorate a Christmas tree with toys, but these toys do not have to be purchased. Even better if they are made by hand. And what could be easier than making a toy on Christmas tree from paper. Take advantage of our step by step instructions and make your christmas ball from paper.

Very simple, but incredibly cute voluminous lanterns can be made from ordinary colored paper. Even children can handle this craft, so feel free to get to work if you have little helpers. Well, if not, then you can do it yourself!

You can make completely unexpected crafts out of paper, including gift boxes. And not just boxes, but in the form of delicious sweets. For such a gift box you will need: cardboard cylinder, colored paper, glue, scissors, satin ribbon.

In continuation of the question of gift wrapping, we want to offer you another budget, but very charming option. You can make such a gift elf with your own hands using our master class.

Here's another option for you original packaging New Year's gift with your own hands.

Need more gift wrapping ideas? See:

On the eve new year holidays shop windows are full of gift boxes, decorative bags, wrapping paper for every taste. Smiling sellers helpfully offer to provide services for wrapping New Year's gifts. And all this seems to be great, because you must admit, it is much more pleasant to receive a New Year's trifle in a beautiful package. But on the other hand, the whole meaning of the gift is lost, the very gift that […]


Want more ideas Christmas balls? See:

Today, on the shelves of stores you can find a huge number of a wide variety of Christmas toys, so turning an ordinary Christmas tree into a real festive beauty is not difficult. However, the New Year is a special day! The day when old year left behind, and ahead are new adventures, new events, new victories. But after all, the old year did not pass without a trace, […]


#55 A simple paper snowflake pattern: decorating a room for a party

#56 Do-it-yourself voluminous paper crafts: making a snowflake. Scheme


#58 Christmas paper crafts: decorate the house with diamond crystals
Download ready-made schemes and make your own paper diamond crystals.

#59 New Year craft paper ball "Mistletoe" with your own hands
Here you can make such a mistletoe paper ball with your own hands, using ready-made cutting templates. Stock up on patience and New Year's mood!


You can decorate a house not only with standard snowflakes or stars. You can make such a wonderful vase out of paper. Download the finished scheme and assemble the vase following the instructions in the master class.

A wide variety of decorative elements can be made from plain paper, just download the finished scheme, print it, cut it out and glue it. A wonderful Christmas paper craft is ready!

#64 Christmas patterns for cutting: a great photo shoot for the new year
Note! Templates are very large sizes and good quality, so the download may take some time.

Simple Christmas decorations can be made from paper. In our master class, an example with a ball is given, but it can be other shapes: hearts, stars, Christmas trees and much more. You can download ready-made templates below.

You can make a simple and original Chinese lantern with your own hands using our ready-made scheme.

An excellent decoration for the new year will be a composite paper star. You can download a ready-made template for gluing below.

In our time, you will not surprise anyone with ordinary paper cutters. Volumetric crafts cause much more delight. In this master class, a scheme for creating a simple volumetric star is described step by step. You can download a ready-made template with a large, medium and small star from the link below.

It's pretty hard to imagine christmas decor without all sorts of variations on the theme of the stars. In this master class, you will learn how to make a volumetric double-sided star out of paper with your own hands. You can download the finished scheme below.

#70 Christmas paper masks
The list of New Year's paper crafts must include Carnival masks. Well, what New Year's party can do without masks? That's right, none! In fact, there are a lot of options for making paper masks, and if you turn on your imagination, you can make many wonderful crafts!

Sinegubova Olga
Christmas decorations in origami technique. Master Class
December - month New Year's crafts. New Year is a favorite holiday for adults and children. He gives us great joy, delight, and we are all waiting for a miracle! We made with children origami christmas decorations. Dear Colleagues, I present to you Master Class.
Necessary material:
1. A square of white or colored paper with a side of 20 cm.
2.8 squares of colored paper with a side of 8.5 cm.
4. Decorations - snowflakes.
Step by step process manufacturing:
1. To find the center of the square, you need to fold the square twice diagonally.

2. Fold all four corners to the center (basic shape "pancake").

3. Turn over the workpiece. Fold in half and in half again.

4. Bend each side alternately to the fold line.


5. Folding the base shape "Catamaran".

6. Fold the squares along the fold lines.

7. From the squares we make the basic shape "Kite".

8. Put each of the resulting triangles vertically and spread out by gently pressing it with your finger.

It turned out a classic kusudama module.
Now we add 8 parts from small squares. We do it like the petals of daisies. See the manufacturing process in my publications: Memories of summer. "Wild Flowers Bouquet". Origami. Master Class (1 -6) .

It remains to glue the finished parts into the classic kusudama module and decorate.
The work was done by the children of the preparatory group.


"Secretary Crow". Master class crafts using the "origami" technique I welcome all the guests of my page! I am very glad that you looked at my master class! Have you seen the secretary bird? I suggest you get it.
Master class "Chicken" in the technique of origami On the eve happy holiday Easter I offer a small master class for older children preschool age"Chicken" in the technique of origami.
Master class on designing from paper using the "origami" technique. Master class for children of senior preschool age 5-6 years. Designing from paper using the origami technique "Gingers swim in the river." By the river.
Master Class " Racing car in the "origami" technique All children love to play with cars, but if it is made with their own hands, it will certainly become loved and desired. My kids, playing with racing.
Master class "Flying star in origami technique". I offer you a master class in making a toy "Flying star" in origami technique. Games with such a toy are held in the form of a competitive one.
Master class "New Year's star" made of paper using the origami technique So the autumn matinees have flown by. Autumn is still in the yard and the calendar, and we are all already living in anticipation of winter and the New Year. I wanted.
Master class "Snowman in the technique of origami" Dear colleagues! I bring to your attention a master class on making a snowman using the Origami technique. The kids blushed - Nakatala.
Master class with parents "Two-pipe boat" in the technique of origami "Dear friends and guests of my page! I would like to present to your attention a master class that I conducted with my parents using the origami technique.
Fairy tale "Mitten" in the technique of "origami". Master class by A. N. Tolstoy: A fairy tale is a great spiritual culture of the people, which we collect bit by bit, and through a fairy tale, a thousand-year-old is revealed to us.
Decorations "Christmas houses". Master class The New Year is coming soon And there is a commotion in the houses, A lot needs to be done, That threshold is above the roof. It is necessary to climb on the mezzanine, Get all the toys.
🎅 Do-it-yourself origami for the New Year: simple decorations in 5 minutes
Origami is one of the most exciting directions in working with paper. Art originated in ancient China, however, so far the hobby has not lost its relevance. Today, in our review, we will show which origami for the New Year can be done quickly and without much skill.

The main condition for a successful craft is the precise folding of the paper elements.
Interesting options for making origami
It is common knowledge that professionals own hundreds of variations different equipment folding paper, by the way, this is how the word origami is translated.
Important! If you are planning to use paper decorations in the house, exclude the occurrence of a fire in advance: no sparklers and lighted candles.

Most often created Christmas decorations in the technique of origami, as well as New Year's cards
Advice! For Christmas decorations choose different paper: there are gilded, voluminous, iridescent coatings that will be very useful for New Year's decor.
Origami in the form of a postcard
Such pleasant trifles, How New Year card will always be one of the long-awaited gifts, especially if they are created by children's hands. Made in a simple technique, such decorations can be placed on the table, put under the Christmas tree, complement the design of the main gift.

New Year cards can be made in different techniques
The manufacturing process is not very complicated. The main thing is to learn the procedure.

One of the options for postcards in the technique of origami
Classic and modular origami for New Year's decor
If you thought that origami is a small decoration folded out of paper, then after reading this material you will understand that origami is a great art, both in the literal and figurative sense of the word.
Figures of New Year's origami
Large origami elements are called modules. The process of making such masterpieces requires perseverance and accuracy.


Christmas tree can be decorated in advance with toys
Modular origami toys can consist of several elements or tiers.


Related article:
Volumetric Christmas trees made of paper and cardboard for the New Year: step by step master classes with a photo of manufacturing in the techniques of origami, vytynanka, quilling and others original ideas- see our publication.
Origami in the form of a garland
A separate direction is New Year's garlands. Here, the constituent elements are created literally by the hundreds and thousands.

Garland is a set of elements
Related article:
DIY garlands for the New Year: photo; step-by-step master classes on making DIY Christmas garlands from Christmas trees and tassels from corrugated paper, from colored circles, from voluminous pom-pom balls, from burlap and bright pieces of fabric, from felt - in our publication.
Origami wreaths
Origami technology is so versatile that it can be used to make many things. No exception - Christmas wreaths. Here, again, he himself will have to focus on the manufacture of individual modules, which will later be combined.


Important! Elements must be additionally glued with glue. This is especially true for thin parts.
Related article:
How to make a New Year's wreath with your own hands: master classes. How to make from old newspapers or wrapping paper, from foam or pipe insulation, from bushings from toilet paper or hanged out spruce branches and cones, from photographs and postcards, from colored felt, from dried flowers and herbs - in our publication.
Let's do origami for the New Year with our own hands
Great scope for decorating an apartment and a Christmas tree for the New Year is presented by origami lovers. All you need is paper, glue and scissors. As well as a fair amount of perseverance and patience. Not everything can work out the first time. But you shouldn't give up.
Origami - Santa Claus
There are dozens and hundreds of options for making the main grandfather of the holiday. Here is just one of the examples in the video tutorial.
Here are some more photos for inspiration.


Origami - Snow Maiden
Paper Snow Maiden is one of the traditional symbols of the holiday. The main thing is to think over the whole image of a blond beauty to the smallest detail. Think about how the hair will look, draw a face.


Origami - Christmas tree
The origami Christmas tree is a modular design that we already know. Elements are simply layered on top of each other, forming an integral composition.


Origami - star
Traditional performance New Year's toys- origami star. Here are a few sequential steps for its manufacture.

Origami - snowflake
Snowflakes are a more subtle piece of paper. The main task is to maintain the correct bend angle.

An interesting technology for creating origami-style snowflakes is assembly from triangles.


Origami - pig
And of course, on the eve of the New Year holidays, we could not ignore the most important symbol of this year - the pig. This decoration can be made by following the simple instructions in this video.
Origami - deer
A separate line of work with paper is the manufacture of animals using the origami technique. Origami masters can create such amazing masterpieces.

Immerse yourself in interesting ancient art with the whole family, the warmth of your hands will breathe life into paper products and give everyone joy!
How to make New Year's origami with your own hands?
The art of folding paper figures without glue and scissors has its roots in ancient China, where paper was invented. Initially, the figurines were used in religious ceremonies, and only representatives of the upper classes owned the folding technique. In the sixties of the last century, origami began to spread around the world, and today it has become a real international art. So why not do this creativity and make your own hands New Year's origami for the holiday?
paper stars
There are many schemes by which you can collect stars with a different number of rays, both to create a garland and as independent toys. The basis for any craft (including New Year's origami) is usually a paper square. To make a star, you first need to fold it in half (at the corners, not the sides). Get a triangle. The action must be repeated. Repetition is needed to outline the middle line. Parts of the triangle are folded to the last (from the corner to the center). Then you need to bend the paper as in the figure (steps 5-6). It is necessary to do several repetitions, and then all that remains is to turn the upper triangle to the side to make an origami star.

Modular stars
You can make modular New Year's origami paper. Such crafts are more difficult, but look more effective. The principle of modular origami is that first separate identical parts are folded in the right amount, and then connected to each other. So from the same elements, completely different figures are obtained. How to make Christmas origami? You need to bend both sides of the square towards the center to mark the fold line, and then fold both parts towards the center. The lower small triangle also needs to be bent up. Then turn the figure over and bend the bottom corners to the center (as in the picture). Fold the corners with an accordion. The modular element is ready. Now you need to add at least three more such figures, connect them with “accordions” to each other to make a star.

Christmas tree for decor
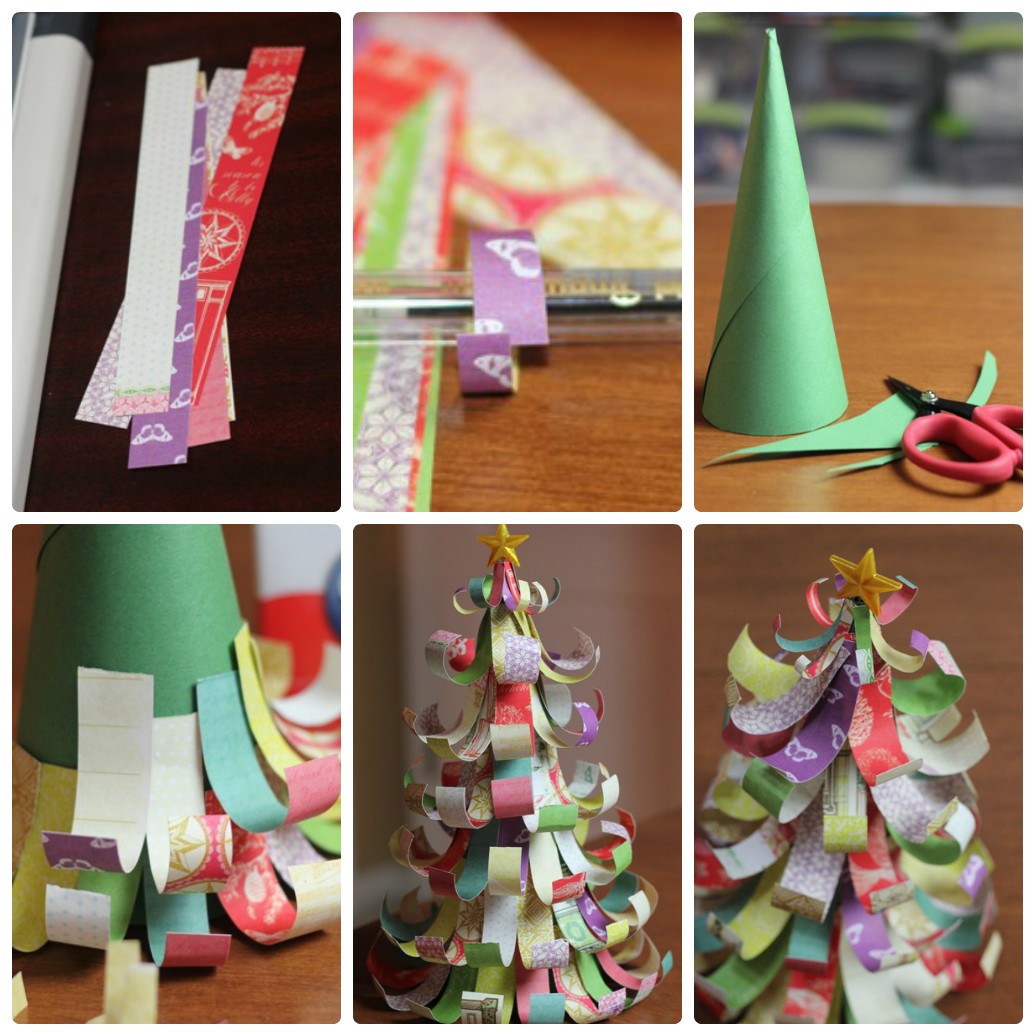
New Year's origami toys can look very stylish and can even be used to decorate an office. Modular Christmas trees will create a New Year's mood in any atmosphere. You can make them from colored or white paper, but crafts made from kraft paper or wrapping paper look much more beautiful.

The base is a square of any size (the size of the figure will depend on the size of the square). Fold the square along two diagonals and iron well to outline the fold lines. Now you need to bend the shape along to get a rectangle. Then, along the last fold line, you need to fold the triangle. The so-called triangle-flapper will turn out. The right and left edges must be bent to the center, combined and smoothed. The part must be turned over and the edges of the triangle must be aligned in the center line. We got fold lines along which it will be convenient to fold the figure further.
Each resulting fold must be straightened. The result is a quadrilateral, which must be folded along the midline. So gradually quadrangles and triangles alternate. The folds can be gently pressed with scissors so that the New Year's origami figure fits well. In the resulting figure, you need to bend the corners, which are then tucked inside the Christmas tree.
Now it remains only to use scissors to make horizontal cuts along the sides of the Christmas tree. Then the corners are bent to the side (towards the center line). Such a New Year's origami craft will become a stylish desktop decoration.

The video will help you get it right.

simple paper snowman
With very young children, you can make a very simple origami snowman with your own hands. New Year's craft will become good decoration on the Christmas tree, can be used as a decorative element for gift wrapping or an application element. The big difficulty in creating such a figure is not even the snowman himself, but his scarf. You will need a sheet of white paper, a sheet of green or any other colored paper, red and black felt-tip pens (to draw button eyes, a carrot and a bucket on your head).

Folding technique
To make a snowman, you need to take a square piece of paper and fold it in half to make a rectangle. Turn any three corners of the rectangle back. Now you need to take a sheet of colored paper and bend it in half diagonally to mark the fold line. Expand the square and bend in half, and not along the middle line (so that a thin line remains in the upper part of the resulting triangle). white stripe). It is necessary to bend the triangle from bottom to top alternately in different sides. You get one strip - a scarf.
The part must be placed under the snowman figure so that a little less than one third of the craft remains on top (there should be an acute angle on top, not bent), and bend. The final touch is to draw beady eyes with a black marker, a carrot and a bucket (draw an acute angle).
paper santa claus costume
To make a cute Santa from two squares of red colored paper, you only need material and a few free minutes. Put the first square with the colored side up, bend the small stripes from above and below towards you, turn the figure over. On the other hand, mark the center line of the resulting rectangle (vertically) and bend the edges to it. Now you need to turn the upper triangles towards you to get a figure that resembles a Santa's cloak. The upper part is folded under the craft. It turns out a Santa Claus costume.

Origami Santa: head and hat
Next, you need to separately make the head of Santa Claus. The upper left corner of the square and small strips from the bottom and left are bent over. The figure needs to be turned over to the other side (the white side will be on top), bend the side triangles to the center. Now top part the cap is bent back (away from itself). Repeat the last action with a small corner at the tip of Santa's hat. Now you need to connect the figures, and on the face of Santa Claus draw eyes, nose, beard.
A cute little penguin is a great Christmas craft. Origami is folded from a square of blue colored paper. You need to bend the top and bottom corners towards the center to outline the center line. Then narrow corners are folded to the center, the right angle of each element is bent twice to make a foot. The figurine is folded in half along the midline. Now the resulting triangle needs to be turned over, the upper corner is bent towards itself, and the right one is wrapped under the “foot” of the penguin. Now it remains only to make a foot at the bottom and form a muzzle. The last step is to draw the eyes on the face of the penguin.

Christmas wreath
A simple origami Christmas wreath can be made from a few strips of paper. It is better to take a different one to make the wreath bright. You need eight strips, each should be 4 cm wide and 8 cm long. Each of them is first folded in half lengthwise, the corners need to be bent from top to bottom. Then the figure is bent across. From such blanks, you can assemble a wreath by alternately inserting one into the other.
If you take strips of kraft paper or with New Year ornaments, you will get a very stylish decoration for your home or Christmas tree. If you proportionally increase the strips of paper (for example, cut them 8 cm wide and 16 cm long or another size), then the wreath will turn out larger. This craft can be decorated front door into the room.