Star News


")


How to make a Christmas tree from fir cones with your own hands: we create a festive mood. How to make a Christmas tree from cones DIY Christmas tree from cones
New Year everyone associates with the smell of tangerines and pine needles, with miracles, and, of course, with fir cones. At first glance, the cones do not look festive at all, but you just need to turn on the fantasy, as usual natural material will sparkle with completely new colors. We invite you to learn how to make a Christmas tree from fir cones with your own hands!
Making such a Christmas tree is very simple, even a child can handle this task, so making a Christmas tree from cones can be a great way to make new Year gifts or holiday decorations for home.

Preparation rules
Very often, cones falling from spruces and pines turn out to be closed and only open after a while, thereby changing the original appearance in which this cone was delivered to your home. This can somewhat overshadow the craft, so before you start making a Christmas tree from spruce or pine cones, you can familiarize yourself with some of the intricacies of preparing cones for crafts.
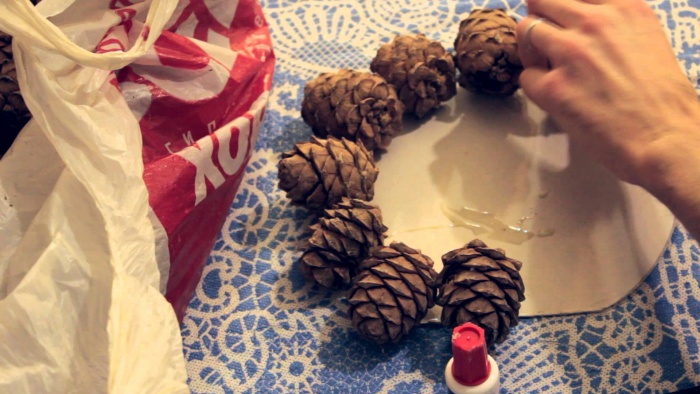
- If you want to leave the buds closed, after collecting them, put them in a container with wood glue for literally 20-30 seconds, this will not allow them to open.
- If you have collected closed buds and want them to open as soon as possible, there are several ways to achieve this:
- you can put them to cook for half an hour, and then dry them on the battery;
- send the cones to the oven, heated to 250 degrees, for 2-2.5 hours.
- plus the heat treatment will kill the microbes and small insects living in the buds and make them safe.
There is also a way to adjust the shape of the cone: you just need to soak it in water for 5-10 minutes, tie it with a thread and dry it on a radiator. To whiten the bumps, they need to be soaked for 5-6 hours in water with diluted bleach (1: 1), then rinsed thoroughly and dried.
You will need:
Pine and spruce cones;
Scissors;
Thick cardboard;
Decorative berries and birds (or any other decorations);
Hot glue;
Low wide vase;
Artificial snow in a can.
First of all, decide on the size of the future Christmas tree, its width. On a sheet of cardboard, draw a circle of the desired diameter (you can use, for example, a plate). Cut out the resulting shape.
Clean the cones prepared for creativity from debris, then sort them by size into three piles: small, medium and large. Put a cardboard circle in front of you, apply a thick layer of hot glue along its edge, then lay the cones on the glue bigger size wide side to the center of the circle. Glue the cones together properly.

Thus, continue to lay out the source materials in tiers in a circle, trying to make each next tier a little smaller in diameter than the previous one. Remember, larger cones must be at the base of the Christmas tree, medium - in its middle, and smaller - at the top. At the very top of the craft, fasten one cone vertically.

The Christmas tree is ready, now you can start decorating it. Apply artificial snow on it (it is better to do this on the street, because if you apply it indoors, you can stain the surrounding objects). Let it dry a little, then decorate the Christmas tree with artificial berries and. The Christmas tree will look very original if the decorations are chosen in the same color scheme.
As soon as the tree is ready, take a wide vase or flower pot, turn the product upside down and apply glue to the bottom. Glue the cardboard base of the craft to the vase/pot and let the glue dry. The decorative Christmas tree is ready.

Every child knows what cones are. They are pine, spruce, cedar. You can make a variety of crafts from them. This requires a little time, imagination, desire and patience.
The process of making any craft will give a lot of pleasure. And as a result, you and your child will admire your creativity for more than one day.

From this natural material you can create:
- Decorative compositions: candlestick, ikebana, wreath on the door.
- Animals: bear, hedgehog, penguin, squirrel, owl.
- Christmas items: Christmas decorations, star on the Christmas tree, Christmas tree.
The process of preparing cones
Before you start making crafts from this natural material, you need to carefully review and process it. Dirty bumps need to be washed and dried, you can use an old toothbrush for cleaning.
Since it is warmer indoors than outdoors, unopened buds will begin to open. Spruce trees will look like hedgehogs, and pine trees will look like fluffy Christmas trees. And if for the manufacture of crafts you need exactly unopened cones, then they must be placed in carpentry glue for 30 seconds, and then dried.
 If you need the opened material, but there is no time to wait, then you need to spread it on a baking sheet and put it in a slightly preheated oven. The oven door must be ajar. After a while, they will gradually open up.
There is another way that will help open the cones - this is cooking. Boil them in boiling water for 30 minutes and then dry them. They will become fluffy and will no longer change shape.
These two processing methods help not only to open up the natural material, but also kill all microbes.
If you do not like the shape of the cones, then this can be corrected. To do this, they must first be soaked in water, and then betrayed to them. desired shape and tie with thread. After drying, they will have the shape that you gave them.
For the manufacture of crafts, this material can be not only in its natural form, it can be coated with varnish, paint, artificial snow.
In order for them to have a white tint, they must be soaked in a special solution for five hours. To prepare the solution, you need to mix water and whiteness in equal proportions. After soaking, they should be washed in clean water and then dried.
Now you know the rules for working with this natural material and you can safely start making crafts.
DIY Christmas tree-cone
Making such a Christmas tree is not difficult, you need desire and patience.
For its manufacture you will need:

Step-by-step instructions for making a Christmas tree:
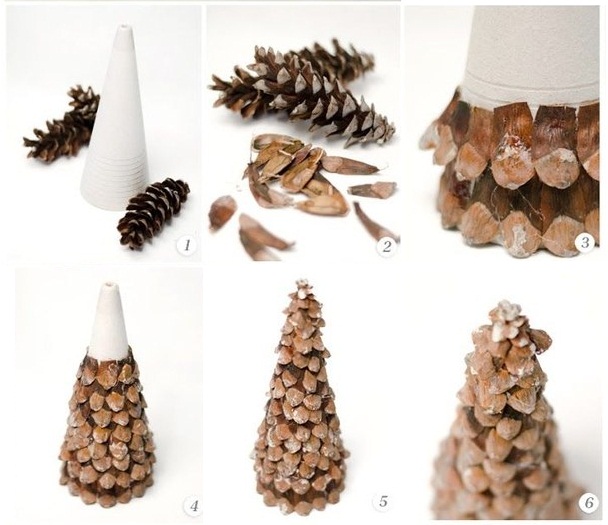
- First you need to make a base - a cone. To do this, draw a circle with a compass or plate. The radius of the circle corresponds to the height of the Christmas tree. Cut out the circle and fold it in half. For a cone, you need one half of a circle. Connect the workpiece with glue. The craft cone is ready.
- Now take the prepared cones and glue them to the cone. You need to start from the bottom and the largest. There should be smaller bumps at the top.
- The void between the cones can be filled with tinsel.
The Christmas tree is ready!
Small Christmas tree made of cones and plasticine
This craft is very easy to make, even a very small child can handle it.
To make a Christmas tree you will need:
- Fir cone;
- Cotton wool;
- Plasticine;
- Braid;
- Green paint.
Manufacturing steps:
- Paint the bump with paint using a brush. It can be done by a child.
- From plasticine, make a Christmas tree stand. To do this, roll up the ball and flatten it.
- Stick an open spruce cone to the base, its scales should look up.
- Roll up small multi-colored balls from plasticine. Attach them to the Christmas tree in different places.
- With the help of cotton wool, you can depict snow.
- From plasticine, you can mold a pike and attach it to the top of the craft.
- It remains to decorate the craft with braid.
A small and original Christmas tree is ready!
Step-by-step master class of Christmas trees from cones
To make such a New Year's beauty, you will need the following materials:
- Cardboard;
- Glue gun;
- PVA glue;
- Pine cones;
- Golden paint.
- Beads and sequins.
Stages of work:
- It is necessary to make a base from cardboard - a cone for a fluffy beauty.
- Glue the cones on the base in rows. The rows need to be fastened with a shift inward, they should resemble a triangle.
- Now paint the Christmas tree and decorate it with beads and sparkles.
Fluffy beauty is ready!
Miniature scale tree
To make such an elegant Christmas tree, you will need pine cone scales, cardboard, scissors, glue and paint of your favorite color.
Manufacturing steps:
- Cut the desired number of scales with scissors.
- Make a Christmas tree cone out of cardboard.
- Glue the scales to the base. It is necessary to glue in circles, starting from the bottom. Rows can be staggered or stacked on top of each other.
- The top of the Christmas tree can be decorated with dried cloves.
- After the glue dries, the Christmas tree needs to be painted, for example, in gold. For this procedure, spray paint is best suited.
- Apply PVA glue to the ends of the scales and sprinkle them with sparkles.
The miniature beauty is ready!
Having made one of these crafts, you will not only get great pleasure, but also delight your baby. Don't be afraid to dream and be creative.
Attention, only TODAY!
Content
The simplest and most accessible material that can be actively used in creativity is an ordinary cone. It can be used both as a separate decor and as part of compositions; its scales can be used in the design of candlesticks or some other decor items. In this article, we propose to practice making a Christmas tree from fir cones, it sounds funny, but it is precisely such a craft that can revive the interior in new year holidays. It is not a shame to present such a Christmas tree both as a gift and install it in an office, a country house.
You can start preparing materials right now. Collect material without flaws, preferably the same size. Before use, it is better to rinse everything with water and dry it. In the case of creating a Christmas tree, open cones are suitable for you, so you can safely dry them without fear that they will open too much.
Christmas tree from one cone
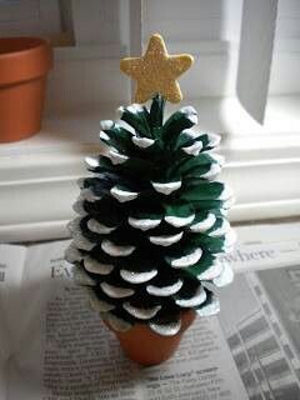
Let's start with the simplest option. Since the cone itself has a conical shape, this design itself can be considered as a small decorative Christmas tree. You will need a fully opened cone, on the scales of which you can glue small soft balls, beads, sequins, sprinkle glitter, attach rhinestones. This craft is easy to do with children, they can be entrusted with the small work of gluing parts.
Ready-made crafts can be glued to small wooden blocks, which must also be arranged first. Such Christmas trees can be placed on the table near each guest or create different New Year's compositions.
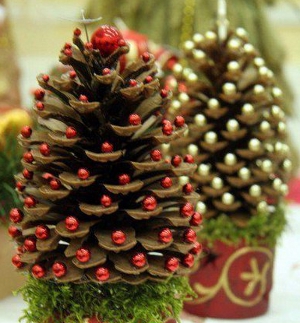
Crafts decorated with different large beads. The tree can also be dyed green color and decorate with a star.
Christmas tree made of several cones
This option is more difficult. Will it take enough a large number of cones and other materials. Such a tree turns out to be voluminous, large, fluffy. What you need to prepare:
- cones (take more, if left, then make other decorations);
- cardboard cone;
- glue gun;
- scissors;
- spray paint (choose any color that suits you. A golden or silver Christmas tree looks beautiful).
It is worth noting that cones can be taken not only from spruce, but also from pine or larch. Can be combined different materials in one tree. First you need to sort them out and choose approximately the same size. Scissors need to remove bumps and some bad parts.
Now you need to glue the main decor onto the cone using a glue gun. Do this carefully, row by row. When all the details are glued, they can be painted with spray paint and decorated with some additional decor. Such a Christmas tree made of cones can replace the usual green beauty and please the eye for a very long time.
A do-it-yourself Christmas tree made of cones will remind you of a pleasant pastime for its creation and will become the pride of the hostess.
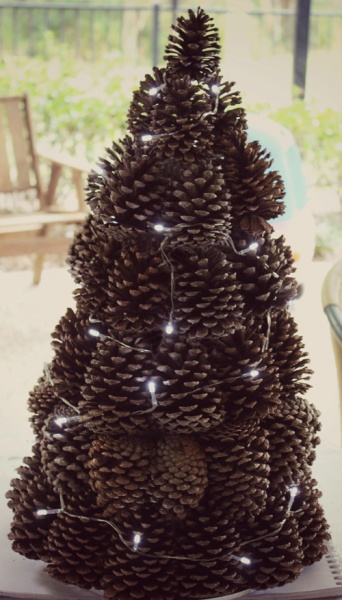
By the way, a similar Christmas tree can be made without using a cardboard cone. The design itself will be made directly by cones. Such a Christmas tree will turn out more magnificent and larger.
You only need to cut out a circle of cardboard of the same diameter as you would like to see the base of the Christmas tree. Cardboard can be replaced with a wooden block. On the blank circle, it is necessary to glue the parts with the base inward.

The larger the diameter of the base, the larger and taller the tree will be. But keep in mind that such a craft will require much more basic material.
Christmas tree from scales
A very delicate and elegant Christmas tree is obtained from scales. Of course, such work is more painstaking, requiring more time, effort and perseverance, but it turns out very beautifully.
For our work, collect the following materials:
- many cones of firs;
- knife, sharp scissors or pliers;
- cardboard or foam cone;
- glue gun;
- paints;
- sequins or any other decor (this is optional, because even without additional decor the Christmas tree looks very beautiful).
Your very first step is to separate the scales. Do this with pliers or sharp scissors, a sharp knife will do.
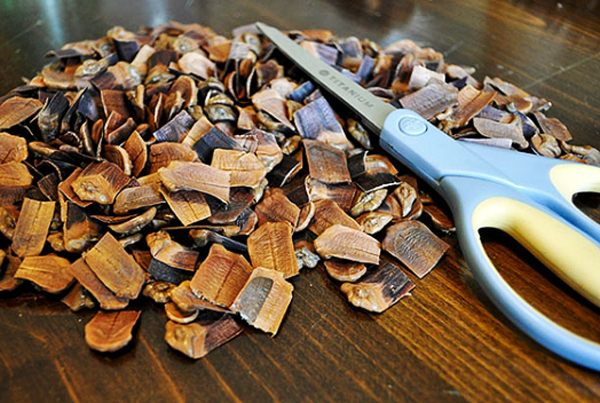
The longer the scales are, the more convenient it will be to stick them and the more magnificent the Christmas tree will turn out.
Now that the main material is ready, let's start creating a New Year's beauty. We take a cone and fasten the scales in a checkerboard pattern. The Christmas tree can be either very small or large, which can be installed on the floor.
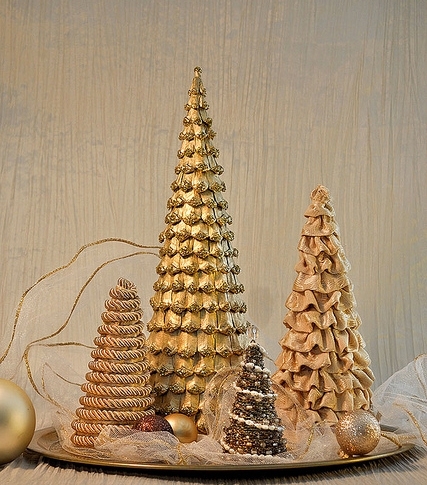
The Christmas tree can be painted in gold or green, decorated with additional decor.

The end result might look like this:
Bonsai from cones
You roughly understood how to make a Christmas tree from cones, but how do you like the option of bonsai from cones? Such is the original move for the New Year. Guests come to you, and instead of a Christmas tree you have a small Japanese tree. For this craft you will need:
- fir cones;
- a branch from a tree;
- small pot;
- pot filler (it can be earth, and scales from cones, and small pebbles).
First you need to form a ball of cones, which will become the basis for the bonsai. It may be small foam ball, on which you attach the main material with a glue gun. Cones can also be glued directly to each other to form a ball.
Helpful Hints
A cone is an excellent natural material from which you can make many different crafts.
One of the popular cone crafts is Christmas tree .
There are several ways to make a Christmas tree from a cone, and we have chosen the most interesting crafts on this topic for children and adults. Decorate your home and create a festive atmosphere in it.
On our website you will also find:
- 20 small DIY Christmas trees that will decorate any home
- How to make a Christmas tree with your own hands
Christmas tree made of cones. Popular option.
Almost any type of cones is suitable for such a Christmas tree.

You will need:
Thick paper or cardboard
Hot glue, superglue or liquid nails
Fir branches (artificial or natural)
Spray paint (optional)
Decorations (tinsel, artificial snow)
Lots of cones.
1. Make a cone out of cardboard.
2. Use glue to attach the cones to the cone.
3. If desired, you can paint the Christmas tree in any color using spray paint.
* Only need to paint outdoors, away from children, with a mask and preferably with goggles, because. Spray paints contain substances harmful to health.
4. Between the cones, you can glue fir branches and various decorations.
5. It remains to decorate the Christmas tree according to your taste.
Christmas tree made of cones (step by step instructions)

You will need:
Cardboard or thick paper
Wooden or carton supply (can do by yourself)
adhesive tape
Old newspaper
Hot glue or super glue
Decorations (garlands, tinsel)
Lots of cones.
1. Make a cone out of a thick sheet of paper or purchase a ready-made foam cone.
2. Fill the inside of the paper cone old newspaper for more stability.

3. Cut off the top of the cone, and use duct tape to attach the cardboard circle to the top of the cone. This is done in order to make it easier to glue the cones on the top of the Christmas tree.
4. From cardboard, cut out a large circle - the base of the Christmas tree - and attach this circle to the cone (see image).
5. Start gluing the cones to the cone from the bottom up. To avoid large gaps, you can turn the bumps of each next row with the crown in the opposite direction and then glue them.

6. When all the cones are glued, you can decorate the Christmas tree with a garland and / or tinsel.
Small Christmas tree made of cones (photo-instruction)

For one Christmas tree you will need:
PVA glue
Artificial snow or white (silver) sparkles
Mini pompoms (can be replaced with multi-colored beads).


Here is another version of a similar tree
Small Christmas tree made of cones (photo)

You will need:
wine stopper
Knife and scissors
PVA glue
Hot glue or super glue
Glitter (optional).

1. Trim the bottom of the cone to make it flatter.

2. Cut the wine cork into 2 equal parts - these will be the bases for the Christmas trees.
3. Glue 1 cone to each base.


4. Apply a little PVA glue to each cone and sprinkle them with salt. You can add glitter.

How to make a big Christmas tree from cones (master class)

You will need:
Wooden slats and wire (to make a conical frame)
Cardboard or plywood (for making the base of the Christmas tree)
Hot glue or super glue
Spray paint (any suitable color)
Jewelry (tinsel, bows, toys)
Lots of cones

1. Create a wooden frame with wooden slats and wire. Make it stable by adding a base of several sheets of thick cardboard or plywood.

2. Buds can be glued to the frame or attached to the wire (using small pieces of thin wire), or both.

3. Decorate the Christmas tree as you wish and taste. You can add aerosol or acrylic paint, tinsel, garlands, bows and / or small Christmas toys.
Here is another version of a large cone tree that uses a large thick wire plant frame (you can make your own and just buy it):


Craft "Christmas tree" from cones

You will need:
Styrofoam cone
Spray paint (shine effect in this example)