Star News


")


Crafts and applications from buttons for children. Original crafts from buttons Button world crafts
Discover a colorful creative world and make DIY button crafts with kids while developing fine motor skills children's fingers and a taste for color.
You can make a variety of crafts from buttons. They can be sewn and glued, made from them applications and decorative elements for the children's room. We will tell you a few ideas on how to make crafts from buttons for children and adults. Have fun and be creative!
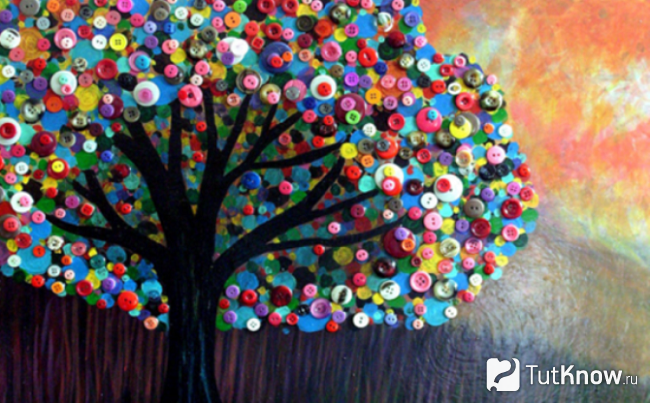
Crafts from buttons do-it-yourself master class - a tree from buttons.
Such a tree in the form of a picture will look great in any living room and will become its decoration. How larger size wood will be, the more interesting you can do the job.
Will need:
- canvas on stretcher,
- brown acrylic paints for the barrel and brush,
- buttons of different sizes and colors,
- good adhesive for bonding plastics.
How to make crafts from buttons with your own hands
- Draw a tree trunk on canvas with brown acrylic paint. The more branches and twigs will be on the trunk, the more interesting the picture will look. It is better to draw the trunk not directly in the center, but start from the lower right corner and move to the upper left, so that you get a diagonal dynamic composition. So crafts for the house will look more interesting. First, the contour of the tree can be applied with light movements. simple pencil and after you are satisfied with the resulting silhouette - paint over it.
- Let the tree trunk dry well. Acrylic paints dry quickly, so you don't have to wait long.
- We glue the buttons to the tree trunk, imitating flowers and leaves. Buttons can be selected in one color scheme, for example, pink - white - red and make a spring flowering sakura tree, or yellow, then the tree will become autumn. Green buttons will remind you of foliage.
This idea can be used to make DIY button crafts for kids. It is only necessary to replace the canvas with cardboard or cloth, and the buttons can be glued or sewn on.
If the fabric is stretched on the hoop and buttons are sewn on, then you can make embroidery with blooming flowers in the meadow, where the stalk is embroidered with large stitches with floss threads.
Craft from buttons with your own hands for children in the form of a letter.
If buttons or unnecessary jewelry are sewn or glued onto a solid base, then you can get a fashionable home decor - three-dimensional letters. Such letters will be especially appropriate in the garden. You can make each child the first letter of his name and make original compositions.
There are two ways to make decorative letters:
- Print a letter on a sheet of paper, stick it on thick cardboard, and then decorate the outline of the letter with colored buttons.
- Paste over the already finished volumetric letter.


Who knows how many interesting things you can make from ordinary buttons with your own hands? It is not as difficult as it seems at first glance, it will take a little time and money. The work done by you can be a great gift for friends and family, because it is a kind of hand-made, and needlework is a very valuable gift.
What to do with buttons
What crafts can be made from buttons depends on the skill, desire and amount of free time. Options can be both the simplest and very complex, requiring perseverance and patience.

Buttons can be used both for independent crafts and for decorating products: hats, scarves, belts, bags. They make beautiful jewelry, paintings, postcards and boxes.

Many photos of button crafts are presented in our gallery.


The most simple but beautiful products
There are a couple of options that are suitable for mothers of needlewomen, they can be used as crafts from buttons for an exhibition in kindergarten or school.

Products of this kind do not take much time after a hard day's work, they can be made together with the child.

To implement these crafts you will need:
- colored or white cardboard (depending on what kind of craft you decide to make)
- buttons in different colors and sizes
- ribbons and beads
- colored markers or watercolor
- scissors

Button painting
- Cut out desired shape a sheet of cardboard, if it is a postcard, you can fold it in half;
- We draw a kind of stencil with a felt-tip pen or paints (if there are flowers, we draw a stem, for a tree a trunk and branches)
- You can draw a penguin, elephants, camels: everything that your imagination is enough for;
- Glue buttons (like petals or flowers, like a crown of a tree, or fill in a stencil of a drawn butterfly or bird)
- We supplement with decorations in the form of ribbons, beads, rhinestones and other things (they will be needed to fill the free space between the buttons)
- Adding a picture or greeting card inscriptions, if desired.


These are the most uncomplicated creations that do not require much time to complete.

Volumetric products and materials for them
For those who want to surprise friends or have skillful hands and want to adapt them, there are options for more painstaking work.

If you decide to make a kind of panel or picture from fabric, embroider a pillow, you will need:
- threads of different colors
- material (preferably thick fabric)
- the buttons themselves
- beads or beads

Initially, you need to draw with a pencil what you are going to embroider or embroider. Then take the buttons you need in color or size and sew them on, not forgetting to fill the empty spaces with beads, rhinestones or ribbons.

New Year decoration
Materials for Christmas decorations:
- base: ball or cone made of foam or foam rubber
- buttons multi-colored and different in size (can be plain)
- pins
- beads
- ribbons

Collecting decorations:
- We put one or more beads on the pin;
- We pass the pin through one of the holes of the button;
- We fasten everything to the base;
- If there is a lot of free space between the buttons, fill it with beads or large beads;
- This is how the whole ball or tree is filled;
- Decorate the Christmas tree with ribbons, attach or glue the ribbon to the ball to hang the toy.

You can use your own hand-drawn stencils as a template for DIY button crafts.

They make a sketch on the material, then buttons are glued or sewn on it and a composition is obtained. You can choose any animals or plants, caterpillars or butterflies and make them from buttons.

If you can’t draw or come up with something, you can choose a craft on the Internet, and a drawing from books on needlework.
Note! 

Stand for glasses or hot
Necessary materials:
- big and small buttons
- thick thread, needle
- cardboard or wooden board
- PVA glue

For the first option, we sew buttons together with dense threads, you can take different colors, you can use plain colors. We pass through each hole of the button with a needle at least 3 times, for greater strength.

You can also stick buttons on a dense base. As a basis, you can use cardboard or a wooden board. You can paint cardboard or take a color one and select buttons by color, so the gaps between them will not be pronounced.

At the same time, you can decorate the glasses themselves, using the same glue.

Button embroidery on pillow
- Taking pillow measurements
- Choosing the material for the pillowcase;
- We cut out the workpiece;
- On paper or on the pillowcase itself, we draw the necessary pattern;
- We arrange the buttons on it, determine how and where each of them will be located;
- We sew buttons.

Note! 
Note
The composition will look more original if the buttons are sewn through the holes not in the usual way, but, for example, with a cross, zigzag, triangle.

Photo crafts from buttons


Note! 


Hello dear readers!
Have you ever made button crafts? It turns out that this is an interesting and exciting activity, a real hand made for the home!
We have been discussing this topic on the blog for a long time, but now I decided to remind you and myself what crafts can be made from buttons for the new year, this is just what is relevant now. Yes, and I have accumulated new photos of original crafts from buttons with my own hands.
New Year crafts from buttons
Let's start with Christmas crafts.
From buttons for the New Year you can make a Christmas wreath, voluminous Christmas decorations, a napkin ring, a candlestick from a children's shoe, funny snowmen. You can make a Christmas tree by gluing buttons onto a cardboard cone.
Making a Christmas wreath is easy, for this you need to glue buttons on a circle of cardboard on both sides. And you can glue the same buttons in pairs, and then glue them to each other, placing them in the form of a ring.
For Christmas ball buttons glued on foam ball or a ball of paper. Gaps can be filled with beads and rhinestones.
By the new year 2019, I propose to make a dog craft from buttons in the form of an applique or a panel: pick up an interesting drawing of a dog, draw or print it on paper and lay it out by gluing the buttons.
Button decorations
Somehow I was cleaning my closet and found a box with a variety of old buttons. Usually, if I throw away some old thing, I unfasten and fold the buttons, they will suddenly come in handy.
Even the buttons from Soviet times have been preserved, when I sewed a little and bought beautiful buttons for future things.
Related article: A selection of works on embroidery with ribbons of paintings by Alexandra Gordienko
Accumulated buttons can be given a new life and decorate different gizmos with them.
flower pot decoration
The first thing I did was decorate the flower pot with buttons. My large tall cyperus was planted in a regular bucket. I decided to decorate it a little with knitting threads. Smeared with PVA glue upper part around the pot (bucket). I glued the end of the thread and wrapped it around the pot, gradually going down.
I have already decorated other flower pots and candlesticks in this way. The threads were not wound tightly to each other, so that the surface of the pot could be seen between them and it turned out to be striped. Glue the end of the thread.

And in the upper part of the pot I glued buttons, picking them up by color. It turned out just the way I like it - simple and creative! It seems that my cyperus liked this new thing.
What other decorations can be made, look at the photo.
Crafts from buttons with your own hands: photo
You can decorate a mirror, frames, watches with buttons, sticking them along the contour, decorating a lampshade in the same way.
Original and simple necklaces and beads can be made.
Very beautiful decor from buttons can be done on clothes, belts, bags, decorative pillows. Especially the idea of decorating pillows warms me, because I like to make different pillows. In these cases, the buttons must be sewn onto the fabric in a certain sequence.
Do you like curtains made of beads? The same can be made from buttons by stringing them on threads. You can also decorate a fabric curtain by sewing buttons on it.
Pictures and panels from buttons
You can make beautiful pictures and panels from buttons. You just need to lay out a drawing on cardboard, burlap or felt with buttons, either multi-colored, or matched in color, or painted with paint of the desired color. Glue with PVA glue and enclose this work in a frame.
Related article: Crafts from cones
And the hoop as a frame is both original, stylish and modern.
If you remember, I made a panel of knitted sunflowers in a hoop.
And now I just really wanted to make a panel with the image of a butterfly, I put it in my plans, especially since I still have a lot of buttons, and I really like the compositions with butterflies in the interior.
crafts for kids
It will be very interesting to make crafts from buttons with your own hands for children and with them: various funny animals, clowns, applications in the form of trees on the theme of autumn, flowers, butterflies.
By the way, such a picture with a Christmas tree for the new year, made by the hands of a child, will be just relevant.
Original crafts from buttons
A simple bookmark for a book or a keychain: tie a large one to a chain or cord beautiful button, it will turn out quite original.
But do you like such a small craft tree made of buttons?
I recently came across this photo of an unusual vase.
Thinking how to make it? With a balloon! This method is already well known to us, so we make different beautiful balls from threads christmas toys from knitted motifs and much more.
So for a vase of buttons, we inflate the ball, spread half of it with PVA glue, we also coat the buttons with glue from the bottom and from the edges and place them tightly against each other on hot-air balloon. After drying, the ball is removed, the vase will remain in the hands.
How to make beautiful crafts from old buttons
Most likely, it is unlikely to be able to collect large collection buttons that match in color, and even more so in one color. But there is a way out - to paint them from a can of paint.
Ordinary buttons can also be given an antique look. For this:
- Large buttons are coated with copper acrylic paint.
- After drying with a brush with stiff bristles, green iridescent paint is unevenly applied so that gaps in the copper layer remain.
- We dry.
- We mix grey-green, mother-of-pearl paints and water and cover the buttons.
- The last layer is varnish.
Cute crafts made of buttons can be a real decoration of any interior. And there is nothing complicated in making these decorative elements.
You just need to show imagination, collect the required number of buttons and allocate some free time to implement the idea. 
This real picture of buttons, in fact, requires only a flight of your imagination, and a minimum of material costs.
Original ideas for creating a panel The main thing to consider when creating a panel is that there are no restrictions. It doesn't have to be a complex plot. It can be simple, but effective drawing. 
Indeed, sometimes it is simple and unpretentious simple panels that look truly magical, giving the interior expressive and original notes. 
Even a novice craftswoman can create such a button tree from a piece of cardboard and the remains of the most ordinary buttons from unnecessary clothes. Compositions in the form of tree branches framed by foliage made of white and transparent buttons look especially impressive. 
Simple in execution, but charming in result, a “blooming” button tree. 
Want to create a more sophisticated decorative element? Create a panel that has a clear outline. 
We will make a bizarre flower with petals shimmering in the sun from buttons of different colors. Compositions made of buttons of different sizes, painted in contrasting shades, look very impressive. 
With the help of buttons, you can even lay out letters and geometric patterns. 
These fittings will come in handy when creating original postcards.
You can come up with the background and drawing for the composition yourself, or you can reproduce the ideas already embodied by someone.

If the button crafts are placed in a frame, they will become an even more elegant and noticeable interior detail, for example, like this amazing butterfly with sparkling openwork button wings. 
Or a beautiful silhouette of a girl whose dress hem is lined with colorful buttons...

The choice is only limited by your imagination.
DIY button crafts To create jewelry, it is best to use flat buttons with two or four holes in the center.
We bring to your attention the option of manufacturing a panel, which, in addition to an aesthetic task, also performs a practical function. In our case, this panel acts as a basis for hanging chains, beads and other accessories. 
In addition to a set of buttons for making jewelry, you will need the following materials:
wooden or cardboard base; a piece of burlap or canvas; 4 empty wooden spools; 4 wood screws; hot glue or "universal"; a simple pencil and a sheet of paper. If you plan to give clear contours to the composition, prepare a frame of the appropriate size to frame it in advance.
Such a stand is convenient in that it will allow you to conveniently place jewelry without giving them the opportunity to get mixed up. You will not waste precious time before leaving the house, which is often spent unraveling bracelets and laces with pendants thrown into the jewelry box. 
The production of panels is carried out in the following sequence:
A square blank measuring 20x20 cm is cut out of a wooden or cardboard base. A pattern of the future heart is made on a sheet of paper. Its dimensions should be approximately 12x12 cm. The paper template is applied to the cardboard, outlined with a pencil, and then the blank is cut out. Both blanks are wrapped with cuts of canvas or burlap and with back side fixed with glue. The heart-shaped workpiece is decorated with buttons. On a square basis, along one of the edges at an equidistant distance, screw the coil onto the self-tapping screws. Both blanks are connected to each other and carefully glued. . 
When creating a button ornament, do not rush. The elements are first simply laid out on the base, forming a pattern. Only after making sure that the composition turned out to be harmonious, each element is lifted in turn and covered with glue from the back.
Crafts from buttons with children. In addition to buttons, you can use beads and seed beads to fill in the pattern. In addition, if the buttons overlap each other with their edges, they give the composition additional volume. 
In order to keep your button crafts neat, make two duplicates of your design. Lay out the pattern from the buttons dry on one copy, slowly picking up the buttons by color and texture.
When the initial drawing is ready, start filling in the second drawing with buttons, lubricating small areas of the drawing with glue and transferring this fragment from the first drawing. 
Similar crafts from buttons can be made not only on paper, but also on fabric, leather, etc. A good decorating technique is the combination various techniques and textures in this wall panel, including the use of simple buttons. 
simple crafts from buttons, despite the fact that they can be made even by a child, will become a real highlight of your interior. 
This kitty, which is made of cardboard and gray buttons, can become a real decoration of your home.
Button crafts are simple and original way make an unusual decor for your home with your children.
If you have accumulated buttons, make pictures, panels, decorations for clothes out of them with your own hands.
Making pictures from buttons with your own hands
Lots of ideas. They will help create artistic masterpieces for children and adults. For it use:
- buttons of different colors;
- glue;
- thick cardboard or thin plywood;
- simple pencil.

Paint the plywood or cardboard in the desired color, let the canvas dry. Redraw the outlines of the future masterpiece on it. As you can see, the vase is lined with bronze-colored buttons. For its edging, small pieces of fittings are used, inside there are larger ones.
Lay cheerfully colored buttons on the canvas to form flowers. Lay out the stems and leaves in green. If you have a lot of white buttons, decorate the background with them. This will help the picture become more voluminous and original.
Even if you have a few buttons, it will not hurt to make a panel.

Kids will love this idea for sure. But first, cook with them:
- white cardboard;
- paints;
- buttons;
- glue;
- brush;
- bath with water;
- white paper.
Let the child fold a strip of white paper in half, draw the right side of the butterfly on it. When he unfolds the leaf, he will get a white-winged insect. It remains to paint the body of the insect with black paint with a thin brush, apply a pattern to the wings and, after the paint dries, glue the butterfly to a flowering tree.
Using buttons, you can create another tree with your own hands.

To reproduce this idea, take:
- brown, red and yellow buttons;
- blue, white and yellow watercolors;
- glue;
- a sheet of cardboard;
- photo frame;
- pencil.
- First, the cardboard is covered with watercolors. Draw the sky blue, for this add a little blue to white, mix with a brush. The location of the ground can be green if there is grass growing there, and if it is sand, then make this part of the background yellow.
- After the paint has completely dried, draw the contours of the tree on the canvas with a pencil.
- Fill the trunk with buttons of a brown shade, black. Attach red and yellow to the crown. You can use other tones.
- Put the picture in a frame and you can hang the masterpiece on the wall.
After drawing the background with paints, you need to give them time to dry. On blue or green colored paper, draw a tree crown, glue it to the canvas. On the back of black or brown paper, draw its trunk, which also needs to be glued in place.
Now let the children give free rein to their imagination by gluing buttons of various colors to the crown.

Hang this picture in your living room, which will have large buttons, medium and small.
First draw the sea, it is bordered by a coastline consisting of sand. So make it yellow. Next comes a darker coastal spit, in the background it is green.
Now you need to stick white buttons on the sea so that they add extra shine to the water. Shells on the sand can be both light and darker tones.
The following button picture will also help you relax after a hard day.

First, a blue background of the sky and green, which will become the stems of flowers, are drawn in gouache. Buttons are glued above them. If they are on legs, then you need to sew them to the cardboard with a thread and a needle.
It will be easy for children under the guidance of adults to make just such a basket of flowers.

To make a panel in the form of an owl, take:
- wooden board;
- two metal loops;
- rope;
- buttons;
- twig.

Draw the outline of a bird on the board. Around the eyes, body and wings, lay out the brown buttons, and make the tummy, the outline around the pupils from white buttons, the pupils from black. Instead of a beak, attach a red one.
Glue a wooden stick down the panel. Attach the paws of an owl to it and around it.
This accessory will help to embody the most daring ideas. To make a Christmas tree New Year, take:
- green, light green buttons different sizes, brown;
- green thread;
- a needle with a large eye;
- scissors.
A star can be made from accessories of this shape or cut out of cardboard, also stitched with a needle and thread. We hang our Christmas tree and admire the beautiful creation.

If you want to make flowers from buttons, take:
- buttons;
- thin wire;
- scissors;
- vase.
Interesting crafts from buttons are both a clock and a wall calendar. For him, you need to cut out circles from cardboard, draw a number on them and stick them in the center of the buttons.
These blanks are sewn or glued to the base and the original calendar is hung on the wall or placed on the table next to it.
If you have a lot of such accessories, you can decorate a mirror, a bathroom wall and even a toilet bowl with it.

But first, the surface must be washed and wiped dry. After that, it is degreased and the accessories are glued in two rows, closing the gaps between the buttons so that the decorated surface does not show through.
If you liked making a Christmas tree, see what other crafts for the New Year you can make from buttons.

Degrease the surface of the ball, pour buttons to match it. If you are celebrating the New Year in nature in the country, there are no toys, then make them from the same sewing accessories.
Do not hold back your imagination, if you wish, arrange buttons according to height or large ones in the middle, small ones at the edges. The color scheme can also be varied.
What they don't make christmas snowflakes, from: napkins; yarn; paper. And the fact that they can be created even from buttons is known to few.

To do this, take:
- white buttons;
- Super glue;
- rope;
- metal hangers;
- pliers.

On the face, this blank will look like this.

Glue the remaining buttons to the metal wire.

Such New Year's snowflakes can be hung on a Christmas tree, on a wall. To do this, glue a rope to the end of the snowflake, tie a loop.
Here is another idea that will show you how to make a Christmas tree out of buttons.

String green on the wire, thread both ends through two large buttons, which will become the leg of the product and give it strength. For the second Christmas tree, you need to make a cone out of cardboard, glue it with buttons. Such accessories will help you make Christmas wreaths.
If you want to make a napkin ring to serve this way festive table, take:
- flexible transparent plastic kitchen board;
- buttons;
- glue;
- scissors.
A flower from sewing accessories also looks great. And you will make original candles from old shoes or those that are small for a child. Glue the buttons on the shoes, tie new laces, put fireproof glass jars inside the shoes, in which you place candles.

See what buttons are wonderful helpers in terms of room decor. Sew them on the pillow by making a pattern or creating the first letter of the name of the person you want to give it to.
Embroider with buttons on a dark bag, and it will become unique.

Decorate curtains with these accessories by sewing them here. Remember how fashionable bamboo curtains used to be? Someone made similar ones from paper clips and beads wrapped in pieces of postcards. You will make these from accessories.

For this you will need:
- buttons;
- fishing line;
- needle;
- rail;
- scissors.
Using this technique, you can make not only curtains for a doorway, but also an analogue of blinds for windows.
DIY button jewelry: photo and description
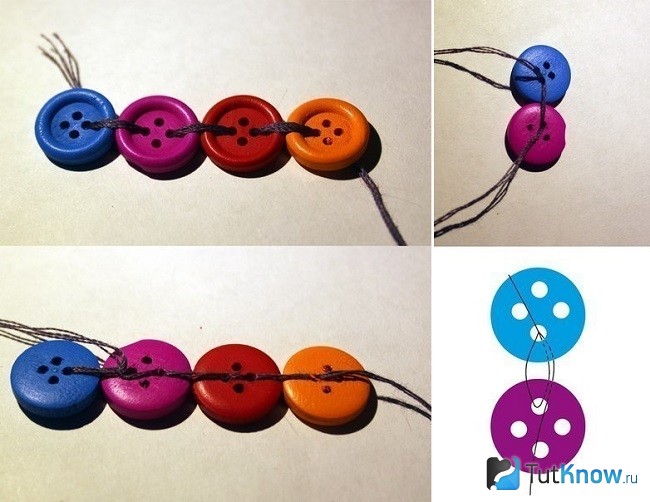
You will make them from the same material. See what an unusual button belt turns out. It goes great with jeans. It will need a strong thread so that it does not break during wear. You can replace it with a thin white rubber band.
Thread the needle, tie both ends with a knot. Move it a little to the side, twist the thread in this place, making a loop. String on the first button, then the second and all the rest.

They fasten such a belt with a button, throwing it over the loop that you made at the beginning.
If you have a men's shirt, add some femininity to it by sewing beautiful buttons on the collar.

They will help create your unique image. Make a rainbow bracelet by looking at step by step photos. This is how wonderful it will turn out.

To make a decoration on your hand, take:
- buttons;
- threads;
- a needle;
- scissors.

To work, you need flat buttons with four holes. Take a needle with an eye so that it fits well into them.
Pass the needle and thread through two opposite holes of one button on the wrong side. On the face, taking the needle out of the second hole, thread it into the first recess of the second button. Bring the needle back into the second hole of the first button on the wrong side. On the face, thread the needle again into the second hole.
Having created the first row, work the second, connecting these rows at the same time. Do the same for the third one.

Weave the free ends of the threads with a pigtail. Trim off the excess.

Tie a loop from the pigtail, which you will put on a button and fasten the bracelet in this way.
If you have metal buttons on the leg, make this bracelet. You can attach them to the chain using wire or metal rings.

For lovers volumetric jewelry You can also recommend another necklace around the neck. The fittings are fastened with metal rings or ordinary paper clips.

If you want to make tiered button beads, then check out the following idea. The main thing is to take a very strong thread or fishing line so that at the most inopportune moment they do not break and the beads do not crumble.

If you have a broken automatic hairpin, and its mechanism is still good, upgrade the thing. To do this, take:
- three flat buttons;
- Super glue;
- two beads;
- cord;
- scissors.

Attach the buttons using super glue.
Lubricate the surface of the metal hairpin well with glue, attach a design of buttons and beads here. After that, you need to let the accessory dry and you can try on a new accessory.
Attach a blank with lace to it, after which you will get an amazing do-it-yourself hairpin.

If you stick three buttons on ordinary black invisible ones, see how the hairpins immediately change.

If you have an elastic band and a matching button, in 2 minutes you will turn them into a new hair accessory. To do this, slip the edge of the elastic band under the leg of the button, thread the free end under it, tie it in a knot.

Crafts from buttons for yourself are not only jewelry, hairpins, but also decorating shoes in an unusual way. Beach flip-flops will be transformed in half an hour if you sew bright buttons to them.

If you want the decorated surface to increase, then first sew the buttons to two triangles of fabric, and then attach them to the slippers.
Buttons will transform other shoes as well. If your favorite shoes are worn, hide them behind these accessories and everyone will think you should buy another pair of shoes.

The same applies to sports shoes- slippers, sneakers, sneakers. Why buy new ones if you can transform the old ones in an hour?

Even if there are only 6 buttons, they will allow you to decorate shoes. Sew them on ballet shoes, thereby adding a twist.

Attach buttons to leggings, hats to create your original and naughty look.

As you can see, button crafts can be very diverse and unexpected. With the help of them you will add new interesting shades to your home, create accessories, update shoes and be fashionable, self-confident.
And in order to better remember what can be made from buttons and recharge with new ideas, watch 2 informative videos.