Star News


Paper applications for children: beautiful do-it-yourself crafts. Interesting applications for children Simple applications for children 4 5 years old
Summer is not only the time for beautiful and bright colors, but this is also the time of ripening of various useful fruits (fruits, vegetables, seeds, mushrooms). What a delicious flavor...
We invite you to make summer application"Gifts of summer." You can give this application to your mother, you can decorate the interior.
To complete the application, you need to prepare:
colored paper;
The basis for the application;
Scissors;
Black marker.
Step by step application process
1. We prepare templates for making applications
.jpg)
2. We prepare the basis for the application. You can take and print out such a basis. You can take a sheet of cardboard, or draw a base on watercolor paper.

3. Cut out the details (elements) of the application.
.jpg)
To cut out the appliqué elements, we use the symmetrical cutting method. To do this, fold the paper dotted lines and cut out the shares of the pear, leaves, berries, cuttings.
The photo shows the process of cutting out a share of the fruit of a pear, strawberry, leaves.
.jpg)
Fold along the dotted lines and cut out.
.jpg)
4. We take all the shares of the pear.
.jpg)
The figure shows the process of gluing a share of pear fruit.
.jpg)
Our pear is ready.
.jpg)
Glue it to the branch.
.jpg)
5. Glue the leaves. We coat with glue only the tips of the leaves.
Here the volume is visible due to the fact that only the tips of the leaves were glued.
.jpg)
6. Glue pink “sides” on strawberries.
.jpg)
7. Glue the green tails.
.jpg)
8. Glue strawberries to the base of the application.
.jpg)
9. Draw black dots with a black felt-tip pen.
.jpg)
10. Our application is ready.
.jpg)
This is how we got the application.
.jpg)
|
Do-it-yourself summer applications for a kindergarten Summer is not only a time for beautiful and bright colors, but it is also a time for the ripening of various fruits (fruits, vegetables, seeds). We invite you to make a summer application "Cherry Branches" from the "Gifts of Summer" series. You can give such an application to your mother, you can decorate the interior. To perform the application, you need to prepare: - colored paper; ... |
|
Do-it-yourself summer applications for a kindergarten Summer is not only a time for beautiful and bright colors, but it is also a time for the ripening of various fruits (fruits, vegetables, seeds). We invite you to make a summer application "Corn" from the "Gifts of Summer" series. You can give such an application to your mother, you can decorate the interior. To complete the application, you need to prepare: ... |
Now in all schools, in labor lessons and extracurricular activities, such creativity as the creation of applications from colored paper is very popular. This is mainly done by children primary school, they make a variety of paper and cardboard crafts, make up pictures and voluminous toys on the tree
Application is a painstaking work that develops thinking, perseverance and instills a love of kids for all kinds of crafts. While working on the application, the child learns to handle scissors, glue paper and study geometric shapes.
A child of 3 years old can do the simplest crafts with their parents. For the smallest, the technique of broken appliqué is used. It can be created without the help of scissors. The child tears off small pieces of paper, spreads it with glue and sticks it on a thick sheet of cardboard, creating a certain picture.
The older the child becomes, the more spatial thinking is developed in him and you can teach him to perform voluminous crafts. To do this, the paper is folded like an accordion, fastened with glue, and then a specific object is formed and glued to a sheet of cardboard.
A more complex type of paper craft is quilling, which consists in twisting thin strips of paper. To create a picture, folded rolls are glued to cardboard or interconnected.
Easy and interesting application from toilet paper your baby will like preschool age. To create it, you need a template diagram, toilet paper or paper white napkins, glue and a bright sheet of cardboard.
Toilet paper elephant step by step:
- On cardboard, draw the body of an elephant with a pencil according to the finished template.
- Tear off a small piece of paper, roll it into a ball, spread it with glue and stick it on the elephant's body. So fill in the whole drawing.
- From white paper, cut out the trunk, head and legs. Glue them in place.
- Eyes can be drawn, can be made from pieces of black paper.
You will get an original three-dimensional picture, which can be supplemented at your discretion - with a tree or grass.
Simple cardboard applications for kids 3-5 years old
If you have nothing to do on a rainy day, try to instill in your child a love of needlework. Start with the simplest applications, such as a kitten. But be prepared that you will have to cut out all the details, and allow the baby to glue.

One of the simple cardboard applications is a cut-out postcard. You can make a greeting card for March 8 or for New Year. Moms and dads will remember the labor lesson at school, and it will be interesting for kids to work together with their parents.
The technology for working on a postcard is very simple:
- You will need a piece of cardboard a set of colored paper.
- Fold the cardboard in half.
- Having decided on the pattern, cut out the necessary details. For example, for a snowman - circles of white or blue color, for a flower - oval petals.
- Parents show, and the child uses glue to attach the blanks to the postcard.
In addition to the usual applications, various funny figures can be made from cardboard.
How to entertain a child: paper applique for grade 1 with templates
When dealing with a child before school, parents should teach the baby how to handle paper. Children in kindergarten trying to do simple crafts. Preschoolers work with applications more difficult - it is in their power to make a small picture.
In modern stores, you can find self-adhesive applications that can be stuck on a notebook or decorate a locker at school.
In grade 1, children in a labor lesson use the simplest geometric shapes to create applications - a square, a circle, an oval, a triangle. If the baby does not know how to work with a ruler, you can use stencils. Children cut out figures according to the template and stick them on cardboard.

First-graders can make light applications:
- Animals - dog, kitten, squirrel, zebra and mouse;
- Birds - owl, swallow, chicken;
- Fairy tale - bun, mermaid, hut;
- Nature - the sun, the cloud, the tree.
All these applications will consist of the simplest elements, the head is a circle, the ears are a triangle. Using ordinary PVA glue, they are attached to the base and a simple muzzle of an animal or bird is obtained.
How to make a black and yellow bee:
- From yellow and black paper, cut out 2 circles with a diameter of 4 cm.
- From red paper cut out two identical wings in the shape of a heart, from yellow paper - two wings a little smaller.
- Their black paper to make antennae-stripes.
- Lay black-yellow-black-yellow circles alternately on blue cardboard.
- Lay out the antennae of the bee from the last yellow one.
- Place the wings on the sides bigger size, then stick smaller wings on them.
- Eyes can be drawn or cut out of green paper.
- Glue all the details to the cardboard - the bee is ready!
Developing thinking: paper applique for grade 2 with templates
Having learned how to make elementary crafts from paper and cardboard, having become acquainted with the technique of creating simple applications, children begin to study new creativity - voluminous applications. Having mastered the skills, children will be able to make beautiful postcards mothers and grandmothers on March 8, dad - crafts on February 23 or birthday.

To create the application "Flowers in a vase" you will need:
- Cardboard sheet;
- colored paper– white, yellow, green, blue;
- Glue stick;
- Pencil;
- Scissors.
Having prepared materials and tools, you can start needlework.
- Make blanks for the application - two squares of white paper 5x5 cm, a yellow circle with a diameter of 4 cm. For a bouquet of 5 daffodils, you need to cut 10 squares and 5 circles according to the template.
- With a simple pencil, draw stripes dividing the square in half - horizontally and vertically.
- On each side of the square, make cuts along the lines, not reaching the middle of about 0.5 cm. You should get a square divided into 4 quadrangles.
- Each square needs to be twisted - put a pencil on the diagonal of the square and wrap the corners on it.
- Similarly, make all 10 large squares.
- Make 5 yellow circles according to the template - the basis for the middle of the flower. Screw the circle folded in half onto the handle, remove and fasten with glue.
- To make a flower, you need to put together two blanks of petals and insert a yellow core. If everything is done correctly, you will get a beautiful daffodil of 8 petals.
- From green paper cut into thin strips - the future leaves of the flower. Bend a little along, give shape.
- According to a pre-prepared template, you need to cut a vase. It can be made of blue color. You can decorate a vase with an arbitrary ornament cut out of paper of a lighter color.
- On an A4 cardboard sheet, first stick a vase so that its bottom coincides with the bottom of the paper. The application is placed vertically.
- Then stick the leaves of daffodils in a chaotic manner, after which you can begin to form a bouquet. Glue the flowers so that they are in the center of the entire application.
Glue all parts well so that after drying they hold firmly. The finished picture can be decorated with a piping of small figures or beads.
Volumetric application for grade 3 with templates
Third grade students can do more complex and laborious work done using the quilling technique or interesting volumetric crafts. Teachers often wonder what kind of paper work to come up with for children so that they are interested.

In the 3rd grade, girls are still playing with dolls, so it will be interesting for them to make voluminous furniture for a dollhouse. The boys can make an airplane, a racing car. On the website of the Country of Masters you can find a sample of three-dimensional paper crafts for every taste - templates for origami, quilling patterns. Schemes and templates can be printed out and performed with the children in the classroom or given homework.
If you run out of ideas, you can always ask the guys what they would like to do in the lesson.
Children's quilling applications are very popular among schoolchildren. This is not only a unique gift, but also a beautiful decoration.
How to make paper applications for children (video)
Paper applications are a great reason to keep children busy for a certain amount of time. This type of creativity can be engaged in even the smallest children - from 3 years old and schoolchildren primary school. Armed with imagination and a craft kit, kids can create incredible paintings and impress their loved ones with their accomplishments.
Master Class. Paper craft with children 5-7 years old.
"Bright summer" applique master class with step by step photo for children 5-7 years old.
Karpova Veronika, 6 years old, preparatory group MBDOU No. 202 "Kindergarten of a general developmental type" Fairy Tale "
Supervisor: Kokorina Tatyana Nikolaevna, MBDOU No. 202 "Kindergarten of a general developmental type" Fairy Tale ", the city of Kemerovo
Target: production of a semi-volumetric composition of colored paper on a summer theme
Tasks:
- continue to learn how to work with scissors;
- continue to learn how to cut symmetrical shapes;
- continue to learn how to work with templates;
- continue to learn how to work with glue carefully;
- contribute to the development fine motor skills hands, through cutting out small details for appliqué;
- to raise interest in the application, to arouse the desire to do paper crafts.
Description: this master class will be of interest to educators of senior and preparatory groups, to all those who like to create something new out of paper, children in grades 1-2, mothers of many children and creative people.
Purpose: this craft can become an interior decoration, can be presented to a loved one for a birthday or become a participant in a competition.
Necessary tools and materials:
- colored and tinted paper;
- white cardboard;
- cardboard disposable plate;
- a simple pencil;
- ruler;
- scissors;
- glue;
- black marker.

- templates: circles d - 13 and 4 cm, half-leaf - 8 cm in height;

Progress.
Summer, summer, you are beautiful:
Everything is blooming and the sky is clear...
Summer is a wonderful time. Flowers, berries, butterflies, ladybugs, green trees, warm water in the river, bright hot sun - everyone who hears about summer will remember all this. And summer crafts are distinguished by their brightness, saturation of colors, they seem to be filled with sun and aroma.
So we could not resist and decide to make a summer craft.
Preparing the background.
1. Using a 13 cm circle template (which corresponds to the diameter of the inner circle of the plate) on blue, light green and bright green paper, draw a circle and cut it out.


2. Fold the blue and light green circles in half.

3. Expand and cut along the formed fold line.

4. Draw grass on a bright green circle.

5. Cut out.

Preparing elements for flowers and ladybugs.
Summer - bright flowers
Unusual beauty!
Each flower is two hearts glued together. We will cut out hearts and leaves using the symmetrical cutting technique. To make them, do the following:
6. Cut out six yellow 4x4 cm squares.

7. Fold in half and draw halves of hearts on them, observing the fold line.

8. Cut out, unfold and get hearts.

9. We glue two hearts together for one half so that we get voluminous flowers.

Let's start cutting out the leaves.
10. Cut out two green rectangles 5x8 cm for the leaves.

11. Fold the rectangles in half lengthwise. Using a half-leaf template, trace a half leaf on each folded rectangle.

12. Cut out, unfold and get the leaves for the flower.

We turn to the manufacture of ladybugs.
ladybug flies
On the blade of grass is very dexterous.
Wings like petals
And they have black dots.
The back is visible from a distance -
She's bright red!
I. Volk
13. Using a template - a circle d 4 cm - circle and cut out two circles on red paper.

14. On the first circle, stepping back about 0.5 mm from the edge, draw a line with a pencil and cut off the resulting semicircle along it.

15. Fold the second circle in half, unfold and cut in half along the resulting fold line. The bodies of ladybugs turned out.

16. We put a red circle and a semicircle on black paper and paint on with a simple pencil head.


17. With a black felt-tip pen, draw spots on the body of ladybugs.
Our blanks are ready.

18. Glue the background: a light green semicircle, a blue semicircle, bright green grass and a flower stem on top.

19. Glue yellow flowers. One slightly on the edge of the plate.

20. Glue green leaves on one barrel, create a semi-volume.

21. Glue the ladybug down on the grass, paint on the antennae.

22. Glue the second ladybug on the flower stem, draw the antennae and paws with a felt-tip pen.

23. The craft is ready.
Good afternoon, today we will do crafts for almost no babies - for children 4 years old. A child at 4 years old already confidently holds a brush, knows how to distribute glue over the entire detail of the application. And most importantly, at the age of 4, he already understands HOW EXACTLY put the detail of the craft - that is, not upside down, not awry. At 4 years old, a child's hand is already aiming, correlating the detail of the craft with the right place for it. Therefore, children at 4 years old can independently make an application sequentially step by step, repeating the demonstration of an adult That is, it is understood that you first yourself, with your own hands, did in front of a child crafts, and then already offered the child the same details to accomplish the same task - to create a masterpiece with your own hands.
In this article, I have selected simple and beautiful crafts, which can be done by a kindergarten teacher or a parent with children 4 years old. I will tell you how to prepare parts for this craft. And ladies guidelines to the lesson itself on this craft. Before you is a whole CARD FILE OF CRAFTS for 4 years. So let's get started.
Craft for 4 years
Horse application.
All children love this craft. She's cool. A horse that was given a carrot. There is work for both the teacher and the child. The caregiver himself prepares all the details of the craft - it's just cut out of colored paper. And separately the teacher himself prepares striped harness for a horse. It is done simply: we cover a sheet of white paper with strips of colored paper, alternating colors. Then we cut this sheet across our colored stripes, into short and not very wide segments. It turns out a lot of such striped segments - just for the entire kindergarten group.

Child task - do not confuse the order of sticker parts. Glue the carrot first, and only then TOP on it we paste the silhouette of the horse's muzzle. Children make a mistake: first put a horse on, and then it’s not clear how to stick a carrot under it. Therefore, in a demonstration of crafts before class, show the children the wrong option and laugh at it together. And already during the lesson, again remind you of such a stupid and funny mistake.
Also, some children first glue the horse's bangs, and only then the striped harness on top. Please note that the bangs should be on top.
This horse craft can be made with children 4 years old, when they have already moved into middle group it is at this age that they begin their first "chik-chik exercises" with scissors. We complicate the lesson for such children, we invite them to cut the green paper square into strips for carrots.
Craft for 4 years
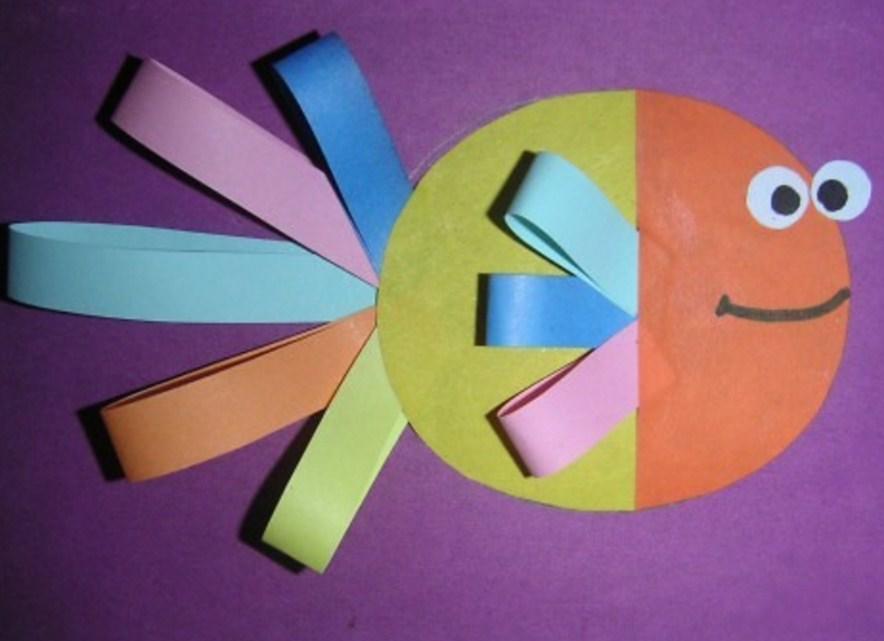
Application lion.
This is very beautiful applique. It becomes quite beautiful if you use not only standard colored paper for the mane, but also paper with a pattern for gift wrapping. The technique for performing this application is as follows. We prepare sheets of paper on which a circle has already been drawn (just a circle with a pencil - it is 1 cm smaller than the lion's head).
And then we show the children how to make the application step by step - we do everything in front of them, before class (as a preliminary work), this does not contradict the preschool education program. I don't like the show in the classroom, because it eats up 60% of the time, and there is very little left for the lesson itself, and the children do not have time.

So we have a sheet of paper in our hands - there is a circle on it. We take the detail of the BEAUTY of our lion and glue it UNDER THE CIRCLE. Next, we tell the children that the circle is like the sun, and now we need to make “rays” around it - for this we use a lot of colored stripes. Stick them in different sides from the circle.
And now all that remains is to stick the silhouette of the muzzle, ears, eyes and nose on top. Simple and fast.
Craft for 4 years
Application BEHEMOTH.
This application is also loved by all children. They like that it is so rough to the touch, and the water is like real water, and the body of the hippopotamus can be seen through the water column.

Everything is simple here. First, we prepare the background - we tint a sheet of white paper with light blue.
METHOD FOR QUICK TINTING. I bought a powder brush especially for quick tinting - thick and gently soft. Pour 2 fingers of water into a glass and dilute a little blue gouache in it so that the water also turns blue. Wet a brush in such water and quickly cover a sheet of paper. Sometimes the sheets, when soaked, roll into a tube - do not worry, unfold and brush again, it will stick to the table from dampness and dry in such a straightened form. In such a quick way, 27 sheets can be tinted in 5 minutes - just for the entire kindergarten group.
While the background sheets are drying, we prepare the appliqué details. We cut out the silhouette of the abdomen with a tubercle of the head, the silhouette of the nose, nostrils. And we find a roll of blue toilet paper, or we cut blue table napkins into strips.
The most important thing is to explain to the child that Toilet paper itself DO NOT need to be smeared with glue. She will crumble and break. We apply glue only to the SHEET CAM and then quickly apply a dry piece of toilet paper to this glue spot.
Applications in kindergarten
for children 4 years old.
Here are some more beautiful large crafts for children 4 years old. I love when the craft is large, when it occupies the entire sheet, and not small goats in the middle of the leaf. Very bright crafts giraffe and kangaroo. That's what they want to do.
And the craft of a kangaroo with a baby can even be timed to coincide with Mother's Day. Because this marsupial couple is just a symbol of motherhood.

But crafts where you need to FOLD some details along the fold line - the mouth of the frog, the ears of the dog. This is just right for a 4 year old. Show the children how to fold the part - how to hold the main part with the palm of your hand, how to wrap the edge of the sheet with your other hand - away from you, or towards you, or from the side (think how it is more convenient in this particular case).

The birdie looks very cute. Very simple craft for children at 4 years old. First we glue the poles, then the grass. Then a thread and on a thread we plant birds from colored paper.

FISH craft is also simple for 4 years. The teacher cuts out an aquarium from a white sheet. Cut out white bubbles from scraps of white paper. The blue background of water does not have to be made of paper = you can paint it with paints. The child glues fish, algae, bubbles.

Here is an interesting application for boys for 4 years. We glue the segments of the tube from the cocktail onto a sheet of cardboard. From above we glue the bottom of the boat, sails. Add portholes, flags, clouds and sun. You can also draw waves with your finger and gouache.

Craft for 4 years
Simple applications FROM NEWSPAPER.
Now let's look at this kind of creativity. He deserves your attention. I don't know why, but color paper sets almost always lack gray. Probably the manufacturers believe that there is no place for gray in a child's life. And so a lot of crafts remain unrealized. For example, a koala bear cub is gray and the application is simple - and what do you have to do to pick up a bag of waste paper and look for long strips of articles without pictures to cut the details of the application. And such crafts are always very joyful - both for children and other parents. “Mom, read what is written on my teddy bear.”
In homes with children, you don't often find colored paper - you're more likely to find a bottle of beer than plasticine and glue. But let's not deprive children of creativity - because now everything you want can be made from ordinary newsprint.


If the house does not have black paper for the nose and ears of the teddy bear, it does not matter. You can cut out these details using the dark spots on the printed newspaper photos. Or paint over pieces of newspaper with black gouache and cut out the details.
You can manage and cut out the part SO THAT there is an interesting headline in the right place. Imagine a bear with a large headline on its chest “You can’t beat Russia with sanctions.”
And years later, leafing through your children's crafts, your adult son will read with interest scraps of quotes from political analysts or watch the dollar exchange rate in early childhood.

On the newspaper, you can draw colored zones - pink bunny ears. And replace the missing parts with household items - a button, a rope, a bottle cap, a piece of candy wrapper.

If individual sheets of the newspaper are covered with gouache paint, then we will get almost colored paper. So at home you can make bright color applications from ordinary newspapers.

Pieces of wet newspaper roll up perfectly into flagella(just curl up like a twisted rope). Such flagella can be painted with gouache in different colors - and you get blanks for the UNICORN's mane - a great craft for girls 4 years old.

Craft for children 4 years old
Light applications
from pressed paper.
In the store you can see on sale paper filters for coffee machines, paper molds for cupcakes. They are sold in packs of 100 pieces. This suggests the idea that there are a lot of them, which means that there will be enough for the whole group and not even for one craft. Unable to resist, I bought such paper things - and now the whole group has already made one craft from this elegant material and will do it more than once.
By the way, such ideas for crafts for 4 years can be glued AND FROM ORDINARY COLOR PAPER, simply by cutting round parts.

The walrus craft is quick and easy for 4 year olds - you can add snow from cotton wool to it, since walruses live in snowy places. You can add a paper fish applique with glued foil.
Sand can be added to the CRAB craft (sift some sand from the sandbox) - after the whole craft is done, we apply a layer of glue on the brown background at the bottom of the sheet and sprinkle it with fine sand until the glue dries. We wait for some time and shake off the sand on the table (but not on the floor).

A chic parrot is obtained from corrugated molds. With a cascading tail, a bright tuft on the head. Beautiful craft for the younger group

And here is a craft that all children of 4 years old and not only love. Toothy shark. The difficulties of the educator are to make blanks for the mouth - on each blank you will need to draw teeth with a pencil, and then paint the shark's mouth with a marker. Children of 4 years old will not draw teeth themselves - this task is too tough for them.

You can make smaller fish from the same material. In the aquarium, pour real sand, or semolina or buckwheat, on the bottom. It's simple - we spread glue on the bottom of the craft - more glue, pour grits on top, wait a few minutes, without touching the grains with our hands, so as not to interfere with the glue to set. Then we pour the excess on the table.

Also on sale are paper lace napkins for confectionery. Of these, it is good to make appliqué princesses in lace dresses, Christmas angels in patterned wings or fins for sea fish. A simple and beautiful craft for kindergarten.

Craft for children 4 years old
MONSTERS.
All kids love monsters. At 4 years old, monsters are not scary, but friendly and funny. Here is a great and very simple craft for kids. We take PVA glue and gouache - we dilute half the glue and half the gouache in a jar. We stir this glue gouache and give the child a brush.

On a sheet of paper, children slap puddles of this glue paint as they please. And while the puddle has not dried up on it, we put ready-made eyes and black silhouettes of the mouth. Eyes can also be drawn on paper - make several blanks different size. We draw the teeth of mostrs with white paint, just fingerprints or brush marks.
You can do exactly the same monsters made of cardboard and colored paper (photo below). This craft is JUST FOR 4 YEARS. Because it is at the age of 4 that the preschool education program sets the task for the child - learn to make a circle from a square of colored paper.
That is, the teacher gives the children squares of paper. And the child cuts the corners of the square with scissors, trying to round it off. And then he sticks these round uneven spots on his monster. Do not forget that the process of turning a square into a circle is first shown by the educator himself, several times - always on large samples, in the form of a sheet of cardboard measuring 20 by 20 cm.

The first experiments on turning a square into a circle will be unsuccessful, crooked - and this craft is just good because the shape and accuracy of the circle are NOT IMPORTANT here. Practice, make mistakes - there will still be a super-monster, even with crooked spots. The crooked, the scarier.
And here is another monster-themed craft - SCARY BITES. This craft will open a mouth full of teeth. It is done simply.

Cut out two circles from colored paper. On one circle, draw a line that divides this circle exactly in HALF. Now we explain to the child - that you need to glue ONLY ONE HALF of the circle with glue (any right or left - most importantly, only one !!!). And on the circle with the glue half smeared, we put the second circle on top - exactly, exactly on top of each other, exactly like a pancake on a pancake.

And it turns out that where there is no glue, this half quietly opens and closes - like a mouth. It remains to stick a red tongue and teeth in this mouth. And then cover the top pancake with spots and stick on the eyes. The mostr may or may not have arms and legs, as desired.
Children's crafts for 4 years
INSECTS.
And now we have one more interesting topic- these are various bugs and insects. A variety of insects are made simply and understandably for children 4 years old.
Craft snail. Here you can combine different techniques. For example, below we see a snail made of cardboard, which is decorated with a spiral of fluffy wire. But the WIRE IS NOT NEEDED - it can be mined with a plasticine sausage spiral. We get an excellent job just for 4 years.
CRAFTS LADYBUG. Here we teach the child to fold a flat paper circle in half - evenly. This is a difficult but useful task - let the child practice, do it himself. Pride from the result achieved will give him faith in his own strength.

And here is another snail craft. Here is a very important lesson - the children learn to highlight the largest circle available - we paste it first, then again we look for the largest circle of the remaining ones, and paste it. And so we continue to the smallest circle.

Here is a craft FUNNY BEE. Two cardboard circles yellow color and two blue wings. Draw stripes on the tummy with paint. We glue the elements. Cut holes for fingers. We now have a tabletop theater character. You can make a few more friends for him, also with holes for fingers.

Here is another beautiful bee craft. She is very interesting with her voluminous wings. Children are simply delighted - they are interested in the task: first glue one end of the strip, wait until it dries and then wrap the other end of the strip and stick it in the same place.

Here is a great SPIDER craft, just for boys 4 years old. A spider is your baby's handprints on a piece of paper, then dried, cut out. Made paper eyes.
We cover the plastic plate with paint of any color. Punch holes along the edge of the plate. If there is no hole punch, you can simply STICK THE INSECTIONS with scissors;

Here is a craft BABBOCH - with double wings. The body of a butterfly can be made from plasticine balls. At the age of 4, children had already learned how to roll balls in kindergarten (according to the preschool education program).
We paint half of the plate green, half blue. We glue paper flowers, glue butterfly wings, glue plasticine lumps.

Crafts FLOWERS
For a 4 year old child.
I really like this kind of craft. Where we get a whole long bed of flowers. The child can form a flower himself - paint the finished contour, or crumple crepe paper into balls and stick these balls on a paper backing, forming the center and flower petals.
And then we plant all the children's flowers in a common flower bed. We cut out a strip from the packaging cardboard, fold it with an accordion and put it on edge - like a screen. Now we glue green stalks on it and plant each flower of the child in a common flower bed.

The image of a flower can be created by various visual means. It could be anything. For 4 years old, we choose simpler and more understandable techniques for the child. The handprint is a finished tulip. A cotton pad folded in a triangle is a calla flower.


Here is a camomile craft made from cotton swabs. From yellow plasticine we make two round pancakes. We put rays of cotton buds (cut in half) on the bottom pancake and close it with the second pancake on top. We make stems and leaves from colored paper or plasticine.

From pasta in the form of bows, you can make a beautiful handicraft LILIES OF THE VALLEY - just a gift for mom on March 8, which a 4-year-old child can do. Glue pasta on plasticine ( simple glue you can't do it here).

Crafts - coloring
For children 4 years old.
All children love to play with paints. But children of 4 years old are still learning to draw shapes with a pencil (squares, ovals, circles) - and in order to draw these shapes with a brush, it’s too early to dream about it. And what? Do not give the child a brush, or what?
Give. And how. But with paints we will DECORATE ready-made forms.
CRAFTS CAT. From corrugated cardboard (packaging gray cardboard), we cut out a semi-oval (cat's body), an oval with ears (cat's head), a curl (tail) and a small semi-oval (support-support at the bottom).
All these details are covered with paint. We make the head, tail and support simply in one color (orange or any to your taste). But we paint over the largest detail (the body of a cat) in the form of different stripes. Here is just a complete delight for children 4 years old. To draw stripes with a brush - how cool and beautiful it turns out, like an adult.

After drying the muzzle and tail, the teacher draws the face of a cat. At 4 years old, only a few of the children (5 out of 20 people) can draw the normal eyes, nose and mouth of a cat according to the model. Yes, those children with whom parents draw at home will be developed in drawing, and for those parents who believe that “when they go to the garden, they will learn there”, a child at 4 years old cannot draw proportionate circles of eyes, nose, mouth.
“If we give a child a pencil, he will paint the furniture.” Of course it will draw. Because it’s not enough to give a pencil - you have to sit down and whole 10 minutes draw kalyaki with him. And in our time, finding 10 minutes in a busy schedule is difficult. Here on gel nails finding 2 hours is not a problem, because this is the right thing to do. And kalyaki is a stupid occupation, all the same, the child still does not know how to draw anything. But how will he learn? If he can't get through kalyak-malyak stage which must be completed in 2 years. So it turns out that he, like a repeater, goes through this stage at the age of 4 - in kindergarten, and it's a pity to look at such a child.
Here is another cute cat that can be painted in stripes, and then in specks.

As we can see, the principle of assembling such a cat is simple. The following details are needed.
- 2 rectangles of cardboard.
- 1 long narrow strip of cardboard (ridge).
- 2 head silhouettes
- 4 sticks for feet (you can use the same cardboard, you can use pencils, you can use wooden skewers)
- 8 cardboard triangles (for paws, 2 for each paw).

We put together 2 rectangles (body), on top we put a ridge (a long strip of cardboard) between them. The spine must be inserted between the halves of the body SO THAT it sticks out behind (like a tail) and in front (like a neck on which we will attach the head).
It is to this ridge that we will glue the halves of the body. It holds perfectly on double-sided tape, less on glue (it’s not worth it on PVA, it only soaks the cardboard and the gluing is not strong).
Now let's glue the head. We smear two silhouettes of the head with glue - and connect them together (pancake on pancake) - clamping between these layers the cervical process of the ridge sticking out of the cat's body.
CRAFTS WITH THREADS.
Such crafts-coloring can be supplemented with another decorative feature. We take and wrap our craft with threads. So that the threads do not jump off or slip, we make cuts with scissors along the edge of the area that we plan to wrap.

Threads can be wound evenly - row by row. Then, with the help of multi-colored threads, you can make funny colored stripes.
Below is a piece of rough packaging cardboard - cats. They are complemented by the ability to stand upright and not fall. Because the middle of the cat is cut (two cuts) and this part is folded back - like a stand for photo frames.

You can color these cats simply with paints on stripes. And you can wrap it with thread. If you wrap, make sure that the THREAD WALKS UNDER THE STAND-BREAKER, so as not to swaddle the stand.
Craft volumetric CATS.
If you have an extra shoe or juice box, or even a small one for tea (size doesn't matter), you can make an excellent 3D craft with a 4-year-old child. And you will become the most beloved mother in the world. And this cat will be the pride of your child.

Here we just take the box. We cut off part of the lower part of it - leaving only processes at 4 corners. From cardboard (from anything, even from pizza). Cut out the silhouette of the muzzle with the breast and the silhouette of the tail. We glue these silhouettes on the box in front and behind - on double-sided tape. We cover it all with paint.

Speaking of paint. For large crafts there is a large consumption of gouache. Especially if we cover a multi-colored box - we need to apply several layers so that the pattern of the box does not shine through. You can do it easier. A hardware store sells acrylic facade paint (which the walls are painted with) - do not buy a bucket, buy a small can (liter) - it will not be expensive. Facade paint closes the pattern on the box with one layer. And then gouache on acrylic will be easy and simple to lay down, and you don’t need a lot of gouache, enough for the whole cat. And this liter of white acrylic will come in handy for you in other crafts - it is stored for a long time, if it thickens a little, it can be diluted with tap water, and everything is like new again.
Here is another craft DOG FRIEND.
The principle is the same - you can take a box from milk, you can from juice, you can from anything. The dog's legs are toilet paper rolls. To make the roll stick with its edge to the bottom of the box, you can do this ... crumple a lump of newspaper (just the size of the hole in the roll). We smear the lump with glue, put it in a roll so that the surface of the lump is flush with the edge of the roll. And now it is convenient to stick this roll to the bottom of the box (at least on the same glue, at least dry it on tape).

Well, since we are talking about boxes, I can’t help but show you another cute craft that can keep your child busy with a fun game for a long time.
In a regular box, we cut a hole-arch. We decorate the box in the form of a hare. Glue the red track of the tongue at the bottom.

By this principle, you can create any character with an open mouth - a shark, a bear, a dog, an elephant, a hippopotamus.
folding crafts
For children aged 4 years.
Here original craft, which can yelp and bark, opening its mouth wide. Cute paper dog.

Everything is done simply. No complex origami. Just fold a sheet of A4 paper lengthwise three times. And then the resulting strip is also folded in half. And fold each half back in half too.
It remains to decorate the fold in the form of a dog - stick the ears, tongue, spots, eyes and nose.
Crafts FROM THE PLATE.
For children aged 4 years.
Generally, disposable plates should not be thrown away. They can become the basis for good children's crafts. For example, here is a monkey. The belly is a whole plate. The head is a plate that has been cut off in a circle, leaving only the appendages of the ears. The rest of the details are cut out of colored paper.

A round plate can turn into any muzzle. It can be painted with paints.

Half of the plate can become the basis for a beautiful solar craft. Strips of colored paper like a rainbow are glued to the cut line, we cut out elephant rays from colored paper. Color the plate yellow.

And from the other half of the plate, you can make a WATERMELON craft, just paint it with paints and stick black plasticine grains. We roll plasticine into a thin sausage, cut the sausage into pieces with a stack. Here are the finished seed buds.

And here is a butterfly craft from two sectors of a plastic plate. Here we work with paints and at the same time we follow the symmetry. That is, both halves must be painted the same way. If there is a red stripe along the edge on the left, then the same stripe on the right, if the next stripe on the left is green, then the second stripe on the right is also green. This logical task just for attention. Children 4 years old forget the rules, but you continue to mumble the whole lesson: “I drew on the right, without immediately changing the paint, draw on the left” or “We don’t change the paint - we repeat on the left.”

The plate can not be painted over with paint, but simply glue the bottom of the plate with a round piece of colored paper. This is how this daisy craft was made with ladybug in the photo below.

And here is another great PIZZA craft based on a plastic plate. First, we paint the plate in the color of mayonnaise and ketchup - with yellow and red gouache. If you add PVA glue to the paint - there is less gouache glue (proportion by eye), then you can immediately throw all the paper elements of the application into such paint, until it dries on a plate - yellow stripes of cheese, pink slices of sausage, brown silhouettes of mushrooms and black circles of olives.

Like these ones interesting crafts you found today for children 4 years old. Now you can organize a lot of creative activities in kindergarten (if you are a teacher), and you will also know what to do with a child at 4 years old at home.

Good luck with your kids.
Olga Klishevskaya was with you, especially for the site
Good websites are worth their weight in gold you can support the enthusiasm of those who work for you.
Current page: 1 (total book has 3 pages) [available reading excerpt: 1 pages]
Font:
100% +
Daria Nikolaevna Koldina
Application with children 3-4 years old
From the author
By the end of the third year of life, the child learns the basic ideas about color, size, shape; listens to fairy tales; learns to compare real objects with their images in pictures; looking at landscapes.
It is easier for a small child to express his impressions with the help of visual activity(three-dimensional image - in modeling, silhouette - in the application, graphic - in drawing). He conveys the images of objects with the help of plasticine, colored paper, paints. These materials should always be with the child at hand. But this is not enough. Need to develop Creative skills baby, show modeling techniques, learn to cut out colored paper, introduce various techniques drawing. To improve visual skills, one should form the perception of form, color, rhythm, aesthetic ideas.
A child of 3–4 years old can do a lot: wash their hands, brush their teeth, eat on their own, dress and undress, use the toilet. The baby develops simple speech reasoning. He gladly answers the questions of adults, reaches out to communicate with other children; his playing skills and arbitrary behavior develop.
For development children's creativity and mastery of visual activity, it is necessary to take into account the interests of children, use a variety of topics of classes and forms of organization (individual and collective work). It is very important to create a friendly atmosphere in the classroom.
At first, the child is interested in the process of making crafts, but gradually he begins to be interested in its quality. He strives to stick the object as accurately as possible, and after the lesson admire his work, tell what color he chose, what this object can do, and what kind of application he got.
In this manual, we provide summaries of exciting activities for children 3-4 years old on applications from colored paper and natural material.
These classes contribute to the implementation of the following tasks: introducing the child to the surrounding beauty; the development of imagination, independence, perseverance, the ability to complete the work, accuracy and diligence, skills in processing various materials, which in the future the baby will be able to independently use to make such crafts.
Classes are compiled according to the thematic principle: one topic unites all classes (on the outside world, on the development of speech, on modeling, on applications, on drawing) during the week.
It is advisable to conduct an applique lesson after the children have sculpted this item.
An application lesson with children 3-4 years old is held once a week and lasts 15 minutes. The manual includes 36 abstracts of complex story-playing lessons, designed for academic year(from September to May).
Read the outline of the lesson carefully in advance and, if something does not suit you, make changes; prepare necessary material and equipment. Preliminary work is also important (reading a work of art, familiarizing yourself with the surrounding phenomena, examining drawings and paintings).
By observing each child in class or playing with other children, you can learn more about him and deal with difficult behaviors.
If a child quits his job, as soon as something did not work out for him, it means that he does not know how to overcome obstacles. This can be taught by offering the child other ways to achieve what they want. Then he will understand that there must be a way out of any situation. For example, if a child wants to draw a snowman, but he can’t, invite him to make a white paper snowman application on a dark background with you.
If a child loses interest quickly, perhaps it is too simple or, on the contrary, difficult for him. Understand the reason and make the task harder or easier. For example, a child needs to complete the application of a turnip with tops. If this is too easy for him, offer him to stick a basket and place different vegetables from colored paper in it. If the task is too difficult for the baby, you can offer him to stick a turnip without tops.
If a child gets tired quickly, cannot sit even five minutes, try to develop his endurance using massage, hardening, sports exercises. In the art classes, alternate active and calm actions more often.
In order for a child understood the task and completed it, it is necessary to develop his attention and ability to concentrate. Play with your baby in the game "What has changed?" (put 3-4 toys in front of the child, and then discreetly hide one of them or swap toys).
Try to find as many ways as possible to involve the child in bringing the task to its logical end (for example): "Let's stick balls on the elephant, otherwise he has nothing to play with" or "Let's make the bunny and the rooster a big house, otherwise they have nowhere to live."
Application classes with children 3-4 years old, we recommend to conduct in accordance with the following sample lesson plan.
1. Creation game situation to attract the attention of children and develop emotional responsiveness (riddles, songs, nursery rhymes; a fairy-tale character in need of help; dramatization games; exercises for the development of memory, attention and thinking; outdoor games).
1. Acquaintance with the subject that children will subsequently depict in the application; determining the sequence of unfolding pre-prepared parts, applying glue to them; attaching forms to paper and gluing.
2. Bringing the application to the desired image with the help of additional decoration with felt-tip pens or decorating the work with small pieces of colored paper (in this case, it is necessary to draw the attention of children to expressive means: correctly selected colors and interesting details).
3. Consideration of finished works (only a positive assessment is given to them). Children should enjoy the result and learn to evaluate their crafts.
There are three types of application:
subject- are depicted individual items not participating in any events (fruits in a vase);
Storyline- a composition is compiled according to events (actions) in fairy tales, stories, poems, nursery rhymes; on a personal note;
Decorative- a pattern is made from geometric shapes on a strip, square, circle.
We list the methods of application that are used in working with children 3-4 years old.
Application from the prepared parts of the subject- the child must make up an object from the proposed parts and stick an object (pyramid, bear) on paper.
Application from prepared silhouettes of objects- the child makes a composition of one or more cut out objects, and then sticks it on a piece of paper (cucumber, tomato).
Mosaic clipping– small circles, triangles, squares or torn pieces of colored paper are pasted inside the outline ( autumn leaves on the tree).
Break along the contour- colored paper is cut off along the intended contour to convey the texture of the object (the curly body of a lamb, a fluffy cloud).
Paper rolling- the paper is torn into small pieces, each piece is wrinkled and rolled into a lump (rowan berries, fluffy chicken).
overhead application- parts of the same shape, but different in size, are glued on top of each other, starting from the largest and ending with the smallest (snail, turtle, flower).
Dried leaves applique- the leaves are laid out and compiled into a conceived object, then glued onto a sheet of paper (fish, swan).
For applique classes, you will need: colored paper, magazine paper, colored napkins, dried leaves, album sheets, colored cardboard, felt-tip pens, PVA glue, oilcloth-lining and a rag.
Estimated skills and abilities of a child by 4 years:
Has an interest in the art of applique from pre-prepared figures;
Able to select colors that match the color of objects;
Knows the procedure for gluing (first you need to lay out all the prepared parts of the application on a sheet of paper and draw up an image of the object, and then gradually stick them on);
Knows how to carefully stick (first you need to put the part with the colored side on the oilcloth, carefully pick up the glue on the brush and apply it in a thin layer from the middle to the center, attach the side with the glue applied to the sheet of paper, gently pressing it with a cloth or napkin);
Able to stick simple objects on a sheet of paper (fruits, tree leaves);
Knows how to make a subject application from 2-4 parts (house, traffic light);
Knows how to create the simplest composition (a plate of fruit, flying planes);
Able to make patterns from prepared geometric elements on a strip, square, rectangle, circle, alternating them in color, shape and size (decorate a scarf);
Knows how to decorate a product using felt-tip pens (draw eyes and a nose for a hare);
He knows how to create an object not only from colored paper, but from magazine paper, dried leaves and napkins.
If your child can't do any of the above, don't worry. You will still have time to catch up.
We wish you success!
annual thematic planning application lessons


Lesson notes
The theme of the week is "Toys"
Lesson 1. Cube to cube (Colored paper. Application from the prepared parts of the subject)
Software content. To teach children to lay out cubes and squares in a certain sequence (in size). To introduce the method of applying glue with a brush on the reverse side of the figure from the middle to the edges; teach to apply the side greased with glue to a sheet of paper and press it tightly with a cloth. Introduce the color blue, learn to correlate the color with its name. Cultivate compassion and kindness.
Demo material. Cubes of three colors.
Handout. Half of the album sheet; 3 blue squares (large, medium and small) cut out of paper; PVA glue, glue brush, rag, oilcloth-lining.
Lesson progress
Read to the children the story of Y. Thais “Dice to Dice”:
“Masha puts a cube on a cube, a cube on a cube, a cube on a cube. Built a tall tower.
Misha came running
- Give me a tower!
- I'm not giving it!
- Give me at least one cube!
- Take one cube. Misha stretched out his hand - and grab the lowest cube! And instantly - bang-tara-rah! - the whole Machine Tower was raz-va-li-las! Ask the children: “Which cube should be given to Misha in order to
did the tower collapse? (Upper.) Let's help Masha build a new tower."
Put in front of each child an album sheet and 3 blue squares (large, medium and small) cut out of paper. The child must find the largest square and put it at the bottom of the sheet, then find the middle square and place it above the large one, and place the small square on top.
Tell the children that now you need to glue the cubes on a piece of paper. Show them how to pick up glue on the brush, apply it in a thin layer from the middle to the edges not from the colored, but from the back side of the small square, press it firmly against the sheet of paper with the greased side and blot the excess glue with a cloth. In the same way, glue a large and medium square.
Look at the resulting towers with the children and ask: “What color are the cubes from which your towers are built?” (Blue.)
Theme of the week "Vegetables"
Lesson 2. Turnip (Colored paper. Application from the prepared parts of the subject)
Software content. Teach children how to make a whole from two parts. To consolidate the ability to apply glue to the parts and stick them on the sheet, pressing with a cloth. Continue to acquaint with the color yellow, learn to correlate the color with its name. Develop memory. Learn to retell fairy tales based on illustrations.
Demo material. Six cards, each of which depicts the hero of the fairy tale "Turnip" (grandfather, grandmother, granddaughter, Bug, cat, mouse) or a sheet of paper with schematic images of heroes.
Handout. Half of the landscape sheet, blanks for turnips, cut out of colored paper (root and tops); glue, glue brush, rag, oilcloth-lining.
Lesson progress
Read Russian to kids in advance folk tale"Turnip".
At the lesson, remind the children of this fairy tale, show the cards on which the heroes of the fairy tale "Turnip" are drawn and offer to arrange the heroes of the fairy tale in the right order: grandfather, grandmother, granddaughter, Bug, cat, mouse. (If you don’t have cards, you can sketch out the characters on a piece of paper, leaving room for a turnip in front of them.)
Help each child make a two-part turnip (root and stem). Show the kids how to evenly apply glue with a brush on the back side of the root blank from the center to the edges and stick it on the sheet, pressing it with a cloth, and then stick the tops in the same way.
Ask the guys: “What color is the turnip? What color is the top? Ask the children to retell the story based on their work.
Theme of the week "Fruit"
Lesson 3. Fruits in a vase (Colored paper. Application from prepared silhouettes of objects)
Software content. To teach children how to apply glue to a part and stick it on a sheet. Continue to introduce in green, learn to correlate color with its name. Cultivate a positive attitude towards others.
Demo material. Doll.
Handout. Colored cardboard on which a vase is pre-glued; yellow and green apples and pears cut out of colored paper; glue, glue brush, rag, oilcloth-lining.
Lesson progress
Show the children the doll and say: “Guys, the Masha doll came to you for help. She got sick. The doctor said that she needs to eat more green apples and pears because they have a lot of vitamins. But the doll does not know which apples and pears are green.”
Invite the children to help the doll by putting only green apples and pears into the vase. Put a colored cardboard in front of each child, on which a vase and blanks cut out of colored paper are pre-glued - apples and pears of yellow and green colors.
Children select green apples and pears and put them on a piece of cardboard.
“Thank you,” the doll says and “takes” a cardboard with fruit blanks from one of the guys (apples and pears fall). “Oh, how can I carry apples and pears home?”
If the guys do not guess that apples and pears need to be glued, tell them. Remind me how to pick up glue on the brush, apply it in a thin layer on the workpiece and press it tightly to the sheet with a cloth.
At the end of the session, say: “Well done, guys! Now the doll won't lose the fruit."
Theme of the week "Berries"
Lesson 4. Strawberries (Colored paper. Application from prepared silhouettes of objects)
Software content. Continue to teach children to stick the parts on the sheet in the right place. Continue to introduce the color red, learn to correlate the color with its name. Cultivate compassion and kindness.
Demo material. Doll, subject picture, which depicts a bush of strawberries with berries.
Handout. Half of an album sheet on which strawberry bushes without berries and red strawberries cut out of colored paper are drawn; glue, glue brush, rag, oilcloth-lining.
Lesson progress
Show the doll to the children and say: “This is the girl Zhenya. She wanted to collect strawberries in the garden, but did not find a single berry. Zhenya is very upset."
Invite the kids to plant berries on strawberry bushes and treat Zhenya.
Put in front of each child a half of an album sheet on which strawberry bushes without berries and red strawberries cut out of colored paper are drawn. Consider strawberry bushes with the kids, determine the shape and color of the berries.
Remind the children how to apply glue to each berry and stick it to the tip of the twig.
At the end of the lesson, invite the children to treat Zhenya: give her strawberry bushes with berries.
Theme of the week "Mushrooms"
Lesson 5. Mushroom (Colored paper. Application from the prepared parts of the subject)
Software content. To improve the ability of children to make an application and apply glue to the details. Learn to accompany the words of the poem with movements corresponding to the text. Develop accuracy and coordination of movements.
Handout. Landscape or tinted sheet of paper; blanks cut out of colored paper: grass, mushroom details; glue, glue brush, rag, oilcloth-lining.
Lesson progress
Talk to the guys about mushrooms, tell them where mushrooms grow, at what time of the year they appear. Tell the children, “Today I invite you to go for a walk in the woods. I will read the poem, and you repeat the appropriate movements after me:
In the morning the children went to the forest (Steps with high knees.)
And they found mushrooms in the forest. (Measured squats.)
Bent over, collected (Leaning forward.)
Lost along the way." (Rhythmic spread of arms to the sides.)
Invite the children to draw a mushroom in the application.
First, they must arrange the blanks - the details of the mushroom and the grass on the sheet, then apply glue to the stem of the mushroom and stick it on, then apply glue and stick on the hat. Grass is glued last.
Tell the children a riddle about the mushroom:
Worth Antoshka
On one leg.
Ask the guys: “Can you say that the mushroom has one leg? (Can.) What else does a mushroom have? (Hat.)
The theme of the week autumn trees and bushes"
Lesson 6. Maple (Colored paper. Collective application from prepared silhouettes of objects)
Software content. To consolidate children's knowledge of the rules of gluing. Introduce the color orange, learn to correlate the color with its name. To consolidate knowledge about yellow, green, red colors. Continue to teach to understand and analyze the content of the poem.
Demo material. Half of Whatman paper on which a maple without leaves is drawn.
Handout. Maple leaves cut out of colored paper (yellow, red, green, orange), glue, glue brush, rag, oilcloth lining.
Lesson progress
Read to the children a poem by D. Rozalieva "Maple":
The maple moves its branches,
Falling leaves.
A cloud runs across the sky
Droplets dropping.
Give the children one maple leaf cut out of paper. Draw the attention of the children to the shape of the leaves - it resembles a star. Tell the children: "Run up to me, everyone with yellow leaves!"
Children with yellow maple leaves in their hands run up to an adult, and then return to their places. Then the guys who have red (green, orange) leaves run up.
Show the children a sheet of drawing paper on which a maple without leaves is drawn and offer: “Guys, let's return its leaves to the maple.” Each child should put glue on their own leaf and stick it on a tree branch.
At the end of the session, say: “Well done, guys! You have a real autumn maple!”
The theme of the week is "Autumn"
Lesson 7. The sun in the clouds (Colored napkins. Breaking along the contour and application from large lumps of paper)
Software content. To teach children to create a plot composition from a circle that is broken along the contour and crumpled lumps of napkins. Learn to stick rolled up large lumps of paper on cardboard. To consolidate the ability to understand and analyze the content of the poem.
Handout. Yellow and white napkins, a sheet of blue cardboard, glue, a glue brush, a rag, an oilcloth-lining.
Lesson progress
Read the Armenian song to the children:
- Where does the sun sleep?
- In grandma's bed.
- Who is his grandmother?
- Blue sky.
- How will it be hidden?
- Woolen cloud.
- And who will cover him?
- Grandpa wind.
Ask the children: “Where does the sun sleep? (In the sky.) What color is the sky? (Blue, blue.) What hides the sun? (Cloud.) What color are the clouds? (White, grey.) Now we will also put the sun to sleep.” Show the children a blue sheet of cardboard and ask, “What does it look like?” (On sky.) Then show them a yellow napkin and ask, “What do you think this napkin can be made from?” (Sun.)
Give each child a yellow napkin and help cut it around to make a “sun”.
Show the children a white napkin and ask: “What can be done from this napkin?” (Clouds, clouds.)
Put a white napkin in front of each child and offer to tear the white napkin along the line into four parts, crumple each part - you get four clouds. Now we need to place the sun and clouds in the sky. The child sticks the sun first, and then the clouds.
The theme of the week is "In the woods"
Lesson 8. Leaves from the forest (Applique from dried leaves)
Software content. Show the children that the application can be made from dried leaves. Learn to relate an object to its shape. Continue to learn to accompany the words of the poem with movements corresponding to the text. Cultivate compassion and kindness.
Handout. Album sheet, on which colored contours of two leaves of different shape and color are drawn; dried leaves of appropriate shapes and colors; leaves cut out of colored paper; glue, glue brush, rag, oilcloth-lining.
Lesson progress
Distribute leaves cut out of colored paper to the kids and invite them to play with these leaves while listening to the poem:
The leaf flew (Wave leaf).
The leaf is spinning
The leaf is spinning (Spin the leaf.)
Lies under your feet. (Lower the leaf at your feet.)
The leaf is torn, torn, torn. (Tear the leaf.)
The leaf is crumpled, crumpled, crumpled. (Crumple up the leaves.)
Beat the situation that two Leaflets came to visit the children from the forest: they are all trampled in the forest, the Leaflets want to find their home.
Place an album sheet in front of each child, on which colored outlines of two leaves of different shapes and colors are drawn, and offer to find a house for each leaf.
Tell the children: “In order for the leaves not to lose their houses again, they need to be glued: apply glue on the back of the leaf with a brush and press it with a cloth to the paper. So we hid the leaves in the houses.
Attention! This is an introductory section of the book.
If you liked the beginning of the book, then the full version can be purchased from our partner - the distributor of legal content LLC "LitRes".

