Star News


Braiding a cabochon with beads with your own hands (photo and video). Beaded necklace: weaving patterns and a step-by-step master class Embroidered necklace with cabochons 1001 ideas
This necklace combines several weaving techniques. The first to catch the eye are many flat stones called kobochons. Since there is no regularity and exact order in this decoration, it means that it is made in a free weaving technique - “freeform”. And the base of the necklace is already woven in the brick weaving technique, which you will get acquainted with thanks to the detailed and visual diagrams below.
What you need to make:
- a sketch (sketch) of the future necklace
- black flat beads square shape with gasoline coating (you can use any other square or round)
- 8 cabochon stones
- pieces soft skin
- button
- various dark beads to decorate the base of the necklace
- monofilament with a needle
Step by step photos and diagrams:

Beginning of work
Start by modeling the necklace. You can draw a finished sketch or draw your own. On a regular sheet of A4 paper, with a simple pencil throw in the approximate arrangement of cabochons, circle those that you have prepared. Get a composition that you really like, do not be lazy to redraw several times, because your efforts will certainly be justified by the result.

Preparing cabochons
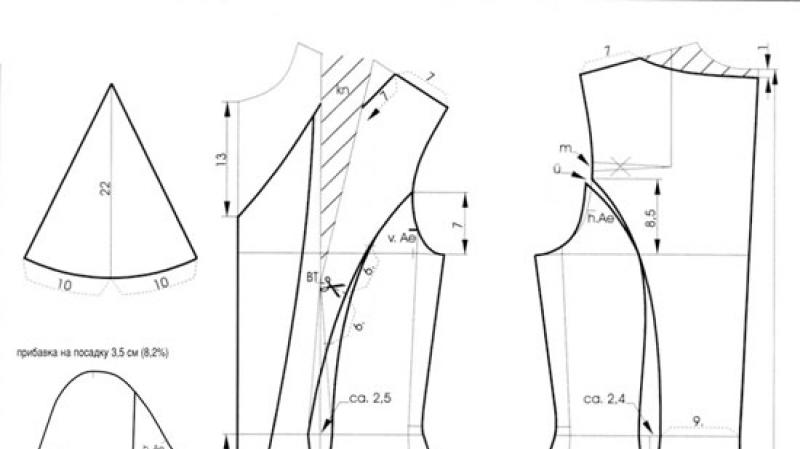
Take a piece of soft and not thick leather, attach a cabochon to it, circle it and cut it out 3-4 mm from the edge of the outlined line. Bead the edge of the cut out piece of leather as shown in the diagram below, fig. 1-3. Then attach the cabochon and start beading it until it fits snugly. Braid all cabochons in this way.

Using your sketch of the necklace as a template, connect the cabochons with a brick weave. In the diagram above, Fig. 5-9 shows the brick weaving technique for those who are not yet familiar with it.
Instead of a regular clasp, this necklace uses a braided button, which clearly fits into the style and idea of this jewelry. The button braiding scheme is below, fig. 10.

Sew a braided button on one side, and a loop of the desired size on the other.
The work is not easy and requires creativity and considerable skills in beading, so if you are not yet confident in your abilities, then it is worth practicing on something less difficult.
Photos taken from Bead&Button magazine.
Today, by popular demand, I am posting a master class on creating The Green Goddess necklace, which was loved by so many. I made this work back in 2012 and later repeated it in other colors, the blue version of the work called "Queen of the Road" was published in the June "Fashion" 2014.
The decoration has participated in several photo shoots, and there is even a short video with him and other decorations.
The master class turned out to be very detailed and focused on the initial level of skill. Experienced craftsmen are unlikely to be interested in it, since the descriptions and diagrams in the magazine are enough to understand the stages of its manufacture.
For work you will need:
- Cabochon 30*45mm - 1 pc.
- Rivoli Swarovski 14 mm - 2 pcs.
- Beads: Czech glass rondels 4*2mm - 26 pieces; Czech long beads of the type of rice, 17mm long - 4pcs.
- Japanese beads Toho No. 11 gold color and No. 15 gold and main color.
- Japanese beads Miyuki Delica No. 11 gold and main color.
- Fabric that does not require edge processing (cloth, felt, leatherette).
- Glue.
- Genuine Leather.
- Set of tools.
- Accessories: wire "with memory"; carabiner lock; rings - 2 pcs.
Making a cabochon.
We glue the cabochon on a piece of fabric that does not require edge processing. The cabochon is pre-degreased with alcohol. Let the glue dry. According to scheme No. 1, we start trimming the cabochon with Miyuki Delica beads No. 11 of the main color. The number of beads in a row must be a multiple of either two or four. Two - for braiding the cabochon with a mosaic canvas, and four if we want to decorate the cabochon with beautiful cloves along the edge.
If you are a lover of schemes, we use the scheme, otherwise, we observe the process in the photo. The diagram shows the process of sewing a cabochon with one bead, the photo shows two, how you will sew is not so important - this is a matter of personal preference. Depending on the mood and circumstances, I use both options.
Fasten the thread from the wrong side and bring the needle to front side. We begin the first row of mosaic weaving. To do this, we collect two beads of the main color.
We make a stitch at a distance of two beads. From the wrong side, we bring the needle to the front side between the first and second dialed Delica beads.
We pass the needle through the second bead. And then we collect two more beads.
Next, we sew the needle back with a seam, each time returning one bead back, and we collect two beads. Thus, it is necessary to sheathe the entire cabochon. Go through all the beads of the base row again and tighten the thread. From this, the beads in the row will align.
According to scheme No. 2 (decorating the edge with teeth), we weave the cabochon frame with “mosaic” weaving in circular rows with beads No. 11 Miyuki Delica and beads No. 15 Toho.
We proceed to the second row of mosaic braid. We bring the thread out of any Delica bead, pick up another Delica bead and, skipping one Delica of the base row, insert the needle into the third Delica bead. We pull the thread.
We sew one more bead, we form a mosaic weaving. So it is necessary to go around the entire cabochon.
Similarly weave the second row. In each row, do not forget to return to the first bead of the row. The second row is ready.
The number of rows depends on the height of the cabochon, in this case we weave one more - the third row. We begin to weave a narrowing row with beads No. 15 Toho.
If we continue the mosaic weaving with beads No. 15 and weave another row, in which we insert one bead, skip the next one, we will get a cabochon decorated with cloves.
We pass the needle with the thread through the braid to the felt and fasten the thread from the inside. We cut off the excess felt as close as possible to the beads of the base row, but so as not to damage the thread. It remains to complete the closing row, and the cabochon is ready.
Cut out a pendant template from plain paper. The template should repeat the shape of the decoration, but be 2 mm smaller at the edges. Glue the template to the underside of the pendant, let the glue dry. A paper template gives some rigidity to the embroidered part of the product, it also aligns the embroidery if it has been slightly deformed. In our case, you can not do this, since the embroidered part is small, and there is only a cabochon in it, however, if your wrong side contains irregularities in the form of small knots, etc., or if the skin you are using is thin, then it is better not to skip this step .
We glue leather / leatherette to the wrong side.
Let the glue dry and cut off the excess. The skin of the back layer should be 1-2 mm larger than the base on which the pendant is embroidered.
Next, we complete the closing row with Japanese beads "Toho" No. 11 of gold color. The closing row is performed in the Russian way according to the scheme No. 3, No. 4. The Russian way of sheathing the edge is a “loop stitch”, which includes beads.
We bring the needle from the wrong side to the front side.
We collect bead No. 11 Toho on the thread, stick the needle from the wrong side into the skin and felt (the needle passes through both layers through) - at a distance equal to the width of the bead. We pass the needle into the loop of the thread.
We pull the thread. We continue to sheathe the cabochon with a “loop stitch”, stringing one bead each time.
Our cabochon is ready.
If your cabochon is tall enough, you can decorate the cabochon braid with a pattern. For the simplest drawing, you will need two types of delica. Such a pattern is weaved quite simply: we sheathe the cabochon with the main color, the number of beads when sheathing is a multiple of four, the next row is a mosaic, we alternate one bead of the main color and one additional, the third row is a mosaic with an additional color, the fourth row is a mosaic, we alternate one bead of the main color and one additional , the location of the beads is important here, the bead of the main color should stand above the bead of the additional color of the second row and vice versa, the fifth row is a mosaic with beads of the main color, the last row is narrowing, we form cloves, one bead of the main color, skip one.
We braid the rivoli.
Almost all braided elements, I perform on a double monofilament. In preparation for this MK, I abandoned monofilament, because. it is unreadable in the photo. We collect 36 Delica beads of the main color per thread. We form a beaded ring, tighten the thread. We sew the next row with mosaic beads No. 11 Delica.
Row is ready. We begin to weave a narrowing row with beads No. 15, alternating 1 raspberry-colored bead and 1 gold-colored bead.
Weave the next row using only gold beads. In the last row, we alternate 1 gold bead and skip 1 bead, passing the thread through the beads of the bottom row (the gold bead should be located above the raspberry bead of one of the previous rows), so we wove the face of the rivoli basket. We pass through the beads of the row several times, pulling the thread together.
In the photo, I turned out a little differently, in terms of the location of the beads, but later in the finished product you will see that I corrected myself. In principle, both options have the right to life.
In the resulting "basket" we put the rivoli. With beads No. 15 we tighten the braid of the stone from the wrong side.
We weave the second row, stitching 2 beads with a mosaic, one pass.
In the third row, we begin to form a pattern on the wrong side of our rivoli. You can choose not to do this and continue to work with one color, but I like it better if the wrong side turns out to be pretty too, so, as a rule, if the wrong side is not sewn to the base, I use this method. So, in the next row, we sew, alternating 1 raspberry bead and one tanzanite color, the raspberry bead should be above the skipped bead of the previous row. In the fourth row we use only raspberry beads.
In the fifth row, we alternate one raspberry bead, one missed one, we place the raspberry bead exactly above the tanzanite bead of the third row. We tighten the sixth row with tanzanite beads, in total there are 6 beads in the row.
Another row of mosaics. In the next row, we alternate one tanzanite bead, one skipped, in the last row we tighten the wrong side with 3 tanzanite beads.
We loop the thread in the wrong side, and at this stage we cut it. I don't leave any ends. Later, when assembling this decoration, we will use a separate thread. This is much more convenient, since you can cut the thread connecting the elements at any time and change their location.
Weave tubes.
Attention! Before weaving the tubes, it is advisable to sketch the pendant. Trace a braided cabochon on paper, circle the braided rivoli below the cabochon, draw the tubes, forming the contours of the pendant. During weaving, determine the length of the tubes according to the sketch.
In our pendant I use three different lengths tubules. Two of them for a pendant of three and six pieces. respectively, and the third size of the tubes in the amount of 4 pcs. to decorate the memorial.
According to the scheme, we weave three central tubes 24 beads high with Miyuki Delica beads No. 11. Weave a series of mosaics.
The first row is ready. Then another row. We should get a strip 10 rows wide.
We connect the tube according to the scheme.
Six more tubes weave for 36 beads in height and four for 18 beads. The tubes can be both plain and patterned, it all depends on your final idea.
Bale.
Weave a bale for the pendant according to the scheme. We collect 4 delica beads on the thread and close in a circle.
In the next row, insert two delica beads between each bead. In the next row, above the two beads, insert two beads, and one between them. Thus, bale is woven with mosaic weaving, using nbele.
We continue weaving by inserting two beads over the two of the previous row, and between one by one, thus weaving 7 rows, in each row the number of beads that you weave between unbleached pairs of beads increases and the bail gradually expands. We decorate the last row with beads of a different color. Literally in the third or fourth row, the bale itself will ask you to fold to form the final shape.
Bale is ready.
Assembly.
We lay out once again all the woven elements, forming a sketch of our future decoration. It is possible at this stage we want to add or change something. We can arrange the cabochon horizontally, change the arrangement of the tubes, or use a different cabochon shape. Everything is in our hands, we are not afraid to experiment, your product will only benefit from this, and will become your exclusive unique creation.
We sew the tubes together. In a similar way, we sewed a flat canvas together, forming a tube. Do not forget to sew on decorative beads at the ends of the tubes.
Sew the bale to the cabochon.
We sew one side of the bail to the beads of the closing edge. The second side is sewn to the cabochon braid. Because the braid and the closing row are at different levels, when sewing the edge of the bail to the braid, we add two beads in the corner.
We connect the rivoli together.
We connect the rivoli with each other with the help of two beads No. 11 "TOHO".
Attach the rivoli to the bottom of the cabochon.
We attach the tubes to the edges of the cabochon and rivoli in the same way. If necessary, if the tubes are close enough to the cabochon, we can either use additional No. 11 Toho beads or attach the tubes without using beads.
We hang the pendant on a memory wire "with memory".
ADVICE! It is better to buy memory wire with a margin that is a multiple of 1.5, since, as a rule, one turn is not enough to wrap around the neck, but if you take 3 turns, then this length may well be enough for two pieces of jewelry.
For convenience, we start working with memory wire from the middle: we collect the required number of beads, alternating them with Japanese beads Miyuki No. 11, and woven tubes (we have 4 of them left).
ADVICE! When making a memory wire, after hanging a pendant on it, it is best to place two large beads, which will be stopper beads, and will not allow the pendant to mix on the memory, so the pendant will always be dressed symmetrically on you.
We decorate the ends of the pendant, attach a carabiner clasp, a double ring and enjoy our creation!
This is how it looks on me:
Using the knowledge gained, based on the presented elements, you can make not only a similar pendant, but also completely different types of pendants.
Happy creativity to all!
Creation of a beaded collar-choker...
To create a collar, we need:
- beads of 3-4 colors and a couple of shades;
- natural stones and glass beads different sizes
(agate, serpentine, quartz, mother-of-pearl, citrine);
- felt (for the base of the collar);
- fishing line, needle No.;
- fabric (can be leather) for the back of the collar;
- satin ribbon 2-3 cm wide.
I decided to make the collar bright, so I took 3 colors: purple, yellow and green.
Having decided on the colors and materials, we take our pebbles and lay them out on the base, having previously drawn the base of the collar. We sew on large stones, then add small stones to the embroidery, not very many, so that there is room for beads.

Then we sheathe each large stone around, she sheathed each stone in different ways, in principle, this could not have been done at all.

We braid the large central stone in a circle:

When we finished with all the stones, we proceed to fill the remaining space with beads. In order to make it look fluffy, we embroider 3 beads in a chaotic manner, the needle enters very close to the place where it came from, then 1 of the beads is obtained from above, as if creating a three-dimensional embroidery:

Thus, we fill everything between the stones: 
When we finished embroidering, we sew on the sides of the tie ribbons and cut out the back side of the collar from the fabric:

We sew our fabric to the collar, closing the edges with beads:

And now our bright spring collar is ready:
Happy creativity! Sincerely, Alexandra Lysenkova (lav-jewelry)
Copying without specifying a hyperlink to the source is prohibited.
Thank you for respecting copyright
Elegant necklace in Egyptian style
What could be more entertaining than needlework? In the process of creativity, we not only show our talent, but also become better and kinder. Making jewelry with your own hands - The best way diversify fashionable image, make it more original and stylish.
A favorite material for making all kinds of jewelry is beads. Matte or mother-of-pearl, classic or bizarre shape, sparkling beads in skillful hands turn into exclusive luxurious beads, pendants, bracelets and necklaces. We offer you to plunge into the world of creative experiments by making several original necklaces made of beads and stones with your own hands.
Materials for making jewelry
The basis of success in needlework is the correct selection of materials for work. To make jewelry from beads and stones with your own hands, you will need:
- Beads. As a rule, in order to make this or that jewelry, the craftswoman selects a scheme that clearly demonstrates the entire step-by-step weaving algorithm. In order for the material to be ideally suited for a particular product, it is necessary to follow the advice of experienced craftsmen. First of all, beads must be selected according to the shape, color, which are indicated in the diagrams, do not forget about the quality and reputation of the manufacturer.
The size of any beads is always determined by the number on the package. Beginners should know: the smaller the number, the larger the beads.
On the shelves you can find materials made of glass, plastic, bone. The best tandem of practicality, durability and aesthetics combines glass beads.
- Cabochons. For the manufacture of hand made jewelry from beads and stones, cabochons are needed. In translation, the word means “head”, such a stone really resembles the crown of the head in shape. He may have the most different shape, color, structure, but always a smooth surface. Beautiful stone ovals or circles are convex on one side and flat on the other, so that the decorative element can be easily attached to the base. When choosing cabochons to create hand made jewelry, you need to pay special attention to the convex part of the stone: there should be no cracks, bumps or notches on the surface.
 Cabochons made of natural stones
 - Decoration base. The classic basis for weaving is fishing line. Beginning craftswomen can use a thin wire, it will help to model the outlines of the product. To create a necklace of beads and cabochons, leather or fabric is used as the basis. Such decorations look most advantageous on luxurious velvet or satin fabric.
The main rule for choosing materials for needlework is a combination of high quality, aesthetic harmony and original solutions.
 Variety of beads
 We make jewelry with our own hands
It is believed that it beautiful accessories give a woman confidence, unique charm and emphasize femininity. We offer to make some exclusive jewelry from beads and natural stones with your own hands.
 Bright set
 Master class on embroidery of the original necklace
As a rule, necklaces or bracelets, where natural stones and beads are combined, are made using the embroidery technique. We offer you to make a magnificent accessory with your own hands. To work, you will need beads, a piece of natural or eco-leather, several cabochons, beautiful faceted beads of various shapes to match, a rhinestone ribbon.
 Turquoise bracelet
 Let's get to work:
- Draw a line on a piece of leather - the center of the product. In the middle we glue the central stone, on the sides there should be enough space for laying other elements.
- We sew the central element with beads, stringing three beads each. You should get an even number of beads. We braid the stone in a mosaic way: we string one bead, passing through one. To fix the stone, add smaller beads.
- On a piece of leather, a little higher than the main element, we glue a smaller cabochon of jasper, we similarly braid it with beads. Next, we place the remaining cabochons and braid each with beads.
When all the elements are ready, we make the initial layout of the decoration details on a sheet of paper. We trace along the contour and cut it out, stepping back a few millimeters from the line inward.
 Form necklace on paper
 - We glue the paper to each blank, this technique will give the product density and help keep the shape of the necklace. Next, glue all the details to the flap genuine leather and cut out.
- To make the edges look neat, we sew along the contour of each blank with beads to match the product. We lay out the parts again, sew together. At the bottom, you can make a fringe of beads, embroider the decoration stand with beads, and attach a lock to the edge.
A beautiful necklace in the style of the incomparable Alexandra Anastasia Lisowska, beloved of the powerful Sultan Suleiman, is ready. In the same way, you can create a whole collection of jewelry by combining materials, experimenting with color and shape of products.
 Necklace with jade
 Delicate pendant
Resourceful craftswomen and fashionistas manage to make luxurious jewelry for all occasions from the simplest and most budgetary materials. To change your image every day, it is enough to make several pendants that can be hung on a chain, leather cord or beaded cord. We offer a basic lesson on creating a delicate pendant.
 Pink pendant with pearls
 The algorithm is the following:
- We will prepare for work beads of pale pink and cream color, cabochon rhodochrosite, quartz and agate, pearl beads, a few rivoli. For the base, you need a piece of fabric and genuine leather.
- We make the markup of the jewelry, glue a large cabochon in the center and sheathe it with beads in several rows. The last row is sheathed with golden beads, like a precious setting of natural stone.
- We lay the rivoli below the cabochon, braid with beads, similarly lay out and decorate the remaining elements of the pendant according to the scheme.
- When all the elements are glued and beaded, cut out the blank, decorate the edges with pearl beads. We will decorate the lower part of the pendant with a fringe of beads, weave a loop of beads on top or simply insert a metal ring. Such a pendant looks equally elegant on satin ribbon, chain or beaded harness.
My master class is dedicated to making a wonderful necklace using the "bead embroidery" technique and will tell you how to create your own unique piece of jewelry.
The master class contains a description of a whole range of basic techniques embroidery,braiding stones, ammonites, rivoli; I will also share some subtleties and nuances work with beads, which will be useful for beginners, as well as for those who are already working with beads.
I really hope that my master class will inspire and help everyone who wants to create their own unique jewelry!
The master class is replete with detailed photographs and diagrams made by me personally, I tried very hard to make everything clear and accessible 🙂
So what do we necessary:
2) Beads of the required shades (round size No. 11, 8 and No. 15 and cylindrical (Miyuki Delica/Toho Treasures) No. 11).
3) Stone cabochons, ammonite.
4) Rivoli (Swarovski or other manufacturer).
5) Artificial or natural leather (color - suitable for the color scheme of the necklace).
6) Scissors.
7) Pencil, felt-tip pen.
8) Doublerin.
9) Accessories for jewelry (2 connectors, pins, rings, lock).
10) Beads.
11) Acrylic paints (if white felt is used).
12) Needle for embroidery with beads.
13) Threads (regular high-strength cotton and waxed for edge processing).
14) Thin-nose pliers, round-nose pliers, wire cutters, a tool for expanding rings.
15) Inspiration and good mood 🙂
The first thing to decide is necklace colors. Personally, I advise you to choose one or two main colors, be sure to add a metallic shade (gold, silver, etc.), plus shades of the main colors.
Important point: your 2 colors must match 100% with each other, otherwise the decoration will not look harmonious. The use of shades is also very important, they help create optical volume and get away from flatness. For the same reason, it will not be superfluous to use beads of different sizes and shapes. But again, it is very important not to deviate from the color concept.
I chose 2 colors: brown and purple, their various shades and beads of metallic shades (gold, bronze) that match the main colors. I selected everything that could be useful in color.

The concept of the necklace is as follows: a non-symmetrical pattern, the presence of flowers (what is autumn without flowers :)), autumn leaves, snail, stones.
We take finished pattern(or it can be done by outlining the line of the neck of the T-shirt). 2 lines are important to us here: the neck line and the middle.


Then acrylic paints paint the felt on the front side. Let it dry (it will dry quickly in the sun). Acrylic, when dry, forms a very comfortable surface for embroidery.
Important point: you need to dry the dyed felt only in a horizontal position! Otherwise, the paint may simply drain, leaving streaks and a light tone.
I will be using leopard jasper, purple agate, amethyst and ammonite cabochons.
Important point: when using transparent stones, such as rock crystal or quartz, do not draw with felt-tip pens or a pen with a dark core, and also try not to draw any lines there, as they can later be visible and shine through the stones!

We remove our materials and finish drawing the approximate contours of future leaves.

Important point: I recommend using the glue correctly according to the instructions on the back of the tube: degrease the back surface of the cabochon and hold for at least 5 minutes. before bonding surfaces. Bonding strength will be even higher!

Let the pebbles and glue dry and start sheathe cabochons.
I can distinguish 2 basic ways of beadwork:
1) when each bead is sewn using the “back needle” method;
2) when 3 (or more) beads are typed and the last one is sewn on.
The diagrams will clearly show you how the beads are sewn on:

I will embroider in the first way, sewing on each bead, the second method will come in handy later, when embroidering elements with small beads.
Try to make the embroidery line as even as possible, place the beads close to each other without gaps. At first, it may not turn out very smoothly, but there is no need to despair: practice will form this skill 🙂
There must be an even number of beads!
Important point: sew the beads "on conscience" and be sure to pass the needle and thread through all the beads again:

After we have sheathed it in such a way, as if “circling” the cabochon, we proceed to its braiding.
I will braid Mosaic way. We weave the second row of beads through one above the base row:


There should be such a number of rows that they seem to hold the cabochon, but also not much cover its surface. The last row is done in the same way, but only small beads are used, size No. 15.

Important point: if you understand that you are running out of thread and its length is not enough to braid the entire stone - it does not matter! In the mosaic, slip the thread down to the base first row and bring it to the wrong side to make a knot. In exactly the same way, bring a new thread along the mosaic (brick by brick) to the required row.
Let's get back to the ammonite. In our composition, he will play the role of a snail sitting on a pebble next to a leaf. Ammonite is an excellent material, but it is often very inconvenient to weave and work with. If you turn the ammonite over, then from the “wrong side” it is uneven and you cannot glue it, since it will look uneven and ugly. Therefore, we grind the back surface of the ammonite until the required height is reached (approximately 2-3 rows of beads). For this I used a whetstone (for sharpening knives):

Important point: avoid putting too much pressure on the ammonite when grinding, as it is quite brittle and can easily break!
After preparing the ammonite, we glue it, circle it along the protruding borders and sheathe it with beads (I used Miyuki "Berry").

We will braid our snail in a way by type tapestry weaving. The number of beads in the first row with this braiding method can be any: even or odd.
We collect the first bead of the second row as in the "mosaic" method.
We collect the second bead, but we pull the needle from right to left through the just sewn bead of the second (upper row):


Then we stretch the needle and thread through the bottom 2 beads and the next third of the bottom row:


Here's how it works for me:


If you get a bead exactly above the bead, then you are doing everything right. Try not to overtighten the thread. Then, in the same way, we make the third row with beads of the 15th size (I have the color "Gold"). Here's what should happen:

Now we need to close the empty corner by pulling up the opposite sides with constrictions.

This method fits very well into our snail concept and even decorates the ammonite.

In the end, here's what we get.

It's time to move on to preparing the flower cores - braiding the rivoles.
We collect 36 beads of the 11th size (I used cylindrical beads of the Glossy Batik color) and tie the threads in a knot, forming a ring.
Important point: be sure to check the size of the resulting bead ring. It is very important that the rivoli pass through the ring closely, but not be noticeably smaller than it.


And add 2 more rows of beads of the 15th size (I used the color "Gold").

We insert our rivol and bring out the working thread, descending along the mosaic to the opposite side.

We make 1 row with small beads. At this stage, it is necessary to check if our crystal flies out of the woven frame. If the stone holds well, then so many rows are enough, if not, then we add another row with beads of the 15th size.


We braid other cores in the same way.
Then we proceed to embroidery autumn leaves. First, we embroider the outline of more dark shade. We highlight the veins of the leaf with beads of the 15th size.
Next, we “paint” the leaf with shades that we like, sewing beads in the direction from the outer edge of the leaf to the middle. I will be using Light Bronze, Berry, Lavender, Smoky Topaz, Antique Bronze.


The next step: sew on the rivoli cores.
First, we bring the threads from the rivoli to the wrong side and also tie a knot. For reliability, I also drip a little glue in the very center. Next, sew the rivoli to the felt for the bottom (base) row of the 11th seed beads. Be careful!


In this way, we sew the rest of the cores, we begin to “paint” the petals of our flowers and embroider the leaves on the other side.
Important point: Avoid gaps between sewn on beads. small beads Size 15 is our lifesaver here! It is very convenient for them to fill in these gaps.
So, here's what we got!

Carefully cut out embroidery, being careful not to damage the threads.
Then we put the embroidery on a sheet of dublerin, circle and draw another contour, retreating from the edge of approximately 1.5-2 mm.

Cut out along the new contour.
Important point: dublerin will hide all the knots on the wrong side and moderately compact the embroidery. You can also use paper or cardboard. The disadvantage of using a paper layer: a high risk of creases, which are especially visible when using thin artificial leather. Dublerin has less risk of creases when bent.
Then glue dublerin to the wrong side of the embroidery.
Next step: apply our embroidery to skin(I used natural), circle, cut, glue.

We cut off all unnecessary, the contour of the skin should be exactly on the embroidery, or protrude literally by 1 mm. Let's dry.
Next stage: edge processing. We will process the edge in such a way that the bead lies with the hole out. This method is suitable because the embroidery, together with the skin, has formed a sufficient height according to bead measurements, and this method is suitable to close the edge.
We hide the knot between the layers of embroidery, bring the needle and thread to the wrong side:

Pick up 1 bead. Then we pierce all the layers with a needle (next to the place where the needle came out):

We pull the thread, forming a loop, which we put on the finger:

We pass the bead with a needle “from bottom to top”, pull out the thread:


Then we repeat algorithm: we collect a bead, at a distance of about one bead from the previous stitch, we pierce the layers with a needle, pull the thread to the front side and pass the bead “from bottom to top” with a needle.


Here's how it should turn out:

We process the entire edge in this way.
We sew the connectors very carefully, but firmly. With the help of tools and accessories, we make a chain with beads and rings, fasten the lock and ... voila!

Here we have such an autumn story!

You can use any colors, crystals and stones. Beads open up great opportunities for creativity!
I really hope that my master class will be useful to you, and everyone will find something for themselves.
Thank you for your attention!
Inspiration and good luck in your work! 🙂