Home decor ideas for the new year. Paper Christmas Decorations Paper Christmas Decorations
New Year decoration
paper can be crafted with children.
The custom of decorating the Christmas tree comes from ancient times. It was believed that if you hang handmade New Year decorations on the Christmas tree, then in the new year the most cherished desires will come true.
The most budgetary and original are decorations made of paper or cardboard.
We offer large selection photos and master classes with New Year's paper decorations.
Necessary materials:
- Colored paper or cardboard;
- Scissors;
- PVA glue.


Christmas decorations: Christmas paper balls.

The original idea is to weave a two-color paper ball.
To do this, take two sheets of colored paper of different colors and on each cut out a template figure (Fig. 2) and 4 circles, you can use different colors.
Before you start weaving, you need to collect 12 strips of paper of the same color and fasten with a circle (see Fig. 1), gluing the strips to it. We collect the same circle of stripes from paper of a different color.
Combine two ball blanks of different colors so that the circles match, front side up and the direction of the bands were in different side, i.e. towards each other.
We begin to interlace the stripes, alternating color. You need to weave neatly and tightly enough so that on the opposite side of the ball the strips come together. In the process of weaving, it is necessary to glue the strips together, in 10 places approximately at an equal distance throughout the ball.
When you connect all the stripes on the other side of the ball, glue them in a circle.


Christmas decorations: paper lanterns.


Master class "Openwork flashlight".

Necessary materials:
- colored paper for pastels (A4 format),
- dummy or clerical knife,
- scissors,
- glue,
- beads for decoration, lace or rope
- metal ruler
- a creasing tool, you can use a regular pen with a non-writing refill.

Print out the pattern and cut it out.


Made a scoring along the fold lines.

We make a small hole on the bottom of the flashlight, so that later we can thread the cord through it.
And glue the side parts of the flashlight.

Then glue the bottom of the flashlight.
We pass the thread through the hole and the entire flashlight. You can put a bead on the thread for decoration. At the bottom of the flashlight, we fix the thread with a knot, or you can also decorate it with a bead and fix it with a knot and glue.

We glue upper part flashlight.


Master class source http://filosofyfree.ru/post261381103/
Christmas decorations: Christmas trees and paper animals.


We create festive mood and decorate the house in a stylish and original way - we will make magnificent New Year's decorations with our own hands!
Any New Year's decorations made with a soul are unique, so to prepare for the holiday, all you need is a couple of free evenings, and a few inspiring ideas to create decorations for the New Year with your own hands. Moreover, for this purpose you need to use items that are probably available in every home. So let's go.
From balls for the Christmas tree we make cool New Year's decorations with our own hands
1. Balloon from a Christmas tree toy
It will require a beautiful Christmas ball, a piece of cardboard, a thick thread and adhesive tape.
From colored cardboard, you will have to cut a blank for the basket. This will be a small box. Its bottom should be such that you can put a coin in it for weighting. Glue it from the inside and attach the threads to the corners of the box with duct tape. It should look like a basket with two handles.
It remains only to collect New Year's decorations with your own hands. To do this, remove the mount from the ball, throw a thread through it and put it back in place.
2. Teddy bear.
To make it, a plain ball and cotton wool are useful. Glue will help shape the cotton balls. They also need to glue the parts together.
3. Nominal Christmas ball.
Leave an imprint of your own palm on a plain Christmas ball. Sign the date and keep for years to come.
4. Christmas garland of hearts.
The easiest Christmas crafts to make are DIY paper Christmas decorations. They are done in just half an hour. And there are a lot of ideas. A garland of paper hearts will look great on a forest beauty. It is made from strips of double-sided colored paper. You need to fasten the parts to each other with a stapler.
5. Ice cream - do-it-yourself creative decorations for the new year.
Cut out a circle from brown cardboard and divide it into two semicircles. Twist each of them into a cone. Glue well. From colored paper, form balls that attach to the cone. First pierce the top with a needle and thread.
6. Snowflake is a ballerina.
These decorations for the New Year are made on the basis of snowflakes. It is only necessary to cut out the torso of a ballerina from white paper according to the template and insert it into the center of the snowflake
Cool ideas for decorations for the New Year to make them out of natural material, for example from threads. All thread crafts can be covered with sparkles or shiny varnish and they will perfectly decorate a Christmas tree or a house.
7. Toy - a horse made of paper and thread.
From the cardboard from the box, cut out two parts of the future toy. Fold them together and wrap tightly with thread or twine.
8. DIY Christmas balls from threads for home decoration.
Inflate round balloon up to the size that the finished decoration should be. Wrap it with thread so that the gaps are visible. Apply PVA glue to all threads. After drying, blow off the ball and remove it from the decoration for the New Year with your own hands. They can be hung in the room or laid out on a table with tinsel and candles.
9. Winter vase
It's a great idea to make decorations for the New Year from improvised materials. beautiful bottle or a glass vase will become magical if you draw a pattern of semolina on the glass surface. And you will immediately be transported to the land of the Snow Queen.
10. Garland of pasta
Such Christmas tree beads will delight children with their unusualness.
11. Toys for the Christmas tree made of wood.
Twig skates will give dad a job to do, and kids will love to color them.
12. Christmas decorations for the house from cones
Painted in green tint the cone will become a Christmas tree.
13. Christmas funny gnomes
Unpeeled peanuts - an occasion to create funny little men out of it.
14. Snowman from socks.
From white stockings or pantyhose filled with millet, cute snowmen are obtained. They can be dressed in jackets and hats made of colored socks. And make noses from the core of an orange pencil.
15. DIY Christmas snowmen
Burnt out light bulbs - the basis for drawing funny gnomes that will decorate the Christmas tree for the New Year.
Helpful Hints
To decorate a Christmas tree or a house, it is not necessary to buy a lot of toys and decorations.
If you have colored paper, cardboard, glue, and a few extra simple materials, you can create a huge amount. New Year's crafts.
Here are just a small part of paper crafts for the new year:
On our website you will also find:
What can be made of paper for the New Year: tube decoration

You will need:
2 sheets of cardstock in different colors or 2 sheets of scrapbooking paper
Scissors
PVA glue
Ring with chain attachment (optional)
1. From one sheet of cardboard, cut out 14 squares with a side of about 2.5 cm.
2. From the second sheet of cardboard, cut out 14 squares with a side of about 3 cm.

3. Start folding the opposite ends of the squares as shown in the image - one end on top of the other. In the place where the ends overlap each other, add a little glue.


4. Cut out a circle with a diameter of 5 cm from any sheet of cardboard. Mark its center.

5. Apply glue to the circle and start gluing the prepared tubes - first large tubes, and then small ones - they are glued on top of the large tubes.

* Try to glue the tube evenly to the tube.
* You may not need all the prepared tubes for crafting - this is normal.


* Glue a few rhinestones to the craft as additional decorations (this is not necessary).
6. Add a ribbon - it can be glued or threaded into a ring attached to the decoration.

DIY paper cones

You will need:
Colored paper or cardboard
Ruler and pencil
Scissors
PVA glue or pins
Styrofoam ball
* If you did not find a foam ball, then it can be replaced with a crumpled sheet of paper in the form of a ball, wrapped with a thread that secures the shape.
1. Cut out strips 2.5 cm thick from paper or cardboard.

2. Cut each strip across into small pieces 2.5 cm wide - you will get several squares.
3. Fold each square as shown in the image - make an arrow by bending the opposite ends.

4. Prepare the ball and start gluing (or pinning) paper blanks to it as shown in the image. Do everything in layers - first the bottom row, then move up, creating new rows.

5. Glue a ribbon to the top of the head so that the tree can be hung on the tree, and you can also add some artificial leaves as a decoration.

New Year paper crafts in quilling style

You will need:
Pages from old magazines or newspapers
PVA glue
Baking tins (optional)
Thread or braid and bead.
1. Cut out strips 4-5 cm wide from paper.
2. Fold each strip in half lengthwise. Unfold the strip and bend again, but this time each side to the center, and then the entire strip in half again (see image).
2. Prepare the glue and start twisting the strips into circles, adding a little glue so that they do not come apart.


3. Take another paper strip and bend it as in step 2. Prepare a baking dish (in this example, it is in the shape of a star) and put a paper strip into it, carefully laying it out inside the mold.
4. Now start laying out the twisted paper circles inside the molds. Apply glue to them so that all the circles are connected to each other and to the strip inside the mold.


4. When the glue dries, remove the blank from the mold. You can add more glue to make the workpiece even stronger.
5. Pass the thread or braid through the craft and add a bead for beauty. Tie a knot.
* For such crafts, you can use different molds, a heart, for example.

Wall decoration made of colored paper for the New Year

You will need:
10 paper plates
20 sheets of green paper
stapler
Double sided tape
Scissors
Cardboard decorations (can be cut from old postcards or drawn and cut)
White braid (optional).

1. Cut out large squares from green paper - one square from one sheet. The square should fit inside the paper plate. If necessary, reduce its size.
2. Fold each paper square like an accordion, and then in half.
3. Fasten the ends of the accordion folded in half to get a semicircle.
4. Repeat steps 1-3 with other paper.
5. Connect the two semicircles together with double-sided tape or a stapler to form a circle.
6. Using double-sided tape, attach the circle to the middle of the paper plate. Glue double-sided tape or apply glue to the back of the plate so that you can stick it to a wall or other surface (you can stick it to plywood, a wooden tablet, cardboard and then put it on a shelf or hang it on the wall).
7. Make 10 similar blanks.
8. Start making Christmas tree decorations. Cut out paper Christmas decorations and glue them together to form a circle. After making several circles (3-4 pieces), they can be glued to the plates, like Christmas decorations.
* You can add a white braid to the top of the Christmas tree, on which the Christmas tree supposedly hangs on the wall.
Christmas decorations made of paper: 3D paper droplet

INwe will need:
colored paper
Pencil
Scissors
1. Draw a large droplet on cardboard and cut it out.
2. Use the drop template to create a few more - place a cardboard drop on paper, trace and cut out.

3. Put a few drops into one stack, fold the stack in half and cut out a circle in the middle (see image).
4. Start gluing the sides of each drop to end up with one voluminous drop. In this example, it took 16 drops to make one voluminous, but more can be done.
* You can add thread or ribbon to hang the decoration on the Christmas tree.

Christmas paper toys: cone balls

You will need:
Paper (can be old magazines)
Scissors
Thread and needle
Double sided tape or glue.
1. Cut paper circles of the same diameter (choose any size)
2. Make a cut along the radius in each circle.

3. Make two cones from each circle - twist the paper from one and the other end (from the notch) to the middle, and fix the workpiece with glue or tape (see image).
4. Also make two cones from each of the remaining circles.

5. Prepare a thread with a needle and thread them through each blank so that in the end a ball is obtained from 10 blanks. Tie a knot.

6. Add string or ribbon to hang the toy on the Christmas tree.

How to make Christmas lanterns out of paper

You will need:
Stationery knife
Pencil and ruler
Thick colored or decorative paper
Needle and thread

1. Prepare a sheet of paper, fold it in half and cut it into two rectangles.
2. Lay one rectangle on a flat surface that can be cut. Using a clerical knife, make several transverse cuts from one end of the paper to the other - the distance between the cuts is the same, and they should lag about 1.5-2 cm from the edges.


* You may need to first mark where the cuts will be. Use a pencil and ruler.
3. Roll the paper into a tube as shown in the image. Secure the ends with tape.
4. Take a needle and thread and start threading them alternately over and under the strips that formed after the cuts.
5. When you have wrapped the entire workpiece with thread, tighten it and tie a knot.

No bright balls from the supermarket, no lights flashing in different colors, no expensive designer sets for decorating Christmas trees can compare with DIY decorations.
Of course, such decorations from the supermarket will make the evergreen guest bright, modernly decorated, but they are unlikely to be able to carry the New Year mood so joyfully as the toys made on their own.
There are a lot of ways to make Christmas decorations, but the most simple, attractive and not requiring much time are toys made of paper. To create them, you may need quite a bit, improvised materials that are stored in every hostess at home. Stock up on a bit of patience and wings for a creative flight of fancy.
Christmas balls
What is the most common Christmas tree decoration? Of course, balls! You can always buy glass, plastic ones in the store, but we will try to make them from thick paper. This includes colored cardboard, old postcards and covers of unnecessary magazines. Colored cardboard balls, plain, will give the Christmas tree or the room that you want to decorate a single style, and colorful balloons will bring the atmosphere of a holiday, magic and a winter fairy tale.
Before you sit down to make a new toy, prepare:
- thick paper;
- use old magazines, cardboard boxes or candy boxes with bright patterns;
- glue, PVA is best;
- scissors;
- a compass or any other object that you can circle around to get an even circle.
Take your cardboard and circle twenty-one identical circles on it, then cut them out with scissors. Each circle is to be folded as follows: bend the circle in half twice, on one side and the other, then straighten it, this will mark the center of the circle.
Bend only one side of it again, so that the edge of the circle is exactly in the intended center. Bend again so the two sides, so you get a triangle. In one of the twenty circles, cut out this triangle, it will serve as a kind of stencil for the rest of the circles. All that remains for you is to impose a triangle on the rest of the circles, circle it and bend the edges of the circles outward along the office.
Take the first ten circles and glue them in a strip, alternating: five down - five up. Glue the resulting strip into a ring, this will serve as the basis for the toy.
Divide the remaining ten by five, and glue them into a circle. By gluing them, you will get two caps.
The top and bottom covers will be glued to the base in the same way. Consider a loop to hang your toy from.

Children can easily help you make such a New Year's toy: you will need scissors, colored paper, packing ribbons.


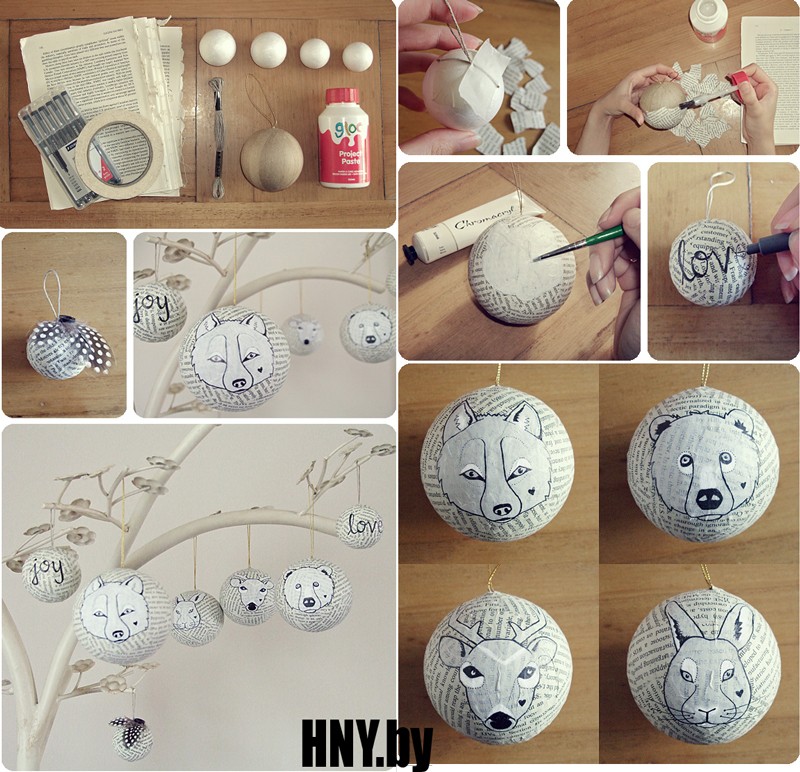
See more:

Today, on the shelves of stores you can find a huge number of a wide variety of Christmas toys, so turning an ordinary Christmas tree into a real festive beauty is not difficult. However, the New Year is a special day! The day when old year left behind, and ahead are new adventures, new events, new victories. But after all, the old year did not pass without a trace, […]
Great idea for Christmas toys will serve as a miniature Christmas tree made of paper. You can make it from thick paper or old postcards, and you can hang your masterpiece on a regular thread.

By the way, if you do not have a real Christmas tree, you can make your own magical Christmas tree. See the article for more ideas:

The Christmas tree is, of course, the main attribute of the most important winter holiday. It will not be possible to do without the forest beauty, the atmosphere is not the same, and where does the good grandfather put the gifts? It so happened that a Christmas tree is decorated in the house for the New Year holidays: someone puts a live one, someone prefers an artificial one, and someone paper. A paper Christmas tree can not only replace a Christmas tree […]
Large volumetric snowflake
Snow is obviously the most important attribute of winter, and a snowflake is the main decoration of the house for the new year. A snowflake can be cut out of paper, glued to a window, as is often done. What about voluminous snowflakes? It is as easy to make as it is to cut. To create it, you only need scissors, a stapler and, of course, paper.

Cut 6 squares of the same size, bend each square diagonally, and then in half. Make parallel cuts along the folds with scissors. Expand the squares, and wrap the inner stripes and fasten them together. The resulting petals are interconnected with a stapler, although glue can also be used. Such a large snowflake can be sprinkled with sparkles or assembled into a garland. You can decorate it with a window, walls or hang it under a chandelier.


What could be easier to decorate than large, voluminous paper candies? It is very easy to make them, for example, from old foil or beautiful wallpaper left over from the repair. Be sure to find paper with a bright pattern. And for this, you just need to measure a small rectangle, twist it into a tube, tie ribbons around the ends. If you are afraid that your toy will lose its shape, then twisting, you can put any paper between the paper. unnecessary thing in the form of a cylinder, for example, a cardboard cylinder from toilet paper.

Toys with family photos
Some types of paper balloons can be made using family photos. Such christmas toys will be the most special, because the important and significant moments of the outgoing year will, as it were, remain with you, and next New Year the toy of memories will again remind you of pleasant moments. By the way, do not forget about pets, let them also remain on your memorable toy, because a dog, a cat or even guinea pigs are also waiting for the New Year holidays!

Flashlights from childhood
What about flashlights? You must remember from childhood how to make paper lanterns. With a little imagination, you can easily come up with new design for a simple flashlight. To completely diversify simple craft, you can decorate it with sparkles, make it from colored paper or printed paper, paint it with paints, add new details. Everything to your taste.


Christmas paper angels
What about New Year's angels? Do you also remember how to make them? Angels can be made from golden paper or newspapers by coloring or adding glitter to them.


Christmas paper cones
What is a tree without cones? Can decorate Christmas tree ordinary cones from the forest, but you can make your own magical ones. There are several ways to make paper cones: it all depends on your preferences, availability of free time and patience. The easiest option is a bump from old postcards.


You may be interested in:

Approaching new year holidays- time to give and receive gifts, decorate the Christmas tree and decorate the house. Perhaps we no longer believe in the good old man Santa Claus, we do not expect gifts from him under the Christmas tree, but we definitely expect a miracle, especially in new year's eve. A miracle is certainly good, but the realities of life dictate their own rules to us. Job, […]


Lace garland
A magical lamp can be created from a simple luminous garland, for this you only need paper and small scissors, with which you can easily cut lacy snowflakes. You can find patterns for snowflakes on the Internet or print them out so that you can then cut out the figures according to the office. You can put light bulbs from a garland into the holes cut in snowflakes, hang such a garland on a window or on a Christmas tree, it will be very beautiful.

A small life hack: if you don’t have time to cut lacy snowflakes, or you can’t make them even and neat, buy lacy napkins in the supermarket, this will shorten your work time, and store napkins will look much neater. The garland will create a bright New Year's mood. Feel free to get to work!

See more garland ideas:

New Year is the most beloved holiday associated with miracles and magic. New Year's Eve Celebration festivities and happy meetings. It is impossible not to love this time of the year, when everything around is transformed, and every house or shop window becomes like scenery for a fairy tale. Everyone wants to participate in this transformation, and therefore they try to decorate their homes […]
Cardboard Santa Claus
You can diversify the decoration of your home and Christmas tree with the help of snowflakes, flowers and lanterns, stars and balls, but what about the most important New Year's miracle - Santa Claus? You can make a funny garland out of little cardboard Santa Clauses, especially if you add different facial expressions to the grandfathers.

To make things easier, you can find toy stencils that only need to be cut and glued.

Christmas tree house
You can decorate the Christmas tree with a paper house. Such a toy looks especially great if you put an electric candle or a garland light bulb inside. Then the windows of the house will glow, as if someone lives in it. Paper houses are made very simply, you can do without a template. You will need paper or old postcards, scissors and glue.


Stars
You can decorate the Christmas tree paper stars. They are made very simply, even kids can cope with such a task, but they look very original!


A New Year or Christmas wreath is usually decorated front door or hang it on the wall. But you can make a mini paper wreath that will look great on the Christmas tree as a toy.

Toys that you made for the holiday with your own hands are the key to a cozy holiday atmosphere. Happy New Year!
Help us become better: if you notice an error, highlight the fragment and click Ctrl+Enter.
Paper crafts are something that can be done for the New Year of the Dog quickly and easily as a gift to loved ones or just to decorate the house. Paper is always in the house and making it is interesting! We offer best crafts for the New Year 2018 from paper, which you can do with your own hands using step-by-step photos and videos.
In addition, consider what else can be done on New Year with your own hands at home from what you eat at hand. For such crafts, you don’t need to spend money on purchasing materials, and the result is interesting and it doesn’t look like completely unnecessary things were used. Let's look at a few master classes, from which everyone will choose what suits him.
? Important! Each description contains the colors of materials and a set of decor for those crafts that have already been made and shown in the photo. But it is not necessary to choose the same shades and the same decor. You can take those materials for the New Year paper craft 2018 that you have at home.
 PHOTO: Paper garland for the New Year
 Several options for a decorative Christmas tree made of paper
Without an elegant Christmas tree in the New Year - no way. Of course, the main heroine of the holiday is a large fluffy live spruce or pine tree in the center of the room, or an artificial beauty dressed up with garlands and colorful toys. But you can also make small ones. decorative Christmas trees do-it-yourself paper and decorate with them for the New Year a table or shelf in the office or at home. The following are two master classes on creating such paper beauties.
For each of them we will need:
- A sheet of thick paper for the cone.
- Paper napkins of any color, you can combine several colors.
- PVA glue or pencil.
- Scissors.
- stapler.
- Pencil or any wooden stick.
- Christmas tree decor. Everything you can find at home: sequins, small beads, bells, ribbons, and so on.
And now, in turn, consider both options for Christmas trees from paper napkins.
Option 1 - Christmas tree made of paper roses
- make a cone out of thick paper. We glue it with glue or a stapler.
- now we make roses from napkins. To do this, we fold each napkin in half and in half again, fix it in the middle with a stapler.

- cut out the circle.

- we have a multi-layer circle and you need to take each subsequent layer from above and twist it tightly. We do this with all layers.

- when all the layers are twisted, you need to straighten the rose a little. Thus we make all the flowers.
- cover the cone with roses. It is better to start from the bottom in a circle and go up.

- glue roses should be close to each other so that there are no gaps.

- after the whole Christmas tree is “dressed” in roses, you can decorate it with any decorative elements by simply gluing them randomly over the flowers.

Such a craft for the New Year 2018 made of paper with your own hands is very simple to perform, even a child, a teenager can handle it, and in appearance it turns out to be very effective and beautiful.
Option 2 - Christmas tree made of paper napkins using the trimming technique
A similar very simple version of the Christmas tree. All that is needed for it is listed above, we will prepare everything according to the list and proceed:

- you have to start from the bottom. Thus, we attach all the twisted squares tightly, as much as possible closer friend to friend.

When we glue the whole Christmas tree with twisted squares, we get a fluffy beauty that can also be decorated with any decorative elements.

Using these techniques (napkin roses and trimming), you can create postcards by gluing elements onto a base with a drawn outline of a Christmas tree or other pattern, a snowman, for example.
 PHOTO: DIY paper Christmas tree
Christmas trees can also be made from paper using other techniques. By simply gluing circles of colored paper onto a cone, or cutting circled palms from green paper. And you can also make loops from strips of paper and stick them on the cone.

Very beautiful Christmas trees from paper are obtained using the vytynanka technique. To do this, you need to fold a sheet of paper in half, draw a contour according to the template and cut through all the necessary places. Do the same with the second sheet. After connecting 2 sheets to each other at the fold.

In general, a paper cone Christmas tree can be decorated with anything. The idea is to make a construction paper cone and decorate it.
For decoration you can use:
- threads for knitting, simply wrapping or cone;
- buttons;
- tinsel and sweets, gluing them in rows alternating;
- crumpled paper petals;
- pasta;
- coffee beans and jute rope.
You can decorate such a Christmas tree with anything you find at home. After that, you can cover the resulting creation with golden paint or artificial snow, or set it aside as it is.
Paper crafts for the New Year in the form of a Christmas tree:
Decorative paper candles
As surprising as it may sound, you can make candles out of paper. Of course, they will not glow, but they can decorate a Christmas tree or a New Year's table.
 PHOTO: Craft in the form of paper candles
 Let's prepare everything that is required in the work:
- colored thick double-sided paper.
- scissors;
- glue stick;
- ruler;
- marker or marker.
When everything is ready, let's start:
- Cut into strips colored paper. Strips can be taken of any width, optimally 3-4 centimeters. To do this, you need to make marks on one and the other side of the sheet, draw lines along the ruler and cut. For one candle you need 2 strips. They can be made in one color or two shades.
- We take 2 strips and glue the ends as shown in the photo.
- Now we make weaving (see photo) and fix the tips. This is how the candle turned out.
- Cut out a circle from paper. We glue a wicker column on it.
- We cut out the flame of a candle of arbitrary shape with a rectangle at the bottom, for which the flame will be glued to the post.
- We draw a wick on both sides with a felt-tip pen, bend the rectangle and glue it to the post.
 step by step photos paper Christmas candle making
 The finished candle can be glued to a clothespin and decorate the Christmas tree, or you can leave it as it is and place several of these candles on a shelf or on New Year's table. Such crafts for the New Year 2018 from paper with your own hands can be made to school or kindergarten for the competition!
Santa Claus and Snow Maiden made of paper
The main characters of the New Year - Santa Claus and the Snow Maiden can also be paper. Let's try to make them with our own hands for the New Year of the Dog 2018!

Getting ready for the creative process:
- We will need colored thick paper in blue and red for the cones.
- White paper for finishing.
- Beads, any decor.
- Paints and brushes.
- Glue.
- Scissors.
- Thread (you can take cotton for knitting).
And now let's get started:
- The description will go for Santa Claus, the Snow Maiden is done in exactly the same way, but you can change the base color and decor.
- We make a cone of thick red paper.
- We cut out several (2 or 3) semicircles from white paper and cut them so that we get terry. This will be the beard. We glue in several layers on a cone. For a beard, you can also use cotton pads.
- Eyes and a nose can be painted with paints or beads can be glued: black - eyes, pink or red - nose.
- Now you can make a cap. For him, we will make a small cone of red paper and glue a strip of white on the bottom. Put a cap on Frost and fix it with a drop of glue.
- You can draw or stick any decor on the figure.
- You can glue a thread to the top of the head, for which we will hang Frost on a Christmas tree or attach a white pom-pom to the tip of the thread.
This craft is something that you can do for the New Year with your own hands and give it to your mother, friends, relatives.
Using this technique, you can also make penguins, snowmen, deer, and any figurine in the New Year theme.

Santa Claus, Reindeer and Paper Towel Snowman
For such beauties, you can use ordinary paper towel rolls or make a roll of any diameter and height yourself from thick paper.
Before starting the process of creating Santa Claus, we will prepare everything that is useful in the work:
- Roll for the base.
- Felt or colored paper in red, white, light brown, black and yellow shades.
- PVA glue.
- Eye blanks, they are sold in any needlework stores. Or you can use half beads for the eyes, buttons, in the end, just cut circles out of black paper or felt.
- Scissors.
And now let's start making paper crafts for the New Year 2018 with our own hands!
First we make Santa:
- Cut out a strip of red felt whose width is equal to the height of the roll plus 2 cm, and the width is equal to the diameter of the roll.
- Cut out a semicircle of light brown felt for the face, glue it on.
- We cut out an oval from white felt, cut off a recess for the face on one side and glue it over the face detail.
- We cut out the details for shoes from black felt (two ovals connected together). Glue on the underside of the roll.
- We cut a strip of black felt, stick it in the middle of the roll - this is a belt.
- Cut out a buckle from yellow felt. We glue over the belt in front.
- Now we glue the eyes and the circle of the nose.
- Glue the cap on top of Santa.

Now we make a snowman:
- Cut out a strip of white felt whose width is equal to the height of the roll plus 2 cm, and the width is equal to the diameter of the roll.
- We glue the roll with a strip, bend the ends inside the roll from one side and the other.
- We glue the eyes, nose and buttons - circles of felt.
- We cut out a scarf from red felt and cut along the edges, we tie it to a snowman.
- We make a cap. Cut out a semicircle from red felt, glue the sides. Cut out a strip of white felt and glue it along the bottom of the cap. Glue a pom-pom to the end.
- Glue the cap on top of the Snowman.

Next is the turn of the deer:
- Cut out a strip of light brown felt whose width is equal to the height of the roll plus 2 cm, and the width is equal to the diameter of the roll.
- We glue the roll with a strip, bend the ends inside the roll from one side and the other.
- We glue the eyes and nose.
- We make a cap. Cut out a semicircle from red felt, glue the sides. Cut out a strip of white felt and glue it along the bottom of the cap. Glue a pom-pom to the end. But here we still need to cut out the horns from brown felt and glue on the sides of the cap.
- Glue the cap on top of the deer.
Thus, three figures are ready. Such paper crafts can be put under the Christmas tree.


Video crafts of Santa Claus from paper in origami style:
Christmas tree toy from strips of paper
Among the crafts for the New Year 2018 made of paper with your own hands, you must definitely make a Christmas tree toy!

Let's analyze very interesting toys from strips of colored paper step by step, first prepare everything you need:
- Colored paper. For one toy one use two shades.
- Scissors.
- Needle with thread. You can use fishing line, or you can use ordinary sewing thread, but thicker.
- Pair of beads.
When everything is ready, we proceed to the process of creating a Christmas tree decoration:
- Cut the paper into strips about 10-15 centimeters long and 1.5 - 2 centimeters wide. For one toy, you need 9 strips of one color and 9 of another.
- Cut out 2 circles with a diameter of 1.5 centimeters.
- Pass the thread through the needle and fasten the bead at the end.
- Now add all the stripes, alternating colors in a pile. We put on the thread over the bead 1 circle and a stack of strips from one edge.
- Then we fold the strips in half and thread the entire pile from the other edge onto the thread.
- On top of the second circle and bead. We make a loop and the toy is ready.

You can make several of these multi-colored Christmas decorations and decorate your Christmas tree or room with them. This is just one version of a Christmas tree toy made of strips of paper, and you can make a great many of them.
New Year's paper garland - video:
Ideas for New Year's crafts for the New Year 2018:
And they will be very cheap in cost, and in beauty they will not be inferior to the purchased ones. Moreover, this year the trend is the naturalness and naturalness of materials in decorating the Christmas tree and the room. So the forest beauty, dressed up with paper toys, will be not only beautiful, but also stylish and fashionable.

Snowman with a whisk
Another craft is a snowman, which we will try to make out of paper, simply folding it in a certain way.
Getting ready for work:
- take paper in white, black, orange and blue;
- scissors;
- paper glue.
And now we start:
- We make two circles for the snowman's body. To do this, we take 2 sheets of a larger format and 2 sheets of a smaller one. We fold them with an accordion.
- We bend the accordions in half. On the one hand, we glue the ends with each other, we get a semicircle. We glue together 2 large semicircles and two smaller semicircles. We glue a smaller circle on top of a large one. This is the body of a snowman.
- In the same way, we make small circles for pens and glue them to the snowman.
- Cut out circles for eyes and buttons from black paper and glue them on the snowman.
- We make a cone of orange paper and attach it to the snowman in place of the nose.
- We cut out a hat from black paper, decorate it with a strip of white paper and glue it on the snowman's head.
- We cut off a long strip of blue paper, cut it along the edges and tie it to the snowman as a scarf.
- It remains to make a whisk. Add up white paper accordion and fasten the ends.
- We make an accordion out of orange paper and fold it in half, attach it to a strip of white paper and attach it to the snowman's handle.

With this snowman, you can decorate the wall in the room by attaching it with pins and needles or double-sided tape to the wallpaper.
And if you make such a snowman in a smaller format, then it will be a great decoration for a postcard. Complete the postcard with paper snowflakes or a Christmas tree made using the same technique, that is, from sheets of paper folded like an accordion and glued in layers.
For creating beautiful crafts for the New Year 2018 from paper with your own hands, use the tips given in the article and add an important “ingredient” - fantasy! Then you will get unique crafts that you can decorate your home with and give as a New Year's present to friends and family, or send the product to school and kindergarten to competitions!
Video craft options:
Happy New Year! ?

