Star News


")


How I sewed a developing book. Do-it-yourself educational book made of felt: my works and ideas for creativity How to make a fabric book for a child
What do you need
1. Future owner.
2. Mood (even tiny and scared will do)
3. Material.
And more about each item.
Baby. It can be quite a baby, 1-5 months old. You can already sew. She will not play and study yet, but she will be happy to watch and listen to what her mother says.
(or pirated, if added) game and educational can be used by children up to 6-7 years old. For older children, we add hidden pockets and complex lacing fasteners, labyrinths, and various places for dolls to stay. And don't take the baby away.
And if you gradually supplement the book, for example, buy more parts or find something at home: parts from toys, old spares of your own or loved ones, then such a toy will never get tired of the child.
The main thing is not to forget that for children under 3 years old (+ -) a book with buttons and other elements is not an independent toy. Children bite off buttons (my Simon at 8 months bit off all the buttons on shirts), suck in ribbons, fabrics (my sister's daughter). Children are unpredictable creatures!
Another such moment, I often encounter. "My child looked at a book (toy) for 5 minutes and quit"
Children do not know how to play and study if they are not taught. And they will play on their own as long and well as you teach them.
I will also try to write assignments from books.
The next item is mood. I'll tell you a secret, I often sit down to work without wild enthusiasm and with zero attitude. And, as you know, there is no mood, there is no good result.
How to get inspired? Watch other people's work and imagine the happy owner of the toy.
Firmly believe you will be able to do everything that you have in mind and even more!!
As they say, appetite comes with eating work.
It is also great to inspire work collected in a heap materials. Of course, not everyone has a large supply and choice of fabrics, accessories, etc.
It happened to me when I sewed the first book for my child. These were some shreds, very tiny and some cotton fabrics, I then collected a nice-looking used piece. For home use, second-hand fabrics may well be suitable. Of course, not lost color and shape. And it’s not bad if these are fabrics of interesting textures: leather, leatherette, fur, fleece, corduroy, shiny fabrics and the remains of curtains.
If there is no sewing machine and this is not a reason to abandon the idea of \u200b\u200bsewing a development kit for a baby.
I’ve been seven years since I bought a sewing machine, I didn’t approach it, I thought it was stupid slipped in the store. Don't sew! Breaking needles! The threads are confusing! And how to thread the thread was the same as dealing with the blueprints of a rocket. That's why I sewed by hand for many years. And the first book was mostly sewn by hand. Even now most of my work has to be done by hand.
How will we work
I planned to write a book on a marine theme with corrections for different ages, but, as the survey showed, there is interest in classic stories as well. So I'm going to give it all. Everyone can choose where the soul will carry. All topics will be in my diary in the rubric MK soft books.
Since everyone has different tastes and wishes, I will first briefly talk about bindings (for now, about appearance) and then I will talk about the preparation of pages for a specific type of binding.
One post will be updated for each step. For example, posted Page "Sunshine" on Monday I wrote the beginning of what we are preparing, on Wednesday in the same Post added continuation, Friday completion. That is, all in one post. We also carry ready-made pages there.
Pace of work tortoiseshell. I myself sew slowly, select fabrics for a long time, think over the colors so that they do not repeat and how they will be combined in colors, texture, where what buttons. Therefore, we will work for a long time and, I hope, productively.
Homework You can find fabrics that are in the house, you can also look at used ones (unnecessary gloves, fleece items, curtains, applications from unnecessary children's clothes, soft jeans, bags, etc.), accessories: buttons, braids, fasteners, you can also use second-hand from things that no one will wear.
Of course, you will have to buy something, but it is better to look well at home, you can not at home.
After you search around at home, write about the results. It is also better to decide on the direction. For example, one of the girls wanted to combine the marine theme with the score.
So, let's get started! Good luck to us D / z (preferably in a photo) to all participants to hand over until Tuesday
Soft developing book will help the child to improve, learn new things. Mom will sew it from patches, braid, beads left over from needlework.
Ideas for designing a developing book

- Try to have the pages of different colors so that the child from infancy can distinguish between them. It would be nice if there were inscriptions with the name of the color. Then he will remember how these words are spelled.
- so that the child can develop fine motor skills, thinking, come up with tasks for him. So, on the pages there may be elements that are attached to the base with Velcro or buttons. For example, vegetables that need to be “planted” in the garden, apples and mushrooms, their child will attach to the hedgehog. Having removed the element with buttons, the child will see something interesting behind it. By unzipping the zipper, the baby will open the wings of a ladybug.
- On some pages, pockets need to be sewn so that the child can put objects of a suitable shape and size there. On others, sew a sneaker made of leather or fabric so that the child learns to tie the lacing, thereby gaining the necessary skill.
- So that he can braid pigtails, sew a few ribbons next to him, Show the baby how it's done.
- For the child to learn the score, number the pages, sewing a certain number to each in order.
- Each page of the book is dedicated to something. For example, one is a garden theme, another is an animal theme, a third is a rainbow, a fourth is a marine theme.
How to make a cover for a soft educational book?
Its dimensions depend on what you want the soft developing book to be. Take your own fleece or felt. These fabrics are soft and hold their shape. You can use both canvases at once, one for the top of the cover, the other for the inside.
The rectangle should be large enough so that you can add 1 cm seam allowance and 5 cm center fold. If you have applications on the cover, then first sew them on the front side. Then fold the two canvases of the page so that the wrong side is at the top, stitch along the edge, leaving 15 cm free on the small side. Through this hole, turn the blank on the front side, put a smaller padding polyester rectangle in it than the cover.
Another option is to make separate pages, make holes in them with a special tool, fix rings here so that the pages can be laced up by connecting them.
You can combine them with a flap, one edge of which you will sew to the first page of the binding, the second to the last. This flap should be basted to each page so that from the binding side they look like an accordion.

DIY soft book - master class
Now you know how to make a binding for her. And here is how to design one of the pages. Ask the child to put fruits and berries in a vase, they will be attached with buttons and Velcro.

You will need to make a page:
- fabric rectangle;
- pieces of cloth;
- large buttons;
- needle and thread;
- buttons;
- Velcro;
- thin synthetic winterizer.

Master Class:
- From thick fabric, cut out all the details that you will sew onto the page. Better if they are in pairs.
- Sew both layers of round berries with a zigzag stitch, also make a loop in the center on a sewing machine, cut it through. Sew a strawberry. Attach a green tail to it.
- Cherries can be crocheted in a circle. On the reverse side, sew buttons to them, paired elements of this accessories, as well as buttons - to the page of the book.
- Take a sheet of fabric measuring 20 by 20 cm, the same is superimposed on it. These parts are combined with the front sides, stitched along the edge, leaving a gap through which the resulting bag is turned out on the front side. You need to smooth its seams, then insert a sheet of padding polyester inside, which is 1 cm smaller than the page on all sides. Sew up the gap on your hands.

If you want him to know the seasons well, then for such soft book for toddlers make 4 pages. To create them, you will need:
- base fabric;
- bright threads;
- scissors;
- tape measure;
- pins;
- needle;
- braid;
- threads;
- beads.

To create books, you can use the most unexpected materials, for example, cloth napkins, household rags. If they are patterned, flip them to the wrong side.
Cut out Christmas trees from a green napkin. Since they all year round have a color to show the winter landscape, cut out snowflakes, decorate trees colorful balls from napkins of a different color.

If a child spends the summer in the country, for sure, there is a pond with fish. Transfer this theme to a textile book by cutting out algae, fish, aquatic vegetation from napkins or felt.

In spring, the ground is covered with bright green grass, flowers bloom. Tell all this to the child by making the appropriate application on the page.

In the fall, more and more clouds appear, but the sun still shines. You can also sew a braid here to make it rain.

If all the elements suit you, then you can sew them directly onto the pages of the book. On a sewing machine, sew large parts, sew small ones on your hands.

Where there is an autumn landscape, sew a thin braid on top, firmly tie beads to these ribbons from below.
Since soft books for children contain quite a lot of small items, attach them firmly, but do not move away from the child while playing with such an item.
If you want a typewriter to drive around the cover of the book, then make small vertical cuts on it in the center, thread the ribbon here. Sew the machine to the base. Fasten the edges of the tape on one and the other side of the cover.

This is how the soft educational book looks from the inside.

It will be enough to tie it on a ribbon and you can close the book.

It will be interesting for kids to invest various items, so sew pockets in the form of a steam locomotive on the book. Make various little animals out of felt. Let the child put these passengers in open cars. Sew on buttons in the form of wheels and you can send the train on the road.

In order for the child to develop fine motor skills, sew threads in the form of a web on the page of the book, sew plastic rings here. Let the baby thread the braid through them, creating a web.

Cut out a sneaker from fabric or leather, sew rings vertically in the center so that the child can thread a lace into them, learn to tie shoes. These skills will be very useful to him, as well as zippering.

For such a book page, you need to take:
- textile;
- lightning;
- woolen threads.
For kids, one more page can be advised, which will have a soft developing book. With their own hands, children will be able to dress dolls, thereby learning this simple task.
To do this, a doll from a dense base is sewn onto the book, Velcro must be attached to it. Cut out the garments of this toy. Place a closet in the form of a pocket next to it. Remove the doll's robe there, on the back of which you will sew Velcro in advance. Have the child dress the doll in the correct order.

Toddlers can be advised to make another page of the book. Sew a thin elastic band here, pull beads, balls, buttons on it, firmly fastening them. The child will surely like the proposed toy.

Playing with the first book in his life, the baby will learn how to assemble a pyramid by height and color. To do this, take:
- textile;
- filler;
- Velcro
- needle and thread.
He will surely like to put the bear to sleep, cover him with a blanket. With such a toy, the child himself will soon fall asleep for the company.

So that he knows that evening is coming, it's time to go to bed, make a figure of the month on the next page. When the baby wakes up, he will look with pleasure at the sun, which will smile benevolently at him.
Do-it-yourself educational book for baby boys
Young gentlemen like cars since childhood, so use them to create a soft educational toy.

Take:
- colored fabric;
- buttons;
- small household sponges;
- markers.
We sew only on the right pages, the left ones will become a garage. Attach Velcro here, as well as on the back of the cars, so that the child can park his vehicle at night.
If the children are small, it is better not to attach buttons to the sponges, but to draw wheels. Or you need to tirelessly monitor the children during such a game so that they do not harm themselves with torn off small objects.

For another baby boy book, use fabric in bright colors. The child will love to play the fireman that you will create from fabric.
Let there be a rising boom on his car, this can be done if you fasten two elements with two buttons. Make a Velcro gate so that, if necessary, the child can open it and enter the building on fire. The braid will turn into a brace, the boy will like to play with such objects, to feel like a fireman.

Soft books on the theme of home farm and garden
On this topic, you can also make soft books. This is a great experience for kids, they will learn the name of the animals, they will know how to care for them. You will tell what vegetables can be grown, how to collect and stack them.
Let's start with the home farm.

The chicken and the duck are cut out of felt, the other items in the book are also made of the same material. Let the door in the house open, for this, sew a button on it, and next to it a loop of elastic. There will also be a swinging window, fix it with two ribbons.
A fence is made from rectangular strips of fabric, turn the green fabric into grass and into a tree crown. Line the pages with tucked strips of fabric. After that, a soft book is ready to buy, of course, which you can, but it is very expensive, and your own can be created from the remnants of matter.
Indeed, to create vegetables for the garden, very small patches are needed. Cut out triangles from the orange ones, sew them in the form of cones, fill them with filler through the upper hole, sew green fleece tops here. Here is the finished carrot. To “plant” it in the garden, position the braid horizontally, sew it so that root crops fit between the seams. Attach a large pocket nearby, where the child will put the crop.
Place a bunny nearby, let the baby know that this animal loves carrots very much. Also in such a book you can sew a flower in the form of a pocket into which a bee will fly and collect nectar.
The butterfly flutters over the flowers, so it will also be very appropriate here. You can sew a zipper between its back wings, when you fasten it, it will turn into a semicircular bug. By unzipping the zipper, you will transform it into a butterfly again.

If you want the child to know that caterpillars appear first, and after pupation they turn into butterflies, then make the body of this insect separately in the form of a sausage. The child will insert it into the ribbon between the wings, thereby turning the caterpillar into a butterfly.
The bee is made of yellow fleece, black stripes of braid are sewn across the body, you need to attach a ribbon to it.

The child will learn about the garden, domestic animals, if the next book is made of fabric.

Sew characters from felt, attach Velcro to them on the back. Then your beloved child will arrange them in the right order, gradually learning this. At the same time, he will get acquainted with the fairy tale Turnip.
Make hidden corners in the book so that the baby gradually finds them. Let the hedgehog live in a mushroom house, only by opening the door you can find this animal, to the great joy of the child.

Children learn that chickens are children of hens by opening the wing of the mother hen.

Tell the children how apples grow in the country. Make such a fabric applique in the book, place fruits here with Velcro. Let the baby rip them off, put them on the hedgehog's needles, and fasten them in the same way.

Apples on a tree can be arranged in a different way by sewing buttons on it, and loops on them. The fruits themselves are made of red or yellow felt or other similar material.

Educational toy for girls
It is performed in the same way, but here a little different. The baby will surely enjoy dressing the doll, as mentioned above. She will also be interested in hanging clothes on a rope, taking them off.

To make this book, you will need:
- felt;
- fleece;
- thin elastic band;
- clothespins;
- hairpins.
Cut out various pieces of clothing from fleece and felt. Let the child hang them on a rope using real clothespins, hairpins.
The next textile book is made in pink colors that girls like.

To do this, take:
- textile;
- beads;
- button;
- wax pencils;
- threads;
- beads.
Inside, you can sew a ladybug, making a slot in the center, insect babies will penetrate here. In order for the girl to learn to weave a braid, on the next page there will be an application of a young lady with long hair from yarn.
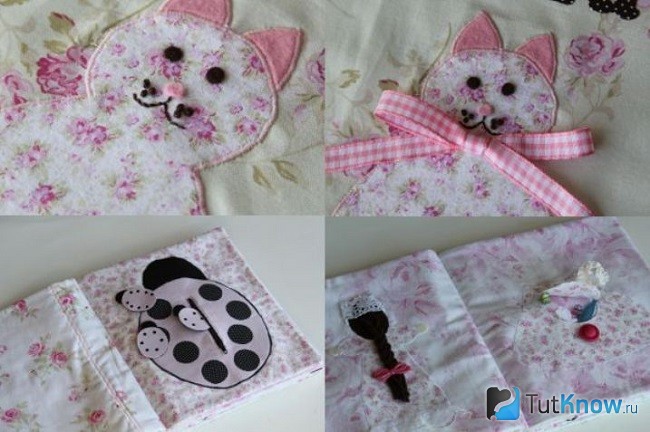
For a girl to learn neatness from infancy, attach an organizer for pencils and a handkerchief on the next spread. Velcro flowers next to the vase to hint to her that they need to be placed in this container. The linen closet stores things for dolls that the child will be happy to put on them. But you read about it earlier, such entertainment will also appeal to the young hostess.

Perhaps she would like to become a doctor if she turns to the next page of the soft book. In the pockets there are various animals made of felt, on the other spread there is a cabinet, opening which the child will find objects the simplest help learn to render it.

Learning to count from a soft developing book
So, in passing, the child will remember how the initial numbers are written, if you do not forget to number the pages. To make him learn to count, make the following soft educational book. To create it you will need:
- base fabric;
- laces;
- large beads;
- marker.

As you promote them, count with your child. In order for the kid to learn to draw numbers, make appliqués from fabric. Sew on a pocket where the chalk will be stored. Then the child will be able to get it and circle the numbers, thereby learning how to draw them.

In the same way, you can introduce children to some letters, then form syllables and short words from them.
This is how, in a relaxed atmosphere, while playing, the child will be able to develop and improve, learn new things. It is very important for parents to show him how to handle certain objects so that a soft developing book really becomes one.
To make it easier for adults to make it, we suggest watching a fascinating story.
How to make a page for boys so that they know what kind of transport exists, you will learn from the following video.
The girl will be happy to play with a book made in the form of a house, put the doll to bed, wash it in the bath, wash things in the typewriter.
All parents want their kids to develop properly and on time. If you are trying to teach your baby at home on your own, then a soft book made of fabric will become your indispensable assistant in this matter. Of course, you can buy it, but it’s not at all difficult to make it yourself. If you are interested, then stay with us.
What are these soft books for?
The study of literature is very important for a person at any age. Almost every mother dreams of raising a smart, educated and successful child in all areas of life. Therefore, it is very important to accustom the kid to books as early as possible. These amazing fabric books will arouse the interest of even the smallest toddler (from 6 months).

Studying only with such a book, you will be able to teach the baby:
1. Distinguish colors, because bright and colorful pages will contribute to this. If the page "Rainbow" appears in your book, then he will cope with such a task twice as fast.
2. Understand the difference between small and large objects, because the book will be full of details different sizes.
3. Develop fine motor skills of fingers due to tactile sensations and thus further contribute to the rapid development of speech.

4. They help little fingers cope faster with different fasteners, locks, laces and rivets.
5. Learn letters, numbers and geometric figures. The kid will learn to count to ten and solve the simplest logic puzzles. And thanks to the stitched letters, he can easily put together his own name or another word.
6. Get some skills necessary in everyday life: tie shoelaces, braid hair and so on.

7. Develops visual perception, attention and thinking.
8. You can also introduce the baby to the seasons, insects, animals, marine life, visit a farm, study the time, and also learn many other exciting and interesting things.

Important! The book should be made only according to your taste. It can be made from any material, different sizes and designs. Ideas for creating pages depend on your imagination. All financial costs during the manufacture of it with your own hands will be much cheaper than buying finished material.

What materials are needed to get started?
- multi-colored felt (it is best to take soft to create voluminous objects and hard for ordinary parts, size from 1 to 3 mm);
- fabric, which will be the basis for the pages and doubler to give them strength;
- multi-colored sewing threads, filler (synthetic winterizer or holofiber) for stuffing parts, pins and needles;
- various ribbons, buttons, beads, rivets, elastic bands, locks, Velcro.
Important points when creating a soft book for children (step by step instructions):
1. First, come up with and draw the layout of your future book. Agree on how many pages it should have, what storylines will be used, and how you will fasten it. Pick up patterns (can be found on the Internet by asking "coloring pages for children" and print them out on a printer).

2. We prepare fabric pages. To do this, take an already prepared cardboard template (square, for example 20 * 20) and cut out neat blanks from dublerin. Lay out a piece of fabric front side down (pre-steam it with an iron). Lay the dublerin squares on it (smooth side down). Heat the iron to the maximum, turn off the steam and smooth the dublerin square on the fabric for 3-4 minutes (they should stick together well). Then carefully cut out the finished squares and you will get excellent compacted pages.

3. Next, take the felt and, according to the plot, using patterns, cut and create the necessary elements. Be sure to make movable (on buttons, Velcro, buttons) and immovable parts. It will be very interesting for children to tear them off the page and fasten them back. We will describe in detail how to make some parts correctly below.

4. We sew the finished pages with the application together, forming a voluminous page of the book. To do this, we insert a synthetic winterizer between the tissues a little bigger size(1 cm and 0.5 cm thick) than the pages and sew them together. We cut off the excess synthetic winterizer and process the edges with an inlay.


5. And the final stage is the choice of the binding option for the book. This one can be cloth-bound, grommet-bound, hard-bound, or otherwise.

Master class - "Fabric binding"
Page ideas for your future soft book
1. For children from 1 year to 3 years:
- "Labyrinth". To create this page, you need to use a grid with large holes (sold in a fabric store), fabric applications or thermal stickers (in order to indicate the beginning and end of the maze) and a flat button that will go through the maze.

- "Spider on a cobweb". On a fabric base, draw a cobweb with a disappearing marker, then sew it on a typewriter with black thread. The spider is made of black felt and is attached to the gossamer with Velcro. We fasten the rings around the web and stretch the lace.

- "Ladybug". It consists of two colors and a zipper. Her children are fastened on top with Velcro. They can even hide under their mother's wings.


- "Bunny Traveler". The balls are attached to the buttons, and can be easily unfastened (you can make any number of them if you wish). Bunny is removable, so the child can play with it as a toy.

- "Animals". Here the child learns the name of each animal and what sounds it makes. Then in a common bowl we have food for everyone and the baby must determine who eats what, fixing it on the appropriate hook.

2. For children 4-5 years old:
- "Watch". Thanks to this page, an adult child can study time. All the numbers are held on with Velcro and are removable, the hands are spinning.

- "Pigtails". The kid trains his fingers by braiding pigtails, and can also fantasize and do different hairstyles for the dog, because there is a set of elastic bands in the kit. There are also beads that can be changed at your discretion.
A developing book for a child is a wonderful project that will bring joy and benefit to any kid! Delight your children with this book or sew a wonderful gift for a future or young mother. We will tell you in detail how to sew a developing book with your own hands and provide you with a pattern of the main details.
Developing book: choice of materials and options
How to sew a developing book for a child with your own hands? In terms of sewing technique, even beginners can do this project. However, be prepared to spend a lot of time, and be patient and careful!The easiest way is to sew a developing book from felt and materials whose edges do not crumble (fleece, some furniture fabrics, suede, leather, etc.). This will save you from having to overcast the edge of the parts, which will save a lot of time. However, most of these materials are solid colors, so we recommend adding at least a few backgrounds and patterned fabric details to bring the book to life.

If you use a thin fabric, reinforce it with non-woven fabric. The pages of the book should be fairly dense, so each of them will require a layer of reinforcing material. It can be a bead or tarpaulin, and even thin plastic, if your machine can handle it.
For attaching removable elements, we used Velcro. It can also be sewn or punch buttons and magnets. The clasp of the book can be made on a buckle, magnet or carabiner.

There are several ways to bind a developing book. We will tell you how to sew a fabric book cover - this is the easiest, although not the fastest way. You can, for example, install eyelets on each page and connect them together with special rings that are sold in scrapbooking departments. This binding will allow you to later add new pages to the book.
Draw a sketch of your book in advance and think about what accessories you will use. If you are sewing a book for absolutely small child(up to 3 years), avoid small parts. For example, in our book, on the page with the seasons, instead of making several small circles with leaves or snow, you can make the crown of a tree in one big detail.

Pages with clocks and tic-tac-toe are also designed for children over 3 years old. In order to plan your own pages, we recommend using the help of the Internet, where you will find many options for designing a book using words such as "Educational book" or "quite book".
So, let's sew a developing book for a child with our own hands!
Pattern and cutting
Print out the pattern on A4 paper. Cut out the details.
Our book has a size of 15x20 cm in order to use half an A4 felt sheet as a background for 1 page. Cut out 6 background pieces and 2 cover pieces without allowances. Cut out reinforcing parts: 1 per sheet if using plastic or other dense material, or 1 per page if using a thinner seal.
Please note that all elements must be indented from the edge of 1 cm, for subsequent edging!
Page "Seasons"
Cut out the outline of the tree from the freeform brown felt, fitting it into the outline of the page. The width of the tree trunk is 2 cm. For the same pattern, cut out two 6x20 cm rectangles for pockets. Cut out three circles A, one circle B and one piece C from four different materials: light green, dark green, white and orange (spring, summer, winter and autumn).
For spring foliage, cut out several white circles of different sizes, maximum 1 cm in diameter. For summer foliage, a few red apples or other fruits, if desired. For the sun, cut out one circle A and one circle D from bright yellow material. You can also carve a moon or a cloud from the appropriate materials.
For each detail (except wood and pockets), cut out its exact copy from the additional material to which Velcro will be sewn. These lower parts can be of different colors to save material and recycle scraps.
Lacing page
Cut out the soles of the shoes using the cut out pattern. For the second sole, flip the pattern in a mirror. Then cut off the toe and cut out the inner oval, cut the resulting piece in a straight line on the pattern. Cut out two mirrored "nose" shoes, adding 0.5 cm of allowance along the bottom edge.
Cut out the cut-out part of the top of the shoes 4 times, mirroring them in pairs, so that you get a two-sided part for the right and left shoes.
"Sorter" page
Cut out 4 geometric shapes from material of different colors (square, cross, triangle and circle D). In the background part, cut out the shapes corresponding to the pattern, the cut out parts will become the basis for removable elements. Cut a 1 cm wide zipper pocket outline at the top. Cut a 15 cm wide x 30 cm long rectangle of fabric that will be the background for the details and the lining of the pocket that best contrasts with the main background of the page.
Page "Puzzle"
Draw a square with a side of 12 cm and draw a grid with 2x2 cm cells in it. Arbitrarily arrange geometric shapes (squares, stripes and polygons) on this grid, filling the entire plane. Cut out the shapes and use this pattern to cut the multi-colored parts, as well as the lower part of these parts from any material. Cut out a pocket-rectangle 6x15 cm.
Tic-Tac-Toe Page
For chips, cut out 10 circles A from white material and 10 circles for the bottom of the chips of any color. You will also need 4 strips of suede 13 cm long, or you can simply lay a line to outline the field of play. From red and black material, cut 5 crosses and 5 zeros. You can also embroider these characters with thick thread.
Page "Clock"
Cut out 2 arrows from white material and 2 arrows from black. Cut the black arrows a little along the contour so that when applied, a white edge peeks out.
For the dial, cut out 12 circles A from white material and 12 circles from dark (for example, gray) material. It is desirable to make the lower details of the same color, as they will become the color of the numbers. Cut out a piece for a 5x15 cm pocket.
COVERS AND BINDING
For the front cover, cut out 5 circles D from materials of different colors and textures. If desired, cut three pieces of multi-colored ribbon 7 cm.
For the top part of the binding, cut out a 10x6-7 cm rectangle. For the inside of the binding, cut out a 9x20 cm rectangle (for the same number of pages as in the example). If you are using loose material, add a hem allowance.
To tie, cut two ribbons of 30 cm each. For edging, you will need a straight or oblique trim. You can use a ready-made inlay 2 cm wide or cut ribbons 3.5-4 cm wide and equal to the length of the page.

Also prepare:
- Velcro 1 cm wide (about 30 cm white and black, one color can be)
- Zipper length 15cm
- Interlining
- Buttons, beads
- Threads, cords, ribbons
- eyelets
Page "Seasons"
Sew red "apples" on dark green details. Sew Velcro squares (soft part) onto bottom circles. Connect the bottom and top part with a stitch along the contour.

Sew white “flowers” on light green parts by hand with white thread. With a yellow thread on large "Flowers", embroider the middle. Sew Velcro squares (soft part) onto bottom circles. Connect the bottom and top part with a stitch along the contour.

Stitch the "winter" white circles with their Velcro bottoms. By the same principle, complete the details in the autumn range.
For the sun, cut out rays on a larger circle, as shown in the photo. Sew Velcro onto the bottom circle. Lay the piece with the rays between the bottom and top piece and sew along the outline of the top circle.

Sew the tree detail in the center of the page. Try on the foliage and sew the second halves of Velcro (harder, with hooks) into place. Also sew Velcro for the sun in the upper right corner.

Sew a buttonhole on the details of the pockets. Fold the pieces to form a flap pocket and sew the sides to the page, placing the pockets on the sides of the barrel. The bottom edge of the pockets must be indented 1 cm from the edge! Sew on buttons.

Lacing page
Sew in pairs the upper and lower parts for the right and left shoes along the inner contour, as shown in the photo. Punch holes and install eyelets for lacing.

Position the soles of the shoes on the page, taking into account the background image, if any, and pin it. Place the "toes" of the shoes on top and pin them as well. by the most top layer pin the eyelet pieces and sew along the contour with a straight stitch or zigzag (depending on the type of material used).

"Sorter" page
Stitch geometric shapes from two parts, sew Velcro to the bottom in advance.


Pin the lining to the page and sew along the outline of the cutouts and the bottom edge of the zipper. Sew along the center of the Velcro contours.


At the level of 5-6 cm, fold the fabric up again and pin to the top edge of the page.

Sew along the sides and top of the zipper and along the sides of the pocket itself, covering the sides of the pocket lining.

Page "Puzzle"

Complete geometric shapes - puzzle pieces. Sew Velcro on the bottom. On long parts, sew several Velcro or one large one.
Sew a pocket along the bottom edge. If desired, decorate the pocket with eyelets and a cord with buttons and beads.

Tic-Tac-Toe Page
Sew the playing field lines with suede cord or stitch with black thread. Sew two Velcro strips on the top.


Sew Velcro on the bottom, and stitch the top and bottom along the edge.
Page "Clock"
Stitch the details of the arrows. Cut out the contours of numbers from 1 to 12 on twelve white circles. Sew Velcro to the lower parts, and stitch the cut out circles with numbers on top.

Step back from the top edge of 7.5 cm and sew the arrows in the center of the page, placing the smaller arrow on top. On the right side, thread the thread through the bead or button, and then reinsert the needle into the same hole. On the wrong side, pass the thread through a small flat button. This mount will allow the arrows to rotate.


Sew a pocket at the bottom.
Covers
On the back cover, draw the alphabet with chalk or soap and stitch the letters along the outline with colored thread.

Sew colored circles on the front cover, and a button with beads in the center.

At the bottom, pin the multi-colored ribbons folded with loops, and sew a piece of felt on top.

Binding
Fold the pages in pairs and cleave. Sew along the edge.

Prepare the wraps. Fold the cut strips in half and iron. Then unfold and fold the edges to the ironed middle line and iron too.

Unfold the facings and pin right sides inward with the edge of the pages. Start pinning the piping from the middle of the long side of the page, from the side where the binding will later be - then the junction of the piping will close.
Pin by matching the edges of the piping and the page to the very corner, then fold the piping at a right angle and continue on the other side.

Sew along the entire edge to the width of the fold (about 7 mm). Bring the line to the corner and, turning it at 45 degrees, bring it to the edge. Cut and start stitching again near the corner.
Turn the facing right side out on the other side of the page and tuck it up and pin it to the base. Sew the facing by hand with a blind seam, bending the corners to one side.

In the cover pages, insert ribbons under the facing for tying. Tie knots at the free ends of the ribbon. You can do stitching if you wish.

Take the rectangular part of the inner binding (larger rectangle). If necessary, hem along the long sides. Step back 6 cm and pin with the second sheet of the book, placing the binding in the center of the page, closing the edges of the facings. Bind around the edge of the page, pin it off.


Sew close to the edge of the page. Use the zipper foot.

Step back from this page at least 3 cm (if the page is very thick with protruding parts, step back more) and attach the next page in the same way.

Now attach the covers to the binding without folding the fabric. Sew and cut off the excess.


The mental and physical health of the child is the main task of parents, educators and other professionals. From birth, the development of the baby goes on continuously and every second. To increase the efficiency of this process, it is necessary to make the world around us diverse, bright and informative. For this, certain conditions must be created. One option is to make educational books with your own hands.
Types of educational toys
The leading activity of the child from birth to three years is a game. This fact must be taken into account and actively used in the development and education of the baby. Any game is impossible to imagine without toys. But they should be useful for the child and correspond to his age characteristics.
It is not at all necessary to buy a toy or a developing book that is useful for development in a store for a lot of money. It can be easily made independently from improvised materials. There are many ways and step by step instructions how to make a toy or how to sew an educational book with your own hands.
Such items can be divided into several categories:
- books;
- cubes;
- panels and rugs;
- pillows;
- stands;
- houses;
- animal figures, etc.
In this article, we will talk about how to make educational books with your own hands. We will also consider the purpose of such toys.
What are educational books?
As a rule, such cognitive toys are intended for children from one year old.
By purpose, they can be divided as follows:

Why do they make soft developing books with their own hands? They stimulate the development of fine motor skills of the hands. This has a positive effect on mental development child, as well as on the formation of speech.
Materials for the manufacture of educational books
It is often thought that the manufacture of an educational toy or book requires expensive materials and special skills. Not at all!
In order to make educational books with your own hands, it is enough to have a desire. Here you can use various improvised materials, such as:
- paper and cardboard;
- fabric, including felt, fleece and even knitwear;
- artificial fur;
- leather or leatherette;
- threads of different thickness;
- tapes;
- Velcro;
- buttons;
- beads;
- cords;
- buttons;
- bells, bells;
- rustling cellophane wrappers;
- cereals (rice, peas, buckwheat);
- ready applications.
Developing books made of fabric are very interesting. You can combine it with your own hands different kinds: cotton and felt, silk and knitwear and the like.
Cardboard and paper book
This type of product is intended for children from a year. The book may contain information about any one animal, color or shape. It can be done using a photo album, files, cardboard and plastic rings. Consider how a do-it-yourself paper developing book is made. A master class on making this type of book is described below.
Necessary materials:

Manufacturing steps:
- For a book using a photo album or files, fill each page (file) with cardboard the same size as the file. To do this, cut out cards from thick paper to fit the page. If the book will consist only of cardboard, without files and an album, then you need to cut out pages from dense double-sided material of the same size.
- So, we are making a developing book with our own hands. Photos can be cut from magazines, coloring books or just draw yourself. You can also find pictures on the Internet, and then simply print them out or take a picture of the necessary items, and then insert the photos into an album.
- Options for placing images on the page:
- one large picture on one page;
- one large photo and several small ones;
- image + poem or short story.
4. Insert pictures into an album or file. If the book is without files and an album, you need to connect the cards together with plastic rings, after making holes with a hole punch.
To make a cardboard book last for a long time, you can laminate the pages before binding.
Do-it-yourself cardboard-fabric educational book: master class
This type of product is similar to the previous one. It is suitable for children from one year old.
Necessary materials:

Manufacturing steps:
- With the preparation of the foundation, a cardboard-fabric educational book begins. We make patterns with our own hands from separate sheets of thick cardboard of the same size.
- Next, we cut a blank from the fabric in the form of two horizontally located pockets. The size of one part is equal to the size of a cardboard blank. We sew along the edges and in the middle. We get two identical pockets.
- Then we insert a cardboard blank into each of them and sew it on a typewriter. The base is ready!
- We add developing elements consisting of threads, buttons, lacing and other types of sewing accessories.
- We put the blanks with pictures and developing elements together and sew them in the middle on a typewriter, thereby connecting them together and forming a book.
Felt books
Do-it-yourself educational books made of felt are very popular with children thanks to their bright colors and soft texture of the material. The manufacture of such toys is in many ways similar to the manufacture of products from cardboard and fabric. Their topics can be very diverse and depend on the tasks. Such a book is suitable for children from 6 months (without using cardboard) and from 1 year (with cardboard).
Necessary materials:

Manufacturing steps:
- Page formation. To do this, you need felt, which must be cut into rectangles of the same size. Next, we sew two rectangles together with an overcast seam on a typewriter or manually. If the basis is cardboard, then it must be inserted between the layers of fabric, and only then sewn.
- We decorate the finished pages of the book with the help of applique, threads, sewing accessories, lacing, based on the subject of the book and the developmental tasks set.
- Connecting pages. When they make educational books for children with their own hands, there are many ways to fix the pages:
- stitching by hand.
- fixing the pages with a kind of felt binding. To make it, you need a strip of fabric: the length is equal to the length of the page of the book, and the width is the total thickness of all pages plus the distance between them. For convenient opening and closing of the book, the distance between the pages should be 0.2-0.5 cm.
- If there is cardboard at the base, then it is better to make double pages (turns), and they should be stitched in the middle, according to the principle of fastening sheets in a regular notebook.
Do-it-yourself soft developing books are easy to make. They are very amusing to kids, arouse interest and thus stimulate their development. Let's look at several options for making pictures for educational books.
Sun
To make a figure of the sun you will need:
- yellow fabric;
- threads, cords;
- scissors;
- needle with thread.
From the fabric, cut out two circles of the same size. Between them at the edges we add threads and cords of different thicknesses, sizes and textures. These will be rays. We sew the resulting blank and fix it on the page of the book. You can weave pigtails from the rays or tie them into ponytails, and make eyes out of buttons.
This option is perfect for studying color, shape, the concepts of "day" and "night".
Octopus
In order to make an octopus, you need:
- stencil cardboard;
- textile;
- scissors;
- buttons for making eyes;
- cereals or small bells;
- thread with a needle.
We start creating an octopus by making a stencil. To do this, you need cardboard and a pencil. On the cardboard we draw the body and tentacles of the octopus, and then cut out the stencil along the contour. We apply it to the fabric, after bending it in half, circle it, and then cut it out. It turns out two identical blanks. We sew them together.

We add grits to the tentacles or sew bells on the bottom. We set the buttons in place of the eyes and attach the octopus to the page of the developing book.
This option contributes to the development of fine motor skills, which favorably affects the mental development of the child, as well as the development of speech. In addition, with the help of an octopus, you can form concepts such as color, marine life.
Butterfly
To make a butterfly you will need:
- stencil cut out of cardboard;
- felt;
- textile;
- scissors;
- thread with a needle.
We put the stencil on the felt and trace along the contour with chalk or a pencil. Cut out the resulting workpiece. From the fabric of the same color as the felt, cut out a square a little larger than a butterfly. We sew the fabric to the page of the book in the form of a pocket in which we hide the butterfly.
By the same principle, you can make several multi-colored pockets and butterflies, and then place them on the page of a developing book. You can also hide in one pocket not one, but two butterflies of the same color, but of different sizes.
This option is perfect for the formation of the child's concepts of color, size, insects.
Velcro applications
To make applications, you need to prepare:
- felt;
- scissors;
- Velcro;
- needle with thread.
First, we cut out the figures necessary for the book from felt: animals, wagons, a train, cars, etc. Using a needle and thread, we attach Velcro to the figures. On the page of the book where the figures will be attached, a thematic background should be selected, that is, a railway for a train or animal houses and the like.
This option can be used to develop thinking, get acquainted with the outside world, theatricalization of your favorite fairy tale.
Lace appliqué
Children are very fond of lacing something, so this addiction can be used to advantage. As an idea, you can apply an application consisting of shoes with laces. How is such a developing book made with your own hands? Its patterns are very simple, and the result will greatly amuse the baby.
To make such an application you will need:

We make shoes from fabric or felt using a stencil. We make holes for the laces, decorate them with accessories. We sew the shoes to the page of the developing book and tie the laces.
Thanks to such an application, a child can easily learn what shoes are like, develop fine motor skills of hands, learn to pull, pull, lace.
Whatever version of the product would not be chosen, it will always be of interest to the baby. And do-it-yourself educational books made by yourself will bring the child not only double benefit, but also joy, since they will also contain a piece of maternal warmth. And this is one of the most important components of the development of a small person.