Star News


Knitted slippers in the form of a dog. Children's knitted slippers - dogs with knitting needles with a description. Scheme for knitting the upper part of the sneaker
It's no secret that small decorative dogs need shoes, not only for a walk, but also at home. At home, of course, it is not as cold as on the street, but in slippers the dog will be much warmer and more comfortable. A small decorative dog in such slippers will feel just great and cozy. How to knit slippers for dogs will be discussed further.
You will need:
thirty grams of colored and ten grams of black yarn (two hundred and fifty meters / one hundred grams) for a sole size of four by five centimeters,
four knitting needles (No. 2.5), a sewing needle;
1 m satin ribbon, rubber thread.
How to knit slippers for dogs:
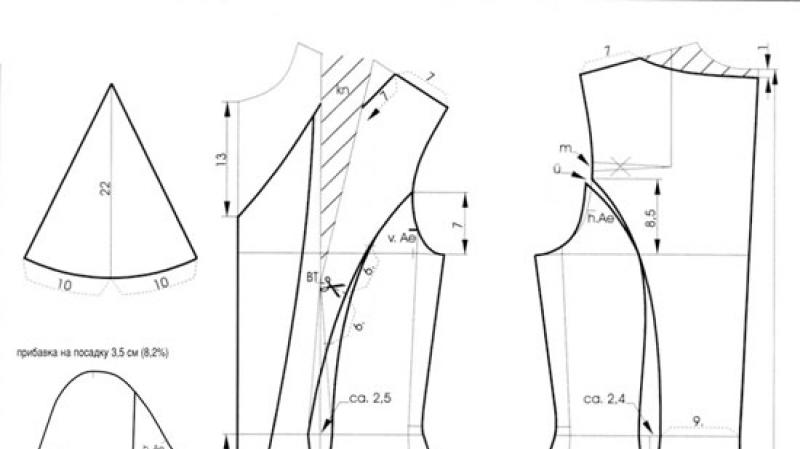
Let's knit a sample of slippers for dogs. In order to determine the density of knitting - we collect twenty-four loops on the knitting needles and knit with an elastic band one by one thirty rows, the fabric should come out ten by ten centimeters in size. We collect eighteen loops with a double thread and knit thirty-two rows, the canvas is ten by ten centimeters.
We measure the length, as well as the width of the sole (here - five centimeters or sixteen rows, four centimeters or seven loops),
the height of the toe of the slippers (one and a half centimeters or four rows),
the height of the slippers (four centimeters or twelve rows),
along the upper edge of the slippers - the circumference of the foot (twelve centimeters or thirty-six loops),
the distance from the toe to the bootleg (two centimeters or six rows).
We start knitting a slipper for dogs from the sole, it is done in garter stitch. We collect seven loops in two threads with black yarn and perform two rows, in the third - we add one loop on each side, then continue the fabric to the sixteenth row. In the sixteenth row from each edge we knit two loops together and in the next - close the loops.
You need to tie the top of the slippers. The first 2 rows are knitted with garter stitch. We collect a slipper along the edge of the sole with a colored thread on the first and third knitting needles, six loops each (heel and toe), eight loops each - on the second and fourth (side parts). In the second row we knit the heel and toe of the slipper, add three loops each, add four loops to the side parts.
Next, you need to knit with an elastic band one by one four rows (sock height). Then we carry out the front part of slippers for dogs. On the needle where the sock loops are located, we knit six rows of garter stitch (the distance from the sock to the top). On the “toe” knitting needle, we knit each last loop together with the first loop from the knitting needle of the side part (the first row is front, the second row is wrong side) and leave it on the “toe” knitting needle, then we turn the knitting.
We continue to knit the bootleg of the slipper on four knitting needles (on each - nine loops after the sock is completed) with an elastic band one by one for another eight rows, and close the loops. In order for the slippers not to fall off, we quilt the bootleg with rubber thread. Cut in half satin ribbon and sew it on the middle at the back of the bootleg.
You can always buy beautiful shoes at the nearest pet store. But will they be comfortable? When making shoes for a dog with your own hands, it is easy to take into account all the anatomical features - the set and size of the paws, the angle of instep, the ideal height of the bootleg. And the best part is that sewing or knitting boots for a four-legged friend is not difficult at all.
Before proceeding with cutting and sewing, we recall the important nuances:
- it is clear that since the dog has four paws, there should also be four boots. But shoes should be sewn in pairs: the hind and front paws differ in the size of the feet, instep, and the distance from the foot to the joint. You need to measure two paws - front and back separately;
- shoes should not slip, so the material for the outer part of the sole should be rough. You can sew a Velcro strip to the sole, but it will collect dust and small litter;
- shoes should in no case be tight, so you need to sew with a small margin for moving the paw back and forth when walking. Consider the length of the claws and the fact that the toes spread out and protrude forward when the dog rests on the foot with all its weight. To make the pattern of shoes for dogs accurate, measure the paw in the rack - the pet rests completely on the limb, does not squat when measuring the front foot and does not lean forward when you touch the hind paw;
- as a clasp, something slimming is more convenient, rather than a zipper or buttons. It is important that the fastener (elastic band, Velcro, tape on the latch) does not squeeze the limb and does not interfere with the bending of the joints when walking. Poor circulation in the paws quickly leads to hypothermia! In addition, the dog will probably try to take off such a boot;
- so that the shoes do not rub, it is better to make the seams external. Especially if it winter model from dense tanned fabric, fur, thick leather. Rough outside seams can be hidden under tape, piping or decorative overlock stitching.
When walking, dogs rely on their toes, and not on the entire foot, like a person. For them, the convenience of shoes is extremely important - the changed position of the paws quickly leads to chronic joint diseases. Therefore, first of all, always think about comfort, and only then about beauty. A dog in shoes should walk the same way as without them - stepping confidently, not semen. Shoes will have to be redone if the pet's paws move apart, the shoes fall off, the sole is clearly not under the foot, the socks look anywhere but forward.
If you urgently need to sew safety shoes for do-it-yourself large breed dogs, this option is ideal (the dog cut his paw, but there is no “rescue” boot). For long wear, such shoes are not very suitable. For small dogs and pets with lean, thin legs, a few extra stitches will be required. The material needs to be soft, elastic and waterproof. The sole can be strengthened by sewing a piece of dense non-slip fabric on the outside.
So, the inner oval or circle is equal to the outlines of the foot (you need to measure the length and width). Line CD - the desired height of the boot.
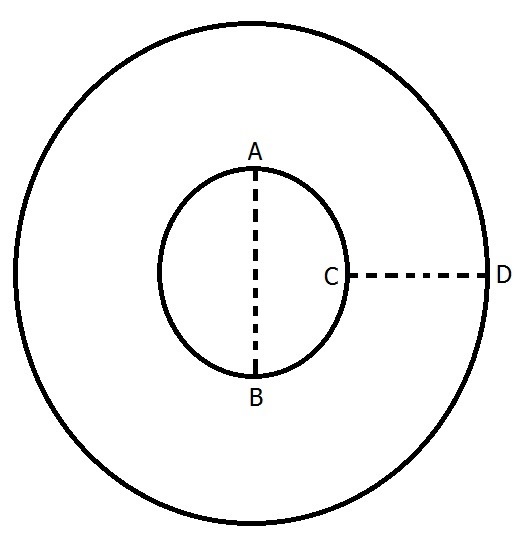
- cut out a circle / oval from the fabric, as it turned out according to the standards and a couple of cm for a hem on top;
- put the dog's paw in the center, right on the fabric;
- raise the fabric up, covering the foot and metacarpus (as if we are packing a flower pot);
- we make several tucks with pins, collecting excess fabric into tucks (everything is superfluous - out of the boot). Keep in mind that the boot must be put on freely, i.e. it is not necessary to tighten the width with darts too much;
- a thick felt insole can be sewn inside or the sole can be sewn on the outside. You can leave the boot soft, but the fabric must be waterproof;
- we sew along the line of darts, cut off the excess protruding fabric;
- we tuck the top and skip the elastic or cord on the latch. We do the same tightening around the metacarpus, immediately above the foot.
Read also: Trick dog training
Comfortable two-piece boots
This shoe pattern for small dogs is also suitable as a base. winter boots, and for sewing light raincoats or anthers. Boots sit comfortably enough on the paw if the fabric is dense and keeps its shape. The insole and / or sole can be reinforced at your discretion - thick leather, a piece of tanned leather, felt, or left soft. Light boots to protect against moisture and dust are sewn in just half an hour, winter boots made of fur or leather take a little longer - you need an awl to make punctures and strong threads.

- draw the sole according to the measurements of the foot plus allowances for the seams;
- draw a trapezoid, the height of which is equal to the height of the boot, and the width is equal to the girth of the metacarpus. At the bottom of the trapezoid is a wave, as in the figure. Her rise will be behind, on the heel (the narrowest point of the trapezoid is the back of the boot), and the sharp corner will fall on the toe of the boot. We are looking for the waveform approximately - it is convenient to cover the foot with paper or an unnecessary piece of fabric, estimate the bends and mark them with chalk / felt-tip pen. And then transfer the pattern from the “draft” to the fabric.
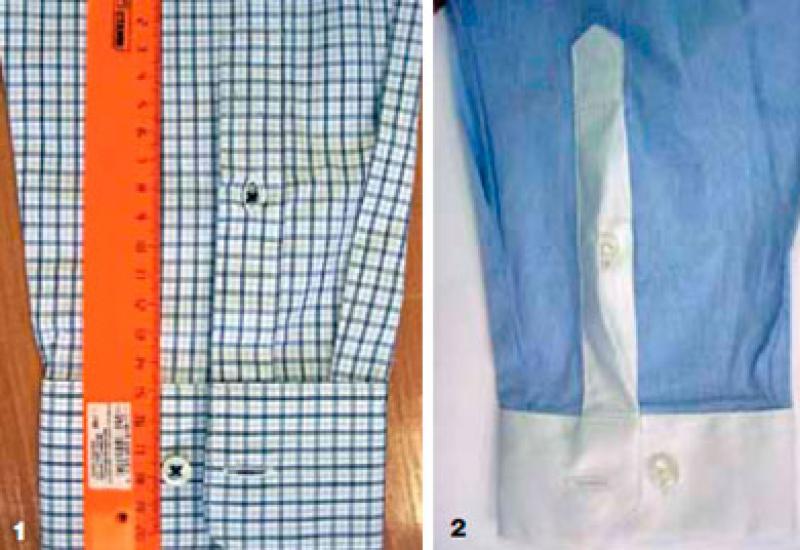
- we process the top (in the photo there is a checkered decorative edging on the top, but it is better to use an additional loose elastic band);
- fold the trapezoid in half, try on the sole. The seam that will connect the sides of the trapezoid must match the toe of the boot, i.e. lean into it. The fold will turn out behind, behind the heel. We sew the part to the sole;
- now we sew the trapezoid along the lines (orange color in the figure). The back is vertical, and the front is slightly beveled due to the inclination of the sides of the trapezoid. If there is a lot of excess fabric, you can make a tuck in front just above the foot (see number 1 in the photo). Around the metacarpus, just above the joint, we skip the lace or Velcro tape (number 2 in the photo).
Boots with tongues
Part 1 is the side of the boot, you need two of them per boot (or four if you want to insert a lining of fleece or other warm material). The tongue is approximately equal in length to part 1, i.e. boot height. Sole - along the contour of the foot (detail 3). Detail 4 covers the toe and together with the tongue forms the front of the boot (you can see how the sneakers are sewn together - it will become clearer). To sew comfortable shoes for dogs small breeds with your own hands according to the pattern below, you will have to do a few trial fittings. Use paper or waste fabric for rough fittings.

- we sew together the heels of the sides and sew along the oval to the sole, starting from the back of the boot. While sewing to the middle of the sole;
- we sew the tongue and toe;
- sew the toe to the front of the sole;
- sew the sides to the end, connect them with the toe. The tongue remains free, the side parts do not need to be sewn along the tongue to the very top, otherwise the boot will be difficult to pull on the paw;
- it remains to skip a lace or Velcro tape around the pastern. If the boots are high, you need an additional elastic band or another drawstring on top. If you are sewing shoes for a large dog, you can insert a strip of fabric between the side parts and the sole, the width of which corresponds to the height of the foot from the floor to the beginning of the joint (see the next pattern, this strip is used there).
Read also: Dog food Darling (Darling)
Comfortable boots for all weather
If you sew from dense leather with a lining, you get warm winter boots with a high ankle. But the pattern is also suitable for sewing nylon raincoats.

Compare the picture with the photo below - it will become clearer what's what. Detail 1 - a sole with a slightly cropped back (the heel is not rounded, but almost straight). Detail 2 - the top of the boot, covering the foot to the beginning of the pastern (to the place where the shaft starts, i.e. the top completely). Detail 3 gives extra space inside the boot - its width is equal to the height of the foot from the floor to the knuckle, and the length is equal to the circumference of the sole. Cylinder-folded detail 4 - shaft (height is up to you, but low boots hold worse).
- sew a strip (detail 3 in the figure and photo) to the sole (1), in a circle;
- we sew the upper part of the boot (2) to the strip in front, not completely;
- the shaft (4th detail) remains open, not stitched. Sew the bottom of the shaft (back fold) to the strip behind the heel and to the top of the boot in front. The edges of the tops remain free, wide open - it is more convenient to put on and take off shoes. So that the paws do not get wet and do not freeze, on one side of the bootleg you need to sew a shelf (5 in the figure) - a strip of fabric, like under a zipper on trousers.
- try on the boot and find a place just above the joint, just above the foot. Here you need to sew a pair of drawstrings (loops from strips of fabric) to the bootleg, through which the Velcro tape will pass. We simply wrap the tape around the metacarpus and tighten it a little (so that the boot does not fall off, but also does not squeeze the paw). If you make two rows of Velcro, the dog will be happy to spank in the mud, not noticing the weather: such shoes do not slip, do not twist and do not change the position of the paws.

Funny house slippers are knitted, details are used for decoration, crocheted. In such home shoes your feet will be warm in autumn and winter.
Size of knitted slippers: 35-36
For knitting you will need: yarn (50% wool, 50% acrylic, 300 m / 100 g) - 60 g dark brown, Carolina yarn (100% acrylic, 438 m / 100 g) - black remnants, yarn "Grass" (100% acrylic) - the remains of light brown and dark brown colors, knitting needles No. 2.5, hook No. 2.75, synthetic winterizer.
Garter stitch: knit. and out. rows - only persons. loops.
Rib 1x1: Knit 1 alternately. n. and 1 out. P.
Gauge: 18 sts x 30 rows in garter st = 10 x 10 cm.
How to knit slippers with knitting needles. Description of work and knitting patterns.
Start knitting from the sole. On the knitting needles with a dark brown thread in 2 additions, dial 26 p. And knit with a garter stitch, adding on both sides in each 2nd row 6 times x 1 p. \u003d 38 p. Then knit 4 rows without additions, then subtract from both sides in each 2nd row 6 times x 1 p. \u003d 26 p. Next, knit the upper part with knitting needles. To do this, type an additional 7 sts on the knitting needle (continuation of the sole), turn the work. Knit the resulting 33 sts, at the end of the row, add another 1 st. Next, from this edge, add 5 more times x 1 st in each 2nd row (as on the soles of slippers). Knit 12 rows straight. Then bind off 20 sts from the side of the heel, knit the remaining sts with knitting needles in garter stitch for 6 more rows straight. Then start decreasing from the side of the toe in every 2nd row 6 times x 1 st. After that, from the side of the heel, dial 20 sts again and knit another 12 rows with an elastic band 1x1. Close the loops. Run a seam.
Ears: crochet slippers with dark brown Grass yarn in 5 rows of st. b/n. In the next row, after knitting the side part and reaching the fold line, add 1 thread of brown color and knit the eyelet with b / n columns according to the scheme. After knitting 10 rows with half-columns, return to the front of the product, knit 3 tbsp. b / n and perform the second eye in the same way. Then tie the ears and side part 1 next to st. b / n thread "Grass" light brown.
Muzzle: with the thread "Carolina" in 2 additions, dial 16 p., knit with knitting needles with a garter stitch 2 rows straight. Then add on both sides in each 2nd row 2 times x 1 p. = 20 p. Knit 18 rows without additions, then decrease on both sides in each 2nd row 4 times x 1 p. close loops. Tie the item around the entire perimeter 1 next to Art. b/n. Then knit 1 more row of st. b / n, skipping every 2nd st. of the previous row so that the muzzle is pulled together.
Spout: with a black thread in 2 additions, dial a chain of 3 air. p., close in a ring. Knit 6 tbsp. b / n in the ring. Next, knit in a circle with b / n columns, evenly adding 6 tbsp. in every row. When you get a circle with a diameter of 3 cm, pull the part along the edges, stuffing it with padding polyester.
Assembling the details of knitted slippers: sew the muzzle with a narrow part between the ears, slightly filling it with padding polyester. Also fill the wide part with padding polyester, sew. Sew the nose onto the muzzle. Sew or glue eyes.
SLIPPERS-DOGS. Size of knitted slippers: 35-36 For knitting you will need: yarn (50% wool, 50% acrylic, 300 m / 100 g) - 60 g dark brown, Carolina yarn (100% acrylic, 438 m / 100 g ) - the remains of black color, grass yarn (100% acrylic) - the remains of light brown and dark brown colors, knitting needles No. 2.5, hook No. 2.75, synthetic winterizer. Garter stitch: knit. and out. rows - only persons. loops. Rib 1x1: Knit 1 alternately. n. and 1 out. p. Density of knitting: 18 p. x 30 rows of garter stitch = 10 x 10 cm. How to knit slippers with knitting needles. Start knitting from the sole. On the knitting needles with a dark brown thread in 2 additions, dial 26 p. And knit with a garter stitch, adding on both sides in each 2nd row 6 times x 1 p. \u003d 38 p. Then knit 4 rows without additions, then subtract from both sides in each 2nd row 6 times x 1 p. \u003d 26 p. Next, knit the upper part with knitting needles. To do this, type an additional 7 sts on the knitting needle (continuation of the sole), turn the work. Knit the resulting 33 sts, at the end of the row, add another 1 st. Next, from this edge, add 5 more times x 1 st in each 2nd row (as on the soles of slippers). Knit 12 rows straight. Then bind off 20 sts from the side of the heel, knit the remaining sts with knitting needles in garter stitch for 6 more rows straight. Then start decreasing from the side of the toe in every 2nd row 6 times x 1 st. After that, from the side of the heel, dial 20 sts again and knit another 12 rows with an elastic band 1x1. Close the loops. Run a seam. Ears: crochet slippers with dark brown Grass yarn in 5 rows of st. b/n. In the next row, after knitting the side part and reaching the fold line, add 1 thread of brown color and knit the eyelet with b / n columns according to the scheme. After knitting 10 rows with half-columns, return to the front of the product, knit 3 tbsp. b / n and perform the second eye in the same way. Then tie the ears and side part 1 next to st. b / n thread "Grass" light brown. Muzzle: with the thread "Carolina" in 2 additions, dial 16 p., knit with knitting needles with a garter stitch 2 rows straight. Then add on both sides in each 2nd row 2 times x 1 p. = 20 p. Knit 18 rows without additions, then decrease on both sides in each 2nd row 4 times x 1 p. close loops. Tie the item around the entire perimeter 1 next to Art. b/n. Then knit 1 more row of st. b / n, skipping every 2nd st. of the previous row so that the muzzle is pulled together. Spout: with a black thread in 2 additions, dial a chain of 3 air. p., close in a ring. Knit 6 tbsp. b / n in the ring. Next, knit in a circle with b / n columns, evenly adding 6 tbsp. in every row. When you get a circle with a diameter of 3 cm, pull the part along the edges, stuffing it with padding polyester. Assembling the details of knitted slippers: sew the muzzle with a narrow part between the ears, slightly filling it with padding polyester. Also fill the wide part with padding polyester, sew. Sew the nose onto the muzzle. Sew or glue eyes.
Good afternoon friends!
Olga Andreeva seems to have become interested in knitting slippers and sent her second wonderful work - funny children's knitted slippers knitting needles in the form of dogs. Well, they are so adorable! Description of knitting is also there.
Hello, readers of the blog "Comfort and warmth of my home"!
I already wrote about myself in a previous article. Today I would like to present one more work for the competition. These are knitted children's slippers.
Recently my nephew arrived with his little son Levushka. He is 1.5 years old. My sister, Lyova's grandmother, just met her grandson, because they live in Moscow.
I wanted to knit something for the baby. From leftovers melange yarn, which I knitted for the competition of slippers - socks, I knitted regular socks. And then I also decided to knit slippers, funny, in the form of dogs. Now the baby runs around the room in them.
Slipper materials
Slippers are knitted with blue thread of two types: wool with acrylic and grass.
I knitted with wool in one thread, and with grass - in 2, because these threads were very thin.
used circular needles size 2.5 mm and stocking knitting needles for knitting the spout.
Knitting pattern: garter and stocking stitch.
For decoration, we bought ready-made eyes, and the nose of the dog is embroidered with black thread.
Slippers are sewn on the back.
Knitting children's slippers with knitting needles in the form of dogs
We start knitting children's slippers with knitting needles from above. We make the necessary measurements, calculate the number of loops according to the sample.
Top
I cast on 44 loops on circular needles with blue wool thread and knitted 3 rows in garter stitch.

Then she changed the thread to grass and knitted it 8 rows with the same pattern.

spout
We turn to knitting the nose of the slipper. We select 12 central loops on the spout. On the sides, 16 loops are obtained.
We knit the first 16 loops, then we continue to knit only the central 12 loops with stocking needles, and leave the side 16 on one side and the other on the ring knitting needles.
We knit the nose of the slipper in stocking knit of the desired length, up to the little finger. I got 22 rows.

Then we decrease the loops. We knit at the beginning and end of the row, two together with the front. In the purl row, we do not decrease, we just knit along the pattern. So we cut 3 times until 6 loops remain on the stocking needle. Cut the thread, then tie it to the main thread.
Sides
We collect from the outer side loops from the nose of the slipper 14 loops on both sides. And starting from the place where we stopped when we started knitting the spout, we continue to knit on circular needles in a circle in garter stitch. The threads that we cut when knitting the spout are tied to a blue thread.
We get 66 loops on the knitting needles (6-nose, 14 loops on both sides, which we scored, and 16 loops that remained on the ring knitting needles).
We knit garter stitch with a blue woolen thread for 10 rows. Then 4 rows - with grass and 2 more rows - again with blue woolen thread.

Sole
We turn to knitting the sole of the slipper. There are 66 loops on the needles. We leave 8 medium ones on the sole.
We knit 36 loops with front loops, then 2 together with the front.
We unfold knitting. Remove 1 loop, knit 6 facial, then purl 2 together, unfold the knitting again.
So we knit the middle loops of the sole with a garter stitch, knitting 2 together with the front in the front row and 2 together with the wrong side at the end of the wrong row. Thus, we cut the side loops until there are 4 loops left on the sides on both sides.

The length of the sole is about 15 cm. I made them a little bigger, because the child's foot grows very quickly.
Heel
Tied up the sole. We have 8 loops on the central needle, 4 on the side needles. We start knitting the heel. We remove the first loop from the central part, knit facial.
Two loops of 8 remain on the central needle, we knit them and the first loop from the side knitting needle together with the front one.
We unfold knitting. We remove the first loop, we knit it with facial ones, again 2 loops remain on the central knitting needle, we knit them and the first one with the side on the wrong side together on the wrong side.
Repeat again, unfold and knit facial, knitting at the end front side 3 together. front, in the wrong side - 3 together wrong side.
So knit until there is only 1 loop left on the knitting needle.
We tighten the thread, leave it longer and sew the back of the slipper with a needle.
Slippers tied. Now let's decorate them.
Decoration of children's knitted slippers
First we knit the ears for the dog. Ours are double. The lower part is knitted with blue woolen thread, top - thread- weed.
Cast on 5 stitches per ear, knit 14 rows in garter stitch. Then on both sides we knit 2 loops together with the front. 3 loops remain on the needles, close them.
We tied 2 ears with woolen thread and 2 grass for each slipper. We sew pairs of ears together and sew on the sides of the slippers.
In front we embroider the nose of our dog with black thread. This was done by my daughter Ksyusha, she helped a little. Attach the eyes to the hot glue.