Star News


Do-it-yourself paper lilies of the valley: instructions with a photo. Do-it-yourself lily of the valley: we perform it in a wide variety of techniques and from various materials Do-it-yourself paper lilies of the valley
Another popular spring flower is, of course, the lily of the valley. Today you can learn how to make lily of the valley flowers from nylon with your own hands. Flowers can be used both for a bouquet and as an element of various decorative compositions. For example, on March 8 or Easter.
Necessary materials:
- wire for flowers from kapron No. 26
- capron for flowers of white and green color.
- teip tape green,
- threads in the color of kapron
- stem wire 1.2 mm thick
- template for creating flowers from nylon No. 2 for petals, No. 1 for leaves.
- scissors
- pliers
Make five turns of wire on template No. 2, remove the resulting turns from the template, fasten all five turns at one point with the help of wire. Do not cut the ends of the mounting wire. After that, spread the petals. Wrap the workpiece with white nylon and fix it over the wire with white thread. Bend the petals, giving them the shape inherent in lily of the valley flowers.

Wrap the sepals of the flower and the ends of the mounting wire with teip tape.

Bend the tip of the stem.

Make 4 such flowers and four leaves for them on template No. 1.

Attach the flower to the end of the wire for the stem along with the leaf and wrap it with teip tape.

Don't forget to shape the flower cup.

Attach all the flowers and petals in turn.


From several branches of lily of the valley you can form a bouquet.

Love to be creative? Looking for new opportunities? Learn how to make paper lilies of the valley with your own hands! You can make these flowers different ways. Made bouquets are suitable as a spring gift, interior decoration or design element of a postcard, packaging, decorative panel.
Relief or three-dimensional composition - what to choose?
Paper is a very good material for creativity. It allows you to create completely different objects using different processing methods and types of surface textures.
First of all, you should decide what you will make: a decor for a postcard, packaging, an interior panel or a composition for a vase. As a spring gift, a delicate origami lily of the valley is suitable, and it is interesting to make a panel on the wall using the quilling technique. Although any method makes it possible both to work with relief and create an application, and to perform a three-dimensional object that can be viewed from all sides.
Manufacturing methods
It is easy to create lilies of the valley from paper with your own hands using different methods. After all, this material lends itself to twisting, cutting, folding, gluing. All options are easy to combine. In addition, paper grades are very diverse. Everything is used: from thin crepe or corrugated paper to thick paper or cardboard, and even ordinary office printer paper. All this gives completely different results and the look of the flower.
So, do-it-yourself paper lilies of the valley can be made in the following ways:
- in the technique of origami;
- with quilling elements;
- forming parts from corrugations.
Each option provides opportunities for creativity and involves several methods of work.
Materials and tools
If you want to try all the methods at once, you will need the following:
- paper (plain, crepe, corrugated, design);
- scissors;
- pencil;
- ruler;
- glue;
- material for stems (strips of cardboard, wire);
- a toothpick or a special quilling tool;
- basis for a panel or a vase.
Above is a list of what you need to work with different methods. If you use any one, choose what you need exactly in your version.
DIY lily of the valley: origami for beginners
If you have never worked in this technique, use simple method folding flowers. They have a conical shape, that is, not quite natural, but in general they look beautiful on a branch. The main thing is that they are easy to make.

Spring gift is ready.

Consider how the flowers themselves are made. The sequence of work is as follows:
- Cut plain white, pearlescent or metallic paper into strips no wider than 5mm.
- Take the first blank and wind it on a toothpick or use a special tool.
- Remove the part and unroll it a little, holding it with your fingers so that the center moves to the bottom of the oval.
- Press in the middle of the upper part so that the element bifurcates. Pull out two petals and bend each to the side with tweezers or fingers.
- Fix the resulting product with glue. You can also twist a yellow circle and put it in the middle between the petals.
Complete as many colors as you require. This is just one of the options for making a flat lily of the valley.

It is even easier to make a volumetric blank using the quilling technique. It turns out not so elegant, but for children's creativity quite suitable. Work like this:
- Also wind a strip of white paper around a toothpick and carefully remove it from it.
- Very carefully extrude the shape in the form of a cone from the middle of the circle up.
- Fix with glue.
The flower is ready.
How to make a beautiful paper lily of the valley with your own hands
For this method, use crepe or corrugated sheets. With this method, you can make not just flowers, but also a bouquet of sweets. True, you will either have to use very small sweets or make large lilies of the valley. The last option does not look very natural, but decorative, beautiful and original.
The sequence of work is as follows:

Make some flowers, cut out the leaves, make a beautiful bouquet.
As you can see, you can make lilies of the valley out of paper with your own hands in completely different ways. Choose the right one. Create spring gifts yourself from available resources!
lilies of the valley waste material. Master Class
Master class "Lily of the valley - the flower of the goddess of Spring"
Author: Proshina Vera Ivanovna - teacher of MADOU CRR kindergarten No. 60 "Fairy Tale", Likino-Dulyovo, Moscow region
Making a lily of the valley from waste material with your own hands.
Silver lily of the valley grew on the edge.
White bell of tender beauty.
A small gift from Spring - girlfriends -
On the green carpet - modest flowers.
A light wind touches the bells gently,
They will ring with joyful music.
And the birds will pick up the song diligently
Festive Orchestra of the Maiden - Spring.

The spring forest hides so many wonders! And lily of the valley is one of them! The flowers, like pearls, are strung on stems, carefully surrounded by wide green leaves. The silvery glow of leaning little bells is always mysterious and attractive. It seems like a moment - and to the sounds spring forest a barely audible crystal ringing will be added. And the gentle aroma of lily of the valley can turn everyone's head.
After the flowering of lilies of the valley, a large red berry appears in place of the crumbled petals. And here is the legend about the lily of the valley.
Spring endowed a young man named Lily of the Valley with love for life, and he always thanked her with warm, affectionate words. Yes, and spring itself was not indifferent to a small flower, elegantly dressed in a little white dress, hiding under wide green leaves. But spring in a brilliant dress and golden curls is a wonderful, cheerful, cheerful creature - a world traveler around the world. All her life, moving from south to north, she does not find peace for herself and, scattering caresses to everyone, does not linger with anyone for a long time. In passing, she caressed Lily of the Valley. And so she charmed, so enchanted our flower, that he blossomed with happiness, fell in love with the charmer. Spring also fell in love with Lily of the Valley, but not for long. Forever young and very restless, she soon left and left the spring flower for the hot summer. The young man Lily of the Valley cried so much from unrequited love, about the beloved Spring that left him, that the tears turned into snow-white pearl flowers. The small petals of the flowers soon fell off, and in their place, from the very heart, fiery-red drops poured out - berries.
Lilies of the valley are a symbol of purity, modesty and sincerity of feelings. By giving a bunch of lilies of the valley to your loved ones, to whom you feel affection: sister, mother, grandmother, girlfriend, you thereby express your feelings of friendship, care, love.
An unpretentious bouquet of a modest lily of the valley will bring good luck and a sea of intoxicating freshness into the house.
The master class will be of interest to educators, teachers elementary school, teachers of additional education, children of 7 years old and loving, caring parents.
Purpose: DIY crafts, gifts, hall decoration, interior decoration.
Material: green plastic bottle, cases from chocolate eggs (or from rubber gloves, from medical shoe covers), green cocktail tubes, scissors, ceiling glue, pearl beads, white gouache, brush.

Target: making lily of the valley flowers with your own hands from waste material.
Tasks.
1. Introduce children to spring flower– lily of the valley, with legends different peoples about lily of the valley.
2. To teach children to convey the similarity of a lily of the valley flower in a handmade work made from waste material.
3. Teach children to make gifts to their loved ones and loved ones.
4. To cultivate observation, aesthetic taste, love and respect for nature.
Progress.
1. On the halves of the case of chocolate eggs, make cuts in the form of triangles around the entire circumference.

2. It turns out such flowers as bells.

3. We bend the sharp teeth.

4. With sharp small scissors we make holes in the center of the flower. To prevent the flower from cracking, you do not need to pierce the plastics with scissors, but scroll them back and forth with pressure (it is done easily and the child will cope with this task quite well).

5. We take a tube from a cocktail, bend the corrugation and make small notches deep into the tube with scissors.

6. Cut the bent small end of the tube into 4 parts 3 cm long.

7. On the other long end of the tube on the inside, we make an oblique cut 3 cm long. We also make the same tube, but shorter than the first

8. Insert the end of the tube cut into 4 parts into the hole of the bell and bend the cuts so that they open.

9. We glue the pearl bead and glue it between the cut parts of the tube, and stretch the tube with the bead inside the flower.


10. Insert the obliquely cut part of the stalk into a small incision on the other tube until it stops (holds tight and does not fly out).

11. Thus, we arrange several flowers on one stem. It turns out here is such a stem with lily of the valley flowers.

12. Making leaves. To do this, take a green plastic bottle and cut off the bottom of the bottle.

13. top cut into 4 pieces until the lid.

14. We decorate the leaves: cut off the corners of each leaf.

15. Fill the lid with plasticine and insert the stem with flowers into the lid, inserting the leaves inside. Here is what a lily of the valley turned out.


16. Lily of the valley flowers can be painted inside with white gouache.

17. Here is the flower I got.


18. Lily of the valley flowers can be made from small cream packs by cutting off the protrusions.


Greetings, dear readers and visitors! I have repeatedly written that I love decorating gifts in the most unexpected ways. And today I suggest you make paper flowers with your own hands. Already twenty-odd methods, by the way.
Now, unfortunately, I rarely get to mass gift wrapping. Moreover, every year there are more and more acquaintances and friends who should be congratulated along with relatives. It's very joyful! I love giving presents. But if I choose them very carefully, then lately I pack them in organza bags, since I decide on detailed packaging only for single holidays (like a birthday).
However, my passion for all sorts of packaging beauty is difficult to overcome, so today I will train with you to make beautiful flowers according to step-by-step schemes.
DIY paper flowers: simple and with a twist
There will be a lot of master classes, get ready. Good news for all rose lovers: there will be 4 of them.
Aster
Guys, honestly, I'm not very strong in the names of colors. So if you see a clear discrepancy for you - write in the comments.
So, the first in line is the aster. For her, cut out five circles: two large, two medium and one very small. Fold each circle in half three times, then draw the edge as in the 4th photo. After unfolding the design, squeeze each petal to add volume. Fold all the circles into each other and decorate the middle.
Almost calendula
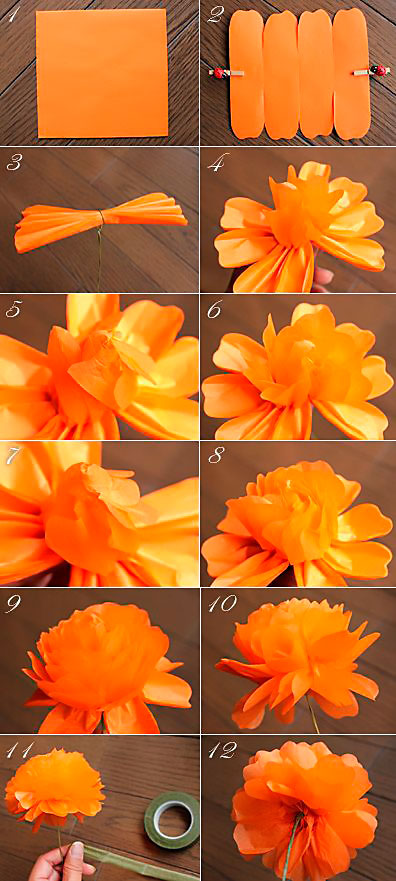
This flower is much more like a packing bow. Prepare for it a square of paper of the desired length and cut the edges according to step 2. You will need several such blanks. Lay them one on top of the other and squeeze in the center, tightening with wire or thread.
Now the most important thing is to straighten the petals so that you get a beautiful likeness of a flower. Accordingly, the more layers, the more petals and the more magnificent the flower in the end.
Tip: make several of these flowers different size and glue them on the packaging next to each other, then you get a beautiful likeness of a bouquet.
Calla
To create calla lilies, you can use both ordinary double-sided paper and foamed rubber (here I wrote what it is - in the section about the minion).
For calla, take a stamen (you can crumple it out of paper, go make it out of polymer clay) and a heart-shaped petal. Insert the stamen into the petal, fold the edges of the petal over the stamen, gluing them together. It remains only to unscrew the edges to get the maximum resemblance to calla lilies.
Such flowers are well suited for postcards, packaging, and as an independent gift in the form of a bouquet.

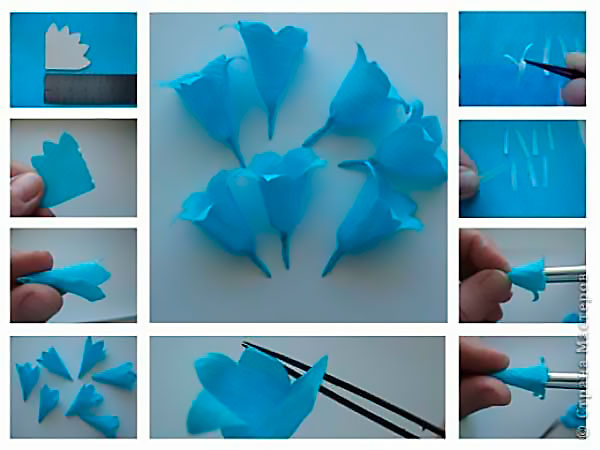
Bell
The master class for the bell is quite simple and understandable. Cut out the blank according to the first photo. Glue the edges of it, and gently straighten the ends. To make everything look natural, make the middle of several oblong stamens that will need to be glued inside the flower.
Of these bells, by the way, it will be great to decorate the packaging for March 8 or just a spring birthday.
lilies of the valley
Well, or something similar. For one flower, take a long rectangle and bend the edge of it, as in the photo. Cut the wide part so that you get a lot of small strips. Using scissors, twist the strips (to do this, you just need to run the sharp side of the scissors along these strips, slightly pressing the blade against them).
To prevent the flower from falling apart, take a rod on which you wind a green strip. Then, from above, begin to gently twist the “flower” part, previously smeared with glue. Apply layers tightly so that greenery does not show through from under them.
But it’s not at all difficult to make green leaves - for them, just fold a rectangle of green paper with an accordion and cut the edges with a “triangle”. When unfolded, you will get a lot of green leaves ready to be glued to the base.

Poppy
Now let's use corrugated paper. Cut out about ten teardrop-shaped petals from it. Stretch the wide part so that the blanks resemble mushrooms.
Take a thin wire and wind some paper around it - this will be the core. Wind the petals onto this core so that each slightly overlaps the previous one. When everything is ready, the structure can be pulled down below so that it does not fall apart.
The master class shows how this flower can be attached to a festive cap, but, believe me, gift box poppy will look great.

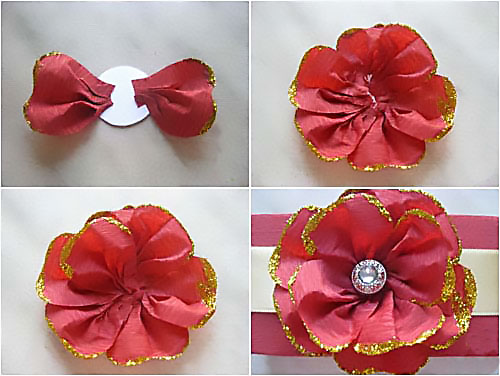
Red flower
What kind of species does he have? No associations came to mind. But this is not the point - to create it, you will need about ten petals (corrugated paper is used, by the way). Their shape is almost drop-shaped. but with a cut end.
Cut out a base circle from thick cardboard. Glue all the petals in layers to this circle, slightly crumpling (doubting? God, how right: _D) the bases, thus forming folds - then the flower will be more voluminous and “fluffy”. Decorate the center with some button or bead.
Such a flower, by the way, will look great from soft felt - so it will gain durability. And if you attach the base for the brooch at the back, you get two in one - a gift decoration and a gift itself.
Extravaganza of color
There are only two flowers, but due to the bright combinations, a very unusual effect is obtained. Take the crepe paper again, cut out a circle and fold it into a chrysalis shape. Cut a “skirt” to it, which you wrap around the chrysalis. Attach the petals on top, gluing them in a circle. Glue two wide leaves at the base.
The second flower is quite simple - cut the fringe and twist it into several layers. Flowers are very simple, they can make a very interesting gift composition.
Unseen flower
To prepare the basis for this flower, I advise you to look here - here the basis for the second Christmas tree is created in the same way. But then the differences begin - each of the corners must be wrapped with a thick wire or knitting needle so that a spiral is obtained.
You can leave this design alone, but I suggest you connect several (say, three) pieces using the existing spirals - the wow effect is provided. Then you can also experiment - combine elements with spirals into unprecedented designs.
Tip: going to a Japanese-style party? Then make such a flower very big size and take it with you - it will serve as an excellent decoration for the chandelier.

Peony
“Pio-, pio-, peonies are given by a new acquaintance ...” - the words from the song of the underground group “My Michelle” (I often listen to it lately, inspired). We will make from corrugated paper. You will need five sizes of petals, approximately five copies of each ( appearance as in the photo).
Stretch the petals so that you get a semblance of a wave (for both large and small ones). Then form a stamen from the same corrugated paper by folding the paper with further compaction. You can do this on a wire skewer, or you can do it without it.
Glue the petals onto the finished stamen, overlapping each subsequent previous one. Do not tighten the petal too much. At the end, it remains only to cut the green leaves and stick them around the peony.

4 in 1: dandelion, carnation, aster, chamomile
All these wonderful creations of nature are made according to the same principle - cutting the edge of the strip from which the flower will be made. The final shape of the flower also depends on the shape of the cut. Keep in mind that some require a core, while others do not.
Please note: despite the very simple design, the flowers are very realistic. If there is very little time for production, then this is an ideal option.
Experiment and discover your unprecedented plants - be sure to tell us what happened.

paper roses
Magic roses are one of my favorite flowers.
Rose with twisted edge
The main difficulty here is to carefully twist the edge of the corrugated paper, straightening the folds. Then make sure that the folds are even. Now twist the strip so that the layers fit snugly together. At the end, fasten with a thread, cut off the excess.

simple rosette
Need to make a plant in five minutes? Then this rose is for you! Just cut out a circle in which draw a spiral. Cut out a spiral like in the photo and twist the rose starting from the longest link of the spiral (the central part will serve as the base).

big rose
Even gigantic, if you follow just such dimensions. Heart petals are stretched and superimposed on each other in a circle with fixing with glue. Green petals are attached at the end. Of course, the flower does not have to be as big as in the photo - start from your preferences.
Twisted paper rose
Once I already described this way of creating a rose (here is the second one). The principle is exactly the same, but the dimensions of the triangles resulting from twisting must be the same along the entire length of the tape, otherwise there will be a not very neat flower.
Once she even made a Rosemary doll, which took part in the city exhibition. Her whole body was covered with roses, made just in this way (the roses were from ribbons, really).

Clover
I will only show you how to make the base for a four leaf clover. To do this, take a square of paper and fold it in half lengthwise and in half again. Bend the ends to the center. Cut out a heart from the resulting design. The result will be exactly what we wanted - a happy flower.

Nameless
As much as I puffed up, I could not give an intelligible name. As a result, Tovariz remained just a beautiful flower, reminiscent of kanzashi motifs (Japanese art of making jewelry from satin ribbons).
The beginning here is the same as in clover. But after bending the edges, it will be necessary to bend the ends so that the length of the bent part is equal to the length of the visible side in the middle. Then these parts are straightened and their edges are already bent so that the sides are even. They are again bent and glued so that three stamens are obtained. There should be three such petals.
Most of all, such a flower is suitable for decorating a gift in the Japanese style.

And again aster
This time, you already need to glue the petals around the edge until you reach the desired volume. Decorate the center as you wish, or simply fill it with as many petals as possible.

On this large flower review, I declare it closed. I hope you have found exactly the option that will help you decorate the best gift. See you soon, subscribe and share with your friends!
Sincerely, Anastasia Skoreva
Everyone knows that lilies of the valley are very tender and beautiful flowers, which are considered signs of the coming spring. Therefore, the image of these flowers is so often used by needlewomen. Consider how to make a lily of the valley with your own hands using the example of various master classes.
We make a lily of the valley with our own hands using the origami technique quickly and easily
One of the most common ways to make a lily of the valley is the origami technique. Such work varies in complexity. Consider one simple option.
To work, take white and green square sheets of paper and some glue to secure the details.
The number of blanks will directly depend on how many bell flowers you want to get in the end.
Progress:
- We collect our own flowers. We bend the square diagonally. Then we collect it into a smaller square, bending each corner to the middle.
- We bend the bent corners, but not along the same fold line, but retreating slightly to the center of the square. And we bend the entire resulting part in the middle.
- We wrap our triangle in a bell so that all the lines are inside, except for the one that we will glue.
- Then we make a stem - just folding the green square into a stick so that there is color on the outside.
- We perform such procedures as many times as you want to make flowers. Then glue the flowers to the green sticks.
- We make a central long branch of green colored paper and glue the petals on it.
- It remains only to make a leaf. We fold the green square so that we get a larger green triangle on top, and white on the bottom.
- Gradually wrap the edges towards the center to close the gap.
- Putting all the work together.
We crochet a lily of the valley in a step-by-step master class for beginners
This beautiful flower can also be made using crochet. Moreover, your work will turn out not only voluminous, but also pleasant in texture. This tutorial will use detailed diagram and job description.

Cups of lilies of the valley should be knitted in a circle, and so that the circle is not flat, but convex. To do this, you should knit the loops according to the diagram below. In the same way, make a petal. Then connect all the parts together, while the lily of the valley stem from the air loops will hide at the base of the leaf.
Such a simple work will bring joy to the one to whom it is prepared as a gift. And if you are making these spring flowers for yourself, then a bunch of lilies of the valley will fit perfectly into any interior.
Recently, do-it-yourself flowers made from foamiran (foamed rubber) are gaining more and more popularity. For Russia, this is a new type of material, but mastering it for creative works have already done. Let's figure out how to make a bouquet spring flowers on such a basis.

- White, yellow and green foamiran (fom).
- Iron.
- Bulk 0.5 cm.
- Sponge.
- Curly and regular scissors.
- Wire.
- Glue and tape.
Step by step job description:
- Prepare squares of white foma measuring 2 by 2 cm.
- Fold the workpiece in half and twist.
- We apply the straightened workpiece to a hot iron.
- We take a bubble and a sponge. We move the quickly heated square to the sponge and squeeze it with the help of the bulb.
- We remove the workpiece, while tightly holding it with a sponge (it should envelop the convex edge of the bulb).
- We cut off a separate cap of the lily of the valley, which we got, with curly scissors.
- To fix the result, we apply our flower petals to the hot iron, and then, bend the petals, attaching the workpiece to a black flat surface.
- We pierce a hole in the middle of the bell.
- using floral wire and teip tape, we make stems based on the number of flowers.
- Making small rectangles yellow foamiran, glue it to the stems and fold it in half.
- Having cut off the excess, we put our flower on the workpiece so that the yellow part is inside.
- With the help of teip tape and glue, we collect the flower.
- It remains to prepare a petal, for this we cut out a blank in an arbitrary form from a green foma, twist it, straighten it and glue it to work.
- You can collect as many flowers and petals as you like in a bouquet.
The more details you have, the more magnificent the bouquet will turn out.

Consider other options for making lilies of the valley with your own hands
There are many more ways to recreate a lily of the valley. For example, for children, the most interesting thing may be the work of sweets.
For this job you will need:
- candies,
- corrugated paper,
- wire,
- teip tape,
- double sided tape.
To begin with, with the help of glue and teip-letna, you place the candy on the wire, then make a corrugated paper shell that easily takes the shape you need. Connect all the details in one bouquet and your work is ready.

For people with well developed fine motor skills hands, works made of polymer clay are perfect.
The workflow will be as follows:
- First, we roll small white balls, put them on the tip of the brush to make a glass.
- Cut the top surface into six petals.
- We make thin stems from green polymer clay and plant flowers on them.
- Then we attach all the details to the main sheet - the flower petal.
Or use practically improvised material and get a lily of the valley from fabric.

Everything is in the will of your imagination, so do not hesitate to create.
Video on the topic of the article
In order for you to visualize how to create a lily of the valley from various materials, we recommend that you view a selection of videos:

