Star News


DIY wire ball. Decorative cement balls for the garden. Ideas and master class. DIY foam ball
Materials:
Metal cable 3 mm, length 2.5 m (15 rubles/m)
Colored glass beads, 20 pcs/pack (30-50 rubles)
Round candle, 1 pc. (3 rubles)
Beads (20 rubles/pack), beads (25 rubles/pack), sequins (20-40 rubles/pack)
Satin packing ribbons, 3 mm, 1 skein (13 rubles)
Shells, pebbles
The total cost of the product (without decor) - 15 rubles.
Tools:
Pliers
1. From a cable 2.5 m long, you get a ball with a diameter of 7 cm; for items bigger size cable will need to be longer. Unwind the cable into individual wires. For a more rigid construction, leave them "stranded". Light openwork balls with beads and small beads should be made from thinner wires, unwinding the "veins" of the bundle into components. Prepare, thus, 3-4 fibers.
2. Make 3-4 turns so that the "rings" are not intertwined, and firmly fix them in your hand.
3. Make the next turn by throwing it over the first three in a direction transverse to them.
5. Having finished working with the first fiber, thread the next fiber into the ball to the middle and continue weaving with two ends at once. Repeat this process for the next fibers.
6. So that the “tails” of the wire do not prick, remove them with pliers inside the ball.
7. Having straightened the elastic weaves of the fibers, make such a hole in the ball so that a candle can be inserted into it.
8. Use different decorative materials to fill the ball, such as glass balls or shells. Creating a ball requires some skill - be prepared for the fact that not everything will work out the first time.
*When starting to weave a ball, keep in mind that the position of the hands can only be changed when the ball is stiff enough to hold its shape. Otherwise, the elastic wire may fall apart when you relax your fingers, and you have to start work again.
* Balls made of thin wire can be decorated with beads, beads or sequins, stringing them on the wire during the winding process. The surface of the finished ball can also be decorated with strips of packaging tape, loosened into thinner components.
* If you are not too lazy and make more than 300 balls (from 4-5 cm in diameter), then by connecting them with fishing line or wire into several long garlands (about 30 items per garland), you can make a decorative partition in the room. It will serve as a decoration and divide the space into several thematic zones. To do this, the garlands must be attached to the floor and ceiling.
Lara Khametova, designer
Handmade- http://handmade.idvz.ru/


Using this material and a similar technique, supplementing the design (of an abstractly woven metal ball) with halogen lamps, you can get a modern lamp, chandelier, floor lamp.
To decorate the room for the holiday, it is not at all necessary to buy expensive decor items. You can surprise guests by making original balls of thread and glue with your own hands. Such balls will look very attractive, while you do not have to spend on decorating the room. a large number time and money.
What is required for work
Most of the materials that you will need to make jewelry can be found in the household. Even if you don’t manage to find everything you need at home, then you shouldn’t be upset - all the materials can be bought at the store, and they are inexpensive.
So, for work you will need:
- glue;
- threads;
- air balloons;
- cream or vaseline.

Glue
An important question is what kind of glue to use for the balls. Special attention should be paid to his choice. PVA or paste is best suited for work. It is not recommended to use ordinary clerical glue, as it will not hold the threads together well.
The easiest and most convenient way is to use pure PVA glue. After drying, it does not leave sloppy marks and does not spoil appearance finished product.
If desired, a paste can be made from PVA glue. To do this, add 50 g of water and 5 tablespoons of sugar to 10 g of glue. When using thick threads, it is recommended to add starch to this mixture - it will make the ball stronger and harder.
Threads
To figure out which thread to use for balls of thread, you need to decide what kind of product you want to end up with. If you need small balls, then you can take ordinary sewing threads or floss. If the balls must be large, then it is best to use a fairly thick yarn.
In the absence of yarn, you can dissolve the old unnecessary sweater.
In order for the threads that have already been in use to become even and beautiful, they must be slightly moistened and tightly wound around a book or chair legs. When the yarn is completely dry, you can use it for work.
If you could not find the threads of the desired color, then you can purchase a can of paint and paint the finished products.
Balloons
Size balloons must be selected depending on the size of your decorative balls of thread. If you want to make them very small, then the balloons can be replaced with ordinary pharmacy fingertips. However, it must be taken into account that after inflation they must have the correct round shape.
Manufacturing process
Before starting work, you should prepare the workplace. If the products will be made on the table, then cover its surface with a film. In case you plan to make balls in a suspended state, you will need to cover the floor under the workplace with a film. Use rubber gloves to protect your hands from the glue.

How to make a ball of thread and glue step by step is described in the following instructions:
- Pour the glue into a small container. If you prepared it yourself, then make sure that it has a sufficiently liquid, but not too thick consistency - when immersed, the threads should be quickly and well saturated with glue.
- Depending on what size your balloon, thread and glue craft should be, inflate to the desired size balloon.
- Then apply on the surface of the ball fat cream, vaseline or sunflower oil. This will be required so that later the threads are well separated from the surface of the balloon.
- Now dip the thread into the glue, and then wrap it around the balloon, making a strong knot. After fixing the thread on the ball, start winding it in random order. In the process of work, it is necessary to ensure that the thread is well saturated in glue, otherwise the finished decoration will delaminate.
- At this stage, many people ask themselves: how to wrap the ball with threads with glue correctly, and how many turns are required? The more layers you wind, the stronger your product will be. If there is too little thread, the ball will eventually not hold its shape and will deform.
- When you wrap enough layers on the base ball, you can send the product to dry. To do this, simply hang it by a thread, after laying a large oilcloth under the bottom. Complete drying time depends on the room temperature. On average, drying takes 1-2 days. It is important that the glue dries well and hardens.

When the product is completely dry and hard, carefully remove balloon. To do this, it must be untied and blown away. If desired, simply pierce it with a needle.
To separate the deflated balloon from the threads, use a pencil with an eraser on the end.
It is necessary to take out the ball as carefully as possible so as not to damage the finished decoration. If the threads have shifted, then you can just gently move them into place.

Products from threads, glue and a balloon can be made more in a simple way. To do this, you need to wind a dry thread around the ball, and then grease its entire surface with glue using a brush. The advantage of this method is that you do not need to get your hands dirty in glue. But when working with a large ball, dry threads can constantly slip off. Therefore, if you are thinking about how to make a large ball of thread, it is better to use the “wet” method.
Exists original way winding the ball with thread. The whole point is that you leave your hands clean. You will learn all this from the video:
Decoration methods
Of course, balls of threads are very beautiful in themselves. But if you stick beads, beads, feathers or ribbon bows on their surface, you will get real designer jewelry that will become a highlight in the design of a festive interior. For gluing decorative elements, you can use.
It is impossible to sew beads and beads to the surface of home-made balls - fragile products are quickly deformed from such manipulations.
You can think of how to decorate a ball of threads on your own, based on the available decorative elements, as well as your imagination. For example, to create the effect of snow, simply soak the surface of your balls with glue, and then roll them in semolina or powdered sugar. Then you can sprinkle the balls with glitter spray and send them to the Christmas tree.
I am a decorator designer and sometimes I have interesting orders. This time, when decorating a wedding, the bride wanted to decorate the ceiling of the hall with thread balls.
For fans of the Pinterest service like me, there is a special article about Pinterest fails - like it can be beautiful on the Internet in pictures and how the user then encounters reality:
In our case, this was the case.
The first photo is Pinterest, the second is reality :) 

And some more reality: 


That is, before the first perfect ball, we had 4 attempts to choose glue, application method, type of winding.
So I propose a proven system:
1) Balls are the most convenient to take round shape with elastic at the end. They are sold in any stores for children or in the sections of supermarkets about the holiday. All balls are reusable. It's a question of economy. If you are only making one ball, you can just use a bare ball and then blow or pop it.
In our case, it was necessary to make 30 balls, so I bought 7 bases and I had a cycle of 7 pieces. 
2) Each ball is wrapped with cling film so that the rubber does not shrink from glue, etc.
We tie the tip, which is inflated, on a thread and also wrap it tightly with a film so as not to eat the glue later, we leave only the back of the pip open, for which we will hold.
Lubricate the film on top of the ball sunflower oil or johnsons baby oil. Why do it?
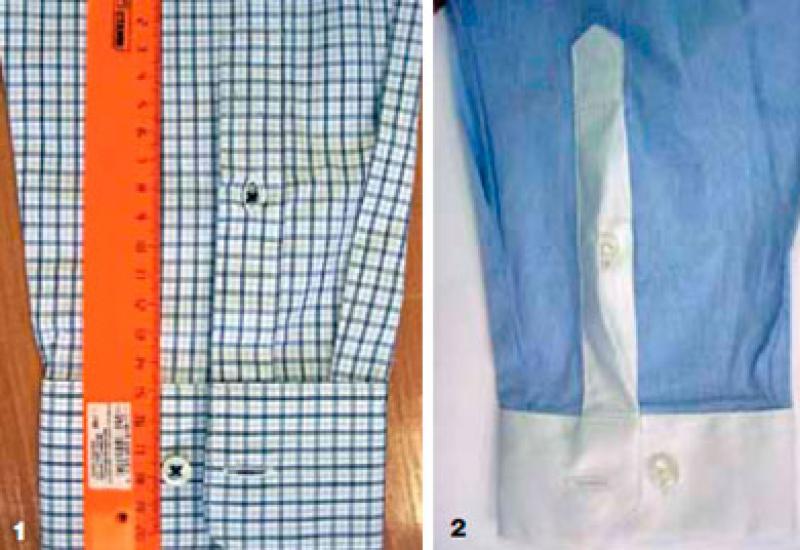
In fact, even if you do not smear, the ball will still lag behind the film, but when you wind the threads, they leave glue strips on the cellophane. If you leave it as is, then the glue dries with a film between the threads and it must be cut out (see photo of the blue ball at the beginning of the post). If there is oil, then it sort of rolls off and remains on the film just like balls. 
3) Glue!!!
Glue should be used PVA brand M (furniture). That is, ordinary clerical glue is not suitable (PVA-K), it does not hold at all. Glue must be bought with the expectation of 1 liter for 7-10 balls, with a diameter of 30 cm. It took me about 3 liters for 32 balls.
PVA glue should not be taken as an emulsion, although it is more expensive, it dries like epoxy surrounding each thread with a transparent cocoon, but simply building pva-m for wood, etc.
Good glue in the photo with a pink label, it was bought in Leroy-Merlin for 23 UAH - 1 liter.
We prepare the glue in portions, adding water and starch to make the ball harder. I cooked about 300 ml in a vessel - a couple of tablespoons of starch and 20-30 ml of water to knead the starch. Make the solution by eye - the glue should not end up much more liquid than before dilution. 

THREADS!!
As it turned out, the question is not fundamental. I took a large acrylic yarn of 300 meters per 100 grams, blue is natural cotton-bamboo. Both natural and artificial thread glued well, provided that it was well impregnated.
4) Two people usually participate in master classes - one person dries the threads in the vessel (he hammers glue into the threads), and the second one winds.
We didn't do it that way, but made a system out of a bottle. In a half-liter bottle, we made two holes - at the bottom and in the cork. In a dry bottle, the thread was threaded with a needle from the bottom up. The hole was made according to the size of the thread so that it would enter tightly, then the glue would not pour out back. In the cork, you can make a hole a little wider so that the glue is not squeezed out all the way, and the thread comes out wet.
So, when each thread passed through the entire length of the bottle from the bottom up and, savoring, was squeezed out a little at the exit, an assistant was not needed. If the thread ran out, then I made a knot in advance before entering the bottle and connected them.
5) The work is dirty, I did everything on the balcony. She spread oilcloth on the floor, put on a raincoat on herself, but backwards. She took up the bottle with her feet and shook it.
First you make a circle around the ball and tie it in a knot, then you wind it randomly.
It is convenient to wind if you pull out a long segment (one and a half to two meters) with glue from the bottle and twist it around the ball, distributing the threads. Then draw the next one. Small pieces are less neat.
6) The balls were drying on the balcony. It was hot, so they dried out in about half a day. I wound early in the morning and in the evening - at night. 

7) When they were completely dry, I looked for a pip to inflate, untied it and let the air out. The film and the ball were taken out from a large sector nearby. 
8) Such a hill gradually grew. 

We used balloons to decorate the ceiling at a wedding, photo report here.
The topiary ball is the basis decorative tree, on which the main and additional decor of the crown is formed. You can buy a ball of the desired diameter ready-made or do it yourself: there are many ways, and we will dwell on each worthwhile option in detail. Take away!
DIY foam ball
Instead of mounting foam, you can use a foam blank, for example, packaging from household appliances, or glue several sheets together to obtain the required thickness.

Papier-mâché technique
Inflate the balloon to right size, we coat the surface with PVA, glue sheets of paper (you can use toilet paper), fragments of old newspapers or napkins. We continue to build up the mass, generously smearing each layer with glue, we gain a thickness of at least 7-10 mm.

After the blank has completely dried, the balloon is gently blown off and pulled out, the frame remains. It turned out fragile, but original ball for topiary in papier-mâché technique. The method is laborious, the base dries for a long time.
Knitting thread
The method exactly imitates the papier-mâché technique, but knitting threads are used instead of paper: a frame is obtained that is suitable for a light crown. We do not recommend using twine instead of yarn: the material is expensive and strongly absorbs glue.
A frame made of knitting threads is the optimal basis for an illuminated topiary: the LEDs installed inside emit a subdued, magical light.
Ready-made balls for the tree of happiness
Purchased blanks and improvised bases for topiary:
- Styrofoam ball. For a tree of happiness, it is advisable to use ready-made foam balls with a diameter of 7 to 30 cm.
- hanging rattan. Ready-made rattan balls are available at decor stores. In addition, they can be made independently (rattan wrapped around a balloon).
- rubber ball. Limited choice of topiary barrels: only a cable will fit, which must be attached to the outside of the ball.
- Ball of knitting thread.
- Chipboard- carving from a dense cardboard. Blank for flat, thickness 1-3 mm.
- tennis ball. For miniature trees.
- ostrich egg. The original basis for the Easter topiary. The ostrich egg is very durable, the decor adheres well to the surface.
- Foam ball. Multi-colored items are used by magicians to show tricks, but also great for our purposes!
- Wooden ball. Rarely used, but for a certain design, it is the wooden base that is optimal.
 1. Styrofoam ball
  2. Hanging rattan
  3. Rubber ball
  4. Ball of thread
  5. Chipboard
  6. Tennis ball
  7. Ostrich egg
  8. Foam ball
  9. Wooden ball
Curly bases
The sphere is the most popular, but not the only form for the base crown of the happiness tree. Figured blanks, usually made of foam, are sold in stores where goods for creativity are presented. Topiary bases come in a variety of forms:
- heart;
- egg;
- cornucopia;
- Christmas wreath;
- ring;
- house;
- bike;
- dollar;
- star;
- pumpkin;
- apple;
- horseshoe.
Winding frame for decorative wood
The basis of the crown of 8 out of 10 topiary - the substrate - performs 2 functions: improves bonding of materials, and is also a base decorative layer that masks the color of the ball.
Pre-wrapping or painting the base prevents the material from burning through when gluing the decor with a hot glue gun.
Substrate manufacturing methods:
- Sisal wrap.
- Twine.
- Wrapping with knitting or sewing threads.
- Gauze or fabric covering.
- Painting a topiary ball (mandatory when gluing coffee beans).
- Apricot kernel lining.
 1. Sisal wrapping
  2. Wrapping with twine or yarn
  3. Thread wrapping
  4. Covering with gauze
  5. Base painting
  6. Substrate of apricot kernels
Of course, the finished foam ball - the best choice the basis for the tree of happiness, practically devoid of flaws. However, do not neglect the free methods: we recommend using a newspaper topiary ball - the best option, also without flaws and moreover - with minimal costs!
Video - how to make a topiary ball
A master class in excellent FullHD 1080p quality on how to make the basis for a tree of happiness from newspapers, synthetic winterizer, cotton wool, fur, scraps of cardboard or fabric. Watch and share with your friends in the most practical ways!
Did you like the master class on frames for the tree of happiness? Subscribe to ours and stay tuned for new releases! Write in the comments which topiary ball do you use the most?
Materials:
Metal cable 3 mm, length 2.5 m (15 rubles/m)
Colored glass beads, 20 pcs/pack (30–50 rubles)
Round candle, 1 pc. (3 rubles)
Beads (20 rubles/pack), beads (25 rubles/pack), sequins (20–40 rubles/pack)
Satin packing ribbons, 3 mm, 1 skein (13 rubles)
Shells, pebbles
The total cost of the product (without decor) is 15 rubles.
1. From a cable 2.5 m long, you get a ball with a diameter of 7 cm; for larger items, the rope will need to be longer. Unwind the cable into individual wires. For a more rigid construction, leave them "stranded". Light openwork balls with beads and small beads should be made from thinner wires, unwinding the "veins" of the bundle into components. Prepare, thus, 3-4 fibers.
2. Make 3-4 turns so that the “rings” do not intertwine, and firmly fix them in your hand.
3. Make the next turn by throwing it over the first three in a direction transverse to them.
5. Having finished working with the first fiber, thread the next fiber into the ball to the middle and continue weaving with two ends at once. Repeat this process for the next fibers.
6. So that the “tails” of the wire do not prick, remove them with pliers inside the ball.
7. Having straightened the elastic weaves of the fibers, make such a hole in the ball so that a candle can be inserted into it.
8. Use different decorative materials to fill the ball, such as glass balls or shells. Creating a ball requires some skill - be prepared for the fact that not everything will work out the first time.
*When starting to weave a ball, keep in mind that the position of the hands can only be changed when the ball is stiff enough to hold its shape. Otherwise, the elastic wire may fall apart when you relax your fingers, and you have to start work again.
* Balls made of thin wire can be decorated with beads, beads or sequins, stringing them on the wire during the winding process. The surface of the finished ball can also be decorated with strips of packaging tape, loosened into thinner components.
* If you are not too lazy and make more than 300 balls (from 4–5 cm in diameter), then by connecting them with fishing line or wire into several long garlands (about 30 items per garland), you can make a decorative partition in the room. It will serve as a decoration and divide the space into several thematic zones. To do this, the garlands must be attached to the floor and ceiling.
Lara Khametova, designer
Handmade - http://handmade.idvz.ru/


Using this material and a similar technique, supplementing the design (of an abstractly woven metal ball) with halogen lamps, you can get a modern lamp, chandelier, floor lamp.