Star News


Christmas toy made of paper ball. We make beautiful Christmas paper balls - examples and diagrams from professionals. Delicate ball of napkins
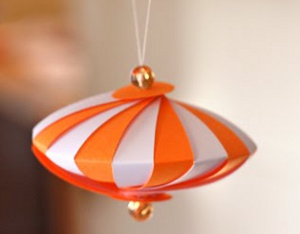
This voluminous and bright ball is suitable for creating a festive entourage for any festive event. For example, it can be New Year's, decorating the Christmas tree, several of these balls look beautiful in the form. The craft is not at all complicated, especially since a paper ball is presented step by step, with a detailed explanation and illustrative photographs.
What is needed for a voluminous paper ball?
- Colored paper. I took three colors - green, yellow and red. But you can, for brightness, take more, for example, 5, according to the number of segments of the side of the ball. Or vice versa, be original and take only 2 colors: black and white, white and blue, red and white. Consider interior color when choosing.
- Scissors, glue stick, thread, compass, simple pencil.

Instead of a compass, I used a glass, and if you have a special composter, then it’s generally wonderful, you can make an unlimited amount of balls and decorate the whole room with a garland.
How to make a paper ball?
To make one paper ball, you will need 20 circles. Their size depends on the size of the ball you need. I circled upper part cups, and I got a nice ball that you can hang on the Christmas tree.
Circle or draw a few circles on colored paper with a compass, fold the paper several times and cut out 20 circles.

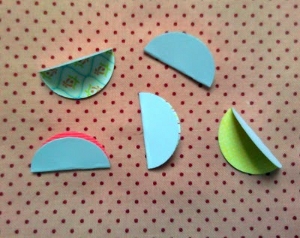
Each circle must be folded so that it has an inner triangle and three sides, which we will later glue to each other. To do this, first bend the two sides of the circle.

Then bend the third. You need to try to make them the same, but if there are small errors, it's not scary.

Thus, you need to put on 20 triangles. But, to make it convenient to take and glue them, after all sides have already been determined, unfold the triangle.

Take two folded circles and glue any sides.


Continuing around the circle, glue all 5 and glue the first and last to complete the circle. It will turn out such a paper part, like a cap.

Make 2 of these lids. It will take 10 circles to create them.

And then we continue to glue the remaining 10 circles, but not in a circle, but straight. That is, each subsequent circle is glued not to the extreme side, completing the circle, but to each other, forming a straight paper piece. This is what 5 colored circles look like.

And here all 10 circles are already glued.

We wrap the long part with the protruding sides outward, and glue the ends. To make a ring.

Now we already have all the components of the paper ball, it remains to put them together.

Glue one cap to the paper ring. You still need to glue in the area of \u200b\u200bthe curved sides of the circles.

And thread the thread into the second cap. If the thread is thick enough, for example, twine, it is enough to make a knot at its tip. But if, like mine, it is very thin, decorative, in addition to the knot, I also used adhesive tape, for reliability. Naturally, all these manipulations must be done in the inside of the cap, only the thread should remain on the outside.

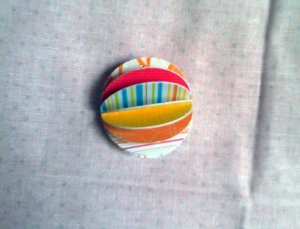
Now it remains only to glue this lid to the almost finished work and the bright ball of paper is ready step by step. If a garland of such balls is needed, the thread or string must pass through the ball, that is, through both caps.


Perhaps the most common shape of a Christmas tree toy is a ball. Traditionally, the Christmas tree is decorated with balls. different size, but of the same color scheme or, conversely, they take balls of the same size, but of different, matching colors. But every year it becomes more and more popular to make New Year's toys with your own hands. That is why we will learn to do Christmas decorations in the form of a ball in the most different techniques needlework!
Balls of beads, buttons and threads
To one of the most simple ways Decorating Christmas balls with your own hands can be attributed to gluing them with threads or decorative cords. To make the ball look more festive, take a string of beads with the cord and glue them, alternating with each other.


Balls of buttons and pasta
Even children can stick multi-colored buttons on the balls, and you just have to admire the result and help them a little if necessary)


And instead of buttons, you can stick pasta or coins, and you will get the most unusual christmas balls with your own hands!
Pre-wrap a foam or any other ball with golden foil to mask the gaps. Alternatively, after gluing small parts, the entire ball can be painted with golden spray paint.

Balls of thread
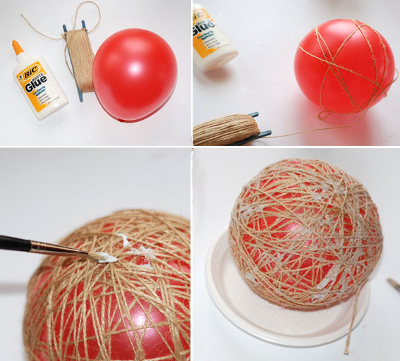
Making balls of thread is also not at all difficult. An ordinary ball is taken as a basis (you can use an old Christmas tree toy, with which, for example, the paint has peeled off in places) and wrapped with knitting threads. Show a little ingenuity and it will turn into a ball ball! Knitting needles are made from toothpicks and a pair of wooden beads.

Another method is based on the use of a balloon in the work, which is wrapped with threads lubricated in PVA glue. You can wind the threads in any order, and at the end it doesn’t hurt to smear the entire surface with glue again.

After the glue dries, pierce balloon and carefully remove it, and decorate the finished ball of thread with a festive bow.

paper balls
To make this cute paper ball, all you need is beautiful paper and glue.

Felting balls - another one interesting way creating a unique Christmas decoration with your own hands!
There are two ways to felt wool balls: one is called dry felting, and the other is wet) The result is equally good if everything is done correctly.
Balloon painting
And finally, another simple way to decorate Christmas balls is painting. It is made using a gel with sparkles of various colors.

take suitable color and draw whatever comes to your mind) By the way, involve children in this activity, they will be delighted!


We hope that from the variety of options offered, you will choose one or several suitable ones for yourself, and your Christmas tree will be decorated with exclusive handmade Christmas balls!
Happiness and creative success in the New Year!!!
CategoriesPaper
New Year's
balloons
1. DIY Christmas ball (option 1)
To make this Christmas decoration, you will need colored paper, thin wire, stapler, glue. The balloon you see in the photo above was made from three different colors of paper (pink, blue and light blue).
Work plan:
1. Take a small glass or glass (glass) and circle it on paper with a simple pencil 12 times. You should have 12 circles (4 circles of each color). Cut out the circles with scissors.

2. Fold each circle in half and stack them together as shown in the picture below. We use paper in three colors (A, B and C) to make this Christmas ball. Stack the circles in the following sequence - ABBCCAABBCCA. If, when making a New Year's ball, you used paper of two colors (A and B), then in this case the circles had to be folded in the following sequence - ABBAABBAABBA.

3. Fasten the circles of paper together with a thin wire, wrapping it around them along the fold line. Twist the ends of the wire together. If you do not have wire, then you can fasten the circles with a regular stapler.


4. Spread the circles and glue the adjacent halves of the circles to each other. Each half must be connected to one adjacent at the top, and with the other - at the bottom.

CHRISTMAS DECORATION - DECORATIVE BALL HONEYCOMB

2. DIY Christmas balls (option 2)
Cut out three circles of the same size but different colors from colored cardboard or thick paper. In the first of them cut a cross (fig. a), in the second circle make a horizontal cut in the middle and perpendicular to it two cuts in the direction from the circle to the center of the circle (fig. b), and in the third - four cuts in the form of a cross, also along direction from the circle to the center (Fig. c). Pass the circle "c" into the circle "b". In circle "a", bend the corners formed as a result of its incision; you get a square hole. Pass the circles "b" and "c" into it, having previously folded them. Then straighten the corners again (fig. d). Attach a thread to the resulting ball.
3. Christmas paper balls (option 3)
From old postcards or colored paper, you can make such cute Christmas toys - Christmas balls.

It is not at all necessary to make a large, complex ball, you can make a small one christmas ball from fewer parts.


4. Making a Christmas ball (option 4)
Very easy to make Christmas paper ball. To make it, you will need colored paper and glue.

Work plan:
1. Cut out eight identical circles from paper of different colors. Although, in fact, the number of circles can be any, but not less than three.

2. Fold each circle in half, right side inward.
3. Glue the halves of the circles together as shown in the photo below. Glue is applied to wrong side half circle.

4. Before final sealing christmas ball, thread a thick thread or ribbon through it. You can also make a wonderful Christmas tree garland from a large number paper balls.

Note: this Christmas decoration can be made not only in the form of a ball, but also in any other shape.
5. DIY Christmas ball (option 5)
To make these wonderful Christmas lanterns, you will need to cut colored paper into strips of the same length and width. The length and width of the strips depends on the size of the flashlight you want to make. To make one paper lantern you will need an average of 14-16 strips of paper.

When making Christmas balls, you can use strips of paper of different colors and beads to decorate Christmas toys with your own hands.

If the strips of paper are bent in the middle, then you get such a New Year's decoration.
6. How to make a Christmas ball (option 6)
So cute and easy to make New Year's crafts from old postcards, we suggest you make it with your child.

1. Using a small glass or wine glass, draw and cut out eight identical circles.

2. Using another object with a round base but smaller in diameter, draw and cut out two small circles.

3. Fold each large circle in half, and then in half again. See photo below.

4. Glue four folded large circles on one small circle, the remaining four on the other. As a result, you will get two halves of your future Christmas ball.
It is very IMPORTANT to correctly place the quarters of the large circles on the small circle. Try to carefully straighten the "pockets" of the folded circles and in advance, before gluing, estimate the correctness of their location. At the same time, focus on the very first photo, which shows a finished ball.

5. Now you just have to glue the two finished halves together and, when the glue dries, straighten all the pockets. Christmas ball is ready!


Making balls from thread:
1. You will need: scissors, balloons, fat cream (Vaseline), any yarn, PVA glue, bowl.
2. Dilute PVA glue with water, approximately 3:1.
3. Inflate the balloon to right size, give it round shape, tie with a thread.
4. After unwinding the required amount of yarn, put it in a bowl and leave for 5 minutes.
5. We spread the ball fat cream and wrap it with yarn, for starters leaving a large distance between the thread.
6. Gradually reduce the distance between the threads until the whole ball is wrapped in yarn and resembles a cocoon.
7. Cut the thread and glue it to the ball. Leave it to dry (at least a day).
8. Gradually untying the balloon, gently blow it off, and then remove it from the thread cocoon; tie a rope to the thread ball on top for fastening.
9. The balloon is ready!
When making a ball, you can use yarn (threads) of any color or paint with any paint or sparkles (spray). Especially for the New Year, you can decorate this thread ball with tinsel and stars. Hang small balls on the Christmas tree, decorate the room with large ones. Fantasize more!
If you are unable to wind the glue-soaked thread around the ball, you can wind the dry thread, and then carefully soak it with glue with a brush or sponge.
Instead of glue, you can use sugar syrup or starch paste. To prepare the paste, take 3 teaspoons of starch in a glass of cold water, mix thoroughly and bring to a boil. Instead of a thread, you can take a thin copper wire and wind it around the ball in the same way.
9. New Year's do-it-yourself. New Year decoration
Old Christmas balls can be updated by wrapping each of them in a shred beautiful fabric and tied with ribbon.

Unusual Christmas balls can be made from ordinary colored paper.
see others how to do new Year gifts and handmade jewelry.
Or maybe you are interested in ready-made ones?
website. Navigator in the world of gifts and souvenirs.
Do you remember how at school and kindergarten did you make lanterns and ring garlands out of paper for the New Year? Such simple crafts many can do, but what about something more complex?
Paper is a very convenient and “pliable” material for the hands of the master, from which you can make something really unusual! Today we invite you to learn how to make beautiful Christmas balls!
For work we need:
- colored paper in two colors (choose contrasting shades);
- scissors;
- glue;
- clothespins;
- ribbon to match one of the colors of the paper
Probably, you have already paid attention to the fact that in the photo we have balls with two variants of the ornament. We'll show you how to make each one.
Ornament "diamond"
Step 1
To get started, you will need a template for the future New Year's ball. Print both.
Attached files:
- template №1.pdf
- template №2.pdf
Step 2
The first template is designed for cutting, you will need two of these sets of each color (white and lilac). According to the second template, assemble the parts, as shown in the picture.

Step 3
Our lilac ball element is ready. Now you need to do all the same steps with white paper.

Step 4
The next step is the combination of white and lilac details. To do this, fold them on top of each other and interlace the first row of "petals" as shown in the figure below.

Step 5
On the reverse side, which is the front, our ball will look like in the picture. As you can see, we get a beautiful ornament of rhombuses in two colors.

Step 6
Continue to weave the "petals" in the same technique that was used at the very beginning. Due to the fact that the “petals” on the template are twisted in a spiral, gradually your design will take on the shape of a circle. Continue to bind the paper until it is finished and the work takes the form of a ball.

Step 7
The place where all the “petals” converged at one point must be glued well. Try to do this as carefully as possible so as not to stain the ball with glue and not damage its shape. After all the actions, we got such a wonderful New Year's ball. Agree, it will look very interesting on the Christmas tree.

Ornament "circles"
Step 1
In order to make such a ball, we need a slightly different template.
Attached files:
- template №3.pdf
Step 2 As in the first case, we cut out the details of the template, apply them to colored paper in two different colors. Next, cut out all the elements that will be needed for work. We glue them together in two blanks.

Step 3
Our colored blanks need to be folded on top of each other, and then proceed to the first row of weaving. Weaving curly “petals” is more difficult than even ones, so we need clothespins.
Step 4
After you complete the first row of weaving, the work will look like the one shown in the picture. Pay attention to how the clothespins hold the "petals" so that the whole structure does not fall apart.
Every holiday that comes into our lives must be made unforgettable, bright, so that it stands out against the background of everyday bustle. This can be achieved through all sorts of decorations with which you decorate the space and any interior elements.
Do-it-yourself paper balls - one of the most popular techniques. Many options for execution allows you to make the design of an event or holiday unusual and varied. It is not difficult to master such needlework, it is only important to strictly follow all the recommendations and clearly follow the steps of the master class, which can be found on the Internet or on specialized needlework forums.

This lesson can be easily mastered not only by an adult, but also by a child. You can learn to make your own paper balls with your own hands, and then do it with the children. Time will fly by unnoticed for such an exciting activity, and amazing decor will appear in your home. But first, you need to stock up on everything you need:
- Sheets of tissue paper in silence. Although this material is thin, but due to the many small folds, it has excellent flexibility and strength. Absolute sympathy among needlewomen enjoys silence because of its resistance to multiple bends and deformations;
- Scissors - any that you use in the household will do. And for children, we recommend choosing specimens with rounded tips so that the child does not get hurt while working on crafts;
- Glue - convenient tubes in the form of a pencil or PVA will be very useful;
- With a thin wire, fishing line, to connect the blanks together and hang paper balls in silence where you like.
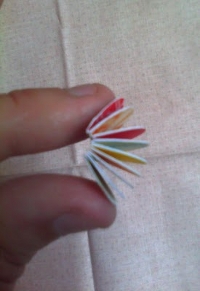
How to make a paper pom pom
Everyone likes bright decorations. Many people want to transform the interior of their own home, create a creative decor for the holiday. We will show you how to make paper pompoms with your own hands.


- Take 6-8 sheets corrugated paper one shade. It is better to start with single-color products, and by understanding the principle of their manufacture, you can vary the color shades, making them more complex and exclusive.
- Fold each of them with an accordion. Mark the middle and carefully fasten it with a thread, wire.
- Please note that the finished decoration will have a diameter that is equal to the width of the selected paper sheet. Reducing this value is simple: figuredly cut along the edges to the desired size.
- The unfolding process will captivate not only adults, but also children. Show how to fluff each layer gently and slowly like a fan so that the baby can repeat. A real miracle will be born literally in front of those who decide to make pompoms with their own hands.
If you are afraid of ruining the paper with ink, then practice on ordinary table napkins. Although they do not keep their shape well, as educational material will be irreplaceable. Having honed your skills, you can start decorating the baby's room, the room where the festive celebration is planned. Amazingly beautiful paper pompoms will create a mood and emphasize the solemnity of each event.
DIY honeycomb balls
If you do not want to stop there, then we suggest learning how to create honeycomb balls with your own hands. Depending on the theme of the holiday, color preferences, you can absolutely various decorations. You just need to follow our instructions and attached photos:


Think in advance what diameter the ball you need. Cut out a circle of this diameter from cardboard and cut it in half.
- Prepare the template as shown in the picture. To do this, take a thick sheet of cardboard and make cuts at an equal distance with a breadboard knife. This value will determine the width of the cells of the future cellular ball. Using two markers of different colors, highlight the lines with color.
- To create tissue balls, take a pack of sheets of the same size, corresponding to the size of the circle. Usually for lush and beautiful product take from 40 to 50 leaves.
- Now let's start gluing! Take the first leaf from the stack, place the slit template on top of it, and carefully apply the glue to only the markings of one color. Remove the template and lay down the next sheet of paper. Smooth it out so that it sticks to the previous one.
- At this stage, you will be gluing along the cuts of a different color. So, alternating the order of gluing, you will assemble the entire structure.
- Glue two semicircles at the beginning and end of the craft to give strength to the entire product.
- Sew the top and bottom corners of the semicircles gently with thread, fastening them together. This is necessary for the ball to turn around. Additionally, on one of the peaks, fasten a fishing line, a ribbon for which you plan to hang paper honeycomb balls.
- Holding the craft with both hands and open it, and glue the edges again. And if you plan to reuse this decor, then sew on the ribbons.
You can enjoy the resulting decoration!
Plain or iridescent, in patriotic colors or any other shades, paper balls for decorating a hall, an open area, an apartment interior will give everyone present only positive emotions.


With a little practice, you can make original decor for any holiday. And, who knows, perhaps this will become a matter of your life, which will bring not only pleasure, but also a stable material income.
Paper balls are a popular trend in the decorating industry.. They look spectacular:
- hanging or wall decorations;
- unusual elements for various pieces of furniture;
- interesting design finds when you need to create bright accents.
If you are looking for original and a budget option for children or family holiday, wedding celebration, anniversary, then choose paper decor for decoration!