Star News


What can be done from buttons. Button crafts are unusual beautiful and original ideas. Master class and tips on how to make crafts with your own hands. Volumetric crafts from buttons
The easiest option is gluing. For this, several adhesives are used:
- "Moment" is universal;
- "Moment Crystal";
- polymer glue;
- "Liquid Nails";
- construction adhesive for skirting boards.
It is convenient to use a glue gun for work. When using buttons without holes, the stem must be removed before gluing. This is done with a troskus or ordinary wire cutters.

Some decorative items cannot be made without the use of thread. It is convenient to fasten the fittings with thin annealed copper or brass wire.

How buttons are sewn onto fabric:
- standard through holes;
- over the edge, the stitches come out of the holes with rays with the same angle of inclination;
- from opposite edges (stitches are at right angles).

Using colored threads, full-fledged panels are created using the sewing technique. Fittings of various shapes are used:
- square;
- triangular;
- round;
- oval;
- asymmetric;
- on the leg.

If there are no buttons of the desired color, use acrylic paint or spray enamel, you can get the desired shade. Volumetric compositions are often painted ready-made. Then complement with colored decor.

Clothing accessories are perfectly combined:
- with beads;
- lace;
- twine;
- ribbons;
- fabric of any texture;
- applications from felt, colored cardboard.

Any material is used for the base:
- cardboard;
- plastic;
- polystyrene foam (it is convenient to cut various shapes from it);
- rubber;
- dense fabric;
- foam rubber.

Decorate with buttons:
- dishes;
- functional household items (napkin holders, pencil holders, key holders);
- carton boxes;
- plastic and glass bottles;
- inflatable balls (they are pre-coated with several layers of glue).

Technique for making decorative items from buttons
Compositions in the form of trees, animals love to create kids. For preschoolers, you need to select large fittings to reduce the risk of injury. Children can attach fittings to hardening plastic or plasticine. For the substrate, use thick cardboard, plywood, plastic - any other materials that can retain their shape.

The technique for creating flat paintings is simple.
- First, prepare the surface where the buttons will be attached.
- The canvas is painted in the desired color (basic tone), allowed to dry.
- After that, the outline of the main elements of the future masterpiece is applied.
- Start decorating.
- For convenience, the buttons are laid out by color, texture.
- After such sorting, it is more convenient to work.
- Buttons are complemented with beads - if necessary, they fill the voids of the pattern with them.

Christmas decorations
Older children enjoy making Christmas decorations, they are done like this:
- Buttons are put on the wire pin different size. By alternating large and small, you can make a pyramid in the shape of a Christmas tree.
- A foam cone is cut out, painted in green color. With the help of colored pins or buttons, fittings are attached. Starting from the bottom row.
- Using a dense thread, construct a garland. They are made flat, the buttons touch only at the edges. It is more convenient to work with products that have 4 holes. Accessories can be fastened from two edges at once, it turns out a double-sided garland.
- Christmas balls convenient to do balloons. They are installed first with the tail down, for this it is convenient to use a skein of adhesive tape. After the top dries, make out the bottom. Leave a hole for mounting. A match is inserted inside with a ribbon tied in the middle. The unbreakable ball is ready.
- Buttons are glued to artificial twigs, strings are tied to them - the decoration is ready.

Applications
Cut out animal figures or other shapes. After that, buttons are selected according to size, texture, color. They are carefully moved onto paper, the rest of the fittings are removed. After that, they begin to fix the accessories: they are glued or sewn onto a fabric base. The finished drawing is attached to thick cardboard. Then holes are made for fastening - chains, ribbons or twine.

The fabric is replaced with felt, if desired, the edges are complemented with rhinestones, sequins. An interesting texture is obtained when using buttons on the leg: they are sewn from the inside with threads to match the fabric. In this technique, frames for photographs are made out: the finished appliqué is supplemented with lace and braid. Patchwork panels with buttons of the same color, but of different textures, look original.

Button jewelry
Original fittings are ideal for making jewelry. For this are used:
- buttons with through holes;
- round, oval, faceted beads of various sizes with large holes;
- a thin decorative braided cord (it is sold by the meter, you need a piece, 2.5 times longer than the planned decoration), decorative elements are strung on it;
- 5–7 cm of steel wire, it is needed to stiffen the cord (it is bent in half, a cord is inserted in the middle);
- nail polish - they are impregnated with the ends of the cord to give strength.

First, a bead or a button with a bead is put on, the lace is folded in half, a knot is made. Then the weaving goes into two threads, they cross when pulled through the holes, then knots are knitted again.

Do not rush to throw away the buttons!

These accessories can become the basis of masterpieces. Knowing the basic principles of the technique of creating panels, Christmas decorations, jewelry, you will surely have ideas for creativity. Create unique things, because each of us is a designer at heart.
For the development of fine motor skills in children, various materials are used. This includes regular buttons. Not everyone imagines that whole compositions are created from them. And for this it is not necessary to run to a sewing accessories store. If you search, then in any house there are dozens of unnecessary buttons that can be used for needlework.
Thanks to such creativity, children develop perseverance, which is useful in school years. And if you use additional small elements in the composition, this will perfectly affect the concentration of the baby's attention. The progress of work must be supervised by an adult so that the baby does not eat the parts.

The range of buttons is so large that the work performed is distinguished by an abundance of colors and shapes. The whole variety of embodied creative ideas can be viewed on the Internet if you find photos of button crafts in a search engine.

The preparatory stage of working with buttons
Before starting work, you need to decide what kind of crafts from buttons you can make. It's worth starting with simpler tasks.


After choosing a craft, you need to prepare improvised tools:
- glue;
- scissors;
- cardboard or thick paper;
- wire and thread.

In addition to this list, it is worth preparing other small items. It is better to choose buttons that are excellent in size and shape, as well as the brightest possible color.

You need to conduct a small briefing with the child, explaining how to work with scissors and glue.

The simplest and at the same time original craft It is obtained from several buttons and a small piece of wire. Glue the smaller button to the largest button. It turned out a body with a head for a bug.

We insert pieces of wire into the holes on the large button (these are the legs of an insect). You can cut out eyes from colored paper, or you can make them from very small buttons. And our beetle is ready.

You can place such a work on indoor plants or curtains. All work takes about 15 minutes, and the child will receive a lot of positive emotions.

Picture compositions
The original idea of \u200b\u200bbutton crafts is to create a picture. With their help, the child's fantasy is displayed, and the necessary elements of the composition can be emphasized. The process itself is very simple. The main thing is that the child will gain skills in working with glue and will be able to apply them in the future.


To create the simplest picture, you need a little help from an adult. It is necessary to depict a tree trunk on thick cardboard, and after that the child starts to work. He will independently select the buttons that are necessary in size. They are glued instead of leaves and flowers, so it is better to prepare buttons in green, red and yellow shades.


If such a picture is planned to be created in a group of children, then it is better to print the stem template in advance.

In addition to a tree, you can draw a fruit or an animal, and fill it with buttons in a variety of ways. If such a picture is framed and hung on the wall, you will emphasize the importance of your child's work, as well as add coziness to your interior.

Beautiful photo frames
Instructions on how to make crafts from buttons can be found in specialized literature or on the Internet. A photo frame also belongs to such DIY crafts. You can also decorate the frame with the baby.

To do this, you can buy a ready-made frame or make it from thick cardboard. It is better to use buttons of different sizes. The main layer should be pasted over with buttons of the largest size.


Smaller buttons are glued on top. On upper layer pick up small buttons or some other small details.

If you choose bright buttons, the frame will stand out against the general background with its rich color and voluminous design. This frame is perfect for original gift close people.

Christmas tree decorations
When winter comes, all children expect a New Year's miracle. They enthusiastically help decorate the Christmas tree. And the Christmas tree will shine even more beautiful if you make toys on it with your own hands.

Apart from original toys, you get a great reason to spend time together. In the manufacture New Year's toys You can use any material at hand, including buttons.

If you purchase green buttons of different sizes, you can create miniature Christmas trees. It turns out beautiful craft from buttons, which can be taken to a kindergarten to decorate a common Christmas tree.


The general technique is very simple. First we string the largest button on the wire, then the smaller one. Continue until you get a pyramid. Instead of a star, we decorate the top of the pyramid with a bead. We make a loop from the wire and the Christmas tree toy is ready.

The use of buttons for interior design
It is possible to use buttons not only to create crafts, but also to decorate home textiles. Matched to the color of the curtains, buttons sewn on sofa cushions can emphasize and highlight the color used in the overall interior. It is very easy to make such pillows, just sew on buttons. It can be a specific composition or just a pattern.

It is also possible to arrange a button composition on the curtains for the kitchen. These curtains will give a cozy and homely atmosphere.


But that is not all. Real craftswomen create unique vases and lampshades, bowls for storing sweets from buttons.

Making a stand for pencils and pens
There are many options for using buttons, as well as ways to create objects from them. Let's spend detailed wizard- a class for creating such crafts from buttons for children, like making a stand for stationery. Such a stand is useful in any home and will help in storing pencils and pens in one place.

First, let's prepare the necessary inventory. To create a stand, we need a few empty bushings from the roll toilet paper, a few pieces of fabric, glue, scissors, cardboard and various bright buttons.

We glue the fabric on the paper sleeves, let it dry well.

Then we glue the fabric on a piece of cardboard, dry it and cut out the base for the stand. The base can be of any shape, but the size must accommodate our glued bushings.

We fix the bushings on the base, additionally glue them together.

The final step will be decorating the stand with buttons. Any flight of fancy is possible here: the creation of a certain pattern or a chaotic arrangement of buttons.

Here is a beautiful stand ready. If you need to place a large number of pencils, then you can take more bushings.

Photo crafts from buttons


What are buttons - everyone knows. But not everyone realizes that they can be used not only for their intended purpose, but also to create all sorts of decor. How to make crafts from buttons? Read below.
Features of making pictures from buttons
Many houses have accumulated a lot of such accessories. It is quite possible to turn it into wonderful panels and paintings with your own hands. There are a lot of ideas. Some of them are also intended for children. For example, there are many craft ideas for kindergarten from buttons. But more on that later.

Before you get started, you must decide on the plot of the picture. It is also important to choose a style. Someone likes abstraction, someone gravitates more towards the classics. As for the topic, you can peep something on the Internet or come up with something of your own.


The next step is to transfer the sketch to the fabric. After that, you can already start picking up buttons and try to make various combinations of them like a mosaic. It is better to overlap the patch, so the pattern will turn out to be more voluminous.

The most important thing in the work is to choose the right colors and clearly follow the chosen scheme. It is also advisable to try to make the most accurate knots.

As soon as the last element is sewn, the canvas must be stretched in the frame. DIY button craft in the form of a panel is ready.

The nuances of choosing a material
The choice of material depends on what exactly you decide to make. In the case of a picture or panel, you can use thread or glue to fasten the buttons.

If you settled on the first option, then you should correctly choose their color. The shade of the threads should match the fittings and not distort the image as a whole.

Are you a stickler? Remember that depending on the situation, you can use the following types of glue: PVA, polymer or super glue.

You need to apply it on the buttons quite a bit so that there are no streaks. Hot glue can also be used. It allows you to adjust and re-glue individual parts.

Interior items
Craftswomen love to use buttons to create original interior decorations. So, they can completely transform an ordinary, boring mirror, adding style and a certain charm to it.


At many houses you can find a lot of useful things, from which quite interesting and original gizmos are obtained. Button crafts are not only a pleasant, but also a useful pastime for children, as they help babies develop. Very often, something that, it would seem, cannot be used, can serve as a good idea for creativity. For example, real needlewomen know that before throwing away an old shirt or dress, you need to cut off buttons from clothes, as they will definitely come in handy on the farm. Sometimes multi-colored buttons accumulate so much that you can create a large composition from them. As for crafts from buttons, each housewife has her own goals and objectives, but you can do needlework not only on your own, but also involve a child in the process.
Important! For kids, working with buttons can be not only a pleasant pastime, but also a useful job that develops fine motor skills hands and creativity.
The more time a child spends in such activities, the more diligent he becomes, so needlework is very useful for preschoolers, as in the future they will have to spend a lot of time at home. Moreover, when buttons or other small details are used in the work, this increases concentration. It should be noted that the buttons are not only safe, unless the child is going to swallow them, but also bright and beautiful. Such a variety will allow you to use interesting color combinations and bring to life interesting ideas.

Working with multi-colored buttons solves many problems that teachers and parents face
Working with multi-colored buttons solves many problems that teachers and parents face. But in order to achieve your goals and not injure the baby, you need to carefully monitor the creative process. It is best to perform similar work with preschoolers aged 5 years and over. Older children will not put buttons in their mouths, plus they can already use scissors and glue, which are often extremely necessary in the work.
Needlework is a creative process that should bring joy, relax and distract from bad thoughts. Experienced craftswomen know that if you sit down to work in a bad mood, the result can be very different from the expected, and not for the better. Therefore, one of the main stages of preparation is to create a favorable atmosphere so that the mood during the creative process is at the highest level. This is especially important when a child is involved in the work. If an adult is annoyed, he will not be able to explain to the baby how to do the button craft correctly. The negative that may arise during the execution of the task forever discourages little man willingness to do similar work in the future.
Important! In addition to creating a favorable atmosphere, it is necessary to take care of the necessary materials.
It all depends on the type of craft using buttons, but most often, additional scissors, paper and cardboard, wire and thread are needed in the work. Elements for creativity should be varied so that the master has more choice for the implementation of the idea. It is desirable that the buttons are not only different colors, but also different sizes.

Just a couple of buttons and a piece of wire can make a fun home decoration.
Just a couple of buttons and a piece of wire can make a fun home decoration. To do this, take a large button and glue a smaller button to its edge. This will be the body and head of the bug. Then we thread a couple of small pieces of wire into the holes on the body, which will serve as legs. If desired, you can glue eyes to the head. The beetle itself can be planted on a houseplant or attached to a curtain. This button craft is done very quickly, and the child will have a lot of joy. This great option for the first creative task, because on the basis of it the kid will be able to understand that it is very interesting to work with buttons, but at the same time he will not get tired of the long work.
Pictures from buttons
One of the most simple crafts from buttons with your own hands, but at the same time exciting activities for a child, a picture can become. In this case, the manifestation of fantasy will be the most important requirement for the baby, since the basic technique is extremely simple. Also, the child will learn to use glue carefully, which is also very useful in the future, for example, when performing more complex work.
There are many options for crafts (pictures) from buttons with your own hands. The simplest, but far from the most primitive species, can be considered a tree. It is possible that the child will need the help of an adult at the initial stage to draw the trunk and branches. Well, then the kid will be able to independently select the colors of the buttons that are suitable for his picture. They will serve as both leaves and flowers in the picture, so be sure to prepare green buttons, as well as blue, red, yellow and white.

One of the simplest do-it-yourself button crafts, but at the same time exciting activities for a child, can be a picture
To create a button tree, you need to prepare thick cardboard, glue, as well as flat buttons of different colors and sizes. If you wish, you can print a picture with a tree trunk on a computer. This option is well suited if there are a lot of children, for example, when making crafts from buttons in kindergarten.
A picture of buttons can be not only in the form of a tree. You can draw or print an outline of any shape and fill it with buttons. It can be a heart, a butterfly, a four-leaf clover. The finished picture can be framed and hung on the wall. This option is well suited for many types of decor, for example, for the French country style.
In a more serious version, you can use not a simple cardboard, but pre-cover it with a cloth. A contour is applied to it, and then buttons are glued. The picture will turn out to be more original, and in a suitable frame it will become an excellent interior decoration.
Buttons make not only good pictures, but also postcards. For example, if you lay out the material in the shape of a triangle, this can become New Year's card. You can also create named Greeting Cards, in which the first letter of the name will be lined with buttons. In general, there can be a lot of options for crafts from buttons, it all depends on the imagination of the performer.
Photo frame
A photo frame is another wonderful and original do-it-yourself button craft, the photo of which can be seen below. You can make it together with the child, since there are no difficulties in this process.
To create a frame for a photo, you should stock up on a ready-made form. It can be purchased at a specialized store or do it yourself. If the second option is chosen by the master, it is worth purchasing thick cardboard, from which the frame itself and the stand are made.
So, after the base for the frame is ready, you need to take multi-colored buttons and arrange them in size. After that, the first layer of buttons is glued, which are selected from the largest. Next, smaller buttons are glued on top of them, and then everything can be supplemented with another layer of the smallest buttons, which cover all possible holes.

Button photo frame
So the frame is not only very bright, but also voluminous. It is advisable to use good glue for fixing the material, but not “super”. You can take the one used for repairing shoes, but you need to work with it in a well-ventilated area. Such a frame can be not only an excellent decoration for a chest of drawers or a wall, but also a wonderful gift.
Christmas decorations
Children are very fond of New Year and always look forward to the holiday. To make the waiting time more enjoyable, you can create some DIY button crafts. Decorating the house for the New Year, the whole family can have a great time. But it will be even more interesting to make Christmas decorations on your own.
For this you can use various materials including buttons. For example, if a large number of green buttons of different sizes have accumulated in the house, you can make Christmas tree toys out of them.
To make these button crafts, you will need wire, green buttons and multi-colored beads. You need to put the largest button on the wire in both holes so that the ends of the wire are on the same side and stick up. Then we alternately put on the remaining buttons so that they form a pyramid. Finally, we connect the ends of the wire and draw them through a bead, which will serve as the top of the Christmas tree. At the top we make a loop, and on this work on christmas toy It will be completed.
Advice! Crafts from buttons in the form of Christmas balls are perfect for children.

If a large number of green buttons of different sizes have accumulated in the house, you can make Christmas tree toys out of them.
To do this, you will need buttons of different sizes and colors. They are put on the wire in the same way as in the manufacture of the Christmas tree, but only in this case it is necessary to start with a small button, and then move on to large specimens. In the middle should be the widest button in diameter, followed by smaller buttons. Ends christmas ball the smallest button, the field of which the ends of the wire are connected into a loop so that the product can be easily hung on a spruce branch.
Buttons in home decor
Real needlewomen always bring various interesting details to the interior of their home, which immediately decorate the room and make it more comfortable. Everything is used in the work. Sometimes even such items are used that, it would seem, can no longer be reused. But a true craftswoman can make everything out of nothing.
If in the hands of the master were in in large numbers buttons, then the scope for imagination will be simply limitless. Sometimes they make just cute crafts from buttons, the photos of which you will see in this article, but often this material becomes an adornment of finished products. For example, with their help, you can revive an old decorative pillow by simply sheathing it with multi-colored buttons. They can also be laid out in the form of an applique, for example, to embroider a heart or an asterisk with buttons on a pillow.
There can be a lot of ideas. Some housewives successfully decorate curtains and kitchen textiles with buttons. With the right approach and a pleasant combination of colors, it looks quite impressive.

If the master had a large number of buttons in his hands, then the scope for imagination would be simply limitless
But the needlewomen do not stop there. Some create vases and lampshades from buttons. If you have enough weaving skills, you can use soft wire and weave the lampshade in the shape of the old frame. Such a lamp will decorate the interior and give it a zest.
Together with your child, you can make a beautiful decorative container in which you can later store useful things, for example, threads or sweets. To do this, you will need small buttons of different colors, balloon and a lot of PVA glue.
The balloon must be inflated and secured so that it stands firmly and does not stagger. Next, the working surface of the ball is carefully lubricated with glue, on top of which it is necessary to carefully lay out the buttons. This procedure must be carried out very carefully and carefully. If the buttons do not fit snugly together, the product will not hold its shape. After all the buttons are carefully stuck to the surface of the ball, it is necessary to go over the top with a brush with glue several more times.

Together with the child, you can make a beautiful decorative container in which you can store useful things later.
Then leave the product to dry completely. It is better to wait 2-3 days for the glue to completely dry. You can check the readiness of the vase by how the glue becomes completely transparent. After the product has stood, you need to take a needle and gently pierce the ball. It should deflate and the buttons stay in place. The result is a deep container that can be used to decorate the room.
Master class on making a stand for stationery
Everything is useful on the farm, even toilet paper rolls. It would seem, for what use these cardboard tubes? But a real needlewoman can teach a master class of do-it-yourself button crafts, having dozens of different options in stock.
For example, from such tubes from toilet paper you can create a beautiful stand for stationery and various small things. To do this, you need 4 bushings, 4 pieces of fabric, glue, multi-colored buttons, cardboard and scissors. We cut square pieces from the fabric, which we wrap around the bushings and fix with glue with inside. The result should be four neat tubes. A separate piece of fabric is glued onto cardboard, and after the glue has dried, we cut out the stand. It can be square, round or heart-shaped. The main thing is that four tubes fit on the stand.
We glue the bushings to the base and glue them together so that they hold tighter. Next, we begin to decorate everything with buttons. You can stick them in any order you like. The result is a comfortable and very original stand for stationery, which will be an excellent decoration of the table.
Where else can buttons be used?
Buttons are a unique material for needlework. It can be used in various ways, both for decorating finished products and for creating new trinkets and useful gizmos. The easiest way is to take and paste over the old item with buttons. This will update it and even make it more durable, which is why buttons are often used to restore things dear to the heart.

Button brooch
If you wish, you can decorate with buttons not only your house, but also clothes. They make cute brooches. Also, with buttons, you can carefully close the hole on the bag or jacket, making the thing more interesting and unusual.
It will take quite a bit of time to create a candlestick for the house with your own hands. To do this, you need a glass with straight walls, a lot of different buttons and glue. After the glued buttons have dried, all that remains is to put a candle in a decorated cup.
Together with a child, you can create a whole panel from buttons, beads and beads. It will decorate the room and remind you of a great time. To do this, take a wooden base and pull the fabric over it. Next, an approximate contour of the drawing is applied, which will be laid out in the picture. Then, according to the drawing, you need to carefully and beautifully lay out the buttons. The main part of the work in this case will be done by an adult, and the kid can show his creative nature and suggest which buttons are best suited to a particular element.
If you have accumulated buttons, make pictures, panels, decorations for clothes out of them with your own hands.
Making pictures from buttons with your own hands
Lots of ideas. They will help create artistic masterpieces for children and adults. For it use:
- buttons of different colors;
- glue;
- thick cardboard or thin plywood;
- simple pencil.

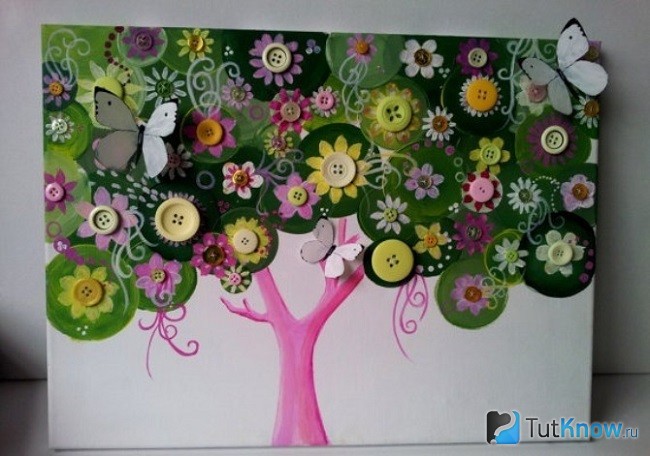
Paint the plywood or cardboard in the desired color, let the canvas dry. Redraw the outlines of the future masterpiece on it. As you can see, the vase is lined with bronze-colored buttons. For its edging, small pieces of fittings are used, inside there are larger ones.
Lay cheerfully colored buttons on the canvas to form flowers. Lay out the stems and leaves in green. If you have a lot of white buttons, decorate the background with them. This will help the picture become more voluminous and original.
Even if you have a few buttons, it will not hurt to make a panel.
Kids will love this idea for sure. But first, cook with them:
- white cardboard;
- paints;
- buttons;
- glue;
- brush;
- bath with water;
- white paper.
Let the child fold a strip of white paper in half, draw the right side of the butterfly on it. When he unfolds the leaf, he will get a white-winged insect. It remains to paint the body of the insect with black paint with a thin brush, apply a pattern to the wings and, after the paint dries, glue the butterfly to a flowering tree.
Using buttons, you can create another tree with your own hands.

To reproduce this idea, take:
- brown, red and yellow buttons;
- blue, white and yellow watercolors;
- glue;
- a sheet of cardboard;
- photo frame;
- pencil.
- First, the cardboard is covered with watercolors. Draw the sky blue, for this add a little blue to white, mix with a brush. The location of the ground can be green if there is grass growing there, and if it is sand, then make this part of the background yellow.
- After the paint has completely dried, draw the contours of the tree on the canvas with a pencil.
- Fill the trunk with buttons of a brown shade, black. Attach red and yellow to the crown. You can use other tones.
- Put the picture in a frame and you can hang the masterpiece on the wall.
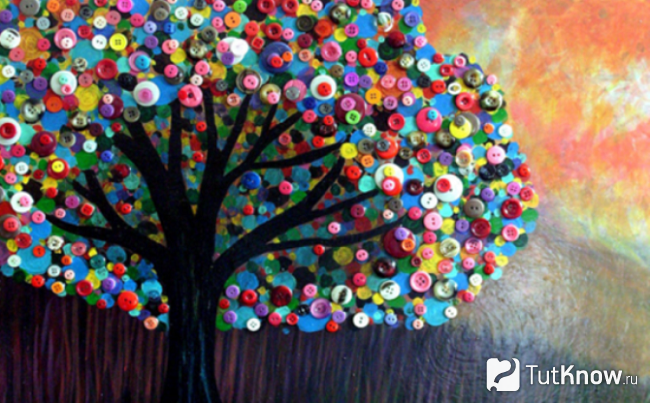
After drawing the background with paints, you need to give them time to dry. On blue or green colored paper, draw a tree crown, glue it to the canvas. On the back of black or brown paper, draw its trunk, which also needs to be glued in place.
Now let the children give free rein to their imagination by gluing buttons of various colors to the crown.

Hang this picture in your living room, which will have large buttons, medium and small.
First draw the sea, it is bordered by a coastline consisting of sand. So make it yellow. Next comes a darker coastal spit, in the background it is green.
Now you need to stick white buttons on the sea so that they add extra shine to the water. Shells on the sand can be both light and darker tones.
The following button picture will also help you relax after a hard day.

First, a blue background of the sky and green, which will become the stems of flowers, are drawn in gouache. Buttons are glued above them. If they are on legs, then you need to sew them to the cardboard with a thread and a needle.
It will be easy for children under the guidance of adults to make just such a basket of flowers.

To make a panel in the form of an owl, take:
- wooden board;
- two metal loops;
- rope;
- buttons;
- twig.
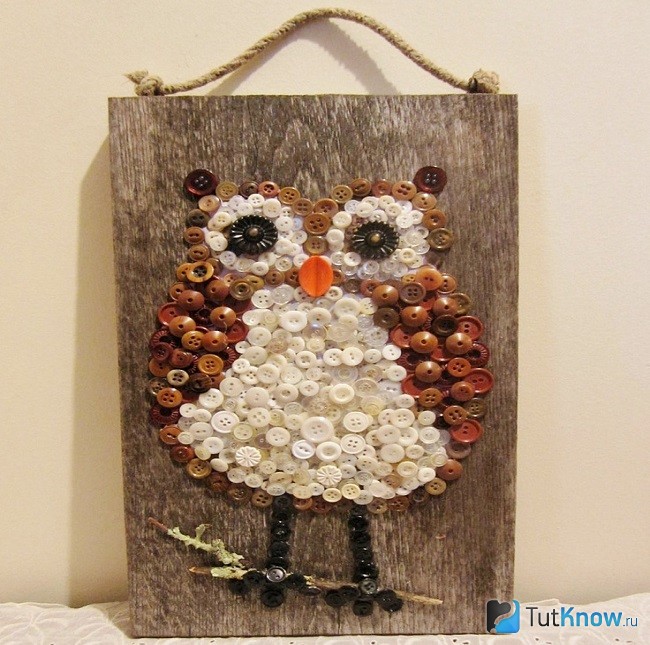
Draw the outline of a bird on the board. Around the eyes, body and wings, lay out the brown buttons, and make the tummy, the outline around the pupils from white buttons, the pupils from black. Instead of a beak, attach a red one.
Glue a wooden stick down the panel. Attach the paws of an owl to it and around it.
This accessory will help to embody the most daring ideas. To make a Christmas tree for the New Year, take:
- buttons of a green, light green shade of different sizes, brown;
- green thread;
- a needle with a large eye;
- scissors.
A star can be made from accessories of this shape or cut out of cardboard, also stitched with a needle and thread. We hang our Christmas tree and admire the beautiful creation.

If you want to make flowers from buttons, take:
- buttons;
- thin wire;
- scissors;
- vase.
Interesting crafts from buttons are both a clock and a wall calendar. For him, you need to cut out circles from cardboard, draw a number on them and stick them in the center of the buttons.
These blanks are sewn or glued to the base and the original calendar is hung on the wall or placed on the table next to it.
If you have a lot of such accessories, you can decorate a mirror, a bathroom wall and even a toilet bowl with it.

But first, the surface must be washed and wiped dry. After that, it is degreased and the accessories are glued in two rows, closing the gaps between the buttons so that the decorated surface does not show through.
If you liked making a Christmas tree, see what other crafts for the New Year you can make from buttons.

Degrease the surface of the ball, pour buttons to match it. If you are celebrating the New Year in nature in the country, there are no toys, then make them from the same sewing accessories.
Do not hold back your imagination, if you wish, arrange buttons according to height or large ones in the middle, small ones at the edges. The color scheme can also be varied.
What they don't make christmas snowflakes, from: napkins; yarn; paper. And the fact that they can be created even from buttons is known to few.

To do this, take:
- white buttons;
- Super glue;
- rope;
- metal hangers;
- pliers.

On the face, this blank will look like this.

Glue the remaining buttons to the metal wire.

Such New Year's snowflakes can be hung on a Christmas tree, on a wall. To do this, glue a rope to the end of the snowflake, tie a loop.
Here is another idea that will show you how to make a Christmas tree out of buttons.

String green on the wire, thread both ends through two large buttons, which will become the leg of the product and give it strength. For the second Christmas tree, you need to make a cone out of cardboard, glue it with buttons. Such accessories will help you make Christmas wreaths.
If you want to make a napkin ring to serve this way festive table, take:
- flexible transparent plastic kitchen board;
- buttons;
- glue;
- scissors.
A flower from sewing accessories also looks great. And you will make original candles from old shoes or those that are small for a child. Glue the buttons on the shoes, tie new laces, put fireproof glass jars inside the shoes, in which you place candles.

See what buttons are wonderful helpers in terms of room decor. Sew them on the pillow by making a pattern or creating the first letter of the name of the person you want to give it to.
Embroider with buttons on a dark bag, and it will become unique.

Decorate curtains with these accessories by sewing them here. Remember how fashionable bamboo curtains used to be? Someone made similar ones from paper clips and beads wrapped in pieces of postcards. You will make these from accessories.

For this you will need:
- buttons;
- fishing line;
- needle;
- rail;
- scissors.
Using this technique, you can make not only curtains for a doorway, but also an analogue of blinds for windows.
DIY button jewelry: photo and description
You will make them from the same material. See what an unusual button belt turns out. It goes great with jeans. It will need a strong thread so that it does not break during wear. You can replace it with a thin white rubber band.
Thread the needle, tie both ends with a knot. Move it a little to the side, twist the thread in this place, making a loop. String on the first button, then the second and all the rest.

They fasten such a belt with a button, throwing it over the loop that you made at the beginning.
If you have a men's shirt, add some femininity to it by sewing beautiful buttons on the collar.

They will help create your unique image. Make a rainbow bracelet by looking at step by step photos. This is how wonderful it will turn out.

To make a decoration on your hand, take:
- buttons;
- threads;
- a needle;
- scissors.

To work, you need flat buttons with four holes. Take a needle with an eye so that it fits well into them.
Pass the needle and thread through two opposite holes of one button on the wrong side. On the face, taking the needle out of the second hole, thread it into the first recess of the second button. Bring the needle back into the second hole of the first button on the wrong side. On the face, thread the needle again into the second hole.
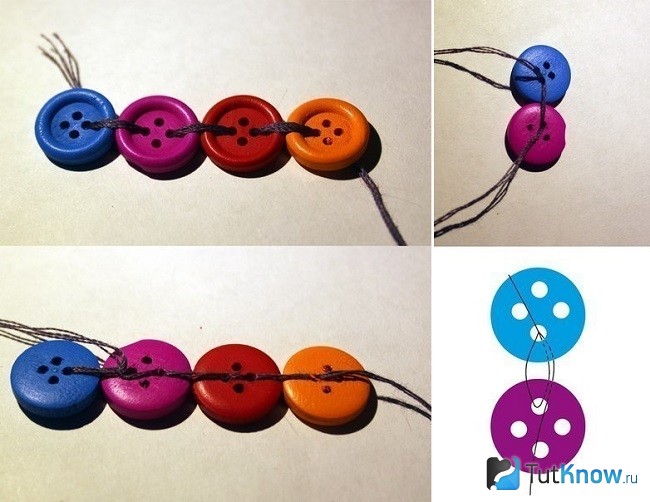
Having created the first row, work the second, connecting these rows at the same time. Do the same for the third one.

Weave the free ends of the threads with a pigtail. Trim off the excess.

Tie a loop from the pigtail, which you will put on a button and fasten the bracelet in this way.
If you have metal buttons on the leg, make this bracelet. You can attach them to the chain using wire or metal rings.

For lovers volumetric jewelry You can also recommend another necklace around the neck. The fittings are fastened with metal rings or ordinary paper clips.

If you want to make tiered button beads, then check out the following idea. The main thing is to take a very strong thread or fishing line so that at the most inopportune moment they do not break and the beads do not crumble.

If you have a broken automatic hairpin, and its mechanism is still good, upgrade the item. To do this, take:
- three flat buttons;
- Super glue;
- two beads;
- cord;
- scissors.

Attach the buttons using super glue.
Lubricate the surface of the metal hairpin well with glue, attach a design of buttons and beads here. After that, you need to let the accessory dry and you can try on a new accessory.
Attach a blank with lace to it, after which you will get an amazing do-it-yourself hairpin.

If you stick three buttons on ordinary black invisible ones, see how the hairpins immediately change.

If you have an elastic band and a matching button, in 2 minutes you will turn them into a new hair accessory. To do this, slip the edge of the elastic band under the leg of the button, thread the free end under it, tie it in a knot.

Crafts from buttons for yourself are not only jewelry, hairpins, but also decorating shoes in an unusual way. Beach flip-flops will be transformed in half an hour if you sew bright buttons to them.

If you want the decorated surface to increase, then first sew the buttons to two triangles of fabric, and then attach them to the slippers.
Buttons will transform other shoes as well. If your favorite shoes are worn, hide them behind these accessories and everyone will think you should buy another pair of shoes.

The same applies to sports shoes- slippers, sneakers, sneakers. Why buy new ones if you can transform the old ones in an hour?

Even if there are only 6 buttons, they will allow you to decorate shoes. Sew them on ballet shoes, thereby adding a twist.

Attach buttons to leggings, hats to create your original and naughty look.

As you can see, button crafts can be very diverse and unexpected. With the help of them you will add new interesting shades to your home, create accessories, update shoes and be fashionable, self-confident.
And in order to better remember what can be made from buttons and recharge with new ideas, watch 2 informative videos.

