Star News


Christmas decoupage balls are unusual. New Year's Christmas decorations in the decoupage technique. Decoupage of New Year's toys - a master class for all design options
Since this is the first decoupage workshop in the group, I will write a little about this technique. It appeared in the 15th century. The essence of decoupage is cutting and pasting. Initially, not only paper was used for gluing, but also leather, wood, fabrics. Any surface was taken as a basis - wood, glass, fabric.
21st century - a new birth of decoupage. It has come back into fashion, and in the stores of almost all major cities you can easily find materials for different techniques this kind of creativity.
Today I suggest you decorate a Christmas ball using decoupage technique. For these purposes, not only a special blank is suitable, but also plastic balls that are now popular. In addition, this is a great chance to give a second life to old glass balls.
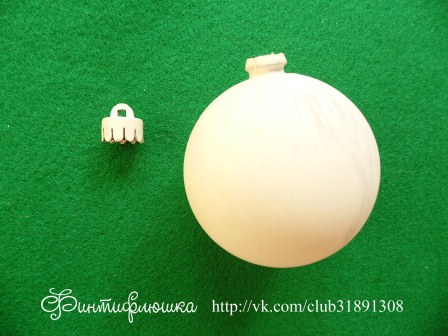
For work we need:
1. Ball (the larger, the more convenient it will be to decorate it)
2. Sponge (I use a sponge for washing dishes. It will be enough to cut off a piece of about 1x2 cm from it)
3. Acrylic white paint.
4. Acrylic colored paints.
5. 3-layer napkin with beautiful pattern(preferably with not very large elements)
6. PVA glue
7. Wide soft brush (squirrel)
8. Acrylic varnish (untinted)
9. Elements for additional decoration (I have tinsel and semolina)
10. Scissors
Step 1
Do not forget to lay a newspaper or oilcloth on the table!
We cover our balls with white paint with a sponge. I have a light ball, so I apply a thin layer of paint in some places there are small gaps. If your ball is dark, then you will have to paint over the second layer, after thoroughly drying the first one. 
It is better to hold the painted ball by the "stalk". After dyeing, tie a thread to the "ear" and hang to dry. I stuck pencils under the microwave and hung them on top. Drying takes 1-2 hours. Better take your time. The paint may not dry and smudge. 
Step 2
While our balls are drying, we cut out motifs from napkins, having previously separated 2 white ones from the color layer, which we do not need. Do not be lazy - the less background remains, the more accurate the work will look. But very thin details should not be deprived of the background - they will simply come off.
It is better to separate motifs from elements - it will be easier to stick. 
Step 3
Now we arm ourselves with a brush and glue!
Glue is best diluted with water 1:1.
Gently, glue the motive from the middle. Avoid creases! And do not be too zealous with a brush so as not to tear the drawing. 

And again we hang our balls to "rest" for an hour. In the meantime, wash the brush yourself - if it dries up, then you can’t wash it off. 
Step 4
Now let's start toning. For toning, in addition to paints, you can use pastels. Those who are already familiar with this can try to work with her. Those who decided to try their hand at decoupage for the first time - wait for another MK - I will definitely tell you.
And now let's work with paint.
We knead the color we need - it's better to stick to the color of the napkin, then you won't have to paint over the background between the details.
We paint especially carefully along the motifs so as not to get into the drawing. The ink won't come off the paper.
After painting, we return our balls to dry. 


Step 5
We proceed to additional decoration with semolina. It gives a very interesting "frozen" effect.
The actions are simple - we apply a drawing with glue (preferably not diluted) and sprinkle with semolina!
Then let it dry again. 


In order for a little semolina to stick, we pour it onto the area nearby, and let it roll itself onto the glue. 
When the glue dries, paint the semolina. it is better to try not to touch the background, but if it still happened - do not despair, continue drawing thin line. Paint carefully - semolina can crumble. do not spare water - the thinner the paint, the better it will penetrate between the grains. you can quickly pass thick paint over the surface of the semolina - then only its upper part will be painted. This gives an interesting effect, but is only suitable for yellow-brown images - unpainted semolina turns yellow.
And then - dry again! 

For the snowy effect, use white paint. but can be painted with other colors. 
Step 6
In fact, this is the last step of decoupage.
At this stage, we have to cover our ball with varnish to give it shine, fix the paint and a napkin.
Again we take a sponge in our hands, and gently apply it to the surface of the ball.
Don't forget to dry! 

Step 7
After drying, our balls can be considered ready 
But there is one BUT: as a rule, the place near the handle does not look neat. Perhaps the transition from the ball to the handle will be poorly painted over, or the handle itself will get dirty. But this is technical. But in fact, we want to give the ball some completeness. I used tinsel to decorate the handle. You can use ribbons, beads, small cones - whatever your imagination desires.
I tied the shank with tinsel, like a bow. Another ball - just wrapped in tinsel with wire inside and twisted its ends. To fix the tinsel on the handle, you can drop a drop of glue on the joint (it is better to use super glue) or varnish, which covered the ball. 
Now our balls can take their rightful place on the Christmas tree! 
Adviсe:
If suddenly you decide to use gouache instead of acrylic paints, add pva glue to it - then it will be less smeared during subsequent work.
Don't skimp on drying. It is better to stretch the work over several days than to get an unsatisfactory result.
Do not forget to wash the tools after each stage of work. Paint and glue can make them unusable if they dry on them. The same applies to work surfaces.
New Year rushing towards us! Vintage - decoupage balls!
Mk "Christmas tree toy".

We will need:
1. Plastic blank
2. Rice paper with suitable plot
4. Acrylic paints
5. Structural paste
6. Antique Medium
7. Medium for flowing effects
8. Liquid bitumen water based
9. Lacquer matte
10. Alcohol for degreasing
Of the tools we need:
brushes,
sponge,
stencil,
palette knife,
sandpaper,
masking tape and
wet wipes.
Completing of the work:
We split our medallion in half and degrease the sides we will be working with. Since on one of the halves I'm going to do reverse decoupage, then I degreased it with inside.

I tear out the plot I like from rice paper. I take a half with a fat-free inner side and on this side I ALWAYS glue my motif face down with decoupage glue

While this half dries, I take another - with a fat-free outer side. With the help of white acrylic paint ground surface (up to 2 times with intermediate drying).

After everything dries well, take the stencil and attach it with masking tape to the half. We take acrylic paste (I have a universal Goya company) and use a palette knife to apply it to the stencil.


We try to do it evenly, but if it suddenly doesn’t work out perfectly, don’t be discouraged - it can be fixed later. We remove the stencil and let our pattern dry well.

I take a half with a pasted motif and apply white acrylic paint over the drawing.

This is done in order to make our picture brighter, to develop it. Try to leave the borders of the motive intact, we will then compare them with the general background. We dry.


After that, I take an antique medium (plaid 17) and a medium for flowing effects (also plaid), mix and apply lightly around the picture with a foam sponge (remember, all this time we are working with the inside of the medallion).

Now we make a general background. To create a suitable tone, I needed white, green and ocher acrylic paints + a medium for flowing effects. 
I also apply them with a sponge, trying to equalize the borders of the picture with the background so that there is no noticeable transition. We dry.

I take a half with a well-dried pattern. The pattern turned out not very neat, so I worked a little with sandpaper.

Now I paint half in suitable color(I mixed ocher with white). We dry.

After that, I varnish (I have a matte acrylic varnish from Maimeri). Dry again.

Now we take liquid water-based bitumen (ferrario company). I apply it with a brush over the entire surface, trying to better walk through the pattern (get into all the cracks). 

I let it dry, just a couple of minutes. Then I take a damp cloth and, slowly, remove the excess bitumen.

Wiped - looked - more - wiped, etc. In general, you decide when enough is enough. If you suddenly overdid it and wiped off the excess, do not worry - repeat the "procedure" again (we have varnish under the bitumen - it will retain our main color).

After you are satisfied with the result, let the bitumen dry and then varnish (I personally cover the bitumen with spray varnish. It does not deform the bitumen itself, does not form streaks).
Now we connect our halves. We take cotton lace (you can use a ribbon) and glue it at the junction of the two halves in a circle.

From above we make a decorative bow from satin ribbons and thread the string. That's all.


Author Olga Koretskaya.
Decoupage inside a ball (or rather a hemisphere). Using elements of the Arte-franchise technique.


I will conduct a master class using the example of such a ball.

1. We take a plastic ball of the diameter you need.
2. We saw it along the factory gluing line, preferably exactly along the contour.


4. We clean all the irregularities at the place of the cut with a sandpaper.
5. Paint the background inside the balloon. You can use spray paints, you can tamp with a sponge. As you please. Use colors according to your motive. To speed up, I painted with an aerosol, but the background will be more beautiful, of course, with a sponge or a brush, because you can make more shadows, color transitions, because. the area of the ball in this case is small.
6. I take cotton pads and exfoliate cotton wool from the middle of the disk. I put suitable pieces on the bottom of the ball, after smearing the place of gluing with PVA glue. I apply in small layers and spray each layer with varnish (you can use hairspray) or apply liquid PVA (the principle of papier-mâché made of cotton wool).


7. We print in advance the motifs of the size you need, several copies. I have six in the photo, but I printed more. There is a possibility that it will not be enough, in the process of work, for one reason or another. Therefore, it is better to make a larger quantity, of the same size. (although the size can be slightly changed, here you can also show your imagination).

8. We cut out the first level, the most distant, from one motive. For example, a horizon with trees. You can repeat this level twice, but in such a small space I think it would be superfluous. Then the second level, we cut out the motif with trees, then the strip with houses. And glue everything in layers into a ball. I glue on Moment rubber glue, sometimes I use a hot gun, all kinds of linings to separate the layers. I sometimes use insulation for linoleums or even this gasket to level the floors, under the parquet board, but I use this when the surfaces are large. You can use double sided tape.


9. After you have glued all the layers, add more cotton wool until the lower borders of the pasted motifs are covered with cotton wool and merge together. Cotton wool is glued in the same way as described above. I glued the motifs with a slight downward shift, so my drawing seems to be refracted. All these roughnesses can be tinted, retouched with paint to match.

10. From other prints, I cut out the central motif with a feeder and birds. There are fewer of them in the photo, I needed more birds. I glued this feeder separately and glued the whole blank into a ball. Again glued the joints with cotton, gluing and sprayed with varnish.


11. Then I cut out fir branches from the following printouts.
12. I glued them along the edge of the ball, using Moment glue, which I applied carefully along the edge of the ball. I glued the motifs with an overlay, one on top of the other, in order to close the trimming points, align the composition and just for beauty.

13. After the glue had dried, I cut off all the protruding points with a clerical knife to the edge of the ball, neatly, accurately and evenly.

14. I applied contour paint, glitter snow on spruce branches, in the background, the strip was held, like snowdrifts, on the trees and roofs, the color-snow refreshed.
15. Dried, you can sprinkle with glitter varnish (suitable for hair) and covered the whole thing with acrylic spray varnish.
16. You can draw a circle around the edge of the ball with glitters and sparkles for beauty, etc. etc. here you can do exactly as you want.
17. Glue an eyelet for hanging a ball on a hot gun, tie a bow and HAPPY NEW YEAR !!!
Mandatory conditions for work! Printing is best done on thick paper. I did it on watercolor paper. And it's better to make several copies at once. I made 7-8 copies.
Vintage Christmas toy in decoupage technique.

Take a big ball
an ordinary plastic blank of pale pink color.

The first stage is skinning.

Now you need to degrease the surface

And primed the surface for better bonding with subsequent layers

The ball must be covered with two layers of soil, so that there are no gaps on the toy ... and besides, the layers must lie evenly, and then the toy will go to rest - to dry ...


So, the work with color begins. Colors should be chosen light - they are easier to darken or repaint.
Use a suitable decoupage card or napkins.
Let's move on to the artistic stage.
We take a semi-finished ball with a picture in one hand, in the other - a special sponge swab and the first tint layer is applied with flicking movements, then the game begins with color palette, here and there strokes of different tones are added ... the effect is magical ... as if another appears from under one layer ... very similar to laminated glass.

Then comes varnishing in 3 layers with an interval of one hour and subsequent drying for 4 hours. - “The main thing is to twist very quickly and evenly, otherwise the varnish will not completely cover the toy”, it is better to rotate by the wooden leg, like a centrifuge.
Before the stage - "diving" the balls are skinned, and then the toys are bathed in varnish and put in rows to dry in special holes.
Next - a magical and very important stage - Creation of cracks with a two-component craquelure varnish.


The pattern is neatly covered by a grid of many cracks.
The next three stages are the application of several layers of varnish, then sanding, again - varnish and sanding, again several layers of varnish, and leave until completely dry.
The final stage was the decoration with lace, by the way, also aged. After all, lace is taken completely new, but after a couple of hours of witchcraft and really simple manipulations, it becomes ancient.
It's simple:
We brew strong and delicious coffee .. no, no .. and we don’t drink it .. but we dip white cotton lace into it .. then we dry it, then we wash it somewhere and - voila !! The old lace is ready! The process seemed to me pleasant, tasty, fragrant and no less creative. At the very end, the old bow is hung on a ball, gold braid and colored ribbons add zest. I must say, the look of the toys is solemn.
Author Khristenko Svetlana
Christmas balls.

We will decorate a plastic ball using decoupage technique. Special skills are not required for this. So let's get started!
We will need:
Plastic balls dia.8 cm,
- acrylic paints: white, yellow, blue,
- acrylic lacquer,
- three-layer napkins with a pattern,
- PVA,
- sequins,
- some semolina
- contours on glass and ceramics,
- flat synthetic brushes,
- piece of sponge
- a palette (I have a plastic board for modeling).
If there are no special blanks for balls, then ordinary balls without a pattern can be used.

We take a ball and a piece of sponge for washing dishes, put a little white paint on the palette, blot it with a sponge into the paint and smack the ball. There should always be paint on the sponge, then it turns out like a snow coating on the ball.

We do this with all the balls and hang them to dry (1 hour). Here's what happened

While the balls are drying, prepare the napkins.

Separate the top paint layer from the white ones.

Carefully cut or tear out motifs.

We dilute the PVA half with water and glue the motifs on the balls. We start gluing from the middle of the motive and gradually move towards the edge.

And so we do with all motives.

For balls with bunnies, we direct light yellow paint and smack on a white background around the motif.

When the paint dries, cover the ball with varnish.

It turned out such beautiful balls.

Now let's make them New Year's!
We take a little white paint and pour semolina into it so that we get a thick porridge and apply it with a thin brush on the ball in those places where we will have snow.


The ball is ready!
Author Slastina Elena.
For inspiration:


Albina Zakirova
In anticipation new year, my children and I decided to make gifts for our beloved parents.
One of the most popular types decoupage is decoupage on wood.
Decoupage - technique decorating interior items, fabrics, wood, glass using paper applications. Word decoupage With French, denotes "cut out".
essence decoupage technique is that an image cut out of thin paper is pasted onto the surface of the object, which is then varnished. Decorative pattern for decoupage can be cut from a regular paper napkin, label, magazine, or you can use special napkins for decoupage.
Blanks for this creativity can be easily purchased on the free market.
For this we used:
1. Wooden blank ball
2. 3-layer napkins (different)
3. PVA glue
4. Acrylic paints.
First, I made blanks (I primed the wooden ball on both sides, glued napkins on the ball. Each child chose the design of his ball.


Like these ones Christmas tree we got the balls.


Class decoupage creative and exciting, creating new and unusual things, you can present unique gifts to loved ones or decorate the house, as we did with children.
Everyone was satisfied!
Related publications:
With parents and with children, we decided to do new Year decoration for the group. Parents brought old CDs and paper napkins for decoupage.
There is very little time left before the New Year, and we all continue to invent something, decorate the group, and make crafts. Job.
An empty wrapper - that's a toy! No ball, no beads, not even a cracker. Empty wrappers are light and beautiful. The foil reflects the overflowing lights.
CHRISTMAS TOYS WITH YOUR HANDS (prize place on the governor's Christmas tree) The new year is just around the corner. I probably won't be mistaken if I say that.
From the first of December and, for almost the entire month, in our kindergarten"Sunshine" was reviewed - a competition of joint creativity of children and parents.
The idea to make Christmas decorations from snail shells came to me, of course, in connection with the approach of the New Year. I have had them at home for a long time.
The New Year is coming. Very soon, the children and I will decorate the group and holiday tree. In connection with these events in the classes on testoplasty.
The New Year is approaching, and now is the time to think about holiday decoration interior and Christmas tree. Of course, today, without any problems, you can buy any Christmas tree decoration in the store. But after all, Christmas decorations made by hand look much more interesting and original.
One of my latest handicraft hobbies is decoupage. It is in this technique that I want to decorate the Christmas tree ball. Let's see what I get as a result. As a basis for creating your own original and unique christmas decoration I decided to use the most ordinary and cheapest plastic christmas ball, purchased at the nearest supermarket:
And I absolutely do not care what color it is - anyway, I'm going to transform it beyond recognition.
Except Christmas ball I have prepared for work:

- a beautiful decorative napkin with a New Year's pattern,
- primer,
- acrylic paints (white and gold),
- brushes,
- small piece of foam
- fine-grained sandpaper,
- scissors,
- decoupage glue,
- a thick cotton thread of white color (I have a cotton “Lilac”, but you can also take No. 10),
- PVA glue,
- gold glitter,
- glossy acrylic lacquer
- golden organza ribbon
- golden lurex thread
Master class: how to make decoupage of a New Year's ball with your own hands
To begin with, I disassemble the Christmas ball into parts, which I then cover with a layer of white primer.
When the primer is dry, I apply white acrylic paint to the surface of the ball with a foam rubber sponge in three layers. Let each layer dry well.

After making sure that the paint is completely dry, I process the surface of the ball with fine-grained sandpaper. I really want the surface of the Christmas ball to be as smooth as possible.

Of course, it was not possible to achieve a perfectly flat surface. Lack of patience and fear of overdoing it and rubbing a hole in the paint layer interfered.
After removing the dust from the surface of the ball with a dry napkin, I proceed to decorate it using the decoupage technique.
While several layers of acrylic paint were drying, I did not waste time - I cut out decorative napkin two drawings and, having layered the napkin, left only the top paint layer for work.

Now I glue the prepared napkin motifs to the surface of the ball on one side and the other, using decoupage glue and a wide flat synthetic brush.
For the first time in my decoupage practice, I manage to paste both motifs without a single crease. And this despite the fact that the surface of the product is not flat, but spherical! Perhaps the dusty and uninteresting work of preparing a smooth surface for decoupage was not in vain?

The pasted motifs must also be allowed to dry. While the glue dries, I paint the eyelet for fastening Christmas ball with gold acrylic paint, again using a piece of foam rubber for this purpose.

Since the drawings I have chosen do not cover the entire surface of the ball, I decided to decorate the empty spaces in an interesting and completely simple way.
I cut a few pieces of white cotton thread 12 cm long. You can use longer pieces, but my ball is quite small, so I don’t need long pieces of thread.
I alternately moisten each piece of thread with water, and then cover with PVA glue. Glue can be applied with anything: brush, sponge. But I prefer to do it with my fingers.

Wet threads are laid in the form of a pattern on the surface of the ball. My imagination was only enough for curls and loops, but in general, of course, the pattern can be absolutely anything.
In those places where the thread lay unevenly, I correct it with a thin flat brush dipped in water.

Thread patterns dry very quickly. Therefore, as soon as the last thread is laid, I begin to cover the curls with gold sparkles, drawing each element of the pattern with glue glitter.

Finishing work on decorating the New Year's ball, I cover it with a glossy acrylic varnish the ball itself and a loop for fastening. I apply the varnish in two layers with intermediate drying.

Having meticulously examined the finished ball, I decide to complement it with a bow of a translucent golden ribbon. I tie the ribbon to a loop and thread a golden lurex thread there so that the ball can be hung on a Christmas tree.
I admire a completely transformed cheap Chinese plastic ball and think that even a non-certified magician can create a small New Year's miracle with his own hands.


Toys are a very exciting activity that even those who have not been fond of anything like this before can cope with. Create some crafts for the Christmas tree yourself. They will delight you every time you prepare for the New Year holidays.
List of required tools and materials
- The most important thing is napkins with a suitable pattern or simple pictures.
- Next, you will need decoupage glue. It can be replaced simple glue PVA, which needs to be slightly diluted with water.
- Tassels. It is better to take synthetic ones, since the pile practically does not crumble from them.
- Varnish. You can take a special one for decoupage, craquelure to create cracks, or one that is available.
- A piece of sponge. You can cut off a little from a kitchen washcloth for washing dishes.
- Acrylic paints. Quantity and color depends on your wishes.
- Ribbons so that the toy can be hung on the Christmas tree.
The rest of the list depends on the design of the crafts. So, for example, to make New Year's toys with a three-dimensional texture, you will need to take a structural gel. It is applied in strokes, hardens and takes shape. Then it is painted in the desired color.
Various sequins, beads, rhinestones and other small decor may also come in handy. To stick these materials, it is better to use a cool gun.
What crafts can be made from

Decoupage New Year's toys impossible to do if you don't have a base. In its capacity, you can use the following materials:
- old ;
- special round shapes from foam (there are any diameter);
- wooden bases of any shape (for example, a ball, Christmas trees, stars, and so on);
- transparent glass or plastic balls;
- old light bulbs;
- thick cardboard, from which various figures are cut out, and much more.
Decoupage of New Year's toys - a master class for all design options
Instructions on how to make crafts using decoupage technique:

- Take your base and, if necessary, clean it of dirt (such as peeling paint, paper labels, etc.).
- Cover the base with a layer of acrylic paint. If you want to completely decorate the craft with a napkin, then take white paint as a substrate. If you will be gluing small elements, then draw the background of the desired color.
- Cut out the part of the picture that you will glue. It is best to soak the brush in water and run it over the napkin. Tear off excess paper easily.
- Coat the area on the base with glue and lean the picture.
- Go over the picture with a thin layer of glue.
- Let the craft dry completely.
- Then pour some of the paint you used for the background onto the paper or palette, lightly dip a sponge into it and go over the edges of the pasted drawing. Movement should be light.
- Cover the craft with a layer of varnish.
- Attach a ribbon to hang on the Christmas tree
Decoupage completed. At your discretion, you can sprinkle glitter on top, draw paint individual elements drawing or making a shadow, sticking rhinestones or beads, and so on.
Possible options for decorating Christmas tree toys

- Take the finished base (for example, an asterisk or a ball), cover with a layer of paint, and then glue the entire napkin. Turn the base over and go around the edges with a brush dipped in water. Tear off excess paper. Do the same with the reverse side. Coat the edges with paint.
- You can make Christmas toys. The master class consists in the fact that, after the glued pattern has dried, a structural gel is applied to the base. With it, you can depict snow or some elements. It is better to mix the gel with paint in a separate container or cover with acrylic at the end.
- Take a ball and cover it with a layer of paint. Then tear the patterned paper into several pieces. Glue each piece separately. It will turn out a very beautiful New Year's toy.
- Prepare the base. Cut out the circle and glue it on. Cover the craft with varnish. Using a glue gun, place flat-bottomed beads (special droplets) along the outline of the picture. The image will appear to be in a frame.