Star News


Easter bunny (hare) with your own hands. Detailed master classes with diagrams and patterns. DIY Easter bunny Easter bunny craft
Easter cake), and the Orthodox rabbit is considered a symbol and hero of the holiday in Western countries.
According to ancient legends, this wonderful animal collects and hides chocolate eggs of different colors in its shelter, and as soon as the children wake up on Sunday morning, they go to look for the animal's mink where delicious sweets can lie. But they do not go to everyone, but only to those children who behaved well and studied well during the year. In another legend, they were looking for dwellings, and one of the children who finds eggs in it will be happy and lucky all year.
In our country, there is such an interesting custom. You probably remember when you were still small, your parents would bring some kind of yummy, and you ask where did you get it? Adults say that the bunny brought a present and you run around the house and rejoice, not knowing how he could do it.
So in Russia, too, everyone knows about the Easter Bunny and for this holiday in kindergartens, and in primary school prepare crafts of this gentle animal with their own hands. So I would like to tell you how to make it from different materials and it will be not only a souvenir for Easter, but also a good gift for children.
Making a paper animal is not difficult. It will be especially funny for your children.

We will need:
- Pencil;
- Scissors;
- Ruler;
- Paper.
1. First, we need to cut out a square of colored paper, equal in length and width.
2. Fold this sheet in half.
By the way, all the lines that you bend should be clear and even, along them you need to fold our rabbit.


4. Unfold the paper, you should get separated lines from the fold. And we begin to bend one section, then another. The photo shows how to do it.

5. We take the middle with our fingers and bend it to the first section. Now connect the bottom side to the top.

6. Expand again, we should get even 8 sections.

7. Fold one and the other side diagonally. See what the end result should be.

8. We count 3 sections and bend.

9. Take the lower right corner with your fingers and bend it a little in the middle.

Thus, we bend to the end so that the middle of the triangle just barely reaches the corner bend.

10. We turn the hare over on the other side and do the same operation.

11. All the ears are done, go to the back. We make a corner along the second line from the bottom, first in one direction, then in the other, so that it is easier to work inside the hare.

12. We unbend the back part and start the triangles inward.

13. We wrap the back along the lines that we have.

14. And now we bend the body of the rabbit in the middle, and in its head part we press it to the ears

15. We do the same with the second side.


17. And we begin to form the ears, and in order to do this, we should get 2 folds on each side. See the picture for how to make them.

18. Now from the nose to the ears, we also bend a little.

19. We bend all the corners from the bottom of the rabbit inward, but not much, just a little bit, so that the animal stands.
20. Then we open the bottom and our wonderful animal is ready.

21. You can paint over the ears, in a redder color, and paint on the eyes, but this is already at your request.
22. You can easily put an Easter egg in it.
By the way, if you are doing it for the first time, then first practice on an unnecessary sheet of paper, otherwise it will not work the first time.
Easter bunny made of fabric with your own hands
I want to show how easy it is to make this beautiful souvenir, and in the easiest way. According to this option, you can sew not only a hare for Easter, but also any other toy that you like. Let this cute creature delight your kids on this wonderful holiday.

We will need:
- Textile;
- Holofiber balls;
- Thread;
- Needle;
- Beads;
- Satin ribbon 2 pcs;
- paper cord;
- Bar;
- Sisal 2 colors.
1. First you need to draw the stole on cardboard and carefully cut it out.
2. Take the fabric and fold it in half with the front side inward.
3. We put the cut out part on a rag and outline it.

4. Where is the hind paw in the figure, we make 2 notches with a pen or pencil, so that this place is not stitched.
5. Along the contour lines that we drew, we begin to flash. The width of the tie is approximately 2.5 mm.

6. We begin to cut out the rabbit, stepping back from the seam about 5 mm.

When you cut out the bunny, do not forget to cut 3 notches with scissors on all rounded areas (under the paws, on their tips, on the ears, near the tail, and so on). We make them without reaching the seam 1 mm. so that when turning the part, the seam does not spread.

8. So that it is not crumpled, it is advisable to iron the bunny.
9. Also, with the help of a stick, we fill the hallofiber. We start pushing from the ears and most importantly, so that there are no empty spaces.

11. We make eyes, and for them we need beads and black thread. We sew them through.

12. We begin to decorate the toy. From satin ribbon make a bow and fasten it with a thread.

13. Sew to the neck of the rabbit, do the same with the rest of the ribbons.

14. You can also glue a flower and beads on top.

15. Well, the bunny is ready, if you want, you can make a stand for it.
16. Glue sisal on a block, and on top of a hare.

Rabbit from felt for Easter 2020
It turns out a very interesting souvenir, and children especially like it. Imagine if the child will help you do it. I will say right away, be patient, because he will be eager to help. But it's worth it, because this fluffy animal will not only decorate the festive table, but will also cause great delight among your children.
We will need:
- Felt three colors (white, beige and yellow);
- Threads in the color of felt;
- Glue fabric;
- Holofiber;
- Pencil;
- Paper.
1. First, what needs to be done is to draw a bunny, cut out all the available details.

2. Also draw a testicle and cut it out.
3. We will have it from yellow felt, so you can outline and cut it.

4. In this way we make details from white felt:
- torso 2 pcs;
- head 2 pcs;
- ears 4 pcs;
- Paws rear 2 pcs;
- Paws front 2 pcs;
- Cheeks 2 pieces need to be done so that they are mirrored.
By the way, when you draw the contours, the cut paper can be attached with pins so as not to move.
5. And the same from beige:
- Inner ears 2 pcs;
- ext. paws 2 pcs;
- spout;
- mouth.
6. Start stitching. With threads (preferably double) of white color, we connect the body to each other and sew from the edge of 2 - 3 mm. passing through the loop from below.

Distances should be the same.

We do this in a circle, but not completely, to fill our hare.
7. Using glue (moment crystal), glue the front legs and legs to the body. You must first glue the pink inserts to the hind legs.

9. Getting to the head part. Glue the inner ears on the outer ears.

10. We sew overeating part of the ears from the back. Just like the body at the end of a little - a little filling with cotton.

11. We form a face. We insert the ears and fix it with the help of pins, we also insert the torso.

12. Glue the mouth, cheeks, nose and eyes.

13. On the cheeks, draw small stripes in the form of antennae.
14. We sew the head in a circle, not forgetting to fill it with hallofiber and paste it on the body.

15. Glue an egg to the Easter Bunny, and it's ready.

You can give to relatives, relatives, children, or keep this souvenir as a keepsake.
Video tutorial on how to tie a rabbit?
How to crochet a very interesting animal? I think everyone will like this idea. The fact is that you can not only give it as a gift, but even put a bottle of lemonade on the neck or close an Easter egg on the festive table with a bunny. It looks very original, so watch the video and understand for yourself.
After watching the video, I think it became clear how to make such an unusual animal. A good souvenir and gift for your loved ones.
The scheme and pattern of the Easter Bunny
The most interesting thing is that the Easter Bunny can be made even from felt, or fabric, as you already understood. But for this you need a pattern. There are people who do not know how to draw well. Therefore, the animal can be made according to the scheme that will be proposed below. And then, everything is simple, we copy from the monitor onto paper or copy and print, cut, put on the fabric you like and transfer the images. In general, there are no difficulties.
Option 1:
1. First, make a copy, cut out the hare pattern in duplicate

2. We do the same with additional details.

3. Eyes and fingers that are small details can be cut out by eye after you sew the hare.

And you can do it this way, draw a hare on the material in duplicate and cut out all the details from the same paper.
Option 2:
We also cut out the hares, transfer them to the fabric, sew, stuff them with cotton wool.

Option 3:

Option 4:

Well, choose a rabbit that you will be interested in and start sewing.
If you have any ideas about this article, you can write comments.
Spring is already in full swing, and very soon one of the most important Orthodox holidays- Easter.
Since childhood, we have become accustomed to the fact that the symbol of Easter is primarily colored eggs and Easter cakes. But gradually other symbols enter our lives. Easter bunnies are also among them - a symbol of fertility and fertility.
Last year, Krestik already talked about where this symbol came from, and also showed master classes on making a wonderful Easter bunny in different techniques needlework.
The wonderful tradition of making DIY crafts for Easter is preserved, and today we want to offer you other options.
Gypsum Easter Bunny

To make such a rabbit, we need:
- Gypsum (alabaster, etc.)
- Vegetable oil
- Empty tin can or plastic cup
- tassel
- Stir stick
- Kinder Surprise Egg
- Plasticine
- White acrylic paint
- Thick colored paper
- Dry grass, moss or decorative sisal
- Ribbon
- Small flower pot

Let's take an egg from a kinder surprise (these will be molds) and grease them from the inside with vegetable oil (so that the gypsum is well behind the molds later)

And plasticine will be needed for small rings - coasters. A mold fixed in such a stand will definitely not turn over.

We take a dry mixture of gypsum and dilute it with water to the consistency of liquid sour cream.

Pour the resulting mixture into molds. And let it dry completely.

Carefully remove the frozen halves. If the edges are uneven, then they must be sanded with sandpaper. Wash off the dust with water.
This procedure is best done with gloves!

Let's move on to decorating. We paint the blanks with white acrylic paint.

While the paint dries, cut out two blanks for the ears from colored paper.

And we collect everything with the help of a thermal gun.

As you can see in the photo, the edges of the lugs are beautifully decorated with machine stitching. This can be done on a sewing machine, or you can do it easier. Pierce small holes along the edge of the ears, and then draw a line with a regular pencil. You will get an imitation of a machine line.
We draw a muzzle for a rabbit and plant it in a pot. Decorate with grass or sisal, tie a ribbon.
The basis for the rabbit does not have to be made independently from gypsum. You can take an empty chicken egg (a more fragile option) or buy a wooden blank.
And carefully sew the hole with a hidden seam.

With the help of a ribbon or rope we tighten the ears. Sasha is ready!


Optionally, you can make a muzzle for a rabbit out of contrasting fabric.

Master class original
Fabric rabbit
Textile bunnies are great DIY Easter gifts!

To make one such rabbit, we need:
- cotton fabric
- synthetic winterizer or other filler for toys
- small piece of cardboard (optional)
We cut out the template of the future rabbit from paper:

And transfer the pattern to the fabric, folded in half.

We pin it with pins so that the parts do not move and sew two sides on a sewing machine, leaving a small unsewn space for eversion (it is most convenient to leave a hole from below, on the rabbit's stomach).
This method - first sew the details, and then cut them out - is great for small elements: the fabric does not crumble, it shifts less.

Cut out with small allowances. To make it convenient to turn the toy, we make small cuts in the places of bends.

We turn it out, carefully straightening all the corners.

And we sew the ears in half. We carefully tie the threads.

We stuff the toy with synthetic winterizer or other filler.

So that the rabbit can stand without support, you can make him a stand. To do this, we cut out a small oval from cardboard, and a little oval from cotton fabric. bigger size. We cover the cardboard stand with a cloth. We tighten the edges with a “forward needle” seam.
Natalya Melkova
easter bunny- one of the symbols of the Easter holiday. Even at the beginning of the 20th century, bright Easter cards depicting a fluffy rabbit with a basket of colorful eggs were popular in Tsarist Russia. And the first mention of a hare as a symbol of Easter dates back to the end of the 17th century. It is believed that the Easter Bunny comes from Germany, because it was there that the first written mention of it was found. The bunny/rabbit was a constant companion of the Anglo-Saxon goddess Eostre (Ostara), the patroness of Spring and fertility. The onset of spring, namely the day of the vernal equinox, was her holiday, and the symbol of the holiday was the rabbit, symbolizing fertility. Rabbits are famous for their fertility, and it was with this quality that the devoted friend of the goddess symbolized the continuation and renewal of life.
In the same place in Germany, in Munich, there is the only Easter bunny museum in the world, which got into the Guinness Book of Records. The museum has over 1000 different exhibits that arrived there from all over the world.
There are many beautiful legends about the appearance of the Easter Bunny. One of them says that during the Great Flood, when the ark was floating on the waves, it stumbled upon the top of the mountain, and a gap was formed in the bottom. The Ark should have sunk, if not for the bunny, who plugged the hole with his tail. And in memory of the brave hare, a beautiful tradition was born and taken root of a magical animal that lays bright, painted eggs.
Today, the Easter Bunny enjoys great love and is one of the main elements of Easter decor. Hares are baked for Easter - cookies or muffins, made from chocolate, mastic, etc. Souvenir hares made of ceramics, plastic, glass, fabric, wood, wax or children's crafts are comfortably "arranged" on mantelpieces, window sills, holiday tables and take part in the Easter celebrations with us. In many Catholic countries, there is such a popular game as Easter Bunny Hunt, which is also successfully taking root in our country - adults hide eggs throughout the house and garden, and kids rush around with delight, trying to find brightly colored eggs, as well as their chocolate ones. imitations.
I bring to your attention two options for the master class easter bunnies that will decorate any interior and make Holy holiday Easter more colorful.

OPTION #1.

For work we need:
* Multi-colored cotton fabric (a small patch of 10 x 18 cm is used for one bunny);
* Reinforced or cotton threads - for stitching parts;
* Mouline threads - for embroidering spouts;
* Plastic eyes for toys or beads;
* Nylon ribbon (width 1 cm and length 50 cm) - for a skirt and a bow;
* Pattern of a bunny.

Progress:
Fold the fabric in half, right side inward and outline the outline of our pattern.


Cut out, taking into account the allowances.

We sweep away the details, stepping back a little from the edge (so that, subsequently, we can easily turn the product on the front side, and sew it on a typewriter.


We sweep and sew tucks.

Cut off the excess fabric, leaving a small allowance on the darts. We twist.

We stuff our bunny with holofiber or cotton wool tightly enough to a pleasant elasticity. It is more convenient to do this with long tweezers or a pencil.


Sew up the opening carefully with blind stitches.


We outline the nose and mouth and embroider them with floss threads.


We turn the allowances of the ears inward and pre-pin with pins, carefully sew with hidden stitches.


For the skirt, I used a nylon ribbon 50 cm long (37 cm - directly for the skirt itself and 13 cm for the bow). We sew the tape together to form a single ring, and assemble it into an assembly, beautifully and evenly distributing the tails. We put the skirt on the bunny and sew it with hidden stitches.


We outline the eyes, glue or draw them with acrylic paint.

From the remaining ribbon we make a bow and sew.


Bunny is ready!


Here is such a nice company of bunnies will help you decorate the interior of the group for the holiday.

OPTION #2.
These felt Easter bunnies are not difficult to make, as they do not consist of more details and actions.
For work we need:
* Multi-colored hard felt;
* Filler holofiber (sintepuh or cotton wool);
* Marker self-disappearing for fabric and felt or pencil;
* Mouline threads - for stitching details;
* Various accessories for decoration (rhinestones, flowers, ribbons - ribbons, bows, etc.);
* Wooden skewers;
* Pattern of bunnies.


Progress:
Fold the felt in half, right side inward and outline the outline of our pattern. It is more convenient to do this with a self-disappearing marker. The contour of the pattern is marked brightly and easily disappears with water, leaving no marks on the felt / fabric.


Cut out.

We sew, leaving a small gap, through which we lightly fill the bunny with holofiber or cotton wool to give it a light and pleasant volume.

We cut out flowers from contrasting felt, decorate them with rhinestones, buttons and ribbons.

Carefully sew the decoration with hidden stitches or glue it with fabric glue.


Similarly, you can make felt Easter eggs.

Using wooden skewers, Easter bunnies can become one of the decorative elements of the composition. Here are some example options:


Such compositions can be easily made using improvised materials.
For this we need:
Flower pots. (For Easter decor, I always use 150 ml mini pots, which in a festive interior, combined with green grass and flowers, look very impressive and colorful).

Grass seeds (a special mixture of cereals can be bought at any flower shop or seed store, such as the seeds in the photo).


We put porous drainage at the bottom of the flower pots.

We fill the earth on 2/3 of the pot and plant the seeds.

Cover with soil and water. We are waiting for shoots.

After a week, the grass looks like this.

For additional decoration of the composition, from salt dough, we sculpt decorative flowers.

We decorate.


We fill the pot with decorative pebbles, put sisal on top.

We decorate with braid.

For decoration we use plastic models of Easter eggs and, of course, our creation - Easter bunnies on skewers. Additionally, the composition can be decorated with willow branches or flowers.

I will be very glad if my master class turned out to be useful and interesting. Happy creativity!
Good day to all. It's no secret that very soon it will be Easter - the warmest and most sincere holiday. And it is also filled with special colors, and allows you to gather all your relatives, relatives and loved ones on this day. Let me remind you that this year we celebrate Svetloye Christ's Resurrection we will be April 8th.
If you are a frequent guest of my blog, then you are already fully armed and ready for this event. Because we have already considered the main points in detail: we learned how to bake and cook, too, and we can even creatively approach the design of the house and the table.
But today I have another idea for you. And I want to talk to you about the cute fluffy symbol of the holiday, the Easter bunny (hare). This tradition came to us quite recently, from Germany, but is already gaining momentum and is very popular.
This product can act as an independent gift toy, a souvenir, or be in the form of a stand for dyes or act as a basket for other attributes of the holiday, as well as decorate the interior.
This time I have selected the most beautiful and original, in my opinion, options for crafts, and I present to your judgment the detailed processes for their manufacture. I remind you that all works are taken from the free access of the Internet.
Master class on making an Easter Bunny with egg pockets
And we will start with the most popular product that flooded the entire Internet. It is understandable why, since the following rabbits are a real find, because it is not difficult to do, but it looks just perfect.
So, attention! For those who know how to crochet, I propose to make such cute animals here. I am sure not only children will like this decoration.

We will need: threads of different colors, hook, scissors, needle, eyes, nose, mustache, ribbon, cone.
Work process:
1. We will start by knitting a pocket. To do this, with a beige thread, dial 78 in. p. and connect them in a circle, then 3 in. lifting and 11 st. s / n, then 1 tubercle (1 yarn over, then insert the hook into the base loop and pull the thread, this must be repeated 3 times. Then grab the thread and pull through the loops to the last, and then through the last two loops). * 12 tbsp. s / n, 1 tubercle-repeat from * 4 times and close the row of connections. Art.
2. So you will need to knit 4 more rows, while increasing by 1 tbsp near the tubercle in each row. s / n, so that in the fifth row between the tubercles there are 16 columns. Knit the tubercles respectively into the tubercle of the previous row, inserting the hook below the loop. After tying, fasten the thread and cut.
3. Now let's see how to tie the torso. You need to dial 78 in. n. and connect them in a circle. Next, knit according to this pattern:

1 row: 6c. n. and 1 c. n turn, 6 tbsp. b / n and 1 c. p. turn;
2 row: 6 tbsp. b / n;
3-4 row: at the beginning, add 1 tbsp. b / n, 6 tbsp. b / n and 1 c. p. turn;
5-10 row: 7 tbsp. b / n;
11-16 row: decrease in each row 1 tbsp. b/n. Tie white and beige ears together.
5. Tie the muzzle: 1 row - white thread 5 in. n. + 1 c. p. turn; 2 row - 4 tbsp. b / n, 1 c. p. turn; 3-4 row - 4 tbsp. b / n; 5-6 row - subtract 1 tbsp. b / n in each row.
6. It remains to put everything together. Fold the torso and pocket together with the edges and tie 1 next to st. b / n white thread. And along the upper edge of the pocket, tie 1 row of st. b / n with a white thread, while capturing the tubercles of the body.
7. Thread a decorative lace or ribbon into the holes on the neck. Fill the head with filler, then sew on the muzzle, glue the eyes and nose, and make the antennae.
The finished bunny is best placed on a flower pot or cardboard cone.
By the way, I found this craft on an excellent site, country of mothers.
And I want to show you in what colors you can still make such a product.


And for your convenience, I am sending you a photo description of such a cute souvenir. You just have to save and print, and then link.


Or maybe you have already made such a cute egg stand? If yes, then don't be discouraged, but read on, there will be many more options.
Crocheted bunnies with diagrams and descriptions
Well, since we are talking about knitting, it is logical now to talk about it.
Exists a large number of toys that can be crocheted and knitted. And for those who are fond of such needlework, it will not be difficult to do Easter work from threads. The main thing is that the schemes are at hand. I tried to find detailed descriptions on this issue. I hope you choose something from the next selection.
An excellent sweet couple, and clothes can be sewn from felt or fabric.


But look what simpotyagi with wheelbarrows!!


This is a very simple option, but it looks no worse than the rest. And if you are just starting to master the crochet technique, then this idea is for you.

Look at what cool warm warmers, I think this table design will definitely not go unnoticed, such cute animals will make everyone smile involuntarily.

I also liked this version of the heating pads, made as a single napkin, but you can also knit them separately.


And since I'm talking about napkins, here's a non-voluminous version of the Easter decoration.


Or such a delicate work, do not forget to starch it!


And here is a variant of a knitted basket with our eared animal, beauty and nothing more.


See how many knitted ideas, choose what you like.
How to make a felt bunny for Easter?

We will need: sheet felt of different shades; colored floss threads; sewing needle; colored thin satin ribbons; synthetic winterizer or any other suitable filler; simple pencil; scissors; paper.
Work process:
1. First, make a craft template on a piece of paper or cardboard. you need two easter eggs different size and one rabbit.

2. Now cut out the hare template and transfer it to a piece of felt sheet folded in half, cut out two identical parts.

3. Remove the back part for now, but we will decorate the front part with embroidery. Start with the flower by forming its petals from loops of thread, securing each with small chain stitches.

4. The middle of the petals must be filled with stitches.

5. Take a thread of a different color and form voluminous stitches in the center and do not completely pass the needle through the fabric to the front side, wind the turns of the thread on it, and then insert it again into the fabric after a small gap and pull the entire thread through the turns, as a result get the original bulk stitch.

6. Make three or four of these three-dimensional stitches.


8. Take black threads and embroider the muzzle, eye and nose with them.

9. Now you need to connect the front to the back. Sew them evenly along the edge, and start from the lower right edge upwards with a floss thread in a contrasting color. Use a regular needle-forward stitch. The stitches should be even, uniform and small in size.

10. At the top of the ears, insert a piece from a thin satin ribbon, approximate length 4-5 cm. Form a loop and sew into a toy.

11. When your workpiece is practically sewn, fill it with padding polyester, which is then evenly distributed inside.

12. When sewing up the bottom of the toy, insert another piece of ribbon in the center, 3-4 cm long.

13. This is what you should end up with.


15. On the front of the egg, embroider a decorative flower with a voluminous center with colored threads, just like you did embroidery on a hare.

16. Connect both halves, starting from the lower right edge, sew with a needle-forward seam.

17. In the upper central part of the egg, insert the end of a piece of satin ribbon, the beginning of which is sewn in at the bottom of the animal.


19. Now cut out the template for the large egg. Cut out on fabric.

20. On the front, also embroider in the form of a flower.

21. Sew the details by sewing into the central part of the free end of the piece of tape, the beginning of which is sewn into the bottom of the previous small egg.

22. Stuff the workpiece with padding polyester and sew it to the end. Cover the junction of the ribbon and the egg with another bow.

23. You can also add one small bow at the junction of the first piece of tape with the bottom of the toy.

24. Your souvenir is ready!! It turned out to be an Easter pendant.

Many more souvenirs can be made from felt. Below will be given options for finished work.
We create crafts in the form of Easter bunnies from paper
If you want to do needlework with your children, then the following master class is definitely for you. First, you will get a lot of pleasure from joint activities, secondly, the most common and not expensive materials are needed, and thirdly, everything is done simply, but it looks cool.
I propose to make you such funny paper rabbits.

You will need: paper, glue, black cardboard, scissors.
Work process:
1. First, cut into thin strips in the form of rectangles.

2. Then glue the eight-pointed star, spreading glue in the middle.

3. Now also glue upper part paper to make a ball.

4. Make another ball in the same way, but only smaller. Connect them to each other with glue.

5. Cut out the ears and glue the pink center.

6. Cut out the necessary elements: eyes, muzzle, teeth. Draw a nose. Glue all the elements.

7. These are the funny ones.

And of course, paper crafts made using the origami technique are in demand. Therefore, catch options and folding schemes.
Such rabbits are best made from thick paper or colored cardboard.

How do you like this box? You can put any character in it.

How do you like this option for a decorative stand. By the way, it can be folded from paper, napkins or fabric.

Or here is such a fluffy with cabbage.

Here's another great table setting. From napkins you can make such rabbits.

Look what a wonderful and cool stretch!

Here are some very simple options from paper cones.

Or some hugs like this. The main thing is to prepare templates, then cut and glue.

Well, even kids can cope with such work, so educators, take note.


How to sew rabbits out of fabric?
And now I suggest you make a great congratulation or bright home decor. We will create with you from improvised materials. After all, we need scraps of fabric, buttons and braid, and a great mood.
You will need: pieces of multi-colored fabric; thermal gun or glue; scissors; threads; paper; interlining; needles; pins; beads; buttons; braid; synthetic winterizer; wire; wooden blocks; acrylic paint; sample.
Work process:
1. Print and cut out the template.

2. Stick a piece of interlining on the fabric, fold in half. Attach the pattern to the fabric and cut out two blanks.
3. Cut the braid or lace, and make a collar for the bunny by bending the ends of the braid to the wrong side of the fabric. Sew on eyes (you can take beads or buttons).
4. Now fold the front and back sides of the craft together, sew them, but leave a small hole to fill the toy with padding polyester. After filling, sew up the opening.
6. Glue the nose, make a mustache.
7. Additionally, you can make a loop of thick threads. Or make a stand using a wooden block. Paint it in any color and cut 10 cm of wire and attach a hare, make a hole in the bar and glue the wire there with a mass of a heat gun.
In the same way, you can sew a chicken, hen, rooster or egg.

And now I want to offer you to sew such cool eared ones. And they are made, you won’t believe what, from simple socks.

You will need: a sock with a long shin; thread and needle; small socks; scissors; stuffing; ribbons, beads, etc.
Work process:
1. Take a sock and fill it with any filler.

2. And to make the torso, tie part of the sock into a knot, thus leaving the lower leg for the ears.


4. Now cut the remaining edge of the sock in half to the knot.

5. Cut out the ears from these parts.


7. Using a few seams, highlight the handles.

8. Take baby sock and cut off the top to the heel, fold the edges inward and get a handbag pocket, glue or sew it on the tummy.

9. Now shape the face, glue the eye, nose, teeth.

10. You can put an egg in the pocket and glue the ears on it. Your craft is ready.

We sculpt a bunny from salt dough or plasticine
An excellent tool for making any souvenir is plasticine, or salty dough. It is also popular to use polymer clay. If you have these materials and you have a fantasy, then you can easily mold this fluffy Easter symbol or follow the following pattern.

You will need: any material for modeling, stack.
Work process:
1. Prepare necessary material. Take one stick.

2. Divide it into 4 equal parts.

3. Roll up a sausage from one part. From the second one more. These will be the paws.

4. From the third, form a ball. This will be the head.

5. And from the fourth form the torso, flattening it at the base.

6. And then smooth all the corners.

7. And press the top a little.

8. Blind small ovals from pink.

9. Blind two oval ears from white material and stretch the pink oval.

10. Form the paws according to the pattern.

11. Then blind the eyebrows.


12. Connect all the parts together. Blind the tail, muzzle and teeth. Designate a stack of eyes.

13. Insert black small balls into the holes for the peephole. Draw cilia and mustache. Additionally, you can mold a decorated egg.

And I offer a couple more photo options:


We sew a souvenir in the form of Tilda (patterns inside)
Toys depicting long-eared rabbits have become very fashionable in our time, and they are called "Tilda". If you know how to sew such products, then for this holiday, you can prepare such crafts. It will look very stylish, and if you are going to give such a bunny, then this will be a great gift. Even I would not refuse such a present.
If you have never tried to sew such a toy, but you really want to test your strength, then I found an excellent video for you. The author shows and explains everything in detail.
And of course, without patterns in sewing, nowhere, so I saved a couple for you, I think you will appreciate it.


And please note that all patterns are full size.
DIY Easter Bunnies
Well, here we come to the most interesting moment. When we learned what souvenirs can be made from and in what technique, I can safely now show you options for finished animals. Now you can choose what you like best and make for this bright holiday.
- Bunnies from plastic or paper cups, and you can also use a paper sleeve or egg coasters.


- Lovely knitted babies.

- fabric options.

- Here's another fun idea for painted egg cups.

- Wooden rabbits.

- Delicate silhouettes made of fabric and felt.


- And how do you like this option from a terry towel? Cool gift for kids.

- Or here's another variant with a folding scheme.


- But the sympathy from simple thick threads.

- Here are some more cute bunnies on felt sticks.

- This work is made of cardboard, and glue a paper cupcake pan on the back.

- Rabbits Tilda.

- "Sleeping" bags made of fabric.

- AND original coasters from salt dough.

And on this bright and colorful note, I end today's article. I hope, as always, was useful and interesting. I want everyone to stay positive!
P.s.: and it started snowing here, this is such a spring now.

- knitted fabric with a tufted/terry wrong side in light gray and pink,
- filler,
- flisofix,
- threads for embroidery in dark gray and pink,
- wool yarn,
- fork,
- scissors,
- tailor pins,
- needles,
- chalk pencil,
- sewing threads,
- templates
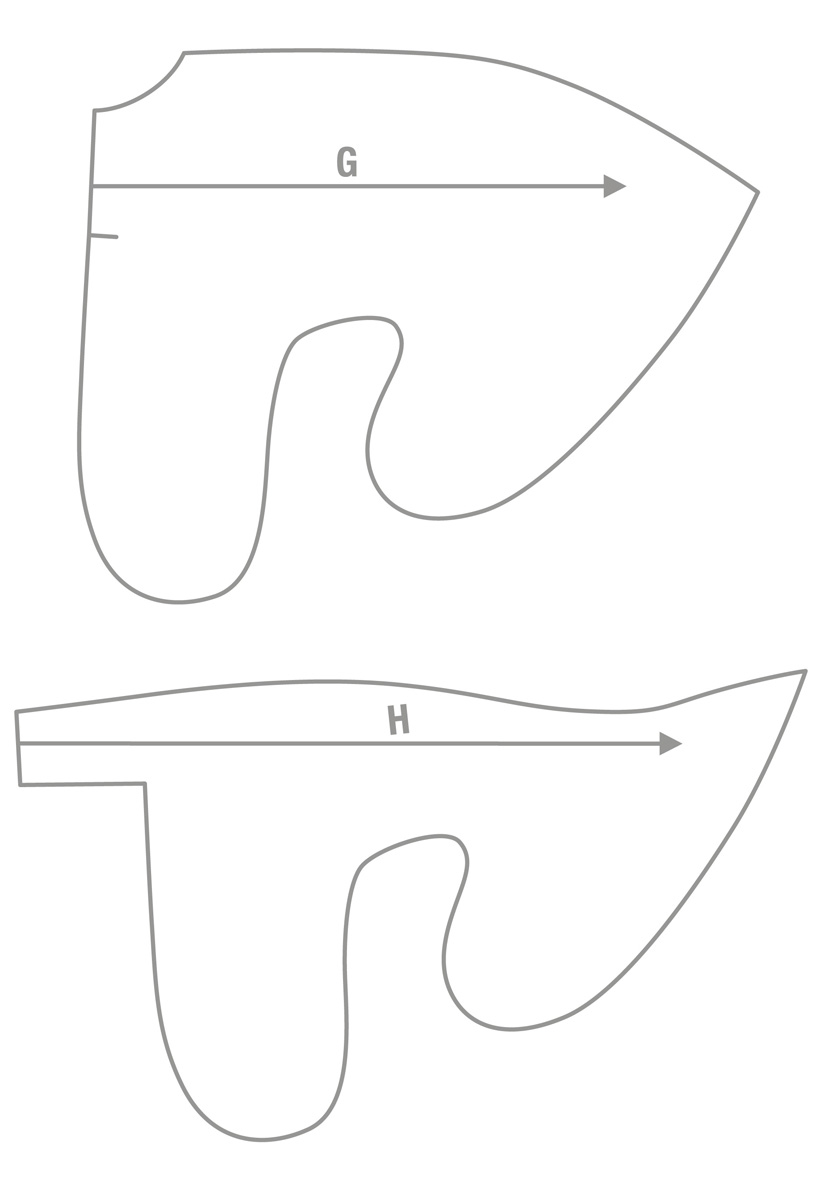
format, A 4

format, A 4
Step 1

Cut out parts A, C, D, E, F, G and H from light gray jersey with 7 mm seam allowances. Detail B cut out from pink jersey without allowances.
A 4x, B 2x, C 1x, D 1x, E 2x, F 1x, G 2x, H 2x.
Step 2 Ears

Parts B are ironed with a fleece fixer to two parts A and stitched along the contour in a narrow zigzag.
Step 3

Fold two pieces of each ear together right side inward and sew along the contour, leaving a small area open in the seam for eversion.
Step 4

Turn the ears inside out, insert between parts C and D right side to the front side and stitch.
Step 5

Pin each side piece E to pieces C and D right side to front side and sew.
Step 6

Sew detail F (lower part of the head/chin) in the same way. Then turn the head out and fill with filler.
Step 7
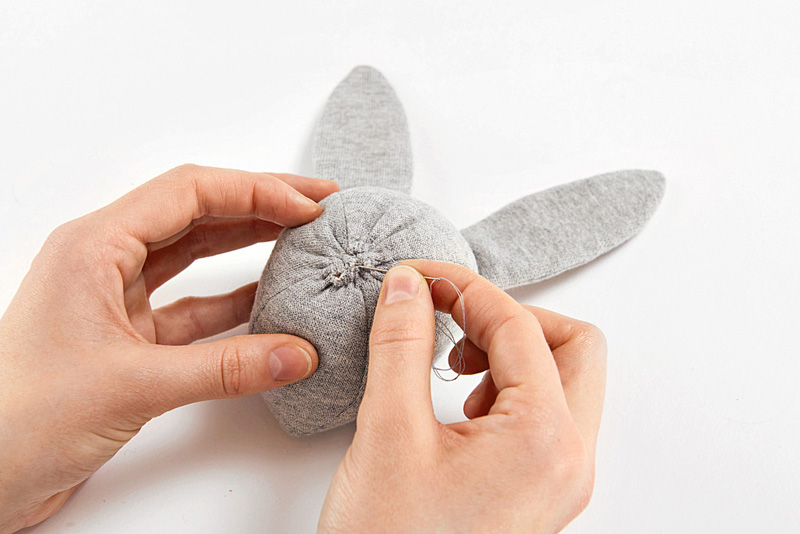
Along the hole at the bottom of the head (lower sections of the head parts), manually lay running stitches, then pull the thread well and tie it in a knot.
You should know it:
Step 8
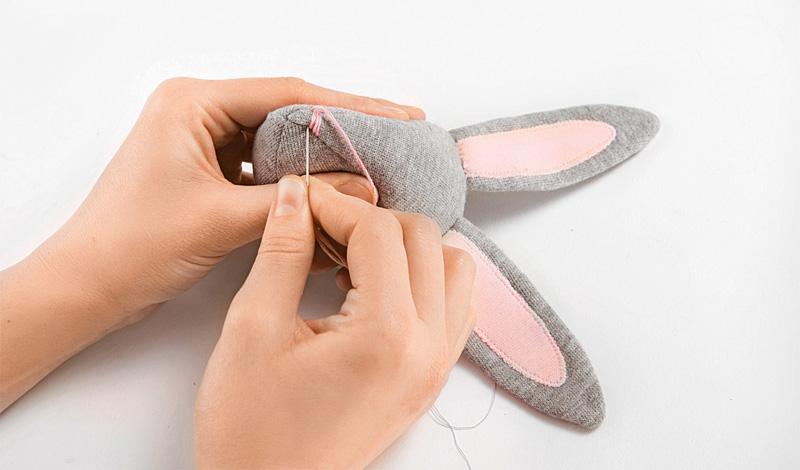
Hand embroider the nose with pink embroidery threads. Then embroider eyes with dark gray embroidery threads.
Step 9

Details G fold front sides and sew the middle seam of the back. Fold details H with the right sides and sew the middle seam of the front (stomach). Place pieces G and H right sides together, chop and stitch along the contour, leaving a small opening in front for turning. Cut in front.
Step 10

Turn the body inside out and fill with filler. Process the neck as described in step 7. Press your finger on the body so that the hind legs converge a little. Sew the hind legs to the body by hand in this position - so the bunny will sit. Sew the head to the body by hand.

For a pompom tail, fasten the not too long end of the woolen yarn between the cloves of the fork in the middle. Wind the yarn around the fork many times.
Step 12

Tie the winding in the middle with the free end of the yarn.
Step 13
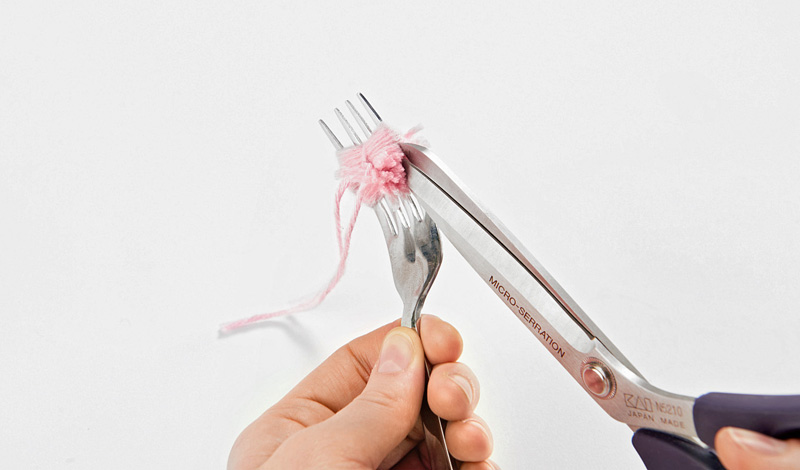
Cut the winding on the sides along the fork.
Step 14

Trim the pompom tail evenly and sew by hand to the body.
Source and photo: Burda 4/2018

