Star News


")


Interesting papier mache crafts. Papier-mache - what is it? Papier-mâché technique. Master class on making a papier-mâché mask
A cheap and durable material from which you can create any three-dimensional compositions at home is papier-mâché. Papier means “paper” in French, and mache means “ground, chewed, compressed”. The literal translation accurately conveys the technology of creating the material.
Sculpture is created in two ways: increasing volume or cutting off volume. To increase the volume, you need to sequentially add layers of paper impregnated with glue. To cut off the volume, you first need to form a shape from a viscous and plastic mass, into which paper turns when mixed with water and glue.
What kind of paper is suitable for making papier-mâché with your own hands:
- Soft multi-layer or single-layer paper. Napkins, toilet paper, paper towels. The softer the cellulose fibers, the faster they absorb water with glue.
- Plain printer paper. It absorbs water for a long time, but if there is no other option, this one will do.
- Notebook sheets, writing paper, notebooks, watercolor paper. Any cellulose-based material can be used, even cardboard. Thick and glossy sheets are poorly saturated with water, so you first need to compress the paper so that it becomes softer.
- Newspaper. This is ideal, as the newspaper sheet is strong enough, and at the same time soft. How many layers of newspaper you need to apply depends on the size of the product.
Before starting the process, you need to decide in what technique the product will be created.:
- mashing. The technique consists in gluing a rigid frame form. For the form, you can use: foil, bottle, jar, wooden block, any product that acts as a support for the final composition.
- modeling. Volumetric figures can be formed from papier-mache in the same way as from clay or sculptural clay. An important point is drying, it will not work to dry such a product quickly. It is more profitable to first create a frame and dry it, and then add volume with additional layers of paper. For modeling, a viscous mixture of cellulose and glue is created, which, when solidified, becomes solid. After sculpting, hands should be washed immediately with warm water and soap, then the glue will be washed off.

Before realizing your plan, you need to make a sketch and decide how to make papier-mâché: sculpting or mashing. The sketch will help to avoid mistakes, determine the technique and work out the image in detail.
The sketch may be approximate, not detailed. It is important to indicate the proportions and approximate dimensions of the product.
Machining: master class
Mashing is such a meditative activity that takes place in stages and sequentially. Haste can ruin the product, so you should tune in to measured work.
Master class on working with papier-mâché (video)
Mk on this papier-mâché technique:
- Prepare pre-cut paper. Some crafters claim that torn paper is better than cut paper, but it's really a matter of personal preference. To strengthen, you can use a bandage, it also needs to be cut. It is convenient when the paper is of different colors. For example, if a newspaper is taken, then layers with text will alternate with layers on which bright announcements are printed. The difference in color will help you figure out where you need to add the next layer, and where it already exists.
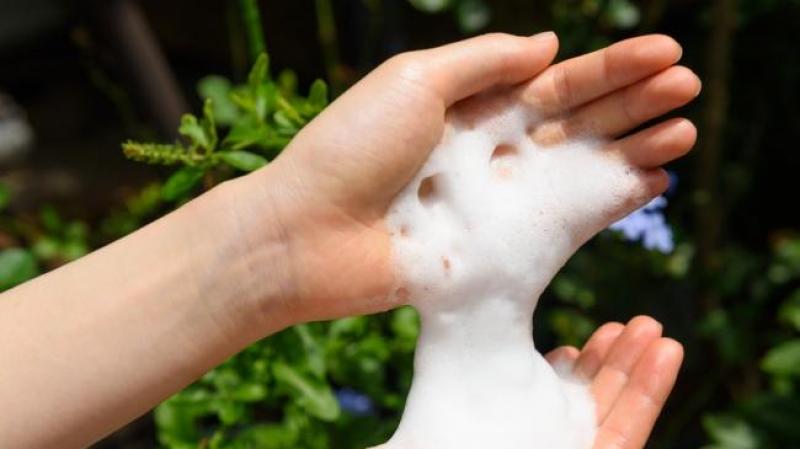
- Prepare a sufficient amount of PVA glue. Glue can be diluted with tap water, then it penetrates the paper faster. The maximum dilution ratio is 3 parts of glue to 1 part of water, the more water is used, the more friable the product becomes. Too much a large number of water will cause the sculpture to "float" and lose its shape. Undiluted glue is better for detailed and thin products. In addition to PVA, you can use glue for paper wallpaper or homemade paste. The instructions for the glue contain information about its toxicity, you need to choose an environmentally friendly glue without a strong odor, because it will take a long time to glue.
- For paste you need starch and boiling water. Pour starch into a cup, pour boiling water and mix until a uniform consistency. The density of the paste should resemble sour cream. After finishing work, the paste must be immediately washed off the cup, after hardening, it will be problematic.
- If the frame form then needs to be removed from the finished product, it is necessary to lubricate its surface with vegetable oil, petroleum jelly or any greasy substance so that the mass of paper does not stick to the frame.
- If the form is not planned to be removed, it can be covered with PVA or paste. After the preparation of consumables is over, you can begin to create a sculpture.
The technique of doing the work is very simple, it is easy to do it yourself with patience. The paper is applied layer by layer, the glue is spread with a large brush. Dry the layers to either dry or semi-dry state.
How to quickly dry papier-mâché: options
After the end of the increase in volume, the product must be left for 2 days. It won't dry quickly at room temperature.

How can you speed up the process:
- Put the product in the oven at 50-100 degrees;
- Use a heater, battery or heat gun.
Some craftsmen claim that the product may crack when heated. This is not true. To check for personal experience how the sculpture reacts to temperature, you can mold a very small product and place it in the oven. If the composition of the glue tolerates heat well, then dry in the oven. If any defects occur, dry most of the work already at room temperature.
How to make papier mache smooth after drying:
- Align the bumps with sandpaper or sandpaper;
- Sand the surface with a fine sandpaper;
- Cover with an acrylic artistic or construction primer;
- Apply paint, varnish, mosaics or decorations.

If a large and simple figure is made from papier-mache with your own hands, for example, a stump for a summer residence, coarse sandpaper is used to speed up the process.
If the figure is small and detailed, for example, flowers or fruits, you should immediately use fine sandpaper.
How to remove papier-mâché from the form
If the sculpture needs to be separated from the frame form, it is necessary to lubricate the form with Vaseline or any other fat cream. For mold processing, ordinary cling film is also used. It is tightly wrapped around the frame so that there is no air gap left. Then they remove the papier-mâché along with the film.

Scotch tape resists glue well, the smooth texture of the tape will prevent the form from sticking to papier-mâché. Pasting with adhesive tape is done in pieces, without gaps.
Papier-mâché: how to make by modeling
The technique of mashing makes it possible to create thin and durable things. If the work is more solid, without small details, it is more profitable to use modeling.
To prepare the mixture for modeling, you will need:
- Basin, cup, bucket, any suitable container that is at home;
- Mixer or drill with a nozzle for mixing paint;
- Sieve or mosquito net.

To make the mixture strong, wallpaper glue or PVA glue is added to it. To make the mixture plastic, you need to prepare a paste.
For paste:
- Pour boiling water over flour, 1 part flour to 3 parts water;
- Bring to a boil, stirring;
- Break the lumps, give a homogeneous consistency;
- Cool and add to mixture.
You can use starch paste.
Making a sculpture from a sculpting mix:
- Pour small pieces of paper into the basin;
- Add warm water and paste;
- Add glue and beat until smooth with a mixer or drill with a nozzle for stirring paint;
- Let it brew for 2-3 hours;
- Stir again;
- Let it brew for 2-3 hours;
- Squeeze out the water, if there is excess, pass the remaining mass through a sieve or through a mosquito net to separate large pieces;
- Sculpt.

The mass must be plastic enough to keep its shape. You can dry at room temperature, and if it does not crack, then in the oven at 50-100 degrees.
Working with papier-mâché at home
High-quality drying and compliance with proportions is necessary condition in order to get a beautiful and neat work. During drying, the product must not be moved, touched or poked with sharp objects to check readiness. Wet papier-mâché must not be dropped or squeezed. Drying should be in those rooms where children and pets do not run, which can accidentally spoil the product.

In order to be able to transfer the sculpture from the desktop to where it will dry, you need to immediately create it on glass, a tray or a board.
If, by an unfortunate accident, some part of the papier-mâché has separated or the product has broken, you should dry everything until cooked, then glue and grind the defects at the junction. You can increase the volume and restore the sculpture, which was injured.
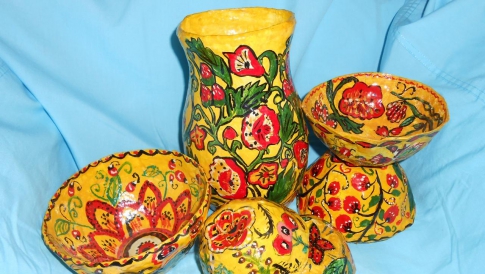
What can be made from papier-mâché
The material has a wide scope, it is used to create any round or flat sculpture, high relief or bas-relief, moldings.

The use of papier-mâché:
- Wall decor with stucco;
- Costumes for children's holidays, helmets, swords;
- Masks on the walls;
- Round vases, three-dimensional flowers, figures of people and animals;
- Interior decorations, decorative plates, bottles.
Papier-mâché flowerpots (video)
After the product has dried, it is sanded, primed, and then coated with acrylic. Acrylic is best paint for papier-mache, which creates a protective film.
You can finish the work by applying a glossy or matte acrylic varnish, brush or spray can.
Papier-mâché technique (photo)


.3_%D0%BC%D0%B0%D1%88%D0%B8%D1%80_.jpg)


Do you want to create something new and unusual? Do-it-yourself updating of outdated and not very nice papier-mâché Christmas decorations for beginners is what you need.
This article is intended for persons over 18 years of age.
Are you over 18 already?
Papier-mâché technology: making DIY Christmas crafts for beginners
Making crafts from paper and glue originated many centuries ago in China and has become one of the leading needlework trends in the world. DIY papier-mâché crafts for beginners is a great way to plunge into the world of creativity and get a lot of pleasure from the manufacturing process and the end result.
Papier-mache technology involves the manufacture of crafts using step-by-step pasting with pieces from old newspapers or toilet paper using the adhesive mixture of the desired shape. In this case, the first thing to prepare is a paste. How to make it? It comes from flour, starch, can be mixed from several components at once. Wallpaper glue can be used, but many craftsmen do not recommend it, because it forms a specific film, and as a result, the product will be difficult to process. To prepare a paste, PVA glue and water are most often used in equal amounts.
For the papier-mâché technique, you will need the following tools and materials:
- newspapers or toilet paper;
- paints;
- hard brushes, because they need to smooth the pieces of newspapers to the shape and at the same time expel the air;
- foam rubber sponges or ordinary sponge, cut into squares;
- sharp scissors made of stainless material, because they will be used to cut wet materials after sculpting;
- glue;
- stationery knife with a sharp blade.
A feature of this technology is that making crafts and toys from papier-mâché with your own hands, even for beginners, is not difficult.
New Year is a time for magic, smiles and gifts. Today, sincere gifts made by hand from scrap materials or papier-mâché crafts are more appreciated, the master classes of which are described below.
Do-it-yourself ball and other papier-mâché crafts for beginners: a master class
Papier-mache is one of the most convenient and affordable materials for creativity. With it, you can do like original toys, and the attributes New Year's costumes. A mask made using this technique is ideal for a themed masquerade party or for children for a matinee, complementing and transforming the outfit.
To make a mask you will need:
- toilet paper;
- water;
- glue;
- cheap mask from the store;
- basin;
- paints.
The technology for preparing the mixture is very simple.
1. Tear small pieces of toilet paper from one roll and put it in a bowl.
2. In a separate jar, dilute the glue and water in a ratio of 1 to 1.
3. Fill the paper in the bowl with the mixture.
4. The mixture is prepared by eye. The main thing is that the lump should not be too liquid, but resemble plasticine in consistency.
5. To avoid lumps, the resulting mass can be loaded into the blender bowl and knocked down. The mass will turn out pliable, which is why it is easy to work with it.
6. Do not forget to wash the blender immediately from glue and paper.
7. On the purchased mask, previously lubricated with oil, apply the papier-mâché mass layer by layer, like plasticine.
8. Give the mask a beak shape, blind the voluminous eyelids and crown. Got an owl mask.
9. Going beyond the base, you can stick ears from a pliable mass, make eyes small without eyelids, instead of a beak - a nose. Then you get a fox or dog mask.
10. Smooth out irregularities and bumps immediately.
11. Put the mask on the battery overnight.
12. Carefully remove the blank from the mask. Cut off any irregularities or sand with sandpaper.
13. Color the mask as you wish and varnish it.
14. Make holes on both sides of the mask and attach an elastic band or ribbon to the workpiece.
Original do-it-yourself toys made of papier-mâché on Christmas tree can be easily made in the form of balls, which will not be difficult at all even for beginners.
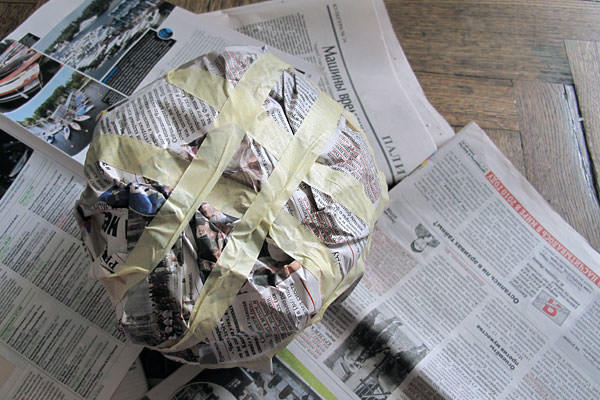
To make a ball, take a basin, finely tear toilet paper into it and fill it with water, leaving it to soak. Then crumple a newspaper sheet and roll a tight ball out of it, wrap it with thread so that it does not straighten out.
Insert a ribbon under the threads in the form of a loop. For her, the toy will be hung on the Christmas tree. Squeeze out the paper base for papier-mâché, fill it with PVA glue and knead.
Paste the newspaper blank with the resulting mass. Try to make an even ball. Leave the resulting product to dry for 2 days. The dried ball can be decorated in different techniques Oh:
- stick with lumps of corrugated paper, sequins or beads;
- paint with paints and decorate with sparkles;
- glue an additional bow on top of satin ribbon or tinsel;
- decorate with decoupage technique.

In the same way, you can make other crafts, for example, a globe. You can decorate the finished blank both manually and with the help of “decoupage”.
Stylish papier-mâché dog
The symbol of 2018 is the dog. Made of toilet paper and glue and painted in bright colors, it will become the best gift for the New Year to family and friends.
For its manufacture you will need:
- toilet paper;
- PVA glue;
- foil for the frame;
- tools: brush and spatula;
- paints.
From foil, make the frame of the dog as believable as possible. Prepare the mass for modeling: gradually mix the torn pieces of toilet paper into the glue until completely dissolved. The result is a plastic mass that is easy to work with. Cover the foil frame with a thin layer of sticky mass. Try to level all the bumps at once.
Having glued the head, give it desired shape, adding ears, eyes, nose, mouth, eyebrows. Leave the product for 2-3 days so that it dries well, and then paint it as fantasy tells. If the frame is made small, such a voluminous dog can be hung on a Christmas tree.

Making a papier-mâché egg
For joint needlework with young children using the papier-mâché technique, you can make an egg. To do this, tear some papers from newspapers and prepare a paste (combine PVA and water in equal amounts). Take a plastic egg and glue it with pieces of newspaper, after wetting them in the mixture. The layer of paper should not be too thick.
Put the blank on the battery overnight to dry it. The dried product can be cut in half to pull out a plastic egg from it, and then glue the halves together with hot glue. But you can leave it like that without stretching the middle.
Color the egg however you like. The main thing is that it should be bright. Attaching a thread and a bow to it, you get original decoration on the tree
In the same way, small children can make their own cup or plate.

On the eve of new year holidays To decorate a Christmas tree or create a festive atmosphere, you can make a snowman. The technology is so simple that even a child can master it. Therefore create festive mood Making a snowman can be done by the whole family.
For this you will need:
- foil for the frame;
- paper pulp;
- PVA glue;
- hot glue;
- tools;
- paints;
- small and narrow spatula, it can be replaced with a butter knife;
- brushes.
First, make a frame for a snowman out of foil. To do this, take the foil, crush it by preparing two small circles different sizes. Fasten them together with hot glue.
Prepare the mass for modeling. For confidence in the correct preparation of the mass, you can watch training videos.

Cover the workpiece with a thin layer of paper pulp prepared from PVA glue and any single-layer paper. To do this, apply a little mass on the snowman with a spatula, smoothing out the bumps. Do not make the snowman too even, the mass should imitate snow.
After the entire workpiece is covered, leave it to dry. There is no need to rush here, because the quality and durability depend on how well it dried out. The workpiece should dry for at least 2-3 days.
When the blank is dry, proceed to the details.
Prepare a hat, scarf, buttons and blind the spout.
Soak a strip of fabric in PVA glue and glue the snowman on the neck. To make the snowman look like a ceramic figurine, you can mold a scarf from the remaining mass. To do this, take a little mass, roll it into a sausage, soak it in glue and attach it to the workpiece, wrapping it around your neck. Give the scarf the desired shape by simulating the development in the wind.
Blind small buttons, eyes and a nose from the mass. Glue to the snowman. To hold the nose tighter, stick a toothpick into the workpiece, and then stick the mass around it, imitating a nose in the form of a carrot.
For a hat, take the foil. Make the desired shape out of it, which is also covered with a thin layer of mass. When the workpiece dries, glue it with hot glue.
After complete drying, cover the product first with white paint, and then paint it at your discretion. Additionally, you can decorate your creation with the help of sparkles.
Papier-mâché products have been familiar to many since childhood. How often babies fall prey to "fake" fruits made from this material and carefully placed in vases in canteens, hotels, boarding houses. It can be very difficult for parents to explain to their child that this beautiful apple is completely tasteless and serves as a kind of decoration. And this is just one particular example of the use of such accessible material.
How to make papier-mâché with your own hands?
This material consists of a paste, wallpaper or other) and paper (absolutely any, from newsprint to toilet paper). And there are two ways to create homemade masterpieces from papier-mâché. The first involves obtaining a homogeneous mass by crumpling the paper and immersing it in glue. The second is pasting strips of newspaper (wallpaper, etc.) on the finished product (figurines, plates, cups, vases) for further creation unique design. Both the first and second methods provide for the subsequent coating of the resulting object with paint. In most cases, acrylic is used, but there may be other options, such as gouache.
Papier-mâché technology

How to make a homogeneous mass of glue and paper, many remember from childhood (in Soviet art, and sometimes even general education schools, they taught this art). Paper (for example, a newspaper) should be torn into small pieces with your hands and filled with water. If possible, boil it for half an hour over low heat. Otherwise, leave to swell for an hour and a half. Then the mass is kneaded with hands, trying to achieve maximum uniformity. It is advisable to use medical gloves made of thin rubber, since both newspaper and glue have a negative effect on the skin. The resulting paper mass is squeezed out. This can be done by hand or use a strainer. And then glue is gradually added to it, getting something that looks like dough. As soon as the mass becomes obedient, it can be considered ready-made raw material for papier-mâché.
How to fashion a bracelet or beads?

Having received the material, you can start creating your own a simple product. Beginners who encounter this technology for the first time are advised to start with something simple. It can be Christmas decorations from papier-mâché (it is easiest to make a ball), a bracelet or beads. In all these cases, a papier-mâché ball of the required size is first rolled up. Then, when a sufficient number of them are made, through holes are made with a needle for the fishing line and left to dry. The final, most interesting stage of creating an ornament is its coloring. You can simply cover the beads with one color, or use a thin brush to draw flowers, stars, some interesting ornament on them. It all depends on the skill and imagination of the author. After the paint dries, they are strung on a fishing line and, depending on its length, you will get beads or a papier-mâché bracelet.
How to make a plate?

Usually, a different technology is used in the manufacture of dishes. The ingredients will need the same: glue, paper (newspaper and thin white, for example, tracing paper, in approximately equal amounts), as well as paints, but you will need to act in a different way. Additionally, you will need a ceramic plate, sticking around which, you get the same one from papier-mâché. How to do things like this? Very simple. First, the newspaper is torn into small squares (2x2 or 3x3 cm). It is not recommended to use scissors, as uneven edges provide an imperceptible border between fragments. Then do the same with white paper. Glue is poured into a saucer or other dish so that it is convenient to dip the pieces into it. The plate must be greased with something greasy to make it easier to separate the finished product from it. And then a layer of newspaper pieces is glued onto it, dipping each of them in glue. This should be done so that they fit snugly against each other, forming a uniform surface. As soon as the entire plate is pasted over, apply on top according to the same principle. white paper. Thus, alternating layers, they are applied from 8 to 10. After that, the plate should dry. As a rule, this takes about a day.
Another 4-5 layers of white paper are glued onto the dried surface so that the newspaper is no longer visible through it. After another day, the ceramic plate is removed, and the finished product is pasted over on the underside with several more layers of white paper. After 24 hours, you can start coloring, after which the craft is considered complete. If desired, the plate can be coated with a transparent varnish, which will make it stronger and the pattern more resistant.
papier mache masks

There is another popular souvenir from this material. Masks are usually created from pieces of paper, but can also be molded from a pre-prepared mass. Their manufacture is considered more complex than the creation of beads or plates. So it’s not worth starting work without any experience. If it is planned to sculpt the mask from papier-mâché (how to make the substance itself is described above), then, apart from it and paints, nothing else will be needed. In this case, you just need to give it the necessary shape with your hands. To make this easier, you can use a mannequin or apply papier-mâché directly to someone's creamed face. The finished mask is dried and painted acrylic paints at will. Particular attention should be paid to the eye holes. If necessary, you can finally correct them with a clerical knife after drying.
If you plan to use pieces of paper, then it is advisable to pre-sculpt the base, for example, from plasticine. It should be pasted over with pieces of paper, similar to a plate. It is better to remove the plasticine base after the mask has dried. So that it can be used for its intended purpose, and not just as a souvenir, small holes are made on both sides, into which you can later insert a ribbon or elastic band.
Papier-mâché figurines

Similar souvenir products are often found in specialized stores. But if desired, figures of animals, mythical characters, dolls, flowers or fruits can be created independently. If we are talking about small souvenirs, then they are usually molded from paper-glue mass. In the case of larger objects, a mock-up is pre-made, which is covered with pieces of paper on top. Animal figurines based on the symbol of the coming year are especially popular for the Christmas holidays. This is a papier-mâché dragon, snake or horse. Undoubtedly, to create such a creation, one needs both talent and certain skills. After all, these are not ordinary balls or plates. But sometimes one desire is enough to build a funny (albeit not very similar to a real one) little animal and give it to a loved one. To make it more stable and strong, you can first make a wire frame. And only then stick it with paper pulp and decorate it.
How to store papier-mâché products?
It is well known that paper is a capricious material. It is easily destroyed by moisture, can change its properties from high or low temperatures and direct sunlight, and is easily ignited. Knowing how to make papier-mâché (from pieces of paper or a mass prepared mixed with glue), one should also understand how to properly store products. Undoubtedly, the glue itself, and the paints, and all kinds of frames used in the work make it somewhat stronger. But, papier-mâché, like ordinary paper, is afraid of dampness. Therefore, products should only be stored in a dry place. At the same time, it is desirable not to allow ultra-low and too high temperatures and open flames nearby. With proper storage, figurines, dishes and other figurines can please the owner for many years.
How to make the material more durable?
Professionals who make figurines for sale try to make them as strong and resistant to external factors as possible. To do this, pre-create a rigid frame of wire or other material. You can also add a little cement or gypsum to the mass. As a result, it will turn out not quite papier-mâché, but rather durable and easy-to-use material. That's just to work with him, you will definitely have to wear gloves.
Using technology for children's creativity

kids preschool age and the older guys love to make things with their hands. It develops Creative skills and develops fine motor skills. As a rule, plasticine or clay is used as the material. But papier-mâché is just as good. After all, this is an absolutely natural safe material (especially if it is made on the basis of a paste), which children of any age will work with pleasure. Of course, the mass itself is better to cook for one of the adults. But you can sculpt from it all together: from the smallest to high school students.
Those who have never worked in this technique, but want to try themselves in this direction, need to understand some of the nuances. First, regarding materials. The paper from which papier-mâché is made can be any, but it is highly desirable that it soak well. It is best to use natural glue (paste or PVA), so that both the mass itself and the product from it are not toxic. It is best to cover the finished product with acrylic paints, since they are the most durable. If it's about children's creativity, it is better to take gouache. In order for the figurine or other structure to be stronger, a wire frame should be used. I fix gouache on the surface with varnish.
And you should never be upset if complex figures do not work out the first time. It’s better to start with something simpler, and with time and experience everything will come out: dolls, animals, and other figures.

The word "papier-mâché" is translated from French like "chewed paper" or "torn paper". This technique first appeared in France. Papier-mâché was used to make trays, toys, snuff boxes, candlesticks and even decorative moldings.
1:928 1:933There are two ways to create papier-mâché products.
1:1040The first is modeling from a moldable mass, consisting of soft paper and adhesive.

The second is gluing torn paper in layers, this type is also called mashing.

The papier-mâché technique is not at all complicated, but it requires accuracy and patience. The manufacturing process of the conceived little thing can take several days due to the long drying of the material.
But the time spent will not be wasted, because as a result, you can create a wide variety of things with your own hands, such as decorative interior elements, caskets, piggy banks, figurines, masks, dolls, rattles and much more.

Papier-mâché is often combined with decoupage technique. Such a union makes it possible to create truly real masterpieces.


The first way - modeling from the mass
Usually, newspaper sheets are used to make the mass, but this is not important; toilet paper and paper towels can be used.
Newspaper sheets are torn or cut into small pieces, put in a deep vessel and filled with water. It is best to use a mixer, grinding in small portions. But you can do it on your own, for this, pour hot water over the torn paper and leave it to soak for about 3 hours.
Then knead with your hands until a homogeneous mass is obtained. Through a sieve, it is necessary to express excess water, and add a mixture of glue and paste to the resulting thick. Knead until it starts to stick a little to your hands.

If not used at one time, you can store in a cool place for several days, do not freeze. During storage, the mass may become liquid, in this case, wring it out and add glue.
The mass is prepared with glue and paste, because when using only glue, it is difficult to sculpt, and one paste does not give the necessary strength. To increase the strength, you can add small sawdust.

Paste for the mass can be prepared as follows:
mix flour and water in a ratio of 1: 3, mix thoroughly so that there are no lumps.
Place on heat and bring to a boil, stirring constantly.
Then remove from heat and let cool.
The paste is stored in the refrigerator for several days, tightly wrapped with plastic wrap.
You need to paint the product with tempera, alkyd or oil paint. Gouache and watercolor are not suitable, due to the fact that they get dirty and erased.

For greater durability of gouache, a little PVA glue is added to it. Cover the painted product colorless varnish. Before painting, the product must be sanded and primed.
The second way is mashing (sticking pieces of paper)

Machining is pasting the prepared form with pieces of paper. The paper should be soft, newspaper sheets are also suitable for this.
The most ideal option is mixed pasting: apply the first layer of colored or white paper, lubricate the surface with glue, then cover with a second layer using paper in a contrasting color or newspaper scraps.

This is used in order not to get confused in the number of layers. In any case, the last layer must be made of white paper. You need to make at least 8-10 layers. Let each two coats dry before applying the next two. It is necessary to ensure that the pieces of paper, when pasting, overlap each other a little, lay down evenly and do not wrinkle.
Paper for mashing should never be cut with scissors, only tear with your hands into small pieces. The edges in this case are thin and well smoothed in the finished product.
Depending on how papier-mâché was made, mashing is internal (pasted from the inside) and external (external). If you expect the pasted form to remain inside the product, lubricate it with glue before working. But in case of subsequent extraction, cover the form with petroleum jelly or a fat cream.

Wallpaper glue is very well suited for mashing, which can be replaced with a home-made paste.
The paste is brewed in the same way as in the case of working with papier-mâché mass, but you can also make it as follows:
starch is diluted with water at room temperature and stirred until the density of sour cream.
Continuing to stir, boiling water is added in small portions until a transparent, thick liquid similar to jelly is obtained.
After cooling, the paste is ready to work.
It can not be stored for a long time, it is better to cook fresh each time.
Casein glue is also used for work, which is sold in hardware stores.

Small details are finished with a mixture of scraps of paper and glue. It must be remembered that when dried, they greatly decrease in size. If this happens, then after complete drying, glue the parts with torn paper to the required size.
The product is dried at room temperature for approximately two days.
It is contraindicated to dry on the battery, as it may crack.

The finished, completely dried workpiece must be removed from the mold and well processed with sandpaper, trying to achieve evenness of the surface. Then prime. For this, it is better to use a water-based or latex-based primer. The primer is applied with a flat brush. Let the previous one dry before applying the next layer.

The finished thing is dyed and varnished, as well as the product from the mass for papier-mâché.
Did you know that the interesting art of papier-mâché originated not in France, as the name might suggest, but in China? It was the inhabitants of the Far East who came up with the idea that paper is an excellent material for modeling. Try and join the creativity of papier-mâché, using the materials that you have at home.
Application methods
There are several different papier-mâché techniques - working with a pre-prepared mass and pasting with pieces of paper of a certain shape. The method of work must be chosen depending on what product you want to make.
Mass work
A sticky plastic material made from paper soaked in a paste, great for creating bulky large items using the papier-mâché technique. For example, in ancient times, Chinese guards were dressed in light paper armor.
Modern masters create toys using this technique, decorating elements for home decoration and even furniture! The process of work resembles modeling.
Pasting with pieces of paper
Mashing - this is what they call this papier-mâché technique. Initially, the master selects the form that he would like to repeat in his product. After that, you need to prepare a lot of paper pieces - you can simply tear the newspaper sheets into small pieces. The base is pasted over with several layers of paper, after which the product is removed from it and painted.
With the help of mashing, it is easy to create dishes: vases, dishes, plates. In addition, in this way you can make small volumetric figures, hollow inside - rattles or maracas, for example.
Paper dough: recipe
Papier-mache mass is easy to prepare at home, because all the necessary ingredients are probably already at your fingertips! In the process, you will need thin paper like newsprint, starch, water.
- Pour the starch with water slightly warmer than room temperature to get a sticky substance that resembles pancake batter in consistency.
- Tear the paper into small pieces, put in a dish with high walls.

- Gradually add small portions of starch paste and knead the paper mass until you get a homogeneous paper dough.
The dough should be slightly sticky, viscous, like plasticine. The finished mixture can be used immediately. If you have too much working material, tighten the dish with it with cling film and refrigerate - then the paper pulp can be used at any time.
You can use the recipe for this test to follow the next video tutorial - how to create a stucco vase decorated with fabulous bird from papier-mâché.
This papier-mâché technique is so easy to perform that it can be used in labor lessons or in orphanages for creativity. Children will love modeling from a new original material, different from salt dough and plasticine.
Recently, needleworkers are gradually moving away from the papier-mâché dough recipe described above. Now they use materials that were not there before: instead of starch paste - 500 grams of liquid PVA glue, instead of old newspapers - paper towels and toilet paper.
In addition, papier-mâché masters found a way to make the material more plastic - for this they wrote 3 tablespoons of linseed oil in the recipe.
- Grind 2 rolls of toilet paper as much as possible, put in a deep bowl and pour about 1.5 liters of water. Take the paper so that it is all in the water, and leave to swell for a day at room temperature.
- The next day, wring out the mass, but so that a little moisture remains inside. Add glue in small portions and mix thoroughly, forming a uniform consistency.
- At the end, add oil and mix again.
This mass can also be set aside and used later. But do not forget that before storing in the refrigerator, the dish with the material must be wrapped with cling film so that the moisture does not evaporate.
papier mache plate
This technique for creating paper crafts a little easier and takes less time than the previous one. It does not require prior kneading of the dough. Just tear a lot of strips and pieces from newsprint, prepare a plate-shaped, a bowl of water at room temperature and PVA glue or wallpaper.
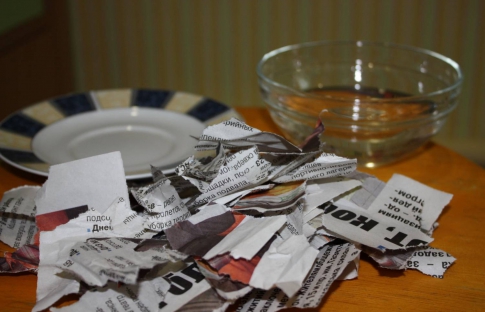
- Turn the plate upside down. Lubricate the workpiece with vegetable oil or petroleum jelly - so your papier-mâché product will not stick.
- Moisten the paper in water and attach to the workpiece. Lay out the entire first layer of work in the same way.

- Dip the first paper of the next layer in glue and glue to work. Repeat with all the details of the second layer, then generously smear them with PVA glue on top with a brush.

- Do the following layers in the same way as the previous one. Depending on how thick the product you want to get, increase or decrease the number of paper levels.
- When you achieve the desired thickness of the workpiece, leave it to dry in a dry place at room temperature. Wait approximately 1-2 days.
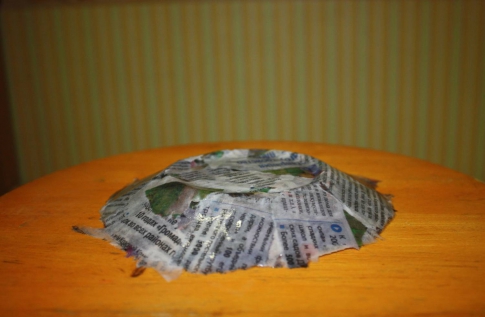
- After the workpiece is completely dry, remove it from the plate - this will be easy to do thanks to the fatty layer of oil.
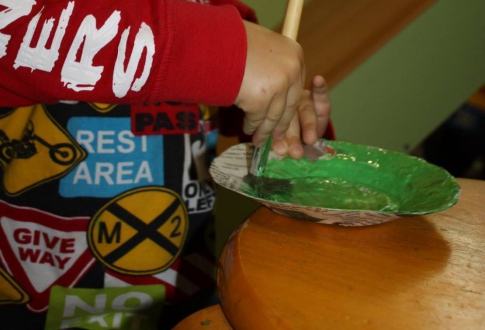
- Sand the jagged edges and surface with sandpaper and apply a coat of putty. So you will make the product smoother.
- Color your plate however you see fit.
The craft can be decorated with stucco patterns from paper dough - in this case, you will combine both papier-mâché techniques in one product.
 Use thick paints like oils or gouache to get bright colors drawings. After the paint has dried, be sure to cover the product with varnish to protect it from peeling and absorbing moisture from the air with paper.