Star News


We make Santa Claus with our own hands. Santa Claus and Snow Maiden with their own hands. Crafts, patterns, master classes. Magical grandfather is ready to decorate the Christmas tree
Always waiting magical holiday the whole family is involved in the production Christmas decorations for green beauty and dwelling. And the main symbol is considered to be the most beloved craft new year holiday- Father Frost.
We suggest you make Santa Claus out of paper. With the help of such simple material you can create real masterpieces with your own hands. You just need to devote a little time to this lesson and show all your boundless imagination.


Study our master classes on making Santa Claus with your own hands and you will be able to please your loved ones with unique New Year's gifts made with soul and care.
Modular origami Santa Claus - master class


We will need: sheets of A4 paper: of blue color- 14 pieces for 211 modules, white - 13 pieces for 207 modules, pink - 1 sheet for 17 modules.
We divide each sheet into 16 rectangles, from which we will make modules.

Step one. We bend a rectangular sheet along in half. With the help of another fold, we outline the line of the middle.

Step two. We bend the edges of the rectangle folded along to the middle, as shown in the photo. Turn the part over and bend the bottom edges up.

Step three. We fold the corners, bending them over a large triangle, and then bend these corners inward. We bend the resulting figure in half - so we learned how to make a module. Now, in the same way, we make the required number of modules, indicated above, from the rest of the paper.

Step four. Let's start making crafts. We take 5 white modules and arrange them as in the photo (we place the module of the upper row with the smaller side up). Next, we assemble a chain of 3 rows of white modules. Each row consists of 25 pieces.

Step five. We close the chain in a ring and turn it over. Next, we perform 3 rows of blue modules. From the seventh row we make a beard. To do this, insert 2 white modules with the smaller side out. The remaining blue modules of the 7th row are inserted as usual.

Step five. In the 8th row we fix 3 white modules, as usual, with the long side, the rest of the modules are blue. With each next row, add one white module on each side of the beard.

Step six. In the 11th row, we insert one red module in the middle of the beard - this is the mouth. 12 row consists of white modules. We put them on the blue modules with the smaller side outward, on the white modules (beard) - with the long side, as usual. In the 13th row, opposite the red module, we put on the white one with the long side out, and 2 pink modules each with the smaller side (see photo).

Step seven. In the 14th row we dress 6 pink modules with the smaller side, and we dress the white modules as usual. 15 row - we dress 17 white modules and 8 pink ones. In the 16th and 17th row we put on all the white modules with the smaller side outward - this is a hat.

Step eight. The last 18 row consists of blue modules with the smaller side out. We collect hands from 3 white modules and 5 blue ones. We glue the finished eyes and insert the nose (detail of the children's mosaic). Santa Claus from paper in technology modular origami ready. We hope that after studying the master class, the Snow Maiden, made in the same technique, will appear next to your Santa Claus.
Origami paper Santa Claus - master class

We'll need colored paper and a little patience. We offer you several schemes according to which you can easily make Santa Claus with your skillful hands. You can hang it on the Christmas tree, decorate a greeting card with it, or give it to friends on New Year.


Santa Claus do-it-yourself from colored paper - master class

We need: red paper, pink for the face, White paper for a beard, cotton wool, felt-tip pens, scissors and glue.

Operating procedure:
- Using a compass or a small plate, draw a semicircle on red paper. Cut it out, fold it into a cone and glue it.
- We cut out an oval from pink paper, draw eyes and a nose on it with a felt-tip pen and glue the face of Santa Claus to the cone.
- Next, glue the beard and white paper hat. To do this, cut out white stripes, cut a fringe on them and twist it with scissors. We glue the strips with twisted fringe to the cone in the lower part of the face in several rows, giving the beard splendor. We make a hat from the same strip. A beard, hat and fur coat for Santa Claus can be made from cotton wool, which is glued to the cone along its lower edge, on the face and upper part cone. Smart Santa Claus made of paper, made by hand, is ready. With the help of a cone, using fantasy, you can also make a Snow Maiden.
Santa Claus from colored paper strips - master class

We will need: thick colored paper, white corrugated cardboard, scissors and glue.

Operating procedure:
- We cut out 6 strips of red paper measuring 1 cm by 15 cm and 6 strips measuring 1 cm by 10 cm. Glue them into rings. We collect a ball from 6 large rings, fastening it with glue in the upper and lower parts. From small rings, we collect a smaller ball in the same way. It turned out the torso and head of Santa Claus.
- From pink or orange paper, cut out a small circle for the face. We cut out a mustache, beard and hat of arbitrary size from corrugated cardboard and make out their faces. Cut out and glue the eyes and nose. Glue the face to a small ball, which is then glued to the body. We cut out mittens and felt boots from cardboard and glue them to the craft. The symbol of the new year made of paper, created by yourself, is ready.
A few more ideas for creating Santa Claus with your own hands
Applying imagination and using the schemes we have proposed, you can make Santa Claus even from a paper napkin.

A paper cone allows you to make many options for Santa Claus with your own hands.


And this family of Santa Clauses is made of ordinary bushings from toilet paper.

Santa Claus and Snow Maiden in the popular technique of modular origami.

We hope that our master classes helped you understand the technique of making Santa Claus from paper and encouraged you to be creative. Apply a little imagination and create your own kind Grandfather or even several. They will decorate your holiday and create a magical mood!
Schemes, printouts, drawings


What New Year is complete without Santa Claus? Santa Claus is the main attribute of the New Year. Fairytale time is on the nose, you need to start preparing already. Today we will make Santa Claus with our own hands from improvised materials.
To create Santa Claus, we need:
- paper (for patterns);
- cardboard (for a footrest);
- wire (for shaping the legs);
- glue gun (for strengthening and gluing parts);
- thread with a needle (for sewing);
- fabric (for pants, mittens, cap);
- synthetic winterizer (for shaping the torso, nose and pompoms);
- foam rubber (for shoes);
- fleece (for tight boots);
- paints (to create a face);
- multi-colored felt (decoration for a fur coat, cap, shoes);
- buttons, beads, beads (decoration for a fur coat);
- wool (to create a mustache, beard, hair);
- scissors.

 We fasten a thin, relatively long wire to a massive wire. We fasten the places of fastening cardboard with wire, as well as wire with wire, with hot glue using a glue gun. From the same fabric that covered the circle, we cut out two long strips of a rectangular shape. We sew both rectangles from the wrong side and put them on Santa Claus's feet. This will be his pants.

 In order for Santa Claus to stand firmly and confidently, you need to strengthen the support of the legs. To do this, take cardboard, cut out traces. Using hot glue, we fix the footprints and the bent wire together. To give the boots a shape, we cut out the lining from the foam rubber and fix it with glue.
 To make the boots attractive, we cover them with fleece material. We glue felt on the sole, if the material goes beyond the boundaries of the boots, then carefully cut it with scissors.
  Here we come to the design of the face. Conditionally divide the cone into the body, head, hat. We make the nose from a small piece of fabric and synthetic winterizer. We put the synthetic winterizer inside the fabric and with the help of a needle and thread we tighten it to give the shape of a ball. Sew the nose to the face of Santa Claus. First, paint the face with white paint, then draw eyes, mouth, red nose and cheeks with other colors.
 It's time to dress up Santa Claus. We sew a red fleece coat. We take the size a little larger than the body itself. Cut, sew, twist. According to the paper template, cut out 4 strips of future hands. We also sew them together, fill them with synthetic winterizer.
 We put on a fur coat on the body, sew on the hands. We decorate the fur coat with details cut out of felt. Add beads, beads and drifts of snow from white felt.
  From white felt we cut out strips for trimming the sleeves, collar, and lapels for boots.

 The final step is the manufacture of the cap. We sew together two conical pieces of fabric, then turn inside out. Right now, are we going to need that little wire? sticking out of my head. The cap is put on the head, and with the help of a wire we shape the tip of the headdress. We also decorate with a pom-pom made similarly to the nose and a white fleece lapel.

That's all, we made Santa Claus, which means we are ready to celebrate the New Year with our heads held high! Happy Holidays!
On the eve of the New Year holidays, everyone is waiting for miracles, preparing and trying to keep traditions. The kids are in a hurry to dress up Christmas tree so that Santa Claus comes faster and gives gifts. Recently, handmade crafts have become popular.
Consider master classes on how to make Santa Claus with your own hands from improvised materials. The step-by-step implementation is understandable to children, so they will create with pleasure and joy.
Fabulous Santa Claus, made of felt and fabric, looks like such a cutie! So I want to quickly start creating such a beautiful character.

Materials:
- a piece of felt;
- textile;
- thread;
- sprig of pine for hat decoration.


Manufacturing process:
- First you need to take a template of Santa Claus, attach it to the felt, circle it with soap and cut it out.
- Also on the stencil it is necessary to cut out a hat, a beard. The cap in the upper part will have to be pulled together with a braid, so it will turn out to be voluminous.
- At the very end, connect all the parts together, securing them to each other with glue.
So that the glue does not show through the material, it is recommended to sew the parts together. However, this process will take a long time.
From a bottle
A beautiful big Santa Claus is obtained from plastic bottles. The figurine of grandfather can be put under the Christmas tree.
First you need to take the bottle in your hands and visually determine where the parts of the body will be located: the head, torso, where the beard and belt, cloak should be drawn. The figure should be proportional.

Color the fur coat red, make the belt black, the face beige, and the beard white. After drying, put a sewn cap on your head, attach a mustache and mittens.
From a light bulb
Used light bulbs are suitable for creating various Christmas tree toys. To do this, you need to be patient, take a brush and acrylic paints, and start creating.
You need to draw Santa Claus, a deer, a bump or other characters and objects according to your imagination or peep similar drawings in coloring books.


It can also be done in a different way. To work, you need glue and semolina. First you need to coat the light bulb with glue, and then roll it in the groats. After complete drying, paint with paints. You can decorate toys with sparkles, pompoms, rhinestones, beads.
toilet paper roll santa
Roll or sleeve from toilet paper or from paper napkins will be needed to make a pipe through which Santa Claus descends into the house. The craft turns out so bright that the children are happy to take on its implementation. Moreover, they have a hope that Santa will come down to them to pamper them with gifts, because the New Year is a holiday of hopes and miracles.

Materials and tools:
- toilet paper roll;
- cardboard;
- scissors;
- glue;
- paints.
Manufacturing instructions:
- Crafts for the New Year Santa Claus pleases with ease of execution. You need to take cardboard, wrap it around a roll and measure out a suitable rectangle. Then cut out the stencil, paint it with red paint and draw black lines - these will be bricks. It turned out a blank for the pipe.
- After drying, you will need to glue the workpiece to the roll, wrapping it tightly. You can do without unnecessary actions and immediately paint the roll itself. This will be much faster, but with additional cardboard, the craft will be more stable.
- Next, you need to make blanks for a hat with a pompom, make socks and mittens from black cardboard, ordinary strips of red cardboard paper will serve as legs.
- First, let's create a composition when the fairy-tale grandfather descends into the chimney. To do this, you need to make sure that only the legs and the stuck bag of sweets look out of the pipe.
- And the second composition shows how Santa Claus gets out of the pipe. To do this, you need to slightly raise the grandfather's cap above the level of the pipe and bend and fasten the mittens so that it can be seen that it rises outward.


A black gift bag can be decorated in a different color, usually it is red. To prevent the gift bag from merging with the pipe, a black strip can be drawn along the edge of the red bag.
Santa Claus from ice cream sticks
Previously, ice cream was sold only with wooden sticks, now a wonderful material for creativity is available in free sale. Adding a little imagination, you can get a beautiful Christmas wall decoration.
From sticks, you can make a simple and complex figure of a character. To make a simple figurine, you will need to take a stick, color it accordingly, draw eyes and glue a beard made of fur or cotton wool.
To make a complex figure of Santa Claus at home, you need to take a few sticks, draw Santa Claus on cardboard. Then glue one stick horizontally - there will be grandfather's eyebrows, and from 5 sticks make a beard. Attach a loop to a horizontal stick, glue a mustache.
From a paper plate
Christmas is a delightful holiday for which you want to thoroughly prepare. Santa Claus can be made from an ordinary paper plate. By the way, if someone cannot buy a ready-made one, you can make it yourself from papier-mâché.

Materials:
- paper plate;
- tassel;
- acrylic multi-colored paints;
- red velvet paper - 1 sheet;
- White paper;
- eyes;
- scissors;
- glue.

Manufacturing process:
- First you need to prepare the necessary templates: a triangle of red paper, white balls, eyes, pompom, glue.
- Next, you need to switch to working with a plate. It is necessary to visually divide the plate into 3 transverse parts and cut off the top. The middle should be painted over with beige paint to match the face.
- Then the finished part for the face must be glued onto the triangle in such a way that an image is obtained. The proportions must be chosen independently.
- It remains only to glue a strip of white paper for the eyebrows (it also covers the cut line of the plate), nose, mouth, eyes.
Wonderful Santa Claus is ready. You can safely celebrate the New Year!
Santa Claus beard decor from old tulle and organza
To make a beautiful pendant on the door you will need:
- circle;
- tulle or organza;
- red cap (ready-made).

Manufacturing process:
- You will need to cut the tulle or organza into long strips, and then, using the macrame technique, make a beard. You need to fasten the strips with a knot.
- First fold the organza strip together. Insert the side on which the loop formed under the circle inward, and then wrap the circle itself, stretch it through the loop and tie it tightly.
- The process will need to be repeated until a beard is obtained.
Put on a cap from above - the suspension is ready. Let her protect your home and bring happiness!
Paper Santa Claus
The art of origami is a complex but fascinating creative process. Originated a very long time ago. From childhood, we remember how our parents made boats for us, and we let them go along the streams. They also tried to learn this craft.
Over time, more and more complex compositions began to appear that require logical thinking designed to develop fine motor skills, memory. Therefore, the child must first perform origami toys under the guidance of adults, and then independently.
Materials:
- colored red paper;
- scissors.
Manufacturing process:
- To make a cap, you will need to cut a rectangle of the desired size out of paper.
- Then on both sides (which are longer), make longitudinal folds to a width of 1.5 cm.
- Then turn the sheet of paper over so that the acute angle of any side looks up and fold it into a triangle - first one side inward, then the second.
It turned out an interesting cap for decorating a Christmas tree or for Santa Claus. You can glue a cotton pom-pom.
Santa in the tube
The story is often told to young children that Santa enters the house late at night through a chimney and leaves gifts under the tree. The kids love this story and are looking forward to the evening when Santa brings them gifts.

For manufacturing, you will need thick cardboard for the pipe and soft felt for Santa.
According to the presented templates, you need to cut out a pipe, details for Santa. Which color to choose is up to you. Then you need to glue the pipe, and sew the details of Santa Claus and fill it with padding polyester to make the toy seem huge. Put Santa in the pipe, as if he is going to go down to the house and give souvenirs.
From old keys
There is nothing complicated. You just need to be able to draw or really want to learn how to do it. On the old keys with acrylic paints, you should draw the face of Santa Claus, a hat. And to make a beard from small rhinestones, you get a brilliant Santa Claus with a beard sparkling like frost.

From paint brushes
Cute Santa can be made from paint brushes. It can be hung on a Christmas tree or somewhere in the house in a conspicuous place.
You need to take a brush with a good pile, paint the handle in red with polka dots - this will be a hat. The beard is the pile of the brush, and the metal strip connecting the brush will serve as a face, so you need to stick eyes on it, just below the nose. Above the eyes, make a cool mop of cotton hair, tie it with a ribbon and decorate with a bow or flower arrangement.


From wood - for the decor of a summer residence
Many people celebrate the New Year in a house on a country plot. We propose an idea to create festive mood, Santa Claus from a log, who will stand and keep order.
Materials:
- flat log;
- paints;
- scarf material.
Manufacturing process:
On a log, you need to make a cut obliquely - this will be the face of Santa Claus. Then take the paint and draw a beard, eyes, nose, mustache and a red cap. Tie a scarf from a piece of material.
From socks
Socks make a creative Santa Claus with the Snow Maiden. Interesting ideas for a school art fair.

Materials:
- red, white and blue socks;
- thread with a needle;
- cotton pads;
- eye patches.
Manufacturing process:
- For Santa Claus and the Snow Maiden, you need to cut off the bottom of the red and blue socks and fill them with rice. It is possible, of course, with sand, but it will wake up outside. Tie with thread.
- To designate the head and torso, you need to tie it up again with a thread, but so that the parts are not equal.
- Then it remains only to put on a hat, glue or sew on eyes, a nose, a mustache from cotton pads, and give hands to Santa Claus with a staff. It can be made of wire and wrapped with tinsel.
And so that the long-awaited guests do not catch a cold, you can tie them scarves from strips of socks.
From cotton pads
A cotton pad - why not a material for creativity? It is very light and you can make Santa Claus out of it for a Christmas tree or give a beautiful toy to your friends.

Materials:
- cotton pads;
- glue;
- velvet red paper.
Manufacturing process:
Everything is extremely simple. First you need to take one disk for the base. From another disk, cut curls for a mustache and a round pompom for a hat. From red paper, cut out a cap and a circle for the nose. All prepared parts are applied to the main disk and glued together.


It turns out elegant beautiful toy, which can be done with the guys in kindergarten.
From leftover plywood
After the repair, pieces of plywood remain. They do not need to be thrown away, they will be needed for New Year's toys Father Frost.
Materials:
- plywood;
- white felt;
- a piece of burlap;
- red fabric.
Step by step manufacturing process:
To make the toy, you need to make blanks from plywood in the form of a square, a triangle and an asterisk. There are 2 options for making Santa Claus.
- On the prepared triangle, you need to stick a white felt for a beard, make your face milky. Draw eyes and glue on a red nose. The cap is made in the shape of an asterisk.
- Glue a mustache, a round wood hat on a rectangular base, decorate with a bow from a strip of burlap.
Got some cute toys waste material. The first option can be hung on a Christmas tree, and the second one will be heavy, so it can be hung on a wall or above a door.

Unusual, extremely simple and original crafts, such as Santa Claus with his own hands from improvised materials, are intended not only for decorating a Christmas tree or a room for the New Year and Christmas.
By doing them, children acquire the skills and abilities to work with various materials they develop thinking, creative imagination, fine motor skills, which is of no small importance in preparing a child for school, as well as kids get great pleasure from work - this is perhaps the most important aspect to enable the child to realize his ideas into reality.
Workshop of Santa Claus "in kindergarten
Antonova Tatyana GennadievnaPosition and place of work: Educator MADOU DS "Gift" Orenburg region, Tashlinsky district, the village of Tashla.
Material Description: Dear colleagues, I bring to your attention a photo report on the joint creative activity children and adults. This material is addressed preschool educators, teachers working with children in primary and secondary schools, teachers of additional education, parents, children and all creative people.
December 2016 preparatory group MADOU DS "Darovanie" under the leadership of Antonova T.G. and Amirova G.R., worked on the implementation of the project "New Year at the Gates". One of the products of the project was the participation of the group in the competition New Year's crafts"Workshop of Santa Claus".
If you are interested in the project "New Year at the Gates", in the eponymous section of my blog, you can find all the material we have accumulated on this project, get acquainted with other products of the project. Blog address:/blogs/tatjana-genadevna-antonova
Purpose of publication: Dissemination of the experience of pedagogical activity among the community of colleagues.
December. Nature, covered with a fluffy white blanket, sleeps and dreams of a hot summer. Snowflakes carefully cover the earth to protect it from the frost that grows stronger every day. But complete peace and tranquility is not felt. Passers-by are in a hurry, somewhere in a hurry, they bring Christmas trees and tangerines to their homes. Here and there, festive illuminations light up. This amazing holiday unites all people, makes them believe and touch the miracle. It seems that even the air is saturated with the magical smell of New Year's fuss. People are preparing for the New Year.

And in our group, in the December days, such miracles were happening ... We were suddenly swept over by a maelstrom of New Year's creativity. Educators, children and parents were passionate about the creative process of making New Year's crafts, decorating the group and preparing the New Year's holiday.
At Santa Claus in the workshop,
Lots of work and worries.
We make here, day after day.
After all, the New Year is coming soon!
For the Christmas tree - a festive outfit,
For the group - decorations.
Need gifts for kids
Candies and cookies.
We really need to do everything,
Even if there is a lot of work.
To joke, laugh, sing,
When the New Year comes to us!
T. Antonova

This time was really magical, because even ordinary paper, flavored with a drop of glue, in the hands of a child suddenly turned into a “Smiling Snowflake”.
Who are the snowflakes
Did you do these?
For work
Who is responsible?
- I! Santa Claus answered
And grabbed me
For the nose!
Galina Novitskaya


The children picked up strips of multi-colored paper, and they suddenly turned into colored balls and jumped onto the Christmas tree. Miracles, and more!


The ball teased from the top branch,
All in confetti and sparkles:
"Hey little kids!
You can't get me here!
You won't be able, goats,
Reach out to me!
Apparently, porridge without additives
Eating such a little thing!
To you, shorty insects,
Before me - like a star!
I'm too beautiful for you -
All in mica raindrops!
At least ten stools
Climb, at least a hundred,
All the same to the top branches
No one will reach!"
But, having heard the braggart,
Santa Claus got angry
Turned a smartass into a bump
Yes, and he took it to the squirrels!
Galina Dyadina
While the children were sleeping, a fabulous squirrel brought a whole basket of cones to the group. These cones were not ordinary, but magical. The cones squeaked all the time: “We also want to go to the Christmas tree!”. To hang them on the Christmas tree, the children painted them with magical colors, the teachers attached a wire to them and glued green bows together with the children. Suddenly, the cones lined up in a row, and turned into a beautiful garland. Here are miracles...


And the crepe paper suddenly spoke in a human voice: “Just think, a garland of cones, take me in your hands, then you will know what a real New Year's garland is.” Really, miracles, right?


The magical New Year's air filled the whole group. He pleasantly beckoned with the smell of tangerines, sweets and pine needles, but this air made the group feel cool. And we decided to make hats to keep warm.
Where is your hat?
Well, look!
Get dressed babe
One and two and three.
Beanie, beanie
The ears are warmer in it.
Beanie, beanie,
Warm up the baby.
Where is your hat
It's time for us to go.
Get it together, babe
The kids are waiting for us.
Beanie, beanie
The ears are warmer in it.
Beanie, beanie,
Warm up the baby.
Fink I.


Gouache paints jumped out of the box, and let's dance on black cardboard. Suddenly, the black cardboard changed, and turned into New Year's Eve. Here are miracles!
Under the blizzard song of the blizzard
Over the snow-covered yards
The magic sleigh flew
On the wings of frosty winds.
Under the thunder of the New Year's ball,
Chasing the boredom of winter away
From these sleighs we were waving
hand New year's night.
Gurina Irina


Admire what a magical transformation happened to our windows. Isn't it a miracle?
Frost drew patterns,
On our windows.
And I helped Frost,
All cut out the palms.
Where is the miracle? Does it exist?
I asked my sister
She looked at the window
And she laughed out loud.
T. Antonova


A detailed description of the design of the windows of our group can be found at:/blogs/tatjana-genadevna-antonova/novogodne-oformlenie-okon.html
Our mothers and fathers did not believe in miracles before. And when they came to the kindergarten for the children, they breathed in the magical New Year's air, and became completely different. They hurried home, but not to do household chores, or surf the open spaces. social networks. Not at all. At home, they set to work: they sewed, knitted, made something. And children - little wizards helped them. These are the miracles our parents did. Miracles!


Cone
The tree looked in the mirror
Chatting with decorations:
"Oh my God, what a delight -
This pin is gold!
As it goes to the green branches
golden color and red!
It is necessary to spruce with such a pendant
Call ELENA the Beautiful!
Galina Dyadina


I want for the New Year:
Christmas tree, sweets, toys,
Let Santa Claus come
Bring crackers with you
Well, it's breathtaking!
On the most long-awaited holiday,
Bold Fire Rooster
May all wishes come true!


Look what a wonderful transformation has happened to our group. All this is done by the hands of educators, children and parents.


The pre-New Year's air of magic reached the hallway, and as if by magic, a beautiful fireplace appeared in the hallway.

Detailed description making a fireplace with your own hands step by step photo look at the address:
Meanwhile, the air of miraculous transformations spread throughout kindergarten, in each group there was an atmosphere of magical creativity. On the street, the teachers dressed the Christmas tree with frosty silver flowers.
Toy Santa Claus with his own hands will bring a holiday to any home. Believe it or not in a magical old man with a bunch of gifts in a bag, but every interior is full of his images. But the children believe in him unconditionally, therefore, making crafts in the form of Santa Claus, they probably expect the real one, bringing them a whole mountain of long-awaited gifts. Give your children real fairy tale and make with them a puppet, paper, plasticine - any Santa Claus that your imagination can only draw. And if our photos from interesting ideas, so even better.
Grandfather Frost with his own hands
We will devote our entire article to how to make Santa Claus with our own hands. After all, in fact, crafts can be very diverse: sewing, felting, knitting, appliqué, painting and modeling. Well, let's start with decoupage.
This plate with the image of Santa Claus is made using decoupage technique. beautiful napkin with a picture, you need to divide it into layers, you only need the top one, in fact, the one on which the picture is applied.
If you are decorating a plate or any object whose surface you will not use, you can use PVA glue to work. But in this work, the technique reverse decoupage, that is, a transparent glass plate is taken and the napkin is glued on the reverse side, and from the front it will shine through.
So, on the back surface, degreased with alcohol, put a napkin and moisten it with water. Make sure that the napkin is well saturated, but does not disperse. Be sure to remove excess water with a cotton swab. While the paper is still damp, cover the surface of the napkin acrylic varnish, thin layer. It should be applied with a narrow brush, moving from the center. The varnish should dry for quite a long time, about twelve hours. If desired, you can apply another layer, also taking enough time to dry. Patterns and ornaments are applied to the clean surface of the plate using acrylic paint, you can paint over the entire surface of the plate with paint. Another layer of acrylic varnish will complete the craft.
Do-it-yourself Santa Claus from felt
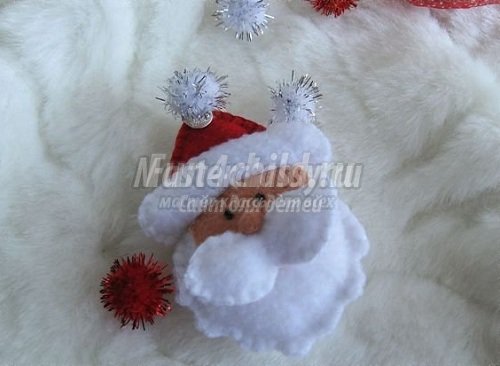
And such Santa Claus with his own hands can decorate your Christmas tree. It is made of felt, and you and I already know that it is completely simple to perform.
To sew the toy, you will need small pieces of white, beige and red felt. Of course, it’s a pity to buy large cuts to make such a crumb out of them, but you can make a lot of such Santa Clauses and give them to all your friends and acquaintances.
- On paper, draw a pattern for your craft, you will need five elements - a head and a beard, a face, an edge, a hat, a mustache.
- From beige felt we cut out one element - the face, from red two elements of the cap.
- From white we cut out two elements of the head with a beard, edges and mustaches.
- Now we create a mustache and a hat, we sew the elements together not completely, we fill them with filler.
- Glue a beige face onto one part of the head using Moment glue, sew the two parts of the head, fill them with silicone filler.
- We put the hat on the top of the head, fix the bottom with a pin, put the edge on the bottom and sew it with hand stitches. At the same time fixing the hat.
- You need to sew the edge with front side, and from the wrong side, we cut out two elements with you.
- A voluminous mustache, bead-eyes and a nose made of felt rolled into a roll with silicone are sewn onto the beige felt.
- The end of the cap is crowned with an elegant bell with a braid for hanging the toy.
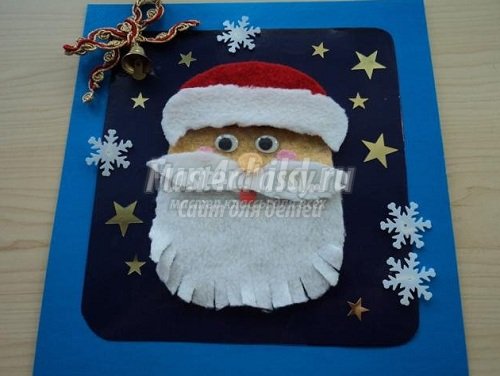
More can be done the simplest postcard from felt with Santa Claus. You don't even need a pattern - just show your imagination and creativity. For beginners, we recommend that you first make a paper sketch of the craft, and only then transfer it to felt fabric. Use glue to connect the pieces of fabric together.
Santa Claus from plywood do it yourself


Santa Claus do-it-yourself paper

New Year is a wonderful occasion to make an application on greeting card. And who will decorate our application better than Santa Claus with his own hands made of paper? You can glue either simple pieces of colored paper, or strips folded using the quilling technique. In the second case, it will be more effective. If everything is more or less clear with the figure of Santa Claus, then we will tell you how to make a Christmas tree in more detail. You will need sheets of double-sided colored paper. Cut out strips from it, but not even, but with small sides two centimeters and a centimeter. Cut a fringe on one side of the strip with scissors and twist it into a roll with a wooden skewer, starting from the narrow edge. When you fold the entire strip, fix the even edge with glue, and gently straighten the fringe so that the element becomes as flat as possible. You need a lot of such patterns, you will need to lay them out and stick them on paper in the shape of a Christmas tree. Decorate the middle of the elements with rolled multi-colored stripes.

With the help of thick paper or cardboard, you can make other important attributes, for example, make Santa Claus's sleigh with your own hands. It can be, or you can use more collapsed for the base newspaper tubes, and we offer you to make a sled based on an old car, from which the body has already been removed. From cardboard, you need to cut out four elements - the sides of the sleigh, the back and the front. You can color the sleigh with pencils and paints, and rhinestones or shiny stickers will add a snowy winter texture. You can put not only Santa Claus and the Snow Maiden in your sleigh, but also put a bag or a box with a gift in them.
Sew Santa Claus with your own hands
With the help of fabric, you can make toys that you will never buy in a store. You can sew Santa Claus with your own hands and your child will be delighted with this toy. Santa Claus tilde has gained immense popularity.

A distinctive feature of these wonderful dolls is a cute facial expression, but at the same time very small facial features, as if just outlined, rosy cheeks, plump tummy shapes, long legs and arms, Natural, soft tissues, which are always used for sewing tildes, are welcomed by all mothers, as the child will be both pleased to play with such toys and safe.

You can not only sew a figurine or a costume of Santa Claus with your own hands, but also knit it. A knitted figurine will be a favorite toy, and if it is not stuffed with filler, then such dolls can be used for a home-made puppet theater.
How to sew Santa Claus with your own hands

But Santa Claus can be not only a toy, but also a decoration for a bag of gifts. We will tell you how to sew Santa Claus with your own hands and place it on the packaging for New Year's souvenirs which we can then give to our relatives or friends. You can embroider the face of Santa Claus with satin stitch or cross stitch, you can make a fabric one with glue, or you can make a crocheted element, which you will then sew onto the bag. It is done quite simply - the first row of loops is closed in a ring and tied with single crochets. When the circle is already of sufficient size, tie it with several circles of snow-white threads, then change the thread to red and knit a hat. Loop long white threads into the bottom row, and then trim the resulting beard with scissors. Also make a red nose, like a real Santa Claus, from threads tied in a circle. The resulting element is sewn to the finished bag quite tightly. Tie the top of the bag better with an elegant ribbon.

For the simplest Santa Claus, do-it-yourself patterns will also be the simplest. It's two big ball- one for the body, one for the head. Having cut out the circles, we fold each of them in half, we bast the thread at the bottom not to the end, and when we fill the fabric with padding polyester, we tighten the thread so that we get a ball. Santa Claus will also need an elegant hat with a pompom made from swatches of fabric. We connect all the elements together, sew eyes on the face, outline the mouth with red threads, make a nose from a small ball. We create a beard and mustache from a synthetic winterizer, from which we make an edge for a hat and a fur coat. Santa Claus for New Year's composition you are ready.
Making a real Santa Claus doll with your own hands will be more difficult, because this is a whole art. ? For such crafts, a combination of modeling and sewing is most often used. With the help of skillful stitches, you can “sculpt” a face for a toy, and a fur coat, hat, and boots are simply sewn from fabric. This combination is called sculptural textiles.

For Santa Claus in technology sculptural textiles you need to create a framework. For these purposes, we need a small plastic bottle, into which the wire is inserted in a loop, into the place where the head will be attached. The same loops will serve as hands; under mittens they will not be visible at all. We paint a face made of fabric, glue eyes, attach a beard made of artificial fiber. A fur coat, felt boots, an elegant sash - we do everything, even the staff of Santa Claus, with our own hands.

If you are familiar with the technique of felting wool, otherwise called felting, then you can make such a variation of the fairy-tale wizard. This technique is very difficult, but at the same time, dolls created using the felting technique always look original and complex. The base material is wool, which is repeatedly pierced with a special needle until the material becomes dense, the fibers do not tangle themselves, forming a dense structure. Since such a craft is hollow inside, it will not require you to spend a lot of material, but if you put such Santa Claus under your Christmas tree, then the delight of all your friends is simply guaranteed.
We hope that we have provided you with enough options on how to make Santa Claus with your own hands. Do not forget to please the New Year's old man by making his granddaughter - the Snow Maiden!
Key news tags: ,
Other news

