Star News


")


How to sew leather slippers with your own hands. How to sew slippers with your own hands: patterns and instructions. denim house shoes
Home slippers should be comfortable, light and soft so that your feet can rest after a hard day's work.
Today, various styles of slippers do not cease to please our female eye. We cannot pass by beautiful home shoes, which are embroidered with crystal stones, embellished with sequins and rhinestones. Winter options slippers fascinate us even more: boots with ears or warm flip flops with fur. In this article we will tell you how to sew slippers according to the pattern.
Models of home shoes
Today in the shop windows we can see a huge assortment of home shoes. Modern designers annually update the range of slippers with new types and interesting colors.
Home slippers are not a cheap pleasure, so many women are interested in how to make a pattern of home slippers with their own hands and sew shoes on it. But for this you need to decide on the style of the product.
Home shoes can be divided into several types:
- slippers;
- slippers with a closed toe;
- slippers;
- slippers 3D;
- ugg slippers;
- moccasins;
- slippers socks.
To understand how to make a pattern of house slippers or ugg boots, slippers with a closed toe or slippers, you need to take into account a few tips:
- In order not to take measurements, you can take an old slipper, put it on paper and outline the sole.
- You will need an awl to sew on the edging.
- As a rule, the sole is cut out of leatherette, split leather or leather.
- The insole can be cut out of cloth or suede.
- To sew a high-quality and durable product, you need to purchase special nylon threads.
Material for sewing home shoes
To pattern home slippers with your own hands, you need to pick up the fabric and stock up on all necessary Material for sewing home shoes should be of high quality and light, for example:
- fleece;
- mahr;
- jeans;
- wool;
- plush;
- suede leather;
- felt.

From jeans, felt and suede, you can cut out and sew light home slippers or moccasins. beautiful products are obtained from fleece, terry and plush. From these types of fabric you can sew any model of home shoes.
How to sew home slippers: felt pattern
To create this home shoes, you will need to make a complex pattern. You will need the following materials:
- 0.5 m felt;
- scissors;
- gypsy needle;
- glue from a gun;
- bright floss threads;
- patch in the form of an apple;
- cardboard;
- pencil.
DIY slippers pattern will look like this:

Manufacturing process:
- Take the cardboard and put your feet on it, using a pencil, outline the left and right feet.
- Now cut out the soles with scissors and circle them on the fabric.
- Cut out these elements.
- Next, we need to create the upper of the shoe. To do this, we again take cardboard and draw two semicircles. The dimensions of these details depend on the completeness and length of your foot.
- After that, we transfer these two details to the felt and cut them out.
- You should have four patterns.
- We must sew the upper part of the slipper with the sole.
- This can be done with the help of floss threads.
- After the two elements are sewn together, we can move on to decorating.
- We must sew a colorful patch to the top of the product.
- Now, according to the same pattern, we sew and decorate the second slippers.
- Home shoes made of felt with bright stripes are ready!
How to sew house slippers uggs
Fleece slippers are ideal for sewing such a product. They will turn out warm, soft and will serve you for more than one year. To create a pattern of slippers-boots, you will need 1 m of fleece, 0.5 m of suede and 0.5 m of leather. It is good if these materials are matched to the tone. You will also need the following sewing supplies:
- threads to match the fabric;
- needle;
- scissors;
- glue "Moment";
- centimeter;
- ruler;
- cardboard;
- pencil;
- pins.

Pattern of house slippers uggs:
- Cut out cardboard rectangles 38 × 20 cm for the shaft (two parts).
- We pin the patterns with pins to the fleece, circle and cut out with an allowance of 1 cm.
- We cut out the insoles from suede 23 cm long.
- Now we take the skin and cut out the soles of about 24 cm in length.
- With the help of pins, we chop off the upper parts of the boot face to face.
- Trim the seam allowances, fold the back sections of the boot and grind them down, leaving a hole in the lining through which you will turn the product inside out.
- Sew the top of the boot from the foot to the top vertically.
- So that the boots do not hang out and sit beautifully on the leg, we turn to the tucks. Make four notches in the places where the product is bent (in the area of the shaft) and carefully sew them, cut off the excess.
- Now turn the outer part of the slipper on front side, insert a suede insole into it and sew up the hole with a blind seam.
- We carefully coat the leather sole with glue and connect it with pins to the foot of the product.
- We do the same with the second boot.
- When all the work is ready, take the boots and fold the top of the products.
- On these lapels, you can make embroidery or decorate ugg boots with ribbons.
How to sew your own slippers-socks
Building a pattern of house slippers with your own hands is a rather time-consuming and scrupulous work. To simplify the task, you can use beautiful terry socks. Thus, you can create original slippers in just 10 minutes!
For this you will need:
- red terry socks;
- leatherette - 0.5 m;
- glue "Moment" (or glue from a gun);
- decoration (bows, beads and stars);
- scissors;
- needle;
- marker;
- red threads.
Step-by-step guide on how to make slippers-socks:
- The sole should be made of leatherette. To do this, place your feet on the material and use a marker to trace the outline of the feet.
- Cut out the soles with scissors and glue them to the socks.
- After the slippers dry, you can proceed to decorating.
- Make a lapel on the workpiece.
- Take slippers and on the side (from the outside) decorate it with a striped bow, right on the lapel.
- Sew beads a little lower and attach a couple of metal stars.
- Thus, the second slippers should be decorated.
Based on this pattern, you can sew similar indoor shoes, but come up with other ways to decorate. It all depends on your taste and ideas!
how are the shoes decorated?
The fashion trend in 2017 was chic fur slippers and slippers with fur. The pattern of house slippers made of fur is easy: for this you can take an old fur coat from a fox (nutria or rabbit) and cut out four details according to your measurements - two semicircle tops and two insoles (the process has already been described).

Then we carefully sew the upper parts of the shoe with the lower elements using special nylon threads. From leatherette, we cut out the sole according to old slippers and glue it to the insoles.
If you want to surprise your guests, you can decorate slippers in an original way. Here everything will already depend on your imagination. It should be based on the general color scheme of slippers, no need to glue on them a large number of versatile decorations. Everything must be tasteful. For example, after you have made a pattern of slippers, boots, decorate the product with bows. Attach embellishments to the sides of the outside of the boots. So, how else can you decorate slippers?
Elements for decorating home shoes:
- tapes;
- stars;
- zigzag braid;
- floss threads;
- buttons;
- stones;
- embroidery;
- rhinestones.
In order for the decorations to sit firmly on the product and not fall off after the first wash, they should be put on glue or sewn tightly with threads.
Having a good pattern, you can sew comfortable house slippers with your own hands, because this is a necessary thing in any home.
We will work with existing fabrics, we will not buy anything, we will use material from unnecessary old things, as well as pieces of leather from worn handbags or even boot tops.
In any house there are skirts, jackets, drape coats that are a pity to throw away, but you will no longer wear. Usually they lie somewhere in a bag in the basement. At least that's how it is for me.
Even if you have worn them with pleasure for a long time, there are definitely good pieces there. Let's give unfashionable, but still very good things a second life.
One piece of advice: if you have an old woolen sweater lying around, then you can roll it in the machine, dry it, iron it - this is a great material for sewing homemade slippers! Felled, it is no longer subject to shedding.
Here are by and large three patterns for cutting and sewing soft cozy house slippers with your own hands.

There are several more options for soft slippers with knitting patterns, by following the link you will find how crocheted, and knitting, as well as varieties, for example, only with crochet trim. Slippers from the attachment to an old magazine, poor quality photo, but I am convinced that the material is still relevant.
2 sewing patterns from Peasant Woman
Who does not know, there were such magazines for women in Soviet times, which were called Peasant Woman and Rabotnitsa. The name, frankly, is not very good, but at one time they were loved by many. There were given recipes, patterns. It is a pity that there were no good color pictures, but they were happy with what they had.
In general, the materials were very useful, the ideas inspired creativity. Since the files of this edition fell into my hands recently, I bring something useful.
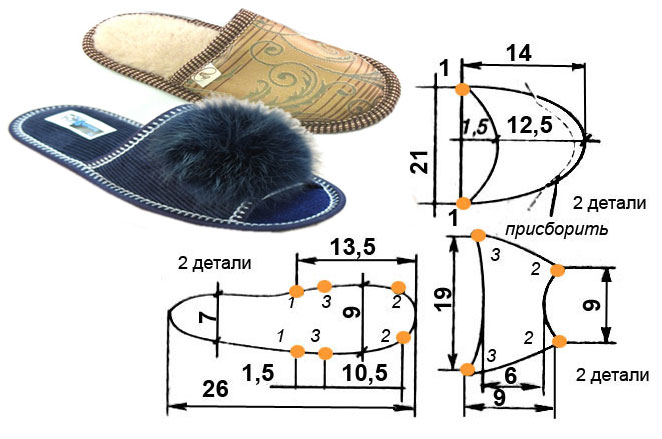
Almost according to one scheme, you can sew both ordinary slippers (without backs) and completely closed slippers.
The first model is more open, the second one has an original valve. Size 36-37. If needed larger size, then increase the pattern along the entire contour. If the leg is narrow, then increase only in length.
The material will suit the simplest, perhaps even gathering dust in the pantry for a long time. For the upper you need corduroy, drape or soft skin. You can use thin fabrics: fold them in several layers and stitch them for density. The sole is best made from the skin of old boots or bags.
Inside slippers it will be possible to put an insole of their skin, fur, drape.
Cutting details (1 piece each - this is for one slipper, without seam allowances, we will take it 0.5 cm):
- Valve
- Sole (cut out along the inner contour of the bottom part)

Sewing order:
Cut parts out of material. Process the top. Cut a slit for the leg on the inside. We either hem the inner edge or grind it with a beautiful braid, piping. You can also decorate with fluffy fringe.
Next, we work with the detail of the bottom. We cut out the sole separately and glue it with moment glue. Now you can connect the details of the top and bottom. First, we tighten the detail of the top along the outer edge with a thread. We do the same with the bottom. Both parts must match the points from 1 to 10, which are written in circles.
They will look a little different - more gathers on the back of the top and the bow of the bottom. We sew them from the face.
You can make a decorative seam with leather or thick colored thread, lace. Or process with braid. One slipper is ready. We proceed to the second. Just do not forget that the pattern will be upside down with respect to the first.
If you decide to decorate slippers with original valves, then cut out part 3. Finish the edge. The valve must be sewn along the line 11-12. It is fastened with ties attached to the point indicated by a cross on the top part and the valve itself. The ties can be a continuation of the braid with which the edge is processed.

Option for a pattern from Burda
The next way to sew slippers for the home was once offered by Burda magazine. True, because of the pompoms and the pointed, upward-looking nose, they look more like little slippers. :)

The pattern is simple, first you just need to measure the length of your foot - it should match the length in the diagram. Enlarge in a graphics editor to the desired width and print on a printer.
The black detail is the sole and the red detail is the upper.

The picture below briefly shows the workflow. Light green indicates the lining - the inner part, and the color pattern - the outer.
Increase the pattern of the sole and upper to 28 centimeters.
Description of work
- Cut out two fabric uppers and one felt sole for each slipper. To get shoes for the right and left feet, cut out one sole as in the pattern, and turn the other over to get a mirror image. Do the same with the side parts - two according to the pattern, two - inverted. Additionally, cut out the fleece top and sole for each slipper. This will be the inside, the lining. Don't forget the 5mm seam allowance.
- Fold the sides of the fabric face to face, chop, and then sew. Iron the seams in different sides. Repeat for the inner side pieces (fig. 1 and 2).
- Fold the outer and inner sides for each slipper and chop them face to face, sew along the inner circumference (Fig. 3). On the circumference, make notches with scissors, turn out, iron.
- Lay the lining and soles facing each other. First, sew on the sole, and then the seam on the heel (Fig. 4).
- Fold the lining and sole together inside with the front sides, stitch, leaving a small hole of 8 cm (Fig. 5). Connect the heel seam.
- Turn the slippers through the left hole, then sew this hole carefully by hand (Fig. 6).
- Make a pompom out of wool, sew to slippers (Fig. 7).

If you like to make original and unusual bags, covers, mittens and other products with your own hands, then making homemade slippers will not be difficult for you. Moreover, you can sew slippers, warm children's boots, uggs from any materials at hand, for example, from an old sheepskin coat or tops of women's leather boots.
Do not forget that old things, clothes, shoes are free material for sewing new clothes and needlework. See What can be sewn from the old.
This article provides two types of patterns for slippers, as well as the technology for their tailoring. Advice is given from what and how to make home slippers, warm children's boots with your own hands.
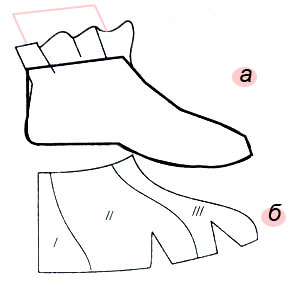
To make a pattern of flip-flops with an open toe or a closed one, take a piece of paper and trace the outline of your foot. You can take old slippers (without a heel) of a suitable size, put them on paper and outline the sole.
If you draw your leg on paper, it is better if it is in a sock or stocking and it is advisable to sit on a chair to reduce the load on the foot. Then there will be no distortion in the size of future slippers on the pattern.
Outline the outline of the foot, and then check it. To do this, measure the distance from the edge of the thumb to the heel with a measuring tape or ruler. This value should correspond to the size of your shoes, for example, for size 43 shoes, this distance will be 28 cm with an error of half a centimeter.
To build a pattern of slippers, you can use the above calculations, fitting them to your size. If you have slippers of the style you need, and you would like to sew exactly the same ones with your own hands, then it is not necessary to build this pattern.
Wrap tightly with paper or cloth upper part slippers, draw the outline of this part with a pencil or felt-tip pen and give allowances for the seams. After that, you can cut out this part, attach it again to the top of the slippers and check if it exactly follows its contour. Correct if necessary.
2. What can you make slippers from
For sewing home slippers you need to use various materials. The right and left parts of the bottom of the sole are cut from shoe leather, split leather, leatherette. Insoles (the upper part of the soles of slippers) are made of split leather, suede or cloth. There should be another padding between the insole and the sole. Usually it is cut out of cardboard and batting (a synthetic winterizer, thin foam rubber is also suitable).
The details of the top of the slippers are cut from leather and lining, they can also be duplicated with soft pads, then quilted.
If the top of the slippers consists of two halves, grind them off or connect them with a braid. They are glued with a gasket and a lining, edging or braiding the cuts (closed slippers have one cut, open slippers have two). Then a decorative finish is performed.
3. Threads and tools

In order to sew durable slippers, you need to use special extra strong threads. For sewing slippers, cotton threads in 6,9,12 additions No. 30, 40, 50 are suitable. Cotton-lavsan threads No. 44 LH-1, 65 LH-1 or lavsan threads No. 22 L, 33 L, 55 L, 90 L. For stitching parts the top of the slippers is best suited for nylon threads No. 65 K, 95 K. For stitching the soles, stronger nylon threads No. 470 K, 565 K are needed.

The details of the top, the edging of the cuts can be done on a sewing machine, but you will have to manually sew the top and piping to the sole. Therefore, purchase a special awl in the hardware store. With it, you can sew strong and durable slippers from any materials.
After the pattern of the sole and top of the slippers is ready, you can start cutting out the details. When cutting the soles, give an allowance for processing the edge of 0.5 cm.
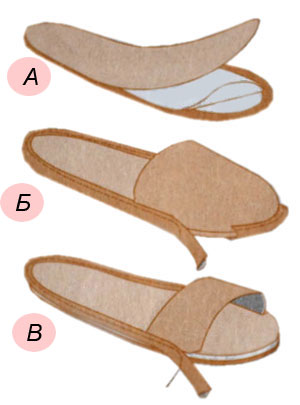
The gasket pattern is reduced by 0.7 cm along the entire contour so that the gaskets do not unnecessarily thicken the seam. Glue soles cut out of leather, cardboard, batting, split leather and trim the edges evenly (Fig. A).
Glue the sole along the edge with the top of the slippers with the seam outward (Fig. B), aligning the control marks. On a closed model, the excess length of the upper part is pre-fitted along the toe. If with a closed top you can allow some freedom for the leg, then in the model with an open toe, you need to adjust the length of the upper part so that it fits snugly around the leg.
The top is connected to the sole with an edge braid, piping, straight stitching. The welt can be made in the form of a piping or an overlay along the edge of the sole from a narrow leather strip (Fig. B). The seam can be closed with a decorative braid woven from thin leather straps, cords, ribbons, etc. To fix the finishing elements, you can use glue gun for needlework.
As in any work with paired products, operations are performed simultaneously on one and the other slipper.
5. How to make a pattern of warm house boots
 For those who prefer warmer indoor boots to slippers with an open back, the work is more difficult. You already know how to make a sole pattern, just outline the leg and add a seam allowance along the contour. But to make a pattern for the top of such slippers (such as uggs), complex calculations are needed. Therefore, we use better method"wraps".
 Since home shoes do not require a snug fit to the foot, but rather the opposite, shoes or boots with flat soles may well serve as a template for removing the pattern of the upper part and further modeling.
First you need to wrinkle the paper so that it fits better on the convex surface of the shoe. Then wrap it around your chosen shoe or leg. Wrapping the leg is not very convenient, but the pattern is more accurate. If you are satisfied with loose and spacious boots, then use shoes for the template.
While wrapping the template, you can lay folds, fixing them with glue or paper tape, pins. Outline the connection line with the sole, the middle line along the front of the boot and along the heel, the contour of the upper edge of the boots (Fig. a).
Peel off the paper (without splitting the pins) if it does not lie flat. Notches are made along the line of connection with the sole in the toe area, the pattern lines are adjusted. The resulting pattern can be divided into several parts, depending on the model you have developed (Fig. b).
6. What and how to make homemade boots
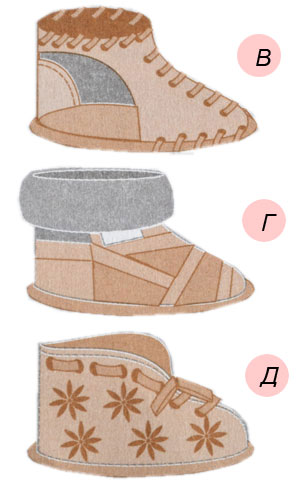
The details of the top of home boots made of leather, split leather, felt, thick cloth, leather set (from different pieces of leather) are cut. The details of the top can include pieces of tapestry, velveteen, cloth, fur. Do not forget about 0.5-0.7cm seam allowances.
According to the same patterns, the lining is cut out, using split leather, cloth, baize, woolen knitwear, and fur for it.
Stitch the top and lining separately. So that the backs do not crumple, a leather heel is attached to the lining inside the boot. Along the edge of the boots, the lining is connected to the upper part with an inner seam, then turned right side out, and a reinforcing stitch is given.
The edges of the neckline can be processed with braid or edging strip of leather, leather braidif the lining is made of split leather, fur or knitted lapels (Fig. D).
They fix the upper part of the boot to the sole in the same way as slippers, fitting the upper part in the toe part and a little in the heel area. The seam is laid from toe to heel in both directions. If you attach in a circle, then due to the fit, the shape of the boot may be deformed, warped in one direction.
If the circumference of the upper part of the boot turned out to be larger than the soles, then the excess is taken into the heel seam.
So that children's home boots do not fall off the child during active movements, sew ties to them or pull them off with a strap pulled through the holes punched in the upper part. If the lining is made of fabric, then put metal blocks in the holes.
It is not difficult to make such slippers from felt or coarse cloth, suede with your own hands. To do this, you just need to remove the top pattern from any shoe and buy a few meters of colored braid. Holes can be punched with a special flat punch or cut with a narrow and sharp knife blade. Any materials can be used as a material, warming and strengthening them with gaskets, including the fur of a sheepskin coat, and for the protective lining of the bottom of the sole - leather from the tops of women's boots.

It will be a little more difficult to make such warm house boots, but they will not only look original and stylish, but also reliably warm your feet. Sew ordinary slippers first, after you learn the technology and working methods, it will be easy for you to sew other models of slippers with your own hands.
Nowadays, many people have problems with shoes, including home shoes. That is, people cannot buy comfortable slippers or slippers at home. But the legs after work or study so need rest. Therefore, we asked ourselves the question: how to sew home slippers.
And not just room slippers, but original model. How to make slippers with your own hands in the form of Mice and Dogs - see the master classes. In addition, here you will find patterns for slippers of any size, from 36 to 45.
Such original slippers, similar to mice, sew quickly and easily. Before sewing slippers, let's look for material for them. What can be taken as a sole: the tops of old boots or boots, leather from old bag, fabric from an old backpack or briefcase, suede or thick cloth.
Take an inventory of old things - and you will surely find something suitable for sewing slippers. According to the principle of our master class, you can sew both children's and adult slippers.

“Ears” can be removed or made smaller and sharper - then it will turn out not to be a Mouse, but a Cat. Even a beginner seamstress can sew such slippers. If you don’t have a sewing machine, sew on your hands, with a “needle forward” seam.
For work you will need:
- A piece of dense fabric (cloth, denim, felt, drape, corduroy, and so on).
- A piece of leather for the sole.
- Foam rubber or batting (you can cut a synthetic winterizer from an old jacket).
- Needle, kapron threads.
- Threads for embroidery.
- Fleece or artificial fur for the insole and lining of slippers.
- Paper, pencil.
- Tailor's pins.
In order to sew slippers with your own hands - you need a pattern. To do this, we take our most comfortable and wide shoes or the shoes of a child, in this case a clog, put the shoe on paper and trace the sole with a pencil.


We take a sheet of paper and wrap it over the shoe. Trace around with a pencil and cut out the top of the template.


So, we cut out: 2 blue parts from cloth or fabric for the top, 2 white parts from fleece for the inside of the top, 2 parts from fleece for the insole, 2 children. for the sole, 4 blue parts for the ears (here you can choose from a larger and smaller version of the ears). Do not forget 0.7-1 cm - allowances for seams. In addition to these parts, you need to cut 2 parts from foam rubber for the sole.

We sew the ears - we sew them with small stitches with a contrasting thread.

Then we embroider the “muzzle” of the Mouse, cut out the nose from the fabric, sew on beads or buttons instead of eyes.


The ears need to be folded at the base as shown in the photo, and stitched with a few stitches. On top of our design we impose a white piece of fleece face to face. Then both parts are sewn, retreating 1 cm from the edge. We sewed the insole and upper together. Now you need to sew the sole.


We sew and stitch along the edges, stepping back from the cuts 0.7-1 cm. We leave the bottom not stitched - we still need to insert foam rubber here.

Then, turn the slippers inside out. It remains only to insert foam rubber or batting inside. To do this, we take our 2 parts, cut out of foam rubber using a stencil, and insert them inside the slippers.

Holding the foam rubber, we fasten the heel with pins and carefully sew the remaining unsewn piece of the sole. Homemade slippers, sewn with your own hands - ready. If you like it, you can sew slippers with different ears: with round ones - like bears, long ones - like bunnies, wide ones - like dogs.
Slippers Dogs - mk
The second option for self-sewn slippers is Dog slippers. The pattern is suitable for sizes 35 and 37. When you cut the upper part of the shoe, pay attention to the width of the part (it seems to us that the width needs to be reduced by 1-2 cm). However, everything is very individual - many people like loose shoes.

On the diagram, the 35th size is indicated in red, and the 37th is marked in black, the slippers of the 35th size have open toes. Do-it-yourself dog slippers differ from previous slippers in that here the firmware goes along the top of the product.
For work we need:
- Fabric for the insole (cotton, coarse calico, bike, and so on)
- A strip of fabric for finishing.
- Narrow ribbon for bows.
- Sintepon.
- Sole made of leather, leatherette, cloth, suede, etc.
- Paper, ruler, pencil.
- Scissors.
- Nylon threads and thread for embroidery.

We will start the master class with the manufacture of a stencil. On sheet A4, we outline the points of the pattern and draw the details right size. Cut out a paper stencil. We impose a stencil on the fabric, folding the fabric in 2 times. We need 4 parts for the insoles. Please note the details are different.

You will get 2 parts of the left, and 2 parts of the right slipper. And according to the same pattern, we cut out 2 parts from the padding polyester. We fold the blanks as in the photo, in the middle - a synthetic winterizer.

We chip off with pins and sew on a typewriter or manually.


We sew the sole to the workpiece, stepping back from the edge of 0.5-0.7 cm.

Cut out 4 top pieces according to the template. Fold inside out. We make out the “nose” and stitch it in a circle at a distance of 0.5 cm from the edge of the part.

We sew on buttons - eyes, we make out the upper cut with a strip of fabric.

We apply the finished top to the insole, pin it with pins and try it on the leg. If the depth of the top suits, we sew around at a distance of 0.5-0.7 cm.

We cut out the ears arbitrarily - 4 identical parts. Sew around.

Sew the ears to both sides of the top. Embroider the mouth with colored thread.

The product is ready. You can decorate the ears with bows.

Ready-made patterns of slippers for all sizes

Patterns for sizes from 36 to 45, you do not need to add allowances for the seams.


Slippers are always associated with coziness and comfort. After all, this is a comfortable, and sometimes warm home shoes, in which it is easy and pleasant to walk around the house. Today, stores offer a wide selection of shoes for home, both warm and regular, for the hot season. But we will tell you how to sew slippers with your own hands!
Shoes can tell a lot about a person. About how careful you are, whether you follow fashion. About whether you suffer from diseases of the joints of the legs, your shoes, sandals, boots can tell. But if the shoes that we put on to go out or go to work must comply with some standards, then you can choose any indoor shoes depending on your desires. We offer you some ideas on how to sew slippers with your own hands.
You can make many pairs of slippers for each family member and for guests. Slippers can be different, or you can make them in the same style. Homemade slippers can also serve as a gift for a family member or close friend.


How to sew house slippers with your own hands. Instruction
In order to sew house slippers, you will need durable soft material. As a material, old things made of thick knitwear, drape, leather, jeans or fur can serve. Before you start sewing, decide on the model and color, sketch out a sketch and make a pattern. According to the shape and size of the foot, the pattern is very simple to make by placing the foot on a piece of paper and circling it. For example, if you decide to make homemade felt slippers, then making them can take you only half an hour.

To get started, make a pattern as mentioned above, just circle your foot, placing your foot on a piece of paper. Then, to the resulting drawn foot, draw two rectangles on the right and left, which will serve as a jumper holding the slipper on the leg. After the pattern is ready, cut it out and put it on a piece of felt. It is enough to make a pattern for one foot, for example, the right one, its reverse part will serve as a pattern for the left foot.

Circle the pattern superimposed on a piece of felt with a pen and cut it out. Then connect the side parts of the jumper to each other into a ring, and try on the future slipper on your leg. Fix the jumper by adjusting it to the leg and sew. Here you have a slipper. You can decorate it as your heart desires. Any decoration is suitable here: buttons, rhinestones, beads, fur.
Fabric slippers can also be sewn at home. In order not to fantasize with a pattern, you can rip open old slippers that have served their purpose and make a pattern in their likeness. If there are no old slippers in the house, then make a pattern yourself, also circling your foot, put on a piece of paper.
What to make the sole for slippers?
Felt insoles with pimples are sold in stores. For the sole, you need to buy such insoles (the price is 36 rubles and 70 kopecks) and cut off a little on the heel and nose.

Then, using Moment - 1 glue, put the sole on stitched or knitted slippers and carefully sheathe around with a “gypsy” needle with a thick thread in dense stitches. You will get a beautiful and neat sole.
Benefits of a pimply outsole
- Felt breathes well and is washable;
- Durable "pimples" give the product an anti-slip effect;
- Inexpensive material is durable and resistant to abrasion, and the sole looks very decent.
And most importantly, you can make an excellent sole for slippers from it in almost 10 minutes!
If you don't want to use felt insoles as soles, look for a different, thicker material. It can be several layers of dense fabric, leatherette, thick denim. After all, the main load falls on the sole, and if it is too thin, it will quickly rub off and wear out. Yes, and walking in slippers with thin soles will not be very comfortable.