Star News


")


Ready-made stencils for snowflakes. Do-it-yourself paper snowflakes for the windows for the new year. Beautiful snowflakes for cutting with simple patterns for children
In anticipation new year holidays everyone wants that the house was extraordinarily beautiful, cozy and fabulous. Therefore, it's time to think about what you can do to achieve your desired goal. A good option for decorating a room before the New Year holidays is to decorate windows with unusual drawings, festive motifs that will bring pre-holiday mood and a New Year's fairy tale to the usual room decor.
And there is no need to think that all home decorations can only be purchased in a store, while spending quite an impressive amount of money. It would be much better, having united with the whole family, to make a variety of decorations for the house and the Christmas tree on their own. For such an activity, you can allocate a certain day, for example, when it is planned to install a New Year's beautiful spruce. And do not forget that this is the most exciting activity!
The easiest thing you can do with your own hands is to cut and attach snowflakes in different places. Everyone remembers how, as a child, they cut them out before the holidays in the garden. Today, becoming parents, you can spend time with your child with benefit and pleasure, cutting out beautiful snow-white snowflakes with your own hands from paper. Kids are always happy to take part in such events.
Teaching a child to cut a snowflake yourself is not at all difficult. For this you need to prepare essential tool and paper. As a basis, you can take napkins, colored paper or just a white sheet from the album.
The thickness of the sheet does not really matter. But you need to know that the most delicate and airy snowflakes are obtained from thin sheets. And too thick paper will be difficult to cut.
You will also need a pencil and sharp scissors. After the pattern for the future snowflake is selected, the paper is folded, as shown in the photo. The more additions you make, the more interesting and openwork the snowflake will turn out.


The size of the future decoration depends on how large sizes sheet is initially selected. In this case, only the desire to have a large or small snowflake influences the choice.

When the drawing is applied to paper, we proceed to cutting. This process requires special care and accuracy. In no case should you cut off the edges of the paper at the folds, as the snowflake may simply fall apart.

Children really like this process. After all, in the end you will get beauty with your own hands, which is so nice to decorate a Christmas tree, windows or walls in a room.
It should be noted that, it would seem, such a simple activity as cutting snowflakes out of paper with your own hands is a great opportunity to develop a child’s imagination, a sense of beauty and artistic taste.
It is possible and necessary to develop the abilities of your child at home, but a variety of circles in the garden, school will only help to raise the level and hone the talents of the child.
In addition to simple paper cutting, a child can be interested in making volumetric models of snowflakes. These decorations are designed for older children and adults. But that doesn't make them any less interesting or beautiful.

All the same openwork paper snowflakes are taken as the basis, the pattern is transferred, for example, to polystyrene or polystyrene foam. With the help of a sharp knife, all the necessary elements are cut out, and as a result, unusually beautiful, voluminous snowflakes are obtained.

They can be left white, but if you connect the kids and paint them together with bright colors, then such decor elements will simply amaze with their unusual design. And the time spent creating them will bring all family members together. The result of your labors will be unique.

Do-it-yourself voluminous paper snowflakes
In this master class, we will make such a heart with a snowflake. It can be used as a bag for a small gift or just as a Christmas decoration with your own hands.

First you need to print this diagram.


We transfer the scheme to paper and cut it out.


The result is two identical blanks.


To fasten together, we make cuts - on one side from the top to half of the snowflake, on the other - from the bottom to half of the snowflake.

We collect the finished volumetric snowflake, threading each other.

Attach the handle.


Do-it-yourself voluminous paper snowflake is ready!

How to make a DIY 3-D snowflake
Modern technology has also reached such a seemingly simple task as creating a snowflake. As the name implies, 3-D snowflakes are a more complex, but very effective technique, due to which the made decor is distinguished by a special elegance of lines and rather unusual shapes.
What may be needed to make a snowflake with a 3D effect?
Prepare a square sheet of paper of the desired color, a pencil and a ruler, scissors or a sharp paper knife, glue. The work of making 3-D snowflakes is very painstaking and requires a lot of patience.
The first step is to draw a sheet of paper into squares. We need 6 identical squares. Then such a scheme is applied. It can be printed.

Fold the square in half diagonally, transfer the diagram as shown in the figure. Fold in half again.

The next step is cutting parallel lines. The incisions must be made in such a way that they are directed towards each other, but do not converge to the end.


We connect and glue the corners of the first small square.


Then turn over and glue the corners of the next square.

And so on in order, until all the corners are glued together.

To make the snowflake voluminous, you need to very carefully glue the corners of all the squares. As a result, six snowflakes are obtained, which, gluing together, form a three-dimensional 3-D figure.

We connect the corners of all the blanks to each other.


In order for the figure to keep its shape and not fall apart, you need to additionally glue the sides of the snowflake.

That's all, our 3-D paper snowflake is ready!

By inventing various patterns, painting the figure with paints and even decorating with beads, you can not only create a very beautiful New Year's decoration, but also help develop your child's imagination and sense of style.
Paper snowflakes - kirigami instructions
Snowflake kirigami is a fairly easy way to quickly and effortlessly make a lot of beautiful decorations. The highlight of this type of snowflake is the selection of paper. For snowflakes - kirigami you need bright colored paper.

It can be colored on one side only, but you can choose paper with rich colors on both sides.
We take an A4 sheet and fold it as shown in the photo.

Cut out a square, fold in half diagonally.

We fold two more times.


Then we print and transfer just such a scheme to the finished workpiece.


The next step is to cut patterns on the workpiece using nail scissors.


Carefully cut out the snowflake and unfold it.


Bend the resulting corners, as in the photo.


A snowflake can be decorated with stasas, beads, Christmas tinsel, and then it will become the central decoration of your New Year's home.
2 more do-it-yourself kirigami snowflake options:


Light, air figurine ballerinas are very beautiful. If you combine two types of a beautiful snowflake and a ballerina figurine together, the effect can exceed all expectations.
It takes a lot of time to make this type of jewelry. But the work of cutting it out is quite simple, even a child can handle it. Not single figures look very impressive, but a whole garland of graceful ballerinas.
What you need to prepare for work:
- dancing ballerina figure template;
- thin white paper for a ballerina's tutu. Paper multilayer napkins are very well suited;
- thin white cardboard;
- scissors.

Choose a ballerina figurine template. On the Internet you can find a large number of options. Simply copy the selected template into a text document, format and print. But it is much more interesting to draw a sketch yourself. Transfer the template to cardboard and cut it out.
It is very important that the cardboard is white on both sides, since the snowflake is voluminous and is clearly visible from any side. The size of the figurine is optional. There are no restrictions in this matter.
Hello everyone! Today I want to continue the theme of crafts and show you how you can easily and quickly create wonderful toys in the form of paper snowflakes at home. The other day my sons and I made such beauty that now this wonderful creation pleases us. Watch and do with us.
I remember how I used to sit and cut snowflakes as a child, it gave me so much joy and pleasure. And then she ran and pasted it on the window. Time passed, but nothing has changed so far, I still love this activity, only now I am doing them with my kids.
I will start, as always, with the most simple options manufacturing, and there along the way there will already be more and more complicated options.
In order to create a snowflake, just one tool is enough - scissors and a piece of paper and a great mood.

Then you need to correctly fold the paper in the form of a triangle, and then draw a suitable pattern and cut it out. You will need a simple pencil still))).
The main thing is to take a sheet square shape, fold it in half (1), then in half again (2), repeat steps (3, 4), almost done! Draw with a pencil what you will cut out, for example, as in this photo:

So, from this triangular blank, I propose to make such magically beautiful and easy options winter snowflakes that you can use everywhere, even bring in kindergarten, school and decorate with them rooms in the apartment, at the entrance and windows.
If you like everything openwork, then this look is for you:

If you like classic options more, then choose these wonderful snowflakes:

A little more complicated are the following layouts and diagrams:

In general, I really liked this selection of all kinds of decorations on snowflakes, which I saw on the Internet:

Look at how picturesque and patterned they are, it’s just super beautiful, and most importantly, it’s accessible to everyone, even a child. preschool age, even for schoolchildren and us adults.
For the little ones, you can offer such crafts in the form of curls from stripes.

Cutting snowflakes from tissue paper
Have you ever seen such, and such, that the cutest snowflakes appear from napkins, which absolutely everyone would like. I found these and share with you, the method is simple and easy, and even budget, you will need glue, napkins, scissors, a pencil or pen and cardboard.
Interesting! Napkins can be replaced with any other type of paper, such as corrugated.
The work steps themselves are not complicated here, but these pictures show the whole sequence, so watch and repeat.
 The final result of the work will be unrealistically beautiful and will be remembered by everyone, and if you decorate it with colored sequins or something like that, then it will be generally cool.

Or so, depending on who decides how to decorate the original sample.

Well, now I'll show you a rather primitive, old way, before such cute snowflakes did everything at labor lessons or in kindergartens at fine arts. You need paper and good mood, of course, scissors and glue. From paper, you will need to cut long strips from a regular A4 sheet, the strip should be 1.5 cm wide and about 30 cm long.

Such multi-colored, you can make plain stripes, you should get 12.
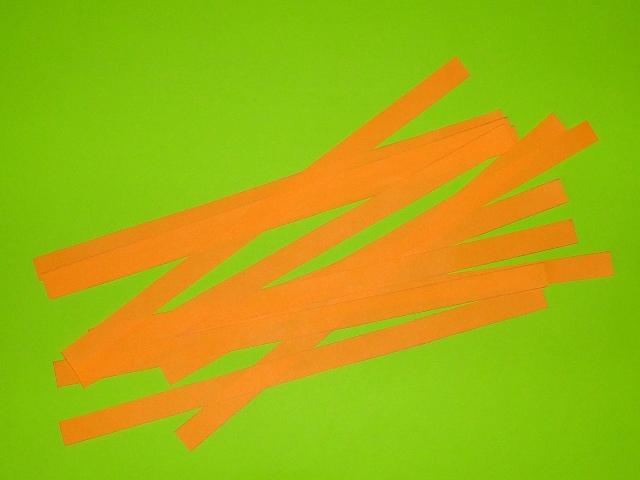

This is how, step by step, gluing these stripes together.

It turned out unusually original, this one can be hung even on a Christmas tree, even on a window or on a chandelier))).

Another similar option from paper stripes.

At a friend's house, I saw a snowflake made from an ordinary newspaper, then you can cover it with a shiny varnish or glue sackcloths.

Or you can twist paper cones and glue them in a circle, alternating colors.

Do-it-yourself volumetric snowflake with step-by-step descriptions
To begin with, I want to offer you this way of working, maybe you will like it more than the following:
This type of work is a little more difficult, but it is the most interesting in my opinion, because it looks such a snowflake poisons as if in 3D form. Of course, it’s time consuming, but it’s worth it, my child and I made such a masterpiece in 1 hour. We are happy to share step by step wizard class with you.

Stages of work:
1. You will need 6 squares of paper (blue and 6 of another, white), we took the usual squares that we already had, they are sold as notepads. If you don't have any, then make your own.
Fold each square in half from one end to the other.

It will turn out something like this, and the last figure is on the table, this is the result of the work.

2. Then, to the fold line on both sides, wrap the two ends of the paper.

Flip the finished templates to the wrong side.


Now turn the craft over to the other side again and stick out those parts that stick out.

4. This is how it should turn out, absolutely easy.

The next step will be to prepare 6 white squares, from which we will make the following blanks.

5. So let's start, this work is even easier than the previous one, again we will make origami out of paper.

It should turn out this way, there should be 6 blue blanks, and 6 white ones as well.

6. Well, after you have cut the white squares, fold each leaf in half, taking one end and attaching it to the other.

Do after the envelope.

7. Now turn all the envelopes over to the other side.

My youngest son also helped, and the eldest joined a little later.

8. Fold the sides.

Flip over and unfold the sides, then fold them towards the center. Cut out a small circle from paper and attach all the modules.

9. Now do the gluing.

Take your time, do everything carefully. Use a napkin.

10. Almost everything is ready, it remains to somehow decorate and cheer up yourself and others.

So I called the eldest son for help, and this is what we got up with him.

11. A photo was glued in the middle, such a funny and mischievous modular paper snowflake turned out. Tomorrow we will hang such beauty on a booth in the garden. Live looks just amazing and much brighter). So be sure that absolutely everyone will like this miracle!

In fact, there are a lot of volumetric options, they can be made using the origami technique, or you can do it in the most ordinary way.
I dug up these on the Internet, I hope they come in handy, take paper, scissors and glue:

Here is another similar option.

If you have a lot of time, then you can make voluminous snowflakes more complicated, I know that they usually dress up the halls of kindergartens, schools, universities, universities and even shops.
Interesting! You can not glue the parts, but use a stapler to do it faster.


Video on how to cut out a Christmas paper snowflake for kids
At first I wanted to show you a primitive video, and then I thought that you can easily do the most ordinary yourself. Therefore, I thought, I thought and ... I propose to cut out an unusual snowflake in the form of an angel:
Simple snowflake patterns for beginners in origami technique
As far as I know, origami is also divided into subspecies, for example, modular origami from paper. What do you love the most? I'll give you some interesting ideas.
Or the simplest and easiest to perform, even school-age children will figure it out:
Modular origami is already getting more complicated, here you first need to learn how to fold the modules correctly, and then everything will go like clockwork.

There will need to be a lot of modules to put together such a composition, but fine motor skills develop)))

Each of these modules can be easily inserted one after the other, so you yourself can come up with any options on the go.

It remains for me to wish you good luck and creative success.

Schemes and templates for cutting paper snowflakes for the New Year
As for a variety of ready-made schemes, I offer you these types of snowflakes. The main thing to remember is that first you need to fold the sheet correctly, as I showed you at the very beginning.
Now outline what you want to see and cut along the contours.

If you want to make the snowflake more voluminous, use pre-made templates like this one:

Then for this purpose you will need to cut out 3-4 templates, and then sew or glue them in the center, press down with a stapler. Who needs such ready-made blanks and diagrams, write a comment below, I will send it to you by mail absolutely free of charge, I have a lot of them in my piggy bank, I will gladly share a whole bunch.


By the way, you yourself can compose your own pattern, see how it looks, try it, creative activity:

I once fancied it was last year, and contrived such charm:

For those who love openwork and very complex options, although there is nothing complicated, I can offer this video for viewing, by the way, paper is folded differently in it, look, there is something to learn:
Quilling snowflake master class for beginners
This type of toy is quite complex if you have never done such a well-known quilling technique before. But this is at first glance, because the main thing is to understand the essence.
The simplest scheme and a snowflake can work even for a beginner, even for a child:

And also this video will help you with this, everything is available and step by step painted and shown in it. You just have to repeat all the actions after the leader and you will get a masterpiece.
Quilling snowflakes, this one is stunningly beautiful and charming. Try to do.
Well, here are ideas for implementation festive mood gave you a whole bunch, decorate your house, apartment. It will just look great, especially with your own hands, such crafts will always bring warmth and comfort to every heart))).

See you! Everyone have a great day, sunny mood! Come visit more often, join my group in contact, write reviews and comments. Bye everyone!
Sincerely, Ekaterina Mantsurova
Remember how in childhood we folded paper sheets into triangles and randomly cut out all sorts of corners and circles on them, and when we unfolded the sheet, we got an unusual snowflake?
Soon New Year, and the soul, just like in childhood, asks to decorate your home and office, but also with magical openwork decorations.
Only if earlier we invented everything ourselves, now there are a lot of all kinds of templates and stencils, by circling which and cutting out the necessary parts, you can create stunningly beautiful and rather unusual creations with your own hands no worse than frost draws on the windows.
Agree that now you want to create a pre-holiday mood? What is the cheapest and easiest way to do this? Of course, cut homemade decorations!
Simple and beautiful paper snowflakes will decorate the interior at the right time.
There is nothing easier than folding a regular paper square and looking at beautiful schemes create triangular bases. Or translate unusual curls from stencils, cutting them out, we get unpredictable jewelry options in expanded form.

Finished products can be used both separately and formed from them, for example, snowfall.

And if a flat openwork snowflake seems too simple to you, then you can connect your imagination and make voluminous decorations.
Do-it-yourself voluminous paper decorations
Volumetric decorations look more impressive than ordinary ones, and they are also created in a matter of minutes. The only thing is that you will have to tinker a bit with gluing the protruding parts, but it's worth it!

And if an ordinary snowflake is most often attached then somewhere on the surface, then a three-dimensional (volumetric) one can be made of any size. And hang her up like in the sight Christmas toys, or an additional decor of a chandelier or a doorway, and as an independent hanging decoration in the middle of the room.

Volumetric jewelry can be made in several techniques. The most common are: three-dimensional designs from stripes, origami, cutting stencils and gluing them.
The volume is created either by cutting and connecting the elements of a flat snowflake into protruding elements, or by gluing the constituent volumetric parts into a single structure.

To create them, in addition to sheets of paper, scissors and imagination, you will need a stapler, thread, glue, clothespins, paper clips and a ruler with a pencil.
Most often, voluminous snowflakes are made from snow-white paper, but no one forbids using colored or shiny paper sheets!

And also the finished product can be covered with sparkles. Or weave flowing rain and tinsel into it.
Schemes for the manufacture of volumetric jewelry
There is no more intuitive way to needlework than to make your own snowflake according to the scheme. The scheme, instead of words, gives a visual representation of how to do step by step with your own hands what you will be proud of, and what will please the eyes of others.
So let's get started:
Scheme for the manufacture of volumetric "Turntables".

Scheme for making a three-dimensional snowflake "Flower".

Scheme for making a three-dimensional origami-style snowflake.

As you can see, everything is made quite easily and simply.
DIY 3D paper snowflakes
3D snowflakes are a kind of three-dimensional products that, although they look intricate, are actually modeled in just a few simple steps.
Don't believe? Let's try to make 3 variants of 3D snowflakes together.
But what if, for starters, we try to make snowflakes from individual strips?

We take a strip and glue its ends to make a drop-loop.

We glue 5 drops together to make a kind of twig. For better gluing, you can clamp the “trunk” of the branch with a clothespin.

It is necessary to make 8 such branches.

To fasten the branches, you need to make a core. To do this, you can wrap a strip of paper on a regular bottle of varnish and glue it.

Glue the branches to the core and - voila! - we got a voluminous snowflake!
The following snowflake can also be made from stripes, but a little more geometric:

We fold the strips crosswise and for better gluing, you can temporarily fasten them with paper clips.

We bend the extreme strips with a spiral and glue their tips together.

We add more on top of the previous stripes, and glue them in the same way as the previous stripes.

Now glue the spiral petals to the main guide strips. And to be sure, for the time of drying the glue, we fix them with paper clips.

We remove the paper clips - our snowflake is ready!

But you can make such interesting snowflakes without using separate strips, but just by cutting separately folded sheets of paper:

We draw straight lines on the square along which we will cut the snowflakes

We cut along the drawn lines, leaving a slightly uncut edge on one tip.

We fold the core and glue it

We turn the next stripes in the other direction and also glue

The resulting "icicles" must be glued together

And now the voluminous snowflakes can't wait to be hung on a string.
Indeed, it turns out very beautifully, doesn't it?
Stencils for cutting
But if you do not have much time, then for simplicity and convenience, you can use ready-made stencils. To do this, sheets of paper are usually folded in four and templates are transferred onto them, along the lines of which unnecessary details are cut out. As soon as we unfold the sheet after cutting it out, we will already have a snowflake ready!
We suggest you use the following stencils:
Option number 1

Option number 2

Option number 3

Option number 4

Option number 5

How to glue voluminous snowflakes
Since snowflakes are usually made from plain or colored paper, any stationery glue for paper products will do.

However, it is worth remembering that the glue stick, if it dries out a little, will weakly glue paper parts together and may not hold the glued components of bulk products.

Silicate glue is well suited for gluing, but it has one drawback - it dries for a very long time and some types of paper get wet through it.

by the most the best option there will be PVA glue, which, firstly, dries much faster than silicate, secondly, it has a higher viscosity than glue stick, and thirdly, it practically glues paper products tightly.

Therefore, if you have a choice, you should still use PVA glue to glue bulk snowflakes.
Beautiful snowflakes on the windows with templates for cutting
And remember how in kindergarten did the teachers help us cut out the snowflakes and then glue them on the windows? Immediately it seemed that it was snowing outside the window.
But after all, in addition to simple lace products scattered around the window, you can create whole compositions from them!
For example, lay them out in the form of such a cute snowman, which will certainly bring a smile to everyone passing by:

Or you can depict a snow blizzard:

And such a window design option can fully replace any curtains!

In other words, turn on your imagination and create whatever comes to mind!
Stencils for cutting beautiful paper jewelry
And to speed up the process of creating the same type of snowflakes, you can use stencils.
According to them, you can either translate the drawing, and literally cut out gorgeous snowflakes in just a few minutes. Or, according to the example given, draw the necessary lines by hand and get openwork fluffy beauties.
Although stencils limit the flight of fantasy a little, you can still learn from them how to make more “chiseled” shapes for cutting.
Stencil #1

Stencil #2

Stencil #3 
Stencil #4 
Stencil #5 
It is also worth mentioning that in last years it became very popular to cut out all kinds of shapes from paper using a special very thin scalpel for paper. This direction in needlework has not bypassed snowflakes!
But for this creation option, we need stencils that need to be printed, and then applied to a sheet of paper and cut out with a blade with neat, precise movements.
Shall we risk making a few of these decorations?

Almost a masterpiece with portraits of movie characters, isn't it?
And such snowflakes will be appreciated by fans of Star Wars:

Such options will be able to cut even the most inexperienced needlewomen:

You can even include elements of national ornament: 
As they say, the eyes are afraid, but the hands are doing! You should definitely try something new!
Printable snowflake templates
Templates will help in cases where you need to cut out many identical snowflakes.
They can be printed, cut out in the form of such a corner template and then applied to folded paper blanks in order to trace complex details and cut them out.
To make a template of a suitable size, you can either transfer it from the monitor screen by applying a sheet and carefully tracing the outline. Or by copying to a Word file, and stretching it on the page to the desired size.
Below we offer you several templates that can be printed on a printer and immediately used to cut out snowflakes on A4 sheets folded into triangles.
Template #1 
Template #2 
Template #3 
Template #4 
Template #5

Good luck in your work! Let this winter please you not only with snow, but also with home-made stunning snowflakes that you will make yourself and, quite possibly, with your household!
Happy New Year!
Paper snowflakes on the windows are a traditional decoration for the New Year holidays. Each snowflake is unique, especially handmade. Paper snowflakes are beautiful and easy to make, because for this you only need paper and scissors. Thanks to their simplicity, snowflakes become a favorite craft for children and adults.
Real snowflakes are hexagonal, but you can also try making a square or octagonal snowflake.
Here simple instruction how to fold paper for a snowflake. The basic hexagonal shape stays the same, but what makes it different is the pattern you'll be cutting out of that shape.
You can use any paper to make snowflakes: wrapping paper, old magazines, printer paper etc. However, do not use very thick paper, as it will be difficult to fold and cut.
How to cut a hexagonal snowflake for window decoration

- Fold a square piece of paper in half to make a triangle (Figure 1).
- Now fold the triangle in half, connecting the ends (Fig. 2).
- Fold the resulting triangle in three (Fig. 3), as shown (Fig. 4).
- cut off upper part so that it is straight (Fig. 5). Start cutting out the pattern according to the pattern or as desired, using straight and curved lines.
- Open the snowflake.
Quadrangular snowflake
Diagram: how to fold a sheet of paper to cut out a quadrangular snowflake

Pentagonal snowflake

- You can use any size sheet of paper. For example, if you want to make many small snowflakes, then you can cut 4 snowflakes from one A4 sheet.
- Leave less paper. The more paper you cut out, the finer it will be.
- If you can't cut the pattern with scissors, try using a utility knife.
Snowflake templates (print)


Beautiful paper ballerina snowflakes

Such an elegant ballerina snowflake is easy to make with your own hands with your children. And then beautifully decorate the New Year's windows in the apartment also with the children.
The basic shape of the ballerina is symmetrical, so we need to fold a sheet of paper in half and cut out the template for the ballerina.

We make a ballerina's tutu in the form of a snowflake. Fold the sheet of paper only 3 times instead of 4 so there are not too many layers to cut out. Use different patterns.

After you have cut out the tutu, fold it in half to thread the ballerina figurine, and only then straighten it. Of such paper snowflakes you can make such a beautiful garland in the room.

Snowflake templates for cutting


Paper snowflake patterns for cutting
Such snowflakes on the theme of the cartoon "Frozen" can be cut out with the children.


Paper snowflake stencils
You can make a snowflake garland to decorate your home.


Snowflakes can also be cut from coffee filters


Decorating windows with snowflakes for the New Year: original photo ideas
Hang snowflakes on the window with hooks or paper clips.

Thread the string through the 2 holes in the snowflakes to make a garland.

By gluing several snowflakes with the same pattern, you can make 3D snowflakes.

You can decorate your gift with a handmade snowflake.

Use double sided tape toothpaste or a soap solution to stick a snowflake to a window or decorate your house or other room with them.

Paper snowflakes are the easiest and most fun way to make new Year decoration for home, office or shop. When we were kids, we just folded white paper for a snowflake by four or eight times, and then cut out the rays of the snowflake as it comes up. It was always interesting when you unfold paper - what kind of paper snowflakes will you get with your own hands? They have always been different. Today dom-v-sadu.ru wants to offer beautiful ideas how to make a paper snowflake and new printable paper snowflake templates.
How to fold paper for a snowflake
The easiest way to fold paper is to take a square piece of paper and fold it in half 4 times. Then, holding the corner in your hands - the center of the fold, cut triangles along the diagonal sides. You can also decorate the edges - cut with curly scissors. We unfold and get an openwork rectangular snowflake.
To cut out snowflakes from paper in the form of a star, you must first take the paper round shape and fold it in half. Divide the semi-arc into 3 equal parts and bend each edge towards the center. draw any of the proposed ornaments on the resulting blank, cut it out and unfold it.
Another option is how to make a paper snowflake with your own hands in a different folding pattern. To do this, a square sheet of paper is folded diagonally, the middle is outlined, folding the sheet. From the middle, the entire workpiece is divided into approximately equal parts and folds are made in this place. It turns out folded paper with two tails from which you can do a lot of interesting things.

Beautiful paper snowflakes - original patterns for cutting
On the resulting blank described above, we draw any pattern, you can even draw a snowman and cut it out, you get snowflakes with snowmen. We suggest you make more openwork New Year paper crafts. To do this, you need to strive to draw a very detailed pattern, consisting of fine lines. For example, you can take one of the suggested cutting patterns. Snowflake templates can be used not only for white, but also for colored paper to make multi-colored snowflakes.

Paper snowflakes cutting templates
The most beautiful and original snowflakes are obtained if you print a template or stencil and then cut it out.
We invite you to use ready-made ideas and print templates for cutting paper snowflakes. Here is a paper snowflake layout print and cut.


Snowflake ballerina
Snowflake cutouts can be used to make a ballerina skirt for another pretty room decoration that hangs from the ceiling by a string. Making ballerina snowflakes is very easy. To do this, cut out the silhouette of a paper ballerina from paper. For a skirt we do christmas snowflakes do it yourself out of paper, trying to make it as delicate and beautiful as possible. In the center, it is imperative to cut a hole, but not very large and it is desirable that it be with sharp edges. So the snowflake will be better to stay on the ballerina. Then we insert the ballerina in the center and glue the parts, if necessary.
You can use the following stencils of ballerinas with snowflakes.

Such snowflakes of a ballerina will dance beautifully if they are hung by thin strings.

- Paper for cutting snowflakes, you can take office, colored paper for children's creativity, origami paper.
- It is convenient to cut out relatively large sections of the pattern with ordinary stationery scissors, for example, along the edge of a snowflake.
- For cutting small details and complex patterns, it is better to use hairdressing or manicure scissors.