Star News


How to make a badge with your own hands - making options (simple and complex). DIY badges for a backpack, how to make plastic key chains in the oven with your own hands How to make a badge from a blank
Have you invited the kids to your son's birthday party and are thinking about small gifts that your child will give to his guests as a token of gratitude for their coming? Did your daughter ask you to help make some distinctive things that will make her and her friends stand out from the crowd of classmates? Your girlfriend is getting married and asked to do DIY badges for witnesses? Yes, yes, the answer to these and many other life situations - homemade badges, original and infinitely extraordinary. Think you can't make it? In vain, it is almost as easy as many other handicraft projects that you are interested in and do from time to time. It turns out the rest - it will work out, the main thing is to choose an idea to your liking, and then the result will definitely bring pleasure!
DIY badge - 5 fun ideas:

1. Badges made of polymer masses
Were you fond of plasticine modeling as a child? Remember the lessons of labor - today you have to do almost the same thing, only, perhaps, on a different topic. The technique is familiar and understandable - despite the fact that the material is tactilely different, you will not feel much difference in work. Choose the figures you need and get to work.

2. Epoxy Resin Heart Badges
Cute and glorious, such hearts can become a hair ornament, an inconspicuous brooch, and a souvenir gift for friends and acquaintances. The work is not difficult, the problem can only arise with finding the right mold, however, if it doesn’t work out, don’t worry, you can make icons of a different shape using the same technology.
3. Boho badges from textile scraps
Badges that will allow your imagination to spread its wings and express itself to the maximum are just this option. Collect the most beautiful pieces of fabric in a pile, add beads and buttons, do not forget about ribbons and cords and create, create, create! Lots of fun and great results.
4. Icon from improvised materials
If you are a little Plyushkin in your soul, you can easily find a variety of unusual things in your house - beautiful feathers, fragments of semiprecious stones, a strange-looking, but interestingly shaped piece of plastic decor and a bunch of everything else. To collect all this wealth into a single whole, you need a lot of talent, but you can!
photo badges– an excellent souvenir from the category “ original and cheap". Such patterned badges popular among fans of sports clubs, anime fans. This is a great corporate souvenir for a corporate party in the company. For photo badge production or drawings need a printer and a press. And blanks. The production is very simple and inexpensive. It can be easily organized remotely. I often see how they make such badges at concerts in clubs or discos. They took a picture of you, prepared it on a laptop and sent it to a printer for printing, and made it on a press in a couple of minutes. From small souvenirs, I described the production and. Badges not too hard to do. 


01. File preparation and printing.
The gray circle around the photo is a technological zone that will go under the icon and will not be visible. The size of the circle is 7x7 cm.


02. Icon blanks
Icon blanks are different. They differ primarily in size - diameter icon and foundation. Another limitation is imposed by machines. Different manufacturers are interested in using only their blanks for badges. We have Talent badge making machine.

Not a very successful machine, but one of the cheapest. We suddenly found out that it is more difficult to find workpieces for it than for other machines.
Packing for 50 pieces looks like this:

And this is one icon disassembled:

Different manufacturers have a different badge base - a white plastic base with holes in the photo. Even a badge of the same diameter for another machine will not work. We once bought 500 pieces with a metal base. Everything seems to be the same in shape and size, but our talent does not want to take them.
03. Printed the image.

04. Making a badge with a photo on the Talent machine.
Begin!

I put down a metal plate.

Above is the printed image.

We close with a film.

Badges are one of the most popular attributes among young people. Each product carries some information about its owner, ranging from preferences in music, cinema, anime and ending with the slogans of a personal attitude to life. Of course, you can buy a badge, but making it in a single copy with your own hands is much more interesting.
There are 2 types of icons:
- Soviet-style metal;
- metal sunset.
New icon based on the old one: method number 1
To make a badge based on the first one, you will need:
- game chip (preferably plastic);
- Soviet-style metal badge;
- medium grit sandpaper or file;
- scissors;
- Super glue;
- A4 paper with a printed image of the future badge.
First you need to prepare a picture or an inscription that you would like to see on your future badge. You can cut out an already finished image or draw it yourself.
After the picture is ready, give it round shape and draw a black border (to make it easier to cut). This can be done in any graphics editor. It is advisable to stick to a resolution of 300 dpi. More than 20 such “round circles” can fit on one sheet of A4 paper. Therefore, you can make badges not only for yourself, but also for all your friends.
After you have edited the picture, copy it into a Word document. Take measurements of the chip (the diameter of a standard chip is 40–40.5 mm). In the Word menu, select "Image Format" and set the required options. The size of the picture should be with a margin - if the chip diameter is 40 mm, the picture should be 41 mm in diameter.
Next, print it on a color printer and make a protective coating. It can be created using colorless varnish, adhesive tape, but most the best option there will be lamination. This is done by any office that provides paid printing services.
The next step is to prepare the badge. Take sandpaper or a file and start erasing its front part to a metal base. The most important thing is to level the surface, so don't worry if some paint remains. This step can be omitted, but then you need to apply more glue. However, there is no guarantee that the picture will be securely fixed on the surface.
When the base is ready, cut out the finished picture and glue it on the back of the chip, and on front side glue the badge last. Be careful not to get crooked. back side homemade badge draw with a marker or paints.
New icon based on the old one: method number 2
To make a badge based on a metal sunset product, you will need:
- scissors;
- metal sunset badge (35-36 mm in diameter);
- a finished picture with margins of at least 1.5 cm (for hem).
First, separate the plastic base of the badge. Then carefully remove the metal part with the image in the film. Having unfolded the edges, remove the factory picture and attach your workpiece in its place, bending the edges over the base.
From above, cover the image with a film, the edges of which are also bent inward. Finally, replace the plastic base with the pin. The icon is ready for use.
How else can you make an icon with your own hands
In addition to the above methods for making a badge, you can make such a product using self-adhesive paper and a plastic base with a pin. To do this, the image must be printed on self-adhesive paper, then laminated or covered with adhesive tape, and then glued to the base.
A more difficult option would be to cast a badge from lead. For this you will need:
- lead;
- sand and fire.
On the sand, make any shape (asterisk, heart, print). Melt the lead in a special metal bowl over a fire. When it becomes liquid, pour your sand mold and let the workpiece harden. After a few hours, you will have a unique badge.
The most important thing in handmade This is your desire and positive attitude. Believe in yourself, and everything will work out for you!
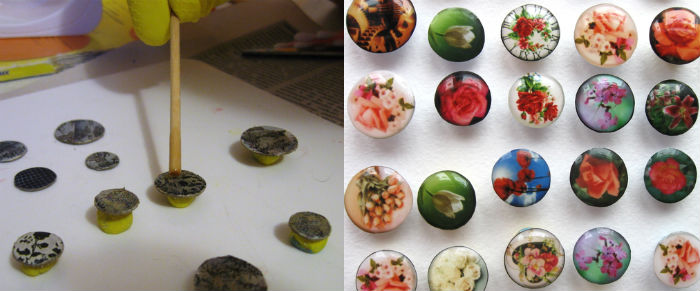
Hi all. With you NataLime and today we will make Tumbler-style badges with our own hands, with which you can decorate a backpack, jacket, bag and anything. They are quite simple to make and we need a plastic container. They usually sell all sorts of cookies, cooking and so on. Well, in order to choose a suitable container, we need to pay attention to the packaging. There should be a PS-06 sign here.
We do not need the ribbed part of the container, so first we cut out a flat part from the container lid. You can use quite a bit of plastic from each container. 
Pre-print on the printer the pictures that you want to see on your icons. Pictures should be 3 times larger than the icon size. We apply plastic to the picture and with a permanent marker we outline everything along the contour. 
Try to circle carefully, but even if there are small gaps, it's not scary. They will fix themselves in the next step. The contour is ready and now we cut out the smiley face with scissors. 
All figures are ready. And now we need a baking sheet, which we previously covered with parchment. We spread the figures on it and send it to the oven preheated to 180 degrees. What happens to them? At first they all curl up and it seems that instead of badges you will get plastic tubes, but, fortunately, then they are aligned. We take out our blanks from the oven as soon as they become even. The plastic badges have shrunk in size by about a third, as expected, and the badge has become very dense, as if it was not made by me myself, but by professionals at the factory. All figurines are great!
And now it's time to breathe life into them with paint! I took acrylic paints and painted each element of the workpiece with inside. There is very little left until complete readiness - glue special pins for badges on hot glue. 

Our icons are ready and now they can decorate and diversify any Look. They can be attached to a backpack, sweater, jeans, and anywhere else your heart desires. These icons are just amazing. They are bright, youthful, stylish, super-duper cool. I really liked them, and I hope you like them too. it’s difficult to make them, but you have to sit for a long time and painstakingly draw everything. And it’s quite easy to make them and the result is simply amazing! 
Of all the badges, I liked Wow, the panda and the palm tree the most. Which icon do you like the most? Please write in the comments.
Badges are one of the most popular youth accessories. Each such product is fraught with some information about its owner. The badge can tell about personal hobbies, values, musical preferences, affiliation with an organization or attitude towards life.
Undoubtedly, a fancy badge can be bought at the store. But a thing made in a single copy is always a priority. Its value lies in the fact that it is unique. No one else will have this! Ready to declare yourself out loud and show your friends what you are capable of? Then hurry see how to make badges at home. Some of the ways will surprise you!

Making a badge out of paper
Most easy way make an icon - make it out of paper. Paper badges, medals and badges are often used during school competitions, sports competitions and children's parties. Love to create them and young fashionistas. And all because the manufacture of cardboard badges does not require special materials, special skills. Only paper, a hairpin and a rich imagination!

Cut out from a magazine, print or draw a picture right size. Stick on cardboard. As a picture, a sticker is also perfect.

To make the badge last longer, wrap it with duct tape on both sides or laminate at any stationery store. You can also add a glossy shine to the icon using wrappers for a notebook. Place the picture between two pieces of the wrapper, glue the edges with an iron and parchment.
That's all! A paper badge for clothes or your favorite bag is ready. A hole punch and a thin rope will easily turn it into a stylish keychain.
Do you have any questions? How to make a badge out of paper and attach a safety pin, the video will tell:
Ice cream and hamburger made. What about cat keychains or clouds? Look!
If a special event is approaching - name day, family celebration or kids party, cardboard badges are easy to decorate with lace, sequins, rhinestones, beads, satin ribbons.

Paper badge can be coated epoxy glue. Glue the picture printed on thick paper onto a cardboard base, let it dry. Attach the chip to a plasticine stand and apply glue in two stages: first, a thin layer, spreading the glue over the entire area of the picture, then add a few drops of glue - they will spread over the chip and make the icon convex.
How to make plastic badges in the oven?
Badges from the oven - unexpected, right? But how beautiful! Tell me, where do you put disposable plastic containers from cakes, salads or cookies? Do not rush to throw them in the trash, better put them in the oven. Two minutes - and a small miracle will manifest itself.
To make plastic badges in the oven, you will need:
- Plastic container,
- scissors,
- hole puncher,
- colored permanent markers.
Use scissors to cut out a smooth and even part of the plastic packaging.

Place the selected pattern under the bottom and transfer it to the plastic with a marker. Paint over. Make a hole on top with a hole punch and cut out the picture along with the loop, retreating a few millimeters from the edge.
Attention! The drawing should be large enough, because during baking it will decrease several times.


Preheat oven to 160°C. Put the blank on parchment paper and keep in the oven for 2-3 minutes. As it heats up, the picture will begin to shrink and curl, so you can flatten it a little with a fork.
Carefully! If, while working with a hot oven, you suddenly forget the safety rules, you can get badly burned. Ask for help from adults.

After baking, your badge will become strong and smooth. Make some of these badges and put them on a thin metal chain. You can do it wonderful bracelet or cool keychain for a portfolio.


Plus, badges are easy to make. from plastic buttons. Apply an image or ornament with acrylic paints and cover with nail polish. Ready!

Masters in the manufacture of badges manage to glue the plastic base with embroidered designs, pulling them together from behind with a thread. The work is painstaking, requires the use of special tools and the ability to embroider with satin stitch.

Wooden badges are the hit of the season!
Stylish, elegant, and most importantly - environmentally friendly! This is why wooden badges are popular among young people. Do you also want an exclusive mini brooch for yourself? Will have to work!

To make a wooden badge for clothes, prepare:
- round flat wood blanks,
- acrylic paints,
- safety pin,
- glue gun,
- simple pencil,
- water and a brush.
Making wooden badges should start with a sketch on paper. You can draw everything that fantasy whispers - ice cream, elephants, bunnies and so on.

Now with the help simple pencil transfer the image to a wooden blank about 5–8 mm thick. They are sold in art supply stores.
It's cool if you know how to work with a chisel, or burn patterns on a tree (this is often taught in labor training lessons). Then the surface of the icon will become textured, and the contours of the image will be sharper.

Draw the desired image with acrylic paints. When the paint is completely dry, use a glue gun to attach a safety pin. Cover the badge with wood varnish.
Stylish decoration is ready.


In the manufacture of wooden badges, additional materials are often used - threads, beads, pieces of fabric.
DIY metal badges
Creative do-it-yourself metal badges are made on the basis of old ones that have already lost their relevance and are not popular with their owner.
To decorate clothes with a metal badge, prepare:
- old metal badge,
- stationery knife,
- acrylic paints,
- pieces of cloth or a napkin.
Take an old iron badge and tear it apart with a utility knife.

Here's what the piece will look like.

Color the icon light acrylic paint in two layers. Once the paint is dry and tacky, cover the badge with a small piece of tissue paper.
Pay attention! If there is too much paint, it will brazenly seep through the napkin and ruin the badge.


Fold the edges of the napkin inside and close the icon.

The final result depends on the image on the napkin. It can be pirates, heroes of your favorite cartoons or fairy tales…


DIY acrylic badges
These original badges will look like just from the store shelf. To make an acrylic badge with your own hands, you need to purchase a special blank. You can find it at any office supply store.

The workpiece consists of a body and a mount. You only need to cut out the image and place it between the base of the badge and the transparent cap. To prevent the image from scrolling, put a drop of glue on the back side. Everything about everything - one minute!

Congratulations! Now you know not only the technique of making badges, but also how to make a keychain with your own hands. After all, with the help of a hole punch, a wood burning device or an ordinary soldering iron, the badge can easily turn into a pendant. However, do not forget about the help of adults. Only under their supervision can you work with electrical appliances.