Star News


Patterns of school sundresses for girls. Do-it-yourself school sundress. Do-it-yourself sundress pattern for a girl: a master class on creating different models Patterns of children's sundresses from velveteen
Sewing master class children's sundress. Today we will tell you how to sew a sundress for a girl with your own hands.
Required materials and tools:
Paper pattern of the base of the bodice of the dress, fabric, hidden zipper, button, threads, scissors, tailor's pins.
Pattern preparation.
To make the sundress easier to sew, and the thing itself turned out to be beautiful and even, it is better to cut out the product using the already proven pattern-base of the bodice of the dress for the girl. On the paper blank on the front and back, we outline a new neck line.
Now imagine where the straps will be. At the same time, it is important that they coincide when combining the patterns of the front and back along the shoulder seam.


The last step in preparing the pattern for the upper part of the sundress is the design of a new armhole line.

Tailoring the top of the sundress.
Using the existing paper base, we cut out two parts for the front and back (one for the lining). We measure the length and width of the strip from the pattern, which will serve as a strap, and also cut it out in duplicate.


Let's make straps. We fold the fabric blank in half and sew along the long side. Then we turn it inside out and smooth it so that the seam is in the middle. It remains only to lay the stabilization line a few millimeters from the long edge.

We connect the straps with the "lining" of the bodice of the sundress. It is advisable at this stage to try on the future product, so that when finished, the straps fit beautifully on the shoulders and shoulder blades of the model girl. Please also note that the seam on the straps at this point should match the right side of the cut lining.

Sew the front and back of the lining along one of the side seams. The other one is left for lightning. Similarly, we sew both parts from the main fabric.

Now we sew the inner and outer parts of the bodice of the sundress, turn the part inside out and, by analogy with the straps, lay a stabilization line along the upper edge.

Sewing a sundress skirt.
To cut out the lower part of this product, no special calculations are necessary. The pattern is a rectangle, the length of which coincides with the length of the future skirt of the product, and the width - with the width of the purchased fabric, but not less than 1.5 girth of the girl's hips.
We sew the rectangle along the only side seam, leaving the area for the zipper unsewn. We lay two straight lines along the upper part of the skirt and gather the fabric until its width is equal to the width of the bodice.

Product assembly.
On the bodice, we smooth the side seam in such a way that a hidden zipper is placed in the formed “pocket”. We sew the main part of the bodice with the skirt, and leave the lining unsewn about 3-4 cm to the future side seam.

We sew in a zipper, smooth the seams.

We bend the bottom of the product.

Tailoring of a belt and a bow.
The pattern and tailoring of a belt for a sundress is not fundamentally different from how the straps are sewn. First, we cut out a rectangle, which we sew along the long side, and after turning it over, we smooth it and sew it a few millimeters from the edge.
To create a bow, cut out a square from the fabric. We smooth its two parallel sides by 0.5 cm, and sew the other two.

We turn the workpiece inside out and manually sew the remaining open edges with hidden stitches. The middle seam should be in the middle.

Now we find the vertical middle of the rectangle and manually tighten along this imaginary line. It turns out a beautiful bow.

We sew it to the edge of the belt, and fasten the button on the back side.

The second part of the button is placed at the second end of the belt. At the same time, the belt itself, so that it holds securely, is best sewn to the sundress in the area of \u200b\u200bthe side seam (without a zipper).

Sundress for the girl is ready!

The final look of the craft. Photo 1.

The final look of the craft. Photo 2.

The final look of the craft. Photo 3.
Sundress can be decorated with bright and beautiful pattern. Find a drawing that suits the girl. To make the drawing beautiful, the quality of the drawing itself must be good. It is best to print on a cut, and not on a finished sundress. Finding where they print pictures is not a problem. For example, printing on a cut is done.

Childhood is an amazing and unique time. It is at this time that children look especially cute and touching, wearing outfits sewn by caring mother's hands. Sewing a sundress for a girl at the age of 1 year is not difficult at all.
You will need a small piece of fabric (about 60 cm long and 150 cm wide) or even an old mother's dress, a sewing machine and 1 free evening. It is not at all necessary to build a sundress pattern - all the details are cut out immediately on the fabric. The dimensions of all details of the dress cut are given for a girl with a chest circumference of 47 cm and a hip circumference of 48 cm. Seam allowances are already included in the indicated sizes.
How to cut a sundress without a pattern for a girl of 1 year
From the pre-ironed fabric, cut out the following details:
1. Skirt panel size 22*140 cm, 1 piece;
2. A frill of a sundress with a size of 6.5 * 210 cm, 1 piece;
3.Sundress straps size 34*8 cm, 2nd detail;
4. Ruffle for straps size 54*6 cm, 2 parts;
5.Sashafan belt size 58*8 cm, 1 piece.
In addition, from the fabric-based adhesive pad, cut out the details of the belt and straps.


After all the details are cut out, you can start assembling the sundress.
The sequence of sewing a sundress
First of all, you need to hem the bottom of the frill. The width of the seam should be 5-7 mm.
Then it, previously laid in small folds, should be sewn to the cloth. The stitching seam allowance must be overcast, ironed in the direction of the panel. On the front side, you need to give a finishing machine line with a width of 2 mm.

After that, the cross sections of the panel must be overcast and then stitched together with a 1 cm seam, leaving a 7 cm long cut at the top. The seam allowances should be ironed out.

The belt should be glued, folded in half along the length and ironed, and then overcast in one long section.

Next, with a raw cut, the belt must be sewn to the skirt panel previously laid with tucks with a seam of 1 cm. The end ends of the belt must be turned. On the right, the end of the finished belt should be a kind of continuation of the cut of the skirt (a loop will be sewn here), and on the left, protrude 3 cm beyond it (a button will be sewn on here).

The ends of the belt must be turned out, straightened, the belt should be unscrewed with a swept edge to the wrong side of the product, fixed, if necessary, in this position with a hand stitch or pins.
On the front side of the belt, a line 2 mm wide should be given. The auxiliary hand stitch or pins must be removed, the belt should be ironed.

After that, it is necessary to prepare a ruffle for the straps, namely, overcast its outer cut, and then iron it to the wrong side by 7 mm. Along the edge, it is necessary to lay a machine line 2-3 mm wide to secure the allowance.

Details of the straps must be duplicated and ironed in half along the length.

With the help of pins or a manual auxiliary stitch, you need to attach the ruffle laid in small folds to the longitudinal section of the straps. It is important that the ends of the frill do not reach the ends of the straps by the width of the belt (3 cm).

The strap must be folded in half (the face should be inside) and stitched with a seam of 1 cm along the longitudinal side. The pins must be removed.

Then the strap must be turned out and ironed. It is necessary to lay along the turning seam finishing stitch 2 mm wide.

The end ends of the straps need to be overcast, and the ends of the threads should be carefully fastened.

The straps should be sewn to the belt of the sundress, placing them 4-5 cm from the middle of the front and back.

On the back of the belt, a loop should be overcast and a button sewn on.
The baby sarafan is ready!
Summer is a happy time for holidays for children and holidays for adults, which means an excess of free time that should be spent outdoors.
However, no matter how useful it may be for kids, this is where the danger lies. Firstly, or burns, and secondly, injuries and pollution. From the latter factors, the simple attention and care of parents will help to protect, and from the former - plentiful drinking, hats and light, well-ventilated clothing. Therefore, in this article we will learn how to build a pattern for our beloved daughter for every taste. They can be made from different materials, any cut and with various types decor: with a drawstring at the waist, a beautiful chiffon flyaway, with multiple ruffles, etc.
Necessary

First, let's find the materials that suit us. future product is better to choose a natural, breathable, thin. It is best to use cotton, linen, satin for children's patterns and their sewing. Before you start cutting out the material, you need to smooth it out and arm yourself with tools: a centimeter, a long straight ruler, chalk for fabric and scissors. The edges on the overlock can not be processed, we will tuck them twice and put a line on the sewing machine. This will greatly simplify the task of patterning children's sundresses for beginners, and therefore speed up the work. So, the first option that we will offer you is a simple loose sundress with an elastic band assembly on the child’s chest and ties on the shoulders.
Getting to the pattern

We need only three measurements: the first is from the level of the chest (or armpits) to the intended bottom of the future product, the second is the circumference of the hips, and the third is the circumference of the chest. On it, we will cut off the elastic band of the required length, while it is better to use a wider and more easily stretched one so that it does not impede the child's breathing. But you can do without it if you insert a strip of fabric or ribbon, which we will do. And now we are building a pattern for a children's sundress. So, we take a piece of light fabric, smooth it, fold it in half. From the fold line horizontally to the side, we set aside a value equal to half the circumference of the hips + 10-15 cm, this will be the total width of the product. From the resulting edge of the line, lay down, parallel to the fold, the value of the first measurement + 10 cm per drawstring, that is, the length of the future sundress. The resulting angle between the two lines must be replaced with a slight bend for the child's armpits, 7-12 centimeters long from the lower level of the drawstring. Everything, we have finished the pattern of a children's sundress.
We sew

To finish our product, we only have to process the edges, make seams and straps. So, we bend the lower (hem) and upper (chest) edges of the fabric cut twice by 0.7-1 cm and iron it well, so even beginners do not have to waste time on preliminary turning. Next, we make 1-2 seams along the obtained strips, we strengthen the beginning and end of the thread with knots on a typewriter. Now we bend the upper edge to the height of the drawstring calculated by us (both front and back) and put one or two sewing lines. Next, we do the same as with the lower edge of the product, with its line at the armpits, but here we are trying to make the fold more curved and less than 1 cm wide. So, our workpiece is completely ready. We just have to make a side seam and fasten the ends of the threads.
Finishing work
Next, we proceed to the final stage - the straps. As mentioned earlier, you can use a wide ribbon (5 cm) or a strip of fabric for this. We choose the second option because satin fabric wears out quickly, wipes off and can break. It is better to take another piece of fabric of a bright and saturated color, you can with a small pattern of polka dots, a flower (or any other children's motive), cut out the longest strip (1.2-1.5 meters) 10 cm wide from it, fold it in half, iron, stitch on both sides, leaving one short edge open. Then unscrew it and sew the remaining segment with a hidden seam. Now, with the help of a large pin, we pass it through both drawstrings. We try on a child: on the one hand, this ribbon will be used as a simple strap, and on the other, it must be beautifully tied in the form of a bow. So, here we finished sewing a simple product, while we built a pattern of a children's sundress easily and quickly.
Other options

However, it was a simple, easy step for beginners. But more experienced mothers in sewing can try more complicated options, creating their own patterns of children's summer sundresses or finding them in magazines. For example, you can sew a product according to our first sample, but instead of straps from a ribbon, make beautiful sleeves like wings from wide lace or the same fabric. So we get a very cute and gentle children's patterns for which, in fact, we have already given in the first version. The only change will be that we will need to make the drawstring less wide (2 cm instead of 4 cm) and prepare a narrow elastic band. Next, we take cotton lace or the same fabric and cut out two pieces 10 cm wide and 20 long. We also need to process the edges and make a drawstring. Next, sew the sleeves to the armholes and thread the elastic. Ready!
Conclusion
As you probably already understood, one of the most spacious topics for your imagination is children's Patterns, you can either find or build it yourself, select materials, decorate products with wide ruffles, appliqués, ribbons, beads or beads, sequins, lace - this is already creative the soul will definitely be able to roam properly. In addition, needlework is a great way to save an extra coin in the family budget, improve relationships with children and create unique images for them. Create, invent, develop with them!
The sundress is also suitable for little girls from infant to adolescence. By choosing the material according to the season, you can sew light summer outfit or warm clothes for autumn and winter days. There are a lot of models to choose from - from basic and concise to ceremonial with fluffy skirts, ruffles, lace trim. Even non-professionals can sew sundresses for girls with their own hands. After spending a little time, you can get a thing that:
- looks good and beautiful;
- does not interfere with the child to play, run, sit (children's clothing should not hinder movement);
- practical to use (even models with a complex cut are easy to iron, and by choosing a wear-resistant fabric, you can extend its service life);
- combined with many wardrobe items (t-shirts, decorated blouses, turtleneck sweaters, cardigans).
vinnypooh.ru
Another reason to sew a do-it-yourself sundress for a girl is the ease of designing a pattern and a lot of ready-made patterns. You can easily choose a model for the age of the child and reproduce it yourself.
- A-line silhouettes are especially well suited for little girls. In a fluffy outfit with straps that expands downwards, the child looks simply charming. To sew a "trapezoid", you need to measure the circumference of the chest and the width of the arms to design the armhole. The choice of length is up to you - interesting to the floor or practical, taller.
- For children over 5-6 years old, we sew sundresses according to complicated patterns - with a combination of different textiles, with sun skirts, the lower part, consisting of several cuts.
- You can complement the product with a cape (figaro, jacket type), unusual lantern sleeves, a belt with buttons or ties, braid or bows.

tobemum.ru
Preparing and creating a pattern
Before you sew the product, you will have to spend time preparing.
In addition to the sewing machine you will need:
- scissors;
- tailor's pins;
- pencil, ruler;
- soap, chalk or disappearing marker;
- buttons, hidden zippers (if necessary);
- pattern paper, thread and fabric, the amount of which is calculated according to the size of the future owner.
In order for the finished item to match the idea, it is better to spend more time creating an accurate pattern or practice on an inexpensive fabric.
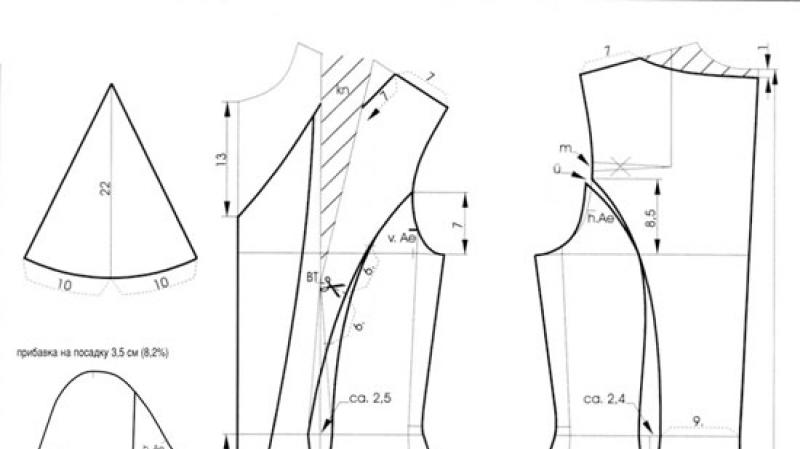
When designing a pattern according to your size, you need:
- mark the neck line on a paper sheet;
- mark the place of attachment of the straps (when combining the front and back, they must match in the shoulder seam);
- make an armhole line;
- carefully circle the details on the fabric base, cut them out and start making things.
As a standard, drawings of the back and front are required for work with turning the top, straps. Features of the construction of the pattern depend on the chosen style.
The sequence of constructing a classical model
- Calculation of the cut length for the product.
- Measurement of the distance from the edge of the chest to the bottom of the skirt. By adding 15 cm for the allowance and turning, you can get the length necessary for sewing.
- If a flounce or frill is intended, shortening the length by his/her size.
- Measurement of chest width. Dividing the parameter by 4 and adding 2-3 cm, the width of the shelf is determined.
- Determining the circumference of the armhole. On the front shelf, it is less gentle than on the back.
- Determination of seam allowances.
Pattern of a product with a drawstring
- On a rectangular piece of fabric, set aside vertical allowances to fold the bottom edge (it can be sheathed with decor).
- Make an allowance for the drawstring (the size depends on the ribbon, cord). It should be borne in mind that there are a lot of assemblies on a wide element, they look more beautiful on thin fabrics.
- Leave seam allowances.
- Cut out the front and back pieces.
- Leave a few centimeters on the armhole, depending on the fullness of the child.
- Transfer the drawing to the base.
Before sewing a school sundress, a pattern with tucks is designed. Thanks to them, the bodice fits well, the thing sits aesthetically on the figure.

vinnypooh.ru
How to make a classic lightweight sundress with straps
Summer outfit for children under 5-6 years old is sewn from lightweight natural materials- satin, cotton, linen. Finished with a zigzag or overlock seam, the edges give the product a neat look.
It is worth starting with the straps: fold them in half (the front surface will be from the inside), stitch, turn out. You can not sew them on purpose, but use braid, ribbons.
- fold the front and back halves with the front surface inward and stitch along the sides;
- adjust the place of attachment of the straps, their length;
- perform a facing of the upper edge, a seam that secures the straps;
- sew sides;
- after turning the lapel, stroke the wrong side, stitch to the edge;
- process the bottom line of the product.

santehnika-mart.ru
If a shuttlecock is provided, you need to fasten its side sections, process the bottom (the usual seam is in the hem), gather the top and sew the element to the skirt. Decorative elements are varied - patch pockets, applications, embroidery. An interesting version of sleeves - "wings" that replace the straps. They need fabric (optional - lace) and an elastic band. The material is sewn to the front and back shelf. If the width of the lace does not allow you to insert an elastic band, a satin strip, an oblique trim is added from the inside.
A detachable skirt (“sun”, “tatyanka”) is also easy to construct.
You will need:
- place the pattern on the material, cut out the elements, process them along the edge;
- fasten the seam at the back along the shelf and bottom, fold the elements with the front surfaces to each other and stitch along the waist, slightly gathering the skirt;
- make a seam along the bottom of the skirt, decorate as desired with lace or other decor.

alicdn.com
Sundresses with a zipper
If you want a thing that is easy and quick to put on, sew an outfit with a zipper. After cutting out the elements of the front and back, fabric blanks of straps are made. For lining, you will need an extra pair of front and back.
Sewing order
- The straps are sewn.
- The straps are connected to the bodice (or lining). Check on the fitting how they fit to the shoulders of the future owner.
- One seam is sewn in front and back of the product / lining - the second will remain for the zipper.
- The inner and outer parts are fastened.
- The sundress turns inside out, a stabilization line is laid.
- A skirt is sewn from a rectangle, the width of which is not less than one and a half girths of the hips. We must not forget about the area for the lightning, it is not fastened.
- A seam is made on the side of the bodice, a hidden zipper is placed in the “pocket”, the bodice and skirt are sewn together, leave 3-4 cm unfastened on the lining.
- A secret lock is sewn in, the bottom is bent.
If a belt is provided, it is made according to the principle of sewing straps. To fix on clothes, the element is fixed with threads along the side seam (where there is no zipper).

tobemum.ru
Sewing products without a pattern
How to sew a sundress if you don’t want to make a drawing? You can choose a free flared model with a drawstring. You will need a piece of matter that completely wraps around the child's figure and up to two meters of braid / tapes for straps. Clothing is made from two parts of the material - on the front and back. To determine the width of the elements, the circumference of the hips is measured and 10 cm or more is added - this depends on the chosen shape of the item.
- On the cuts folded face inward, the armhole is indicated, the length with the width.
- Cut out the elements, leaving allowances for the seams.
- Bend and stitch the edges on the armhole.
- Sew the sides.
- They process the bottom, adding decor (flounces, braid, border) as desired.
- They make a drawstring, bending the neck, thread a fixing tape / cord into it.
- Similarly, sundresses with a diagonal cut are made. Products flow, they are distinguished by a contoured silhouette.
Bilateral sundresses

tobemum.ru
Reversible products (with contrasting bottom and front layers) are not as difficult to sew as it seems. You need two pieces of fabric of the same size, in which allowances are taken into account, as well as twice as many elements of the front and back - four parts in total.
- Sections are processed, the bottom is stitched with a “zigzag”.
- Fold the front details.
- Stitch the seams on the sides, iron.
- Sew the front and back of the second fabric.
- Put the first "dress" in the second. They must be face to face. Sew along the lines of the armhole, straps and neckline.
- Notch allowances along the neckline and armholes, turn the product inside out, iron the edges.
- Finish with decorative stitching.
- Hem the hems of the inner and outer parts.
If lace or other decor is provided, they are sewn on one side. The result is a spectacular, unusual, comfortable outfit.
Needlework has always been and will be in fashion, because it is, consider, the only means available to everyone to emphasize their own individuality, to arrange a comfortable life, in the end, just to cheer yourself up or your family with some new, hand-made thing.
For hot summer days, you can easily sew without a pattern, with your own hands, a simple, but at the same time elegant sundress with an elastic band for your daughter. Or like this one.
To do this, you need to take the following materials:
- fabric: chintz for dress 2 m;
- oblique trim matching the color of the fabric at least 5 m;
- threads for sewing to match the fabric and inlay;
- needle for hand sewing;
- thin elastic band at least 5 m;
- scissors;
- tape meter;
- sewing machine.
Sundress with an elastic band for a girl of 5-6 years old with your own hands - how to sew without a pattern:
1. For a children's summer sundress with an elastic band, it is better to use chintz fabric. Chintz is a fairly thin and delicate fabric that is made from cotton, which indicates its naturalness and environmental friendliness. This fabric is very pleasant to the touch, quite light and airy, in view of which the body in things made of calico will be able to "breathe".
From the chintz selected for sewing the sundress, we cut out and cut out a rectangle measuring 50 cm by 200 cm. 
2. We sew the long sides of the part cut out of the fabric with a sewing machine with an oblique trim - this will be the top and bottom of the sundress. 
3. In the upper part of the future sundress, we mark up: 7 rows every 2 cm. 
4. According to this markup, we sew the rows on sewing machine stitches of medium, closer to large size. 
5. Now the most painstaking work that we have to do is stretch the elastic in rows. 50 cm of elastic on the needle manually stretched into each stitch along wrong side through the row (i.e. only four rows, starting from the very first). 
6. We sew the sides of the sundress. 
7. Four strips of oblique inlay 25 cm long are folded in half lengthwise and stitched. The straps obtained in this way are sewn in a typical place. 
8. So, with your own hands, without a pattern and special skills, you can sew a modern sundress with an elastic band for your child. By the same principle, you can sew a sundress for yourself, your beloved.