Star News


")


Do-it-yourself warmer for a teapot pattern. Volumetric textile teapot: master class. Master class on creating a charm doll for a teapot
In today's master class we will talk about a special kind of needlework, which is common in many countries. Of course, this refers to patchwork or patchwork(patchwork). This type of needlework originates in England, but in America, needlewomen fell in love with patchwork and gained the greatest popularity.
Initially, the details in patchwork were sewn to each other in random order. Currently, there are many patterns and patchwork ornaments. But still, a drawing made up of squares of the same size can be considered a classic. It is from this pattern that it is recommended to start mastering patchwork. Therefore, this master class is suitable for beginner craftswomen.
I think I will not be very mistaken if I say that we all want beautiful things to surround us. Let's try to sew a heating pad on the teapot and turn the process of tea drinking into something special!
But back to the patchwork, because it is in this technique that we have to work. First, let's talk about the fabrics from which we will sew. Traditionally, for patchwork, natural cotton fabrics are used. These fabrics are very easy to work with, and if you are a beginner, it is advisable that you work with these fabrics.

A patchwork pattern is created by alternating pieces of fabric of different colors. That is why it is so important that the color combinations are correctly chosen. Products should not look too colorful.
Let's decide on the materials and tools that we need to work.
Materials and tools for sewing heating pads.
- Textile. For my heating pad, I used 6 colors: 2 of them are light, the rest are dark. In total, we will need to cut 40 squares. I will not limit your imagination and give clear recommendations on choosing colors. Still, what we are doing is creativity, and there are no restrictions here. In addition, you may have various shreds and remnants of fabric at home that you can safely put into work. It is advisable to wash and iron the fabric before work.
- Roller knife and mat for cutting fabric. These tools were described in detail in our master class on how to sew a hot stand. Check it out if you're interested: Patchwork Spinner Block. Hot plate or pot holder. Master Class.
It does not matter if you do not have a special knife and mat. 40 squares is not so much, it is quite possible to cut them out with scissors.
- Thin synthetic winterizer.
- Threads.
- Sewing machine. Of course, you can also sew by hand. I will say even more: initially, a sewing machine was not used in patchwork, and many modern masters of this art still sew with their hands. But a sewing machine will make your job much easier.
- Iron. There will be a lot of ironing!
So, we cut out 40 squares with a side of 7.5 cm. In order not to be mistaken with the amount of fabric needed, it is better to first draw both sides of the future heating pad on paper and calculate how many squares of one color or another will be required.
Now fold the cut out squares in accordance with the pattern.

Now let's start stitching the squares into one canvas. I will tell you how to do it simply and quickly.
By the way, do not forget that in patchwork the seam allowance is 6 mm, because the foot of the sewing machine has such a width.
We start sewing squares. We take two adjacent squares from the upper left corner. We put the right square on the left front side to each other.

Sew the right side of the squares with a straight line. We do not break the thread, we leave the squares under the foot of the machine.

Now we take the next two squares from the first two columns on the left side. Simply put, we take two squares that on our sketch lie under those that we just sewed.
Gently raise the foot of the sewing machine and sew the squares. We sew as if we have a solid canvas. Look at the photo and you will immediately understand everything:

Here it is very important to bend the seams correctly. In fact, everything is very simple: you bend one seam (for example, the top one) up, and the second (bottom) - down. When sewing the next square, do the opposite: bend the top seam down, and the bottom seam up.

Similarly, we sew all the squares in the first two columns. After the column is sewn, you can cut the thread.

Now we start sewing the squares of the third row. Again we take the upper left square, turn it over wrong side up, apply to the extreme square with right side and stitch.

Then we take the second square in the third row and sew its trail behind the first one without breaking the thread.

Similarly, we sew all the rows of squares. After the squares are sewn horizontally, sew them vertically.

When all the squares are sewn, we need to carefully unfold the seams on the wrong side. With small scissors we make cuts at the junction of the squares and unfold the seam.

Steam the seams.
If you correctly sewed the squares together, then this is what you should get on the wrong side:

Stitch.
Now that all the squares are sewn and the seams are neatly ironed, you can start stitching. The stitch performs not only a decorative function, but also connects the layers of the product together. We will quilt on a sewing machine, using the simplest stitch in the seam.
Fold the bottom layer, synthetic winterizer and top layer in order.

Pin off all three layers with sewing pins. Do not forget to look at the wrong side, there should not be bends and waves.

We start quilting. Try to make the needle hit exactly in the line connecting the two squares. The stitch can be sewn with threads in the color of the right side or in a contrasting color.

Sew the other side of the heating pad in the same way.

Now you need to give the heating pad a shape, that is, round off the upper corners. To do this, you can cut out a template from a newspaper, and then circle it on the fabric and cut it out. After that, we sew both halves of the heating pad into one. Please note: we sew on the front side.

The seam that goes along the top of the heating pad must be hidden. To do this, we perform the final operation, which is called "edging".
To do this, we cut out strips along an oblique width of 5 cm and sew them to the required length on a sewing machine.
Sew the resulting strip to the top edge of the heating pad as shown in the photo:

Unscrew the edging to the back of the product, wrap it about 1.5 cm and sew it with a blind seam by hand.

Treat the bottom edge of the heating pad in the same way.

Happy sewing! WITH Best wishes in creativity, author of the master class Anna Lavrentieva.
This master class was written specifically for the site, so copying the entire material is FORBIDDEN!
When partially copying, be sure to place a link to the source.
If we recall the traditions of tea drinking on Ancient Rus', for many, such cute, original and at the same time funny nozzles will immediately pop up in their memory. At that time, home-made nozzles in the form of various figures were used, and in cartoons we saw how an ordinary felt boot was used for the same purpose. With the advent of electric kettles and the abandonment of bulky samovars, interest in tea did not disappear, but the truth is that the ceremonies of drinking such a drink are no longer so maintained.
Most often, we drink it on the run, getting ready for work, or - more correctly, in a quiet, comfortable environment during the holidays. This is where the accessory forgotten by many comes in handy (though not for the electric kettle itself, but for the teapot) - a do-it-yourself heating pad for the kettle. Patterns can be made easily, sewing is also a small problem. Such a thing will perfectly fit into the interior, and if desired, you can make it look like some kind of plant, animal or any other object. Let's consider in detail how to implement such an idea.
Heating pad for teapot
In the modern world, any item can be purchased at the store. Kettle warmers are no exception. Such a thing is useful in the household: it helps keep the water in the kettle hot, makes tea leaves stronger, and is also part of the interior. However, often in the store you do not find what you would like so much that you want to buy.
There is a way out of this situation: we take patterns, fabrics and do what you want.
Pattern of a heating pad for a teapot
Do-it-yourself diagrams and patterns of a heating pad for a kettle found on the Internet are not always suitable for a particular case. Therefore, this method is not the most correct.
In order not to run into problems, it is easier to make a pattern yourself, especially since it is not so difficult. For this you will need:
- A2 or A3 paper. Suitable as graph paper, sold in specialized stores, and regular newspaper.
- Stationery (pencil, eraser, long ruler).
First of all, you need to take measurements of the kettle: width and height, and write these data on a piece of paper so as not to forget.
Important! The height is measured from the base to the top of the lid, and the width is measured from the outermost part of the handle to the end of the spout.
- Lay out the paper on the floor or table.
- Set aside the height of the teapot, adding a couple of centimeters of margin.
- The second number is the width, divide it in half, set aside the resulting figure perpendicular to the height, not forgetting the reserve.
- We connect the extreme points with a quarter of the circle. You can change the shape a little, make it more square.
The pattern is ready! It remains only to cut it, and you can proceed to the next step.
We sew a heating pad
The next step begs the question, how to sew a cover for a teapot with your own hands, having patterns?
For this part of the work you will need:
- Thick fabric for the inside of the heating pad.
- The fabric you like for the outside.
- Insulation (preferably synthetic winterizer or cotton wool).
- Jewelry elements, if you want to complement the finished case.
 Next, we perform the following actions:
- Fold the lightweight fabric in half. We put a pattern to the fold so that when cutting the workpiece from the fabric, a semicircle is obtained. There should be two such details.
- Repeat step 1 for dense fabric. The result should be four blanks: two light and two dense.
- We sew a light fabric around the circumference, without affecting the base. We repeat the same for blanks made of dense fabric.
Important! For faster and more durable stitching, you can use a sewing machine.
- We sew the blanks at the base, not forgetting to place a warming filler between the two layers of fabric.
- We bend the lower part inward by a centimeter, smooth and stitch.
Important! If desired, you can sew a small loop on top. To decorate a hand-made heating pad on a teapot, you can use miscellaneous products from fabric:
- bows, butterflies and other trifles that can be bought in sewing stores;
- beads and beads;
- embroidery.
Ideas for a heating pad
If you want to make something unique, you can change the scheme a little or even make the case look like some kind of animal, be it a cat, a rooster or a cow.
heating pad cat
To make an ordinary heating pad look like a cat, you need to choose the right fabric and add a few elements, for example, a tail, a head with eyes and a nose, and paws.
It is not at all necessary to sew everything separately: some parts can simply be drawn. It all depends on your imagination.
Rooster warmer
How to make a rooster heating pad on a teapot with your own hands? It's a bit more complicated than making a cat:
- Firstly, the shape of the cover should be slightly elongated, and end with a “head”. To this head you need to sew a beak, beard, comb and eyes.
- Secondly, any rooster must have a tail. We make feathers for him each separately. We cut out two arcs from a certain color and sew them together, stuffing them with padding polyester. We sew the finished feathers to the part where the rooster should have a tail.
Important! The splendor of the tail depends on your desire: it may be magnificent or not exist at all. You can make a tail by simply stretching the back of the heating pad a little.
- You can also make wings by simply drawing them or making them out of fabric like a tail.
hot water cow
It is done in almost the same way as a cat. The head should have horns, nose, eyes and ears. The tail is made of a fairly thick rope, at the end there is a brush. You can sew a loop instead of a tail.
The tradition of inviting friends for a cup of tea has been around for a long time. There are people for whom it is completely normal to drink an infusion of something from a bag on the run, but true connoisseurs of the drink assure: only a leaf brewed according to all the rules can give real pleasure. To keep warm, you need not a banal towel, but a heating pad for the kettle. With your own hands, making a pattern, sewing and decorating is not at all difficult.
 The easiest option to do. But this does not mean at all that it should be nothing - a few decorative elements will turn the craft into an interesting accessory for the kitchen. You can make a heating pad on the kettle with your own hands, a master class will help even beginners cope with this task.
If the heating pad completely covers the teapot, in this case, you can do without a complex pattern. It is better to make the inner surface of the cap from cotton fabric; as a warming material, you can take a synthetic winterizer, batting or even felt - the main thing is that it provides thermal insulation. The outer layer can be anything, it all depends on the desire of the author and his creative intent.
By wrapping a sheet of paper around the teapot, you can determine the width of the fabric cut. Now you need to set the height, for which you need to connect the paper from the side of the spout and from the side of the handle.
The resulting rectangle is the size for the inner layers of the cap. The outer cut is made a little larger: the fabric should not “stick” to the insulation and squeeze it. All layers must be cut out with seam allowances on four sides, a centimeter or one and a half will be enough. After that, you can start assembling the parts:
- First on cotton fabric(face down) you need to lay the insulation, bend 1 cm and sew the bottom edge.
- Wrap the top 2 cm and also stitch, putting the lace inside in advance.
- Now it's the turn of the side seam. The main thing is not to flash the laces, because they need to pull off the top of the bell as much as possible. The base of the heating pad is ready.
How to decorate the outer part of the cap is up to the author of the work: decorate with embroidery, beads, appliqué or drapery. And you can take a waffle towel with your favorite ornament or use the patchwork technique. The outer "clothing" of the heating pad can be either removable or sewn to the bell. The assembly principle is the same, but the laces of the base and the front layer must be tied so that the fabric does not move during operation, and a loop must be sewn into the “crown” of the heating pad for convenience.
If there are scraps of fabric used for the outside, it will be very handy to make some napkin coasters under the cup.
Sewing a heating pad for a chicken-shaped teapot is not as difficult as it might seem. Having prepared the fabric for the inner and outer layers, insulation (batting, synthetic winterizer), threads, scissors, sewing machine and a needle, you can get to work:

Many people call the heating pad on the teapot by another name - Dunyasha. From a hand-made doll to a teapot according to the patterns that were used back in Tsarist Russia, creating a samovar grandmother, it breathes comfort and warmth. The difference, perhaps, is only in the selection of materials. As for the doll itself, there are many options:
- Russian beauty with a porcelain face;
- funny tilde;
- round-faced rag toy.
The top of an old, but in good condition, plastic doll is fine too. The working part of the product is a skirt, which is made according to the cap principle. Dimensions for a life-size doll pattern for a teapot are made using paper wrapped around the teapot.
If the top fabric along the bottom edge is not connected to the insulation and the inner layer, you should first make a functional part: spread the insulation between two rectangles of cotton fabric and quilt. The resulting blank is 29x74 cm in size and will become a heat-insulating bell after the side, bottom and top seams are stitched. With the help of an elastic band in the drawstring, the base is pulled together.
Darling Dunyasha
 To make a head for a samovar woman, it is better to take a beige, but you can also use a white one, a square with sides of 29 cm. Put a lump of filler (cotton wool, padding polyester) in the center, wrap it with a cloth and tightly wrap the “neck” with a strong thread. Now you need to securely fix the head by sewing it to a heat-insulating bell, sewn from rectangular blanks measuring 55x23 cm.
The upper removable skirt can be decorated in an ethnic style, but it is quite acceptable to create a fantasy costume in accordance with the external data of the chosen model.
From the same fabric as the skirt, or the same color with a scarf tied on the head, you need to sew sleeves - a tube 20 cm long, fill it not very tightly with holofiber or padding polyester, sew up the edges. The central part of the blank is attached to the head and skirt, the ends are also fastened with several stitches to the base.
The heating pad is ready, it can be performed as a talisman, that is, without certain facial features. But if there is a desire, then eyebrows, eyes, nose and mouth can be embroidered or drawn.
 To make a woman for a samovar, in addition to the head and arms created for Dunyasha, you will need a torso with signs of a portly person. A torso is made from a colored piece of fabric and foam rubber, two cotton balls in fabric covers are sewn - this will be a magnificent bust. The functional part of the heating pad (heat-insulating dome) must be sewn from rectangular and quilted blanks measuring 58x27 cm. All parts are sewn with a blind seam.
But you can also complicate the task: make a frame for the product from wire. Three segments of 80 cm each must be folded in half, and then begin to twist them together into one bundle. After 15 cm, at shoulder level, insert a piece 20 cm long between the segments - these will be the arms. Continue twisting the “torso” to the waist (another 10 centimeters), and then spread the ends according to the principle of spider legs: in different sides and curved outwards.
 The frame must be installed on the base and sewn over the dome, and carefully bend the excess wire. The torso is also made on the frame and is immediately connected with strong threads to the bell with a hidden seam. For hands, you can take a ribbon from the remnants of the synthetic winterizer and wrap the frame with it. The head is put on a twist and sewn to the body with a hidden seam. To make a hairstyle or braid braids, you can use floss or woolen threads for hair.
Now the doll needs to be dressed up and decorated. Everything that the author likes will be used: the costume for Maria Ivanovna can even be silk or guipure lined, with beads, embroidery, lace or braid. Here it is important not to lose a sense of proportion and choose the optimal combination of decor and colors.
Methods for making heating pads for a kettle in different techniques a lot, but it's even good: You can choose the option you like. Any of these dolls will add coziness to the kitchen and help make a conversation over a cup of friendly tea heartfelt and unforgettably warm.
Attention, only TODAY!
We all love to drink real fragrant tea from a teapot with sweets or pies. To make the tea stronger (some people like this “thick”), the tea stays hot for a long time, there are heating pads for the kettle.
For those who know at least a little how to use a sewing machine, make do-it-yourself heating pad for teapot from the fabric will be quite easy. It can be both sewn and knitted.
At the samovar, me and my Masha
We will drink tea as a bite until the morning ...
What you need to sew a heating pad made of fabric on a teapot
In order for the tea leaves in the kettle to remain hot for a long time, a heater is needed inside. The insulation is usually batting or synthetic winterizer.
You will also need a little lining (better natural fabric, will be in direct contact with a hot kettle, I used fabric from bed linen), as well as the actual main beautiful fabric.
Well, it’s still nice to have a sewing machine of any model, then things will go much faster! And the right attitude - you must be sure that everything will turn out very cool!
Here is a pattern of my heating pad (without seam allowances) for a teapot in full size, if I may say so:

It should be noted that there is no universal heating pad pattern for all teapots. Because such dishes are sometimes produced completely different sizes and bizarre shapes. Everyone has her own. The task is for the cover to cover the entire brewer as a whole and to be put on without tension, freely. At the same time, it should not be too large.
So if you have two teapots, one small and the other large, very different in size, then it is better to sew a heating pad for each. Since I have several, but almost the same, only the height is different, I sewed one for everyone, if necessary, I simply fold the bottom inward and the cover becomes shorter.
To sew the simplest, we will make the scheme in the form of a rectangle, perhaps with rounded edges to make it beautiful. To estimate how much fabric will go, how it will need to be cut out, you need to take two measurements with a centimeter.
How best to do this is described in a couple of paragraphs below, and a formula is also given for constructing a pattern, taking into account seam allowances.
If you want to get an interesting original kitchen heating pad, ready to spend extra time, then you can make a heating pad for a teapot in the shape of an animal - chickens, pussies, cows, lions, owls - the scope of imagination is great. It is only necessary to make an additional head (sewn to the body, i.e. to the heating pad itself at the top side) and a tail (sewn into the seam). For a cow, cat, dog, this form is suitable.

If you have time, desire, then you can sew such a chicken (or cockerel) on a sewing machine with your own hands. It consists of many small double-sided parts, inside each, even a very small element, there is an insulating gasket inside, some parts are simply stuffed with synthetic wool or what you found at home - finely chopped unnecessary shreds, insulation from an old jacket, etc. . (no one will ever look inside these fragments, everything will remain inside).
The size can also be reduced or increased depending on the size of the brewer.
If you want to make a slightly different shape of the body, then you can, for example, increase this pattern in height - make the top round or elongated upwards - this is how you can make a chicken or a sitting cat, the head will be in the middle. If desired, you can sew on the paws or just mark them with a line.

Warmer cow under Khokhloma
My first thought was to sew a heating pad in the form of a cow, but then I got too lazy, in the end I decided to make such a simple version of a heating pad for an “average” teapot.

Warmer for kettle - simple pattern from fabric under Khokhloma
First, let's measure our teapot with a flexible centimeter, one measure (X) - from the bottom vertically upward through the highest point (together with the lid!) To the bottom of the opposite side, the second (Y) - horizontal measure "diameter" (equator), along the most prominent parts - on the one hand it is a spout, on the other - a handle.
x/2+2*1.5cm+2cm
Y/2+2*1.5cm+2cm.
I have two different kettles. I made a heating pad of such a size that it was possible to use both kettles.
One teapot is taller, so when I use a small one, I tuck a few centimeters (about 5) in from the bottom.
On the pattern-rectangle, round the two upper corners. You need two of these items.
How to sew a heating pad for a teapot with your own hands
To make it convenient to use, we will immediately prepare a loop, it will be sewn into the seam from above. You can use ready-made ribbons or make them from the same material.
We fold the parts with the right sides inward (do not forget to insert a loop!), Sew the two parts along the rounded side.
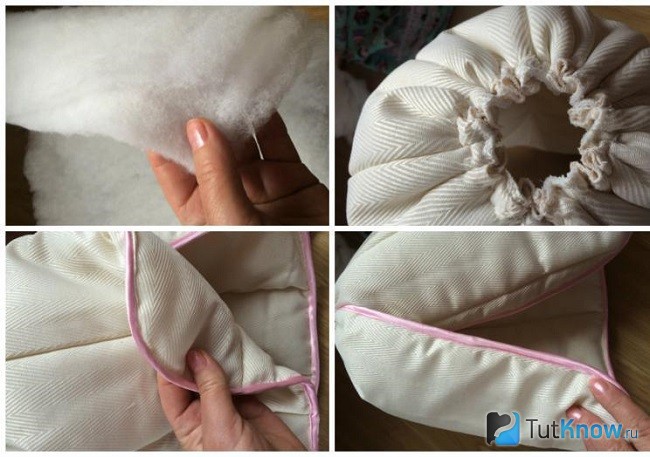
We cut out similar details from a synthetic winterizer (2 pieces), lining (4 pieces - from above, from below a synthetic winterizer). Insulation can be taken along with the lining from the old jacket, I used cotton fabric as the lining, which I had left after altering the pillowcases (instead of 80x80 I now have 40x80). Attach the synthetic winterizer to the lining, connect, quilt. Fold the parts with the fabric inward, stitch along the rounded line.
Put the cotton cap inside the front of the heating pad, now it remains only to process the lower part - carefully bend the edges inward, iron it, stitch it by hand or use a sewing machine, whichever is more convenient for you.
I found such a beautiful fabric in the Russian style at home, it just suited my idea, I already have potholders for the kitchen and a mitten made of similar material, now I have come through another kitchen item.

My kettle and heating pad
That's it. We brew strong tea, cover it with our new heating pad, and prepare to drink it with cookies or cakes.
You may be interested in:

Another heating pad for a teapot is knitted from the remains of threads and yarn in the form of a house with sewn-on windows, a pipe, a door and flowers in front of the house. The pattern is very simple, as is the knitting pattern. Interesting decoration with small embroidery. Inside is a sewn-in insulation case made of synthetic winterizer on a lining.
A cute idea to decorate a hot boiled egg warmer for Easter with a simple Easter motif in the form of bunnies sitting on a green meadow. The pattern is very simple, a rectangle with rounded edges, the same as for a teapot, only much smaller. For sewing, you need shreds of fabric, sewing threads, a machine, for embroidery - a hoop, floss with a needle. A description of the work plus a color counting drawing is attached.

A pattern with descriptions and photos for knitting cute eared animals that serve as a kitchen accessory - these are testicle warmers for breakfast. By clicking on the link, you will find another photo of another, I think more simple option crocheted. All these nice interesting little things for the kitchen from the remnants of yarn, single balls lying around, are made by hand.

Toys that are actually made to be warm covers - to keep testicles warm, to keep them hot for breakfast - a cute kitchen accessory. You can make it according to the shape of your favorite animal, here you will find a white cow with black spots and a bell around its neck, a flirtatious pig with a red bow, gray sheep with a pearl necklace.
Items such as a soft vase, cups, and a fabric teapot will help make your kitchen cozy and unique. Check out how to sew a ball from this material.
Beautiful soft vase with your own hands

To sew one, take:
- several cuts of various cotton fabrics;
- rope or cord;
- needle and thread;
- pins;
- bowl
- scissors.

When this canvas is wound, take the second piece. Bring its beginning under the end of the first, also wind it around the cord.

Continue winding the base, making turns around it. To make it more convenient, put the work on an upside down bowl or other suitably shaped vessel. Break off the coils with pins.

Having fixed the row in this way, stitch it with the previous one. Remove the pins, fasten it to the next one.

Having completed the work to the end, you will have to cut the lace, tuck the fabric under it, sew it to the previous turn. You got a beautiful soft vase, moreover, and very original. If you want to make another one, see how to do it.

Such a vase for all sorts of little things is made from scraps of fabric and from old jeans. To create it, take:
- denim;
- cotton fabric;
- interlining;
- cardboard;
- sewing accessories;
- rope with a lock.

We put cardboard on the wrong side of the denim square, and non-woven fabric on it. In the photo, white dots show the place where the edges of the jeans are folded. Before doing this, cut off the corners on it.

Bend the side blanks in half, tuck the sides on one side and the other, iron. Stitch them to the front side of the square.

Sew the sides to the edge, stepping back 1-1.5 cm. Thread the cord into the hole formed in the sidewalls, connecting them in this way. By pulling it up, you can disassemble and assemble a soft fabric vase.

Sew a fabric rectangle on the other side of the bottom, and the new original piece of furniture is ready.
Teapots sewn from fabric
They will decorate any home. Such dishes can be given, sold, presented to children so that they play with a safe object, arranging puppet tea parties.

Enlarge the pattern on the screen, attach an A4 sheet to it, redraw it.

The pattern will tell you how to sew such a teapot. As you can see, it consists of five templates. Two circles are the bottom (the larger one with wavy edges) and the lid of the teapot. You can make the edges not so, but even. For the sidewalls, you need to cut 8 wedges for the outside and the same amount for the inside. At the top right of the photo is the curved handle of the teapot, below on the same side is its spout. From the fabric you will need to cut two such blanks.
Here's what it took to reproduce this model:
- plain fabric and variegated, matching in color;
- loose interlining;
- thread and needle;
- cotton lace;
- sewing machine.
On this sample, the blanks for the facade part consist of two parts. A braid was inserted into the seam between them, thus grinding the canvas, then already opening it.

Applying wedges to each other, grind them on a sewing machine into a single canvas.

Connect the wedges for the inside of the teapot in the same way.

Attaching the bottom template to the colorful fabric, cut a circle out of it. Fold the inside and outside sides of the teapot right sides together. Align their bottom with a round bottom, stitch along the edge.

Turn the sidewalls on the face, put interlining between them. To separate the slices, sew between them on your hands.

Sewing a teapot with the hands of a craftswoman, that is, with her own, is very exciting. Let's start decorating it. To do this, cut 2 ribbons from the fabric, each 5 cm wide. The length depends on the length of the arc of the teapot neck, bottom.
Cut out two round blanks for the bottom and lid. You will also need two cardboard circles, slightly smaller than the fabric, so that its edges can be wrapped.

Put a little interlining on the fabric circle of the bottom, cardboard on it. Sew the bottom on your hands to the bottom of the sidewall. Flip the teapot over, sew the tape to the top of the teapot on the face. Putting a synthetic winterizer here, wrap this tape inward, sew it to the second edge on your hands.

Open the spout and handle of the teapot, stitch the paired details from the sides. Insert a synthetic winterizer into the hole formed.

Sew on the spout on one side to the teapot, and its handle on the other.

For the lid, you also need to cut out a circle of cardboard, slightly smaller than the fabric blanks. Put a padding polyester on the wrong side of the fabric cover, then cardboard. Sew the front with the back of the cover, laying a ribbon along the edge, which we also stuff with padding polyester.

Using the same principle, make a small handle for the lid, sew to its center.

These wonderful sewn teapots are obtained as a result of fascinating needlework.

If you want to make a service, then see how to sew such a wonderful cup and saucer.

It is created according to the same principle as a teapot: wedges are cut out of fabric for the front and back sides, the gap between them is filled with padding polyester, and stitched between the slices on the hands. It remains to sew a small bottom on the bottom, hem the cup on top and sew a rounded handle to it.
The saucer can be with beautiful wavy edges. It consists of two fabrics of the same size, between them you need to lay a thin rolled padding polyester or interlining. You can limit yourself to a circle of cardboard. The dimensions of the wedges for the cup, the template for the saucer can be found in the following pattern.

Do-it-yourself heating pad for a teapot
Continuing the topic we started, let's see how to sew it. The heating pad will help the tea to brew well, will not allow the drink to cool for a long time. Let's start with a simple example, which even dressmakers with very little experience can master.

Here is such an interesting little thing will soon appear in your kitchen. Take:
- textile;
- interlining;
- scissors;
- pencil;
- ruler;
- small ribbon;
- pins.
Each side consists of two sheets of fabric, between them there will be a slightly smaller interlining. Chip interlining with fabric with pins, quilt these 2 layers. To do this, draw oblique lines with a pencil along the ruler. Some of them are parallel, others are perpendicular.

Take the threads to match the facade fabric, make stitches according to the pencil markings.

Also decorate the second part of the front quilted fabric, fold them with the first front sides, sew on the sides.
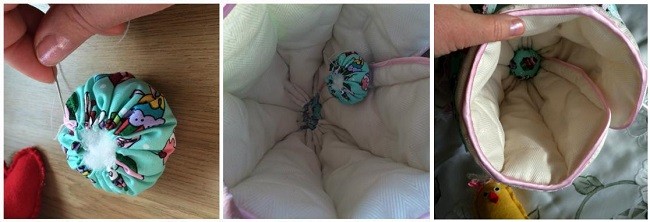
From another fabric, cut out two blanks for the inside, sew them together on the sides, turn them right side out.

Insert the inner part into the front part so that the seams of these parts are inside. Sew along the bottom, folding the edges of the fabric inward.
Stitching along the edges of the workpiece for the front and inside, leave 1 cm not sewn up in the center at the top. Insert a loop of braid here, sew the hole in your hands.
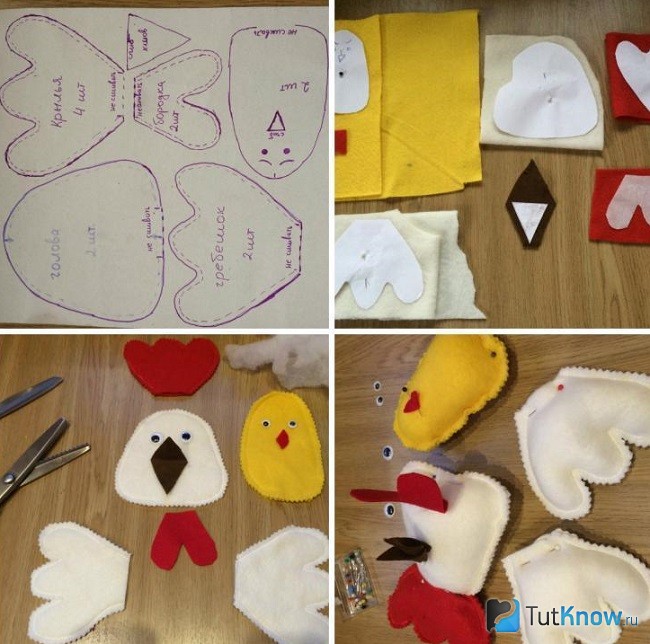
Having mastered this simple example, you can sew a chicken on a teapot, the pattern of which is attached.

Each side also consists of three layers - two fabric, between them there is a non-woven fabric. Cut out the scallop and beak from red fabric. Give these parts volume, fill them with interlining, sew in place.
Wings can not be sewn, but stitched with lace braid to designate.

Having coped with this task, move on to a more difficult one. See what a wonderful chicken with chicken you get.
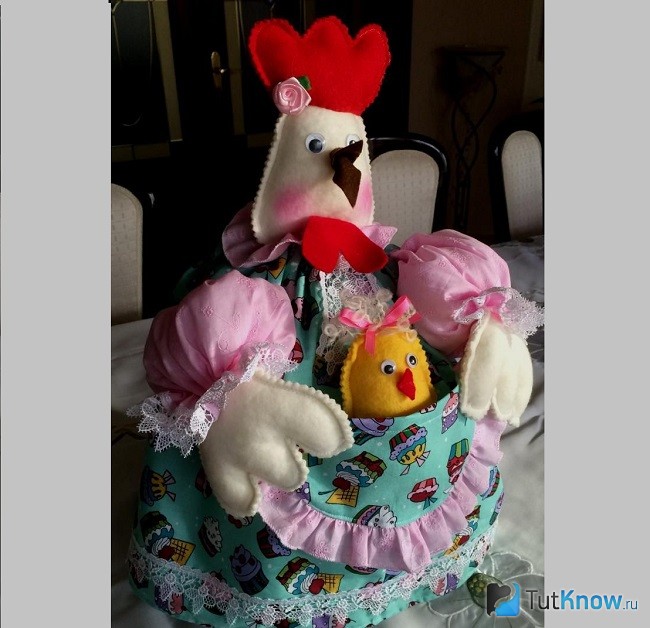
Here's what you'll need:
- fabric for a dress measuring 35x100 cm;
- canvas for the petticoat (quilted synthetic winterizer or insulation);
- 1 m oblique inlay;
- 1.5m lace;
- filler (synthetic winterizer, synthetic winterizer, holofiber);
- for the eyes, pieces of felt (white or black) or plastic;
- felt or fleece;
- shadows, blush or pastel pencils;
- pattern paper;
- silicone gun or fabric glue;
- thread, needle;
- tailor's chalk;
- regular and zigzag scissors;
- tape measure.
We decorate the side edges and below with an oblique trim, in the photo it is pink. We collect the upper side, which is not framed by an oblique trim, on a thread. In this case, the opposite edges must overlap.
We cut the upper skirt from a canvas measuring 35x100 cm. Finish the edges with an overlock, hem the bottom of the skirt, stitch lace on it. Connect the side edges, sew.

From the same fabric, cut out a semicircular pocket measuring 16 by 10 cm, process it from all sides with an overlock. Gather a strip of lace 40 cm long, stitch it to the rounded part of the pocket.
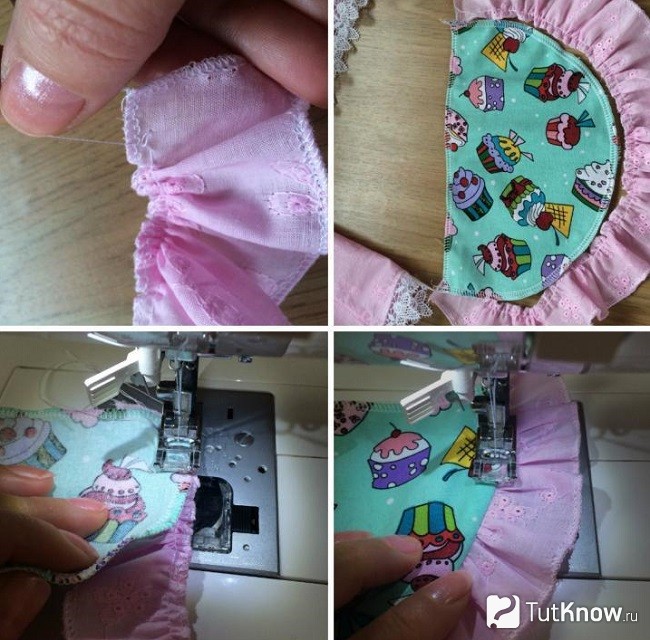
Attach the pocket to the front panel of the skirt, pin it with pins, then sew it here. Gather the top of the skirt on a strong thread, fix it. Lay the top of the skirt on its bottom, sew on the belt on the hands.
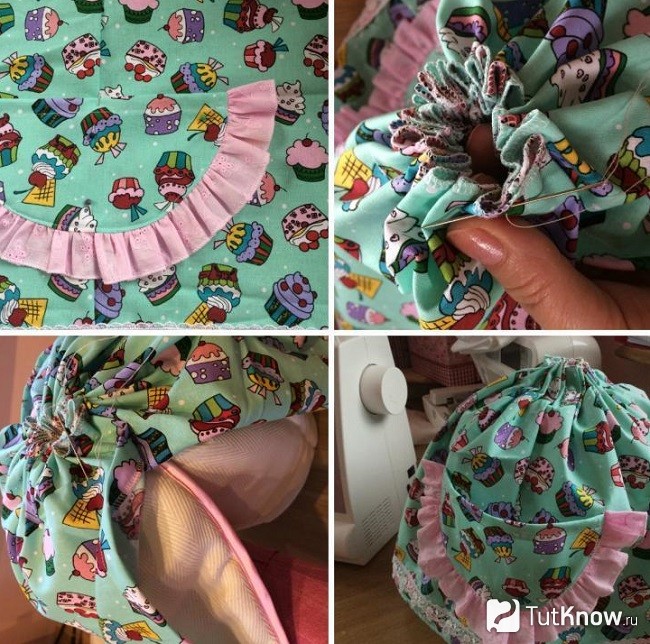
This is how such a heating pad is made on the teapot, with your own hands you need to cut the sleeves for the chicken dress. To do this, take two rectangles of fabric measuring 15 x 35 cm. Overlock them, fold the 2 short sides together, sew. Slightly above the lace, gather the bottom of the sleeves on the thread with a needle. Stuff the sleeves with padding polyester, sew them in place.
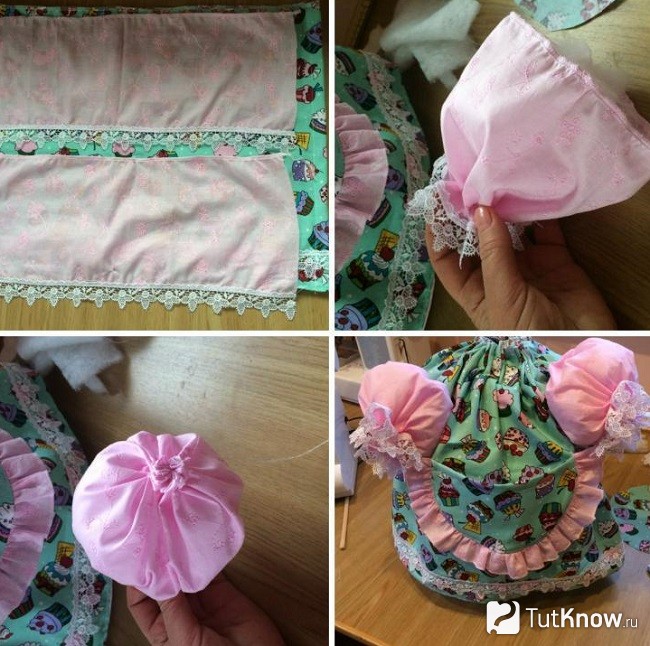
From the main fabric, cut out a square with sides of 15 cm. Cut off its corners to make a circle. Sew along the edge with a basting seam, tighten the thread, but not to the end, but so as to fill the resulting part with synthetic winterizer. You will sew it inside the skirt.
There is very little left for the heating pad to be ready for the kettle, do-it-yourself chicken and chicken patterns will help to complete the work.
Reshoot them.
Where it says “do not sew” on the pattern, you do not need to grind the details. Pay attention to how many blanks you need for each item.
Chicken cut out of felt or fleece yellow color, cut the head of the chicken from white, cut the scallop, beard and beak from red material. Sew paired blanks of wings on the wrong side, process the edges with a zigzag, turn them on the face. Put in the sleeves of the dress, sew.
Glue the eyes in place, sew on the beaks of the hen and chicken. Sew the paired parts of the scallop, beards, stuff them with padding polyester, sew on the hands to the heads of the characters.
It remains to add beauty to the chicken by going over the cheeks with blush. Instead of a chicken, you can put tea and coffee bags in her pocket.
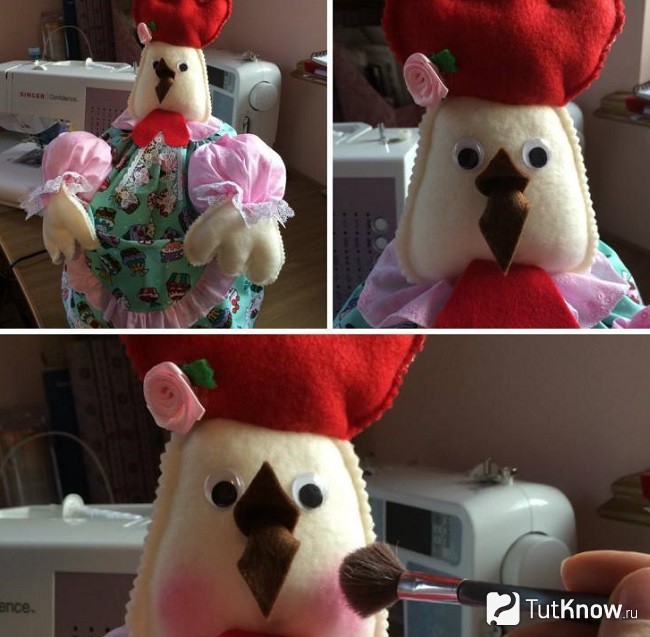
Here you have such a wonderful heating pad for a teapot in the form of a chicken. Let's see how to make another interesting fabric item to please very young children.
Soft fabric ball for kids

This is for kids up to 2 years old. They will be able to touch the ball by its ribs, roll, toss. For needlework, take:
- several pieces of fabric of different colors;
- soft filler;
- a needle;
- saucer;
- threads.

Sew these circles in pairs, leaving one small pocket on both sides for stuffing them with synthetic winterizer.

In total, you need to create 5-6 such blanks. So that there are no unnecessary gathers at the seam, notch it in several places with scissors. Fold these blanks in a pile so that the pockets for stuffing the filler are outside, sew them in the center.

Gradually fill each slice with padding polyester, sew up the holes.

One ball is ready. If you want to see how to make the second one, check out the workflow.

To make one, take: scraps of fabric; filler; threads; a needle; scissors.
For one ball, you need to cut out 8 oval blanks and two round ones, the edges of which are bent inwards by 6 mm and ironed.

In the photographs, three balls are created at once. Sew alternately all the blanks on the sides.
To make it easier to sew, cut off the details of the sidewalls of the ball in pairs, stitch them on one side. Then chop off the paired elements, sew those.

As a result, you should get such a ball that you need to fill through the remaining unsewn hole with a padding polyester. When this is done, sew it on by hand.

To make the ball neat, stitch a round piece of fabric on both sides, after which another masterpiece of needlework is ready. See how to make a fabric teapot.
In the second video, we have selected for you interesting ideas. After reviewing them, many will also want to create a knitted heating pad for a teapot or fabric.