Star news


Crochet scarf - diagrams, MK, description for beginners. Crochet scarf pattern, crocheting scarves Kerchief for girls fillet crochet
A knitted scarf is a necessary item in a woman's summer wardrobe. You can wear it for a walk, on vacation, or on the beach. The advantage of crocheting is that it can be used to create wonderful openwork items. In our article you will learn how to learn how to knit a headscarf using a crochet hook, and how to help beginners!


Here are some interesting crocheted scarf patterns for beginners:


Crochet scarves for women with a pattern for beginners

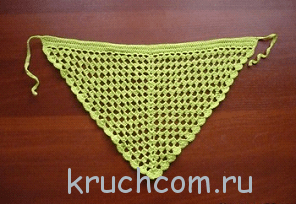
Size of the finished scarf: 25x44 cm.
We will need: 100 g of cotton yarn (140 m/50 g) and hook No. 3.
Pattern diagram:

Explanation of the diagram:

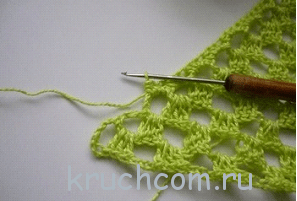
Description of the pattern: we knit the scarf fabric according to the pattern in straight and reverse rows. We collect three air loops. We knit five double crochets in the third chain stitch from the hook, making three chain loops between the stitches. In the next rows, instead of double crochets, we knit three lifting loops. We knit the last double crochet of the row in the third instep stitch of the previous row. The diagram shows the first four rows. The remaining rows are knitted in exactly the same way with repeating between the arrows marked in the diagram.
Knitting density: 34 loops x 13 rows of the main pattern = 10 x 10 cm.
We study a step-by-step job description
Scarf fabric: the entire scarf is knitted with the main pattern. We knit the first four rows according to the pattern. We begin to expand the fabric from the fifth row, adding double crochets in the same way as in the third and fourth row. Having knitted 23 cm (21 rows), we knit two more rows of double crochets.
Tying the edge of the scarf: for this you can use yarn of any other color. We secure the thread with a connecting post (provided that a thread of a contrasting color is used for tying). Next, to the upper corner of the scarf, we perform rapport: two air loops, one single crochet into the next third double crochet, while inserting the hook into the column located one row below. Then we knit four single crochets into an arch of three chain stitches and finish the row, performing symmetrical rapport.
Assembly: to make the ties, from the corners of the scarf fabric we collect a chain of air loops 26 cm long. Please note that they need to be knitted with thread in two folds.
Master class on creating a stylish headband for a girl
If you are the mother of a little girl or a grandmother, you will probably be interested in learning how to crochet a scarf. In sunny weather, such a scarf is simply necessary for a child; it will reliably protect the head from heat and sunstroke.

You will need: cotton yarn of blue, light blue and yellow colors, hook No. 2 and thread with a needle.
Scarf fabric
We put seven air loops on the hook.

We close the connected chain into a ring using a connecting post.
First row: knit five chain stitches, six double crochets in a ring, one chain stitch, seven double crochets in a ring.

Second row: three chain stitches, three stitches for the pattern, six double crochets in the stitches of the first row (the first stitch is worked into the second double crochet of the previous row, and the last stitch into the last stitch before the chain crochet of the previous row), five chain stitches , again six double crochets in the loops of the previous row (the first loop is knitted in the first loop after the chain loop of the previous row, and the last one in the penultimate stitch), three chain crochets, one double crochet in the last loop of the previous row.

Third row: five chain crochets, seven double crochets in the arch of the previous row, one chain crochet, seven double crochets in the next arch, one chain crochet, again seven double crochets in the same arch, one chain crochet, eight double crochets with a double crochet into the next arch.

Fourth row: three air loops for lifting, three air loops for the pattern, seven double crochets (we knit the first stitch in the second of the previous row, and the last one in the loop before the air loops), five chain loops, seven double crochets in the loops of the previous row ( we knit them exactly as described above), five chain loops, again seven double crochets, five chain loops, seven double crochets, three chain loops, one double crochet in the last loop of the previous row.
Fifth row: five chain crochets, seven double crochets in the arch of the previous row, one chain loop, seven double crochets in the next arch, one chain loop, seven double crochets in the next arch, one chain loop, seven double crochets again in the same arch, one chain crochet, seven double crochets in the next arch, one chain crochet, seven double crochets in the next arch, eight double crochets.

We knit all the remaining rows in the same way as in the fifth row until the length of the scarf fabric reaches the desired size. It should look like this:

The scarf pattern should look like in the photo:

Scarf tie
We put on a hook a chain of thirty air loops from blue yarn.

Then we attach it to the right corner of the scarf.
To do this, we knit single crochets along the straight edge of the scarf to the left corner.

Again we knit three air loops. We cast on one lifting air loop, turn the knitting and again knit single crochets to the end of the tie. We knit three rows in this way.
Fashion is fickle - it comes and goes. But there are things that remain forever in our wardrobe, which are not influenced by either time or fashion - this is an openwork crocheted shawl. Even simple clothes, if you throw a beautiful shawl, an openwork bactus, a triangular scarf, a scarf over it, will look completely different - more feminine, a little more mysterious. Crocheting a shawl is an activity for a real lady. You won’t surprise anyone with simple shawls these days. And we will tell you how to crochet a very beautiful shawl, knit a headscarf, scarf, and also how to crochet bactus. Schemes and descriptions are attached.
Simple crochet shawl, crocheted shawl with floral pattern. This openwork scarf can be worn over outerwear, or wrapped around your throat in cold weather. The openwork crochet scarf measures 90 cm/90 cm. Crocheting a shawl is a useful activity for several evenings. Approximate yarn consumption (50% wool, 50% acrylic) is 400-450 grams. We will crochet with a thickness of 2 mm. Knitting density: 1 square has a side of 9 cm.

Designations:
- VP - air loop.
- PBN(SS) - semi-column b/n (connecting article).
- RLS - column b/n.
- 2 CH - closed together.
- 3 CH - closed together.
We start knitting a square with a chain of 6 VPs. On this chain we further knit in this way:
1st row: 1 VP for 1 RLS and 11 RLS in a circle, close the circle with 1 RLS (SS) in the VP of the beginning of the row.
2nd row: (15 ch, 1 sc (ss) in next sc) - repeat 12 times.
3rd row: 1 PBN (SS) in each of the 1st 7 loops of the first arch of 15 VP; 3 VP for 1 VP, 2 VP, 4 VP and 3 VP in the first arch of 15 VP; (4 VP, 1 sc in the next arch) - repeat 2 times, 4 VP; * 3 dc, 4 VP and 3 dc in the next arch, (4 VP, 1 sc in the next arch) - repeat 2 times, 4 VP *, repeat from * to * 3 times in total; finish 1 pbn (ss) in the third ch of the beginning of the row.
4th row: we start with an arch of 4 VP: 2 PBN (SS); 3 VP for 1 CH, 2 CH, 4 VP, 3 CH in the first arch; 4 VP, 1 sc in the next arch of 4 VP, 3 dc in the next arch of 4 VP, 1 sc in the next arch of 4 VP; * 3 dc, 4 VP and 3 dc in the next arch of 4 VP, 1 sc in the next arch of 4 VP, 3 CH in the next. arch of 4 VP, 1 RLS in the next. arch of 4 VP*; repeat from * to * 3 times in total; then we finish 1 pbn (ss) in the third ch of the beginning of the row and finish the square.
Then we make 100 such squares. We collect all the squares and combine them, as in the assembly diagram. We make 10 stripes from 10 squares, and then connect 10 strips. You can decorate the shawl with fringe. We have finished crocheting a shawl with patterns.

Crochet shawl for beginners, quickly and beautifully - nothing is impossible. The bactus pattern is simple, even if you are not very good at crocheting, it will not be difficult for you to crochet a bactus shawl. The bactus scarf has 3 sides. Its dimensions are: 150 cm/54 cm/54 cm. 150 cm is the size of the base of the bactus. For knitting, yarn is used (50% acrylic, 30% polyamide, 20% wool, 50 g/300 m) - 2 skeins. Hook 3 mm thick. The openwork scarf is crocheted in a fancy pattern. We knit the harness according to the description. Knitting density: 2 motifs with a fantasy pattern: 11 cm/10 cm = 10 rows.

Designations:
- VP - air loop.
- PBN (SS) - half single crochet (connecting stitch).
- RLS - single crochet.
- CH - double crochet.
- C2H - double crochet stitch.
- C3H - double crochet stitch.
How to knit a scarf? We start knitting a scarf with a crochet pattern from 1 ch, knit it with a fantasy pattern, adding on both sides as shown in the adding pattern: 13 times for one motif in 4 p. When you reach a height of 54 cm (54 rows from the beginning of knitting), you should have 27 motifs. We are finishing the main work, all that remains is to tie the bactus.
Tying: * 3 sc in the arch from the VP of the previous row, 5 VP, 1 PBN (SS) in the last sc *, repeat from * to *. We make a crochet tie on three sides of the scarf.

Bosnian baktus crochet is a type of knitting where the scarf is crocheted at the back walls. This interesting type of knitting comes from Bosnia. Knitting in appearance resembles woven fabric; this technique is also called Slip Stitch Crochet. The patterns of a crocheted scarf crocheted using this technique resemble tight loops - these are connecting posts (blind loops). By combining connecting posts and air loops in different ways, you can get an interesting neck piece. We invite you to crochet a bactus pattern with your own hands. Next, we will crochet bactus master class.

The connecting stitch is knitted like this:

Bactus is crocheted all the time behind the back wall. We knit in front and back cases only on the same wall - on the back.

To work you will need:
- Wool blend yarn (45% wool, 55% acrylic) 380 m/100 g. - 1.5 skeins.
- Hook 2.5 mm thick.
In Bosnian knitting, each even row is knitted with connecting stitches.
1st row: at the beginning we make 4 air loops, then 2 dc in the first loop of the chain, 3 ch.
2nd row: connecting posts. In the second ch from the hook, tie a sl st behind the back wall of the loop. So knit the entire row.
Next, knit according to the pattern, alternating a row of DC and a row of SS - 2 times, a row of the fillet wall: * 1 DC, 1VP * - repeat, then 1 row of connecting posts (SS). At the end of each row, do not forget to knit the outer loop. Having knitted to the middle of the bactus, approximately 65-70 cm from the beginning, knit 1 row of dc without increments, then a row of dc, and 1 row of dc. Then knit the rows not completely, as if making decreases. Don’t forget to tie 3 VPs at the edge for the fringe. Check the second part of the scarf with the first so that they are symmetrical. After 140 cm from the beginning, we complete the knitting. Tie edge 1 next to sc, 1 next to crawfish step.
An interesting small shawl can be knitted from leftover yarn. The crocheting pattern for a shawl is not at all complicated; blankets, pillows, bags, etc. are knitted with such squares. The size of the scarf is 100 cm/44 cm without tassels. 100-150 g is enough for a scarf. yarn.

To work you will need:
- Yarn (wool with cashmere 120 m./25 g.) 25 g. five colors.
- Hook 2.5 mm.
Knitting density: diamond = 12.5 cm/11 cm.
The crocheting pattern for a scarf is easy to knit. First, we perform a chain of 5 VPs, closing the chain with 1 connection. st. (connection of a column) into a ring. Next we knit according to pattern A from the first to the third circular row. Start each round row with 3 VPs instead of the 1st stitch. s/n (double crochet), also complete 1 st/s/n, 1 p/s or 1 connection. Art.

First, we make a chain of 5 VPs, closing it with 1 connecting column into a ring. We knit according to pattern B from the 1st to the 3rd circular row, starting each row with 3 VP instead of the 1st double crochet, or with 4 VP instead of the 1st double crochet.


The scarf is knitted from 28 whole rhombuses and 8 halves; we choose the colors randomly, but so that they match. Arrange diamonds and halves. Connect all the rhombuses by tying one to the other with a crochet hook - in the last crochet. row, instead of VP, we perform a connecting column in the next VP. We make tassels for the shawl from pieces of thread of different colors, pieces 30 cm long. We attach the tassels to the scarf.
The crocheted bactus shawl will come in handy in any bad weather. The shawl is decorated with trim and a knitting pattern is given for it. At the end we decorate the shawl with laces and tassels. Bactus dimensions: 100 cm/47 cm. Knitting density: 9.5 cm/9.5 cm - square.

To work you will need:
- Half-wool yarn (50% acrylic, 50% wool), 200 m./50 grams.
- Hook 3 mm thick.
Designations
- Air loop - VP.
- Single crochet - sc.
- Half single crochet (joint stitch) PBN (SS).
- Double crochet stitch - C2H.
- Closed together - 3CH.

How to knit 2 dc, closed together, and 3 dc, closed together.


Explanations
First, you need to make a chain of 8 VP, then close 1 PBN (SS) in the first VP in a circle.
1st row: 3 VP + 2 DC closed together = 3 CH closed together, * 3 VP, 3 DC closed together, 1 VP, 3 DC closed in v.*, repeat from * to * 3 times, 3 VP, 3 DC closed vm., 1 VP, and 1 PBN (SS) closed vm. in the third VP of the beginning of the row.
2nd row: 1 pn (ss) to start with an arch, 3 dc closed together, * 3 ch, 3 dc closed together, 2 ch, 3 dc, 2 ch, 3 dc closed together * repeat from * to * 3 times. 3 ch, 3 dc closed together, 2 ch, 3 dc, 2 ch, end row 1 pbn (ss) in the third ch of the beginning of the row.
3rd row: 1 pbn (ss) start from the arch, 3 dc closed together, * 3 ch, 3 dc closed vm., 2 ch, 7 dc, 2 ch, 3 dc closed vm. * repeat from * to * 3 times. 3 VP, 3 DC closed in, 2 VP, 7 SN, 2 VP, end row 1 PBN (SS) in the third VP of the beginning of the row.
4th row: 1 pbn (ss) to start with the arch, 3 dc closed together, * 3 ch, 3 dc closed vm., 2 ch, 11 dc, 2 ch, 3 dc closed vm. * repeat from * to * 3 times. 3 VP, 3 DC closed in., 2 VP, 11 SN, 2 VP, end row 1 PBN (SS) in the third VP of the beginning of the row.
5th row: 1 pbn (ss), 3 dc closed together, * 3 ch, 3 dc closed together, 2 ch, 15 dc, 2 ch, 3 dc closed vm. * repeat from * to * 3 times and 3 ch, 3 dc closed v., 2 ch, 15 dc, 2 ch, finish row 1 pbn (ss) in the third ch of the beginning of the row.
6th row: 1 PBN (SS), 3 DC closed together, * 3 VP, 3 DC closed in, 2 VP, 19 DC, 2 VP, 3 DC closed in. * repeat from * to * 3 times and 3 ch, 3 dc closed v, 2 ch, 19 dc, 2 ch, end row 1 pbn (ss) in the third ch of the beginning of the row, and stop.
We make 21 such squares.
Triangle execution diagram
We start with a chain of 8 VPs, close 1 PBN (SS) in the first VP in a circular manner.
1st r.: 4 VP for S2H, * 1 VP, 3 CH closed vm. * repeat from * to * 2 times, 3 VP, 3 CH closed vm., 1 VP, 3 CH closed vm., 1 VP, 1 C2H.
2nd r.: 4 VP for C2H, 1 VP, * 3 CH closed together, 2 VP, 3 CH, 2 VP, 3 CH closed together * 3 VP, then repeat from * to * 1 time and 1 VP, 1 S2H.
3rd r.: 4 VP for S2H, 1 VP, * 3 CH closed vm., 2 VP, 7 CH, 2 VP, 3 CH closed together *, 3 VP, then repeat * up to * 1 time and 1 VP, 1 C2H.
4th r.: 4 VP for S2H, 1 VP, * 3 SN closed vm., 2 VP, 11 SN, 2 VP, 3 SN closed together *, 3 VP, then repeat from * to * 1 time and 1 VP , 1 C2H.
5th row: 4 VP for C2H, 1 VP, * 3 CH closed together, 2 VP, 15 CH, 2 VP, 3 CH closed together *, 3 VP, then repeat from * to * 1 time and 1 VP, 1 C2H.
6th row: 4 VP for C2H, 1 VP, * 3 CH closed together, 2 VP, 19 CH, 2 VP, 3 CH closed together *, 3 VP, then repeat * up to * 1 time and 1 VP, 1 C2H, then stop work.
We make 7 such triangles.
We fold the squares and triangles according to the assembly diagram. Make one row of sc around the shawl. Sew all the squares and triangles together with a large eye needle. Next, we do the tying.

On the short sides of the triangle we do the finishing in this way:
1 sc (ss) in 1 sc, * 12 ch, 1 sc (ss) in the sixth of these 12 loops to form a small ring, in the last one make: * 1 sc, 2 ch, 2 dc and 2 ch *; repeat from * to * 3 times, end with 1 sc, then 1 sc (ss) in the 5th of 12 ch, 4 ch, skip 3 sc, 1 sc (ss) in the next loop: * 5 ch, skip 1 st. , 1 pn (ss) in the next loop * repeat from * to * 3 times, repeat from * to *.
On the large side of the shawl, do: * 1 sc (ss), 5 ch, skip 1 sc, always repeat from * to *, end with 1 sc (ss).
We make “bumps”. We cast on 4 VP, close in the round 1 PBN (SS) in the first loop.
1st row: 3 ch for 1 dc and 11 dc, pierce with a hook in the round = 12 dc, end with 1 pbn (ss) in the third ch of the beginning of the row.
2nd row: 1 VP for 1 sc and 1 sc in each of 11 sc = 12 sc. We finish 1 pbn (ss) in the first ch of the beginning of the row.
3rd, 4th and 5th r.: 1 VP for 1 RLS and 1 RLS in each of the 11 RLS. = 12 RLS.
We finish rows 1 PBN (SS) in the first VP of the beginning of the row, stop working.
We stuff it, thread it through the loop of the last row, and tighten it until a small ball is formed.
We make 8 cm tassels from 26 threads bent in half, fix 2 tassels on a cord of two 4 cm threads and 1 tassel on a cord of two 8 cm threads. That's all the crocheted scarves, the latest model is a beautiful shawl from a German designer.
We bring to your attention the most beautiful patterns for crochet shawls.

Crocheted scarves not only do not lose their relevance, but on the contrary, they are becoming more and more popular among the fair sex of different ages.
A light openwork scarf is an important summer wardrobe item, indispensable for long walks in the scorching sun. In particular, little princesses who like to play outside for a long time need a headscarf: it will protect the child’s head from the harmful effects of the sun’s rays and will not allow unruly hairs to interfere during play.
As a rule, crocheting a scarf for a girl is as easy as shelling pears, and even the most ordinary fillet mesh looks truly charming on small heads, but mothers give full rein to their imagination by coming up with exclusive models of scarves.

The patterns of crochet scarves amaze the imagination, they are not similar to each other, and if they have something in common, then the different colors, original finishes and openwork patterns make each product truly unique.

Scarves are crocheted quite quickly; with the right skill, in a few hours of crocheting you can get a new exclusive headdress. The only important point in preparing for knitting is the selection of the appropriate yarn: for summer scarves it is better to use cotton yarn (like “Iris”), for spring-autumn models it is advisable to make them from thin mohair or cotton thread with the addition of wool, which creates an air layer for preservation heat.
We invite beginners in crocheting and experienced craftswomen to master classes on knitting a variety of scarves: children's and women's, light summer and warmer ones for the spring-autumn season. Step-by-step instructions, diagrams and explanatory photos will help you quickly understand the material and crochet a wonderful scarf!

Abbreviations in the text:
- VP – air. a loop;
- Runway - air. lifting loop;
- Art. s/n – double crochet;
- Art. b/n – single crochet;
- Art. s/2n – double crochet stitch;
- PS – half-column;
- pet. - a loop;
- flail - chain;
- PR – previous row;
- SS – connection column.
Photo tutorial on knitting a simple scarf for beginners

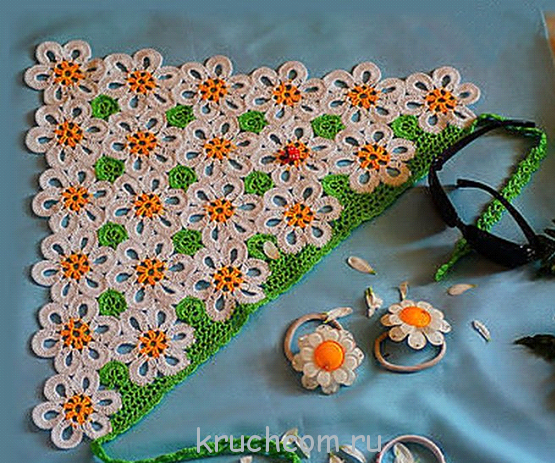
A summer children's scarf with decorative crocheted flowers is a great way to please your little one with a new bright accessory. The process of knitting it is quite simple; it is possible to decorate the headdress with any decorative elements, depending on the flight of fancy of the craftswoman.
For knitting you need no more than 100 grams. cotton yarn (iris, daffodil) and hook No. 1.5.

Knitting progress
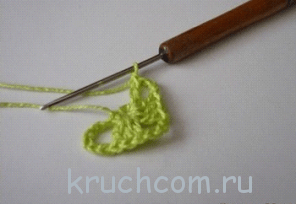
We collect the flail. on 5 VP, we connect the SS into a ring.

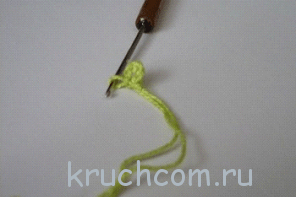
We recruit 6 more VPs.


Let's start knitting the pattern: 6 VP + 3 tbsp. s/n + 3 VP + 3 tbsp. s/n + 3 VP + 1 tbsp. s/n (this entire combination must be knitted in a ring of 5 VPs).
To knit the second row of the pattern, the knitting must be turned over. Raise 6 VP.


We knit the third and all subsequent rows of the pattern in the same way as the second row, expanding the corner of the scarf with a combination of “3 tbsp. s/n + 3 VP + 3 tbsp. s/n" into the central arch.

We knit the scarf fabric until it reaches a width equal to the circumference of the child’s head.
The next step is tying the product along the non-stretch edge: 2 runways, in each cell - 3 PS s/n. So we will knit several rows.


Tying with an openwork border on the remaining two sides with the following repeats: “5 tbsp. s/n from one loop in the 2nd st. s/n there are three of them, art. b/n – under the chain.”

Completion: knitting ropes (cast on a chain of 50 VPs on each side, knit into each loop using a double stitch), as well as decorative flowers.
We knit flowers according to the pattern:

We decorate the headband with ready-made crocheted flowers, decorate them with pearl beads or other decorative elements (rhinestones, flower buttons, etc.).
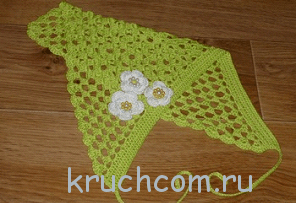
Sprinkle the finished product with starch solution and iron it with a hot iron to give the scarf the correct shape. Ready!
Openwork scarf for baby daughter

Those who have mastered the basics of knitting scarves can confidently move on to a more complex model - an elegant openwork scarf. For knitting you need cotton yarn, as well as a hook No. 2.5.
Progress
The scarf is knitted not as usual - from the corner, but from the base.
Row No. 1: pick up the flail. for 33 VP (the number of stitches can be varied, observing an important condition: it must be divided by 3) + 2 VP for the pattern + 1 runway, in each stitch. chains - according to the 1st art. b/n.
Row No. 2: turn of work, 2 VP, skip 1st st. PR, next. pet. – 1 tbsp. b/n, skip 1st stitch again. PR, next pet. – 1 tbsp. b/n, add 3 VP + 1 tbsp. b/n, then we knit with rapports to the end of the row: “skip 2 stitches. PR, next. pet. – 4 tbsp. s/n (between them - 2 VP), skip 2 pets. PR, art. b/n, 3 VP, art. b/n".
Row No. 3: turn around the work, into the 1st arch from the 1st VP - st. b/n + 3 VP + st. s/n, in the central arch of the fan: st. b/n + 3 VP + st. b/n, rapports to the end of the row: in an arch of 3 VP - 4 tbsp. s2/n (2 VPs between them), to the center. fan arch - art. b/n + 3 VP + st. b/n.
We knit the ties: a chain of VP, we tie them according to the principle of a fillet mesh: 1 VP, through 1 st. - Art. s/n. We smoothly move on to tying the smooth edge of the scarf (the base of the triangle), knitting it with fillet mesh.
Tying the openwork sides of the scarf (top of the triangle): we pass the st. along the entire perimeter. b/n. Then we unfold the work, 2 VP, SS in the next. pet., repeat the rapports to the end: (3 VP in one pet., treble s/2n, SS) x 4 times, 3 VP + SS + 2 VP, after 1 st. PR - SS, 3 VP, through 1 st. PR - SS, 2 VP, through 1 st. PR – SS.
The openwork scarf is ready. Using the principle of this knitting, you can knit a light bactus scarf for a woman; to do this, you just need to calculate the correct number of loops for the knitting base (must be divisible by 3).
For clarity, we offer you step-by-step video tutorials on how to make such a scarf:
Crochet air scarf made of square, pentagonal and triangular motifs

Despite all the airiness, this scarf can be knitted from wool and acrylic yarn, which means it can act as a headdress that doesn’t burden your hair or as a light cape over your shoulders in the cold season.
The knitting patterns for scarf motifs are as follows:

For knitting you will need: 170 gr. yarn (wool, cotton, acrylic), hook No. 2-2.5.
Progress
Quadrangular motif (5 pieces): we collect a flail. from 8 VP, we close it in the SS ring.
Row No. 1: 1 runway, 11 st. b/n in the base ring. SS.
Row No. 2: 11 rapports: “5 VP, 1 tbsp. with 2/n in st. b/n PR, 5 VP.” SS.
Row No. 3: 6 VP (1 VP, 5 VP), 12 repeats: “1 tbsp. b/n in Art. with 2/n PR, 5 VP.” SS.
Row No. 4-13: knit according to the pattern, ending each with a SS.
Triangular motif (4 pcs.): we collect a flail. from 8 VP, we close it in the SS ring.
Row No. 1: 1 runway, 11 st. b/n in the base ring. SS.
Rows No. 2-13: knit forward and backward according to the pattern.
Pentagon motif (1 piece): we collect a flail. from 8 VP, we close it in a circle with SS.
Row No. 1: 1 runway, 9 st. b/n in the ring. SS.
Row No. 2: rapports 9 times: “5 VP + 1 tbsp. s2/n in st. b/n PR, 5 VP.” SS.
Row No. 3: 6 VP (1 VP, 5 VP), 10 repeats: “1 tbsp. b/n in Art. s2/n PR, 5 VP.” SS.
Rows No. 4-13: continue according to the pattern.
Assembling the scarf: we connect the knitted motifs according to the motif connection diagram (presented above).
Finishing: we tie the base of the scarf according to pattern No. 1 in two rows. Sides (triangle) - according to strapping pattern No. 2 (6 rows).
The original women's all-season headscarf is ready!
Bright women's headscarf made with fillet crochet

For knitting you will need: 350 gr. yarn (cotton - for the summer, wool - for the spring-autumn season), as well as a hook No. 2-2.5.
Knitting pattern:

Progress
Central square motif: we collect a flail. for 27 VP (22 VP base + 3 VP + 2 VP).
Row No. 1: 1 tbsp. s/n in the 9th VP chain. from the hook, 7 rapports: “2 VP, 1 tbsp. s/n in the 3rd VP of the base chain.”
Rows No. 2-7: continue in the forward and reverse directions according to the square motif pattern.
Rows No. 8-12: knit in a circular manner according to the pattern. We end each row with a SS.
Row No. 13: to the beginning of work, go through with SS and knit on 3 sides of the square motif according to the row pattern. Next we knit in the forward and reverse directions up to the 28th row inclusive. We cut off the thread.
The back side of the scarf (green color in the diagram): attach the thread, knit straight and back according to pattern No. 3 main. pattern (rows No. 1-15).
Right side of the scarf (blue color in the diagram): attach the thread and knit straight and back according to pattern No. 2 main. pattern (rows No. 1-31). We cut off the thread.
Left side of the scarf (blue color in the diagram): attach the thread and knit straight and back according to pattern No. 2 main. pattern (rows No. 1-31). We don’t cut the thread, we immediately start tying. We knit along the long side of the scarf - according to the binding pattern.
We tie the side (short) sides of the scarf along the trail. principle: rapports to the end of the row “1 tbsp. non-woven, arch made of 30 VP" (such a harness will replace the need to attach fringe). SS. We cut off the thread. The scarf is ready!
Video tutorials on crocheting scarves
In order to examine in more detail the process of crocheting scarves, we suggest that you familiarize yourself with detailed master classes from famous domestic craftswomen:
In the summer heat, a headscarf will be an ideal protection from the scorching sun. Any craftswoman who knows at least the basic basics of this craft can crochet it. There are many designs for scarves: from the simplest to the extremely complex. But all of them are created in order to make every girl and woman unique.
Simple mesh
So, let's start crocheting a scarf. The diagrams for the presented model are quite simple and understandable. There are two methods of knitting: from the base and from the corner. This model is being expanded.
First, let's dial five v/p and connect them into a ring. Next we knit 3 chain stitches, 4 double crochets and 1 chain stitch and double crochet. We knit the next row, increasing the number of double crochet groups. We make 3 lifting chain stitches and under the last stitch of the first row we knit 3 double crochets. Then we knit 1 chain stitch, between the second and third stitch we make 2 double crochets, double crochet and again 2 double crochets. We complete the row with 3 double crochets, a chain loop and a double crochet.
We knit according to this pattern until the desired size is reached. In this case, in the center there should be a clear strip of four double crochets and an air loop between them, and in each row one group of three double crochets should be added along the edges.
Openwork scarf-shawl
Here is another beautiful crochet scarf. Its scheme is not the simplest, but there is nothing complicated about it either. We also start knitting from the corner. We collect 10 air loops and make a ring out of them.
We knit the first row according to a simple pattern: 12 chain loops, a double crochet, a chain loop, a double crochet, a chain loop, a double crochet, 8 chain loops and a double crochet.

The next row consists of chain stitches: 10 chain stitches, 15 chain stitches and 7 chain stitches and a double crochet stitch. In the third row we already knit two groups of double crochets according to the pattern described in the first row.
After a certain interval, a new pattern element appears in the canvas. Above the group of double crochets, stitches are knitted again according to the following pattern: double crochet and 2 double crochets. The elements are arranged in a checkerboard pattern.
When a scarf is crocheted, for decorative purposes it is better to tie all the edges of the product with any edge pattern to make it more neat and elegant.
Blue headscarf with lush fans
The next model is an openwork crochet scarf for a girl. Its diagram is also built from the bottom corner.
First, we make a ring of 15 air loops. We knit a chain of 2 chain stitches and 4 double crochets. In the second row we make 1 lifting chain of 2 single crochets and 9 double crochets. We knit the third row the same way, but we make 1 air loop between the columns.

In the next row we make 3 arches of 5 each, and after that another 1 row of 5 of the same arches. And after that we knit openwork fans according to the same pattern. Thus, we will be able to add 1 element to each patterned row, due to which the expansion of the canvas will occur.
To make a scarf for a girl crocheted according to this pattern comfortable to wear, you can tie special ties at the corners. For this, even ordinary chains of air loops will be enough, but it is still better to make small ribbons in any convenient way.
Sirloin scarf
The next crochet scarf, the diagram and description of which are not complicated, represents the fillet knitting technique in its complicated form.
This product is knitted from the base to the narrowing. Therefore, we start by casting a chain that is a multiple of 23 plus 5 chain loops for lifting. We begin to build the pattern from the first row. The diagram clearly shows the number of chain stitches and double crochets. Therefore, there is no point in describing them in detail. The main thing is to clearly follow the scheme. After 2-3 patterned rows, the craftswoman will learn the technique by heart and will look at the diagram only in individual cases.

The scarf pattern itself is constructed in such a way that in each row the number of patterned diamonds is reduced by one. This helps to narrow the product at an angle. It is worth noting that the scarf can be knitted from both thin yarn and warm wool. The purpose of the product will depend on the choice of material: a summer scarf or a winter shawl.
Crochet scarf made from motifs
Essentially, any scarf is an isosceles right triangle. Therefore, it can be created from square motifs, which together will create half of a huge square, cut diagonally.
The motive for the scarf can be anything. We offer you a diagram for a dense warm product. If you need to knit a summer scarf, use a more openwork pattern.
This crochet scarf, the diagram of which is presented, does not require a description. All elements in it are extremely simple and clear. But in the last row you will need to knit triangles using the same pattern. This is where novice craftswomen can get a little confused.

First, divide the diagram diagonally. Now it becomes clear what part of the motive to knit. In places where there is an odd number of loops and stitches, divide them in half and round up. For example, where there are 3 air loops, we expect that in the half you will need to knit 2 loops. Where you need to “cut” the arch, we use double crochets. The number of yarn overs is determined experimentally depending on the thickness of the yarn and the size of the hook.
Summer scarf
Here is another crochet scarf for girls. Its diagram was lost on the Internet, but from the photo we will understand the intricacies of working on it.
The pattern of the product is simple. It is knitted from the wide side to the narrowing side. This makes the job a little easier.
We cast on the required number of air loops and begin to knit the first row. His report is as follows: 3 chain crochets, single crochet, 3 chain crochets, 4 double crochets with a common top. We knit the next row according to the following pattern: 3 chain stitches, single crochet, 3 chain stitches, double crochet. At the same time, make sure that the single crochet is knitted at the top of the group of stitches of the previous row.

We knit the next row according to the pattern of the first. At the beginning and at the end of each row, we do not knit 1 element, but simply start a chain of 4 single crochets or a double crochet stitch, respectively. We tie the finished product and attach a ribbon for tying.
Final finishing
It has been mentioned many times that a crocheted scarf for a girl requires additional processing when the main fabric is ready. There are several ways to do this. The simplest of them is to go along the edges with single crochets. If you wish, you can make 1-2 more rows of an openwork pattern, but this is not necessary.
The ribbon for tying is also made using different techniques. We cast on an arbitrary number of air loops, leaving this tail on the hook, tie the wide base with single crochets and again cast on the same number of loops. The reverse row is knitted from any stitches. The number of rows depends on the required width of the ribbon tie.
Hello, dear mothers, aunts, grandmothers, sisters, in general, all those who have a little princess growing up at home! Summer has come! The sun is shining brightly, everything is blooming around, the birds are singing... the mood is such that you want to sing! Imagine how happy the children are about the arrival of summer! And try to keep them at home! In warm summer weather, they are ready to be outside all day! Play, run, swim - enjoy your childhood! But, caring mothers, we should not forget that the long-awaited sun in summer is quite insidious and children definitely need a light hat. And what it will be like, it all depends on you, and of course on the desires of your little fashionista.
My youngest daughter is very capricious in choosing hats: “I don’t want this, I won’t do this, it’s inconvenient...”, probably many mothers are familiar with this situation. It is generally impossible to put a hat or cap on her. After all, as far as you know, all children's hats for girls are made with a thin elastic band under the neck so that the headdress does not blow off in the wind. So, it is this rope that does not give my child peace. And so, we decided to knit a scarf with our own hands. We chose yarn, selected a model... and started making a masterpiece.
When the work was completed, the result exceeded all expectations. The scarf turned out to be light, delicate, and delicate. Crochet products always look much more elegant. It’s simply impossible to describe how much joy my daughter had! She was spinning around the mirror, not taking her eyes off the scarf, she didn’t even want to take it off.
Try crocheting a scarf for a girl and see how your beauty will transform. The pattern is simple, you only need a little yarn. I bought two skeins, white and blue. There's even some yarn left. Enough to knit two more scarves. It takes about 3-4 hours to make a crochet scarf. In 3 hours with your own hands, using a hook and thread, you will create a wonderful thing that even the most capricious fashionista will definitely like. Well, let's get started?
Necessary materials for knitting a scarf:
- 1. White cotton threads (“Coco”) – 50 grams;
- 2. Blue cotton threads (“Lacy pekhorka”) – 50 grams;
- 3. Hook 1.5.
Note: the yarn can be different, the main thing is that it is made from cotton threads. If the yarn is thicker and more voluminous, the scarf will gradually turn into an autumn hat. And if the thread is too thin, then the scarf will look like a cobweb and will hardly protect you from the sun’s rays, and it will also lose its appearance.

How to knit a summer scarf for a girl?
Before you start crocheting a scarf, take a centimeter and measure the volume of the child’s head, this will make it easier to navigate the size.

I found a knitting pattern on the Internet; in principle, it’s clear how to knit. Start over. We put a chain of 4 air loops on the hook with a white thread.

We combine the chain into a ring and fasten it with a connecting loop.

We knit the first row according to the pattern.

Then the second one. At first, the drawing seems complicated and unclear. But later it will be much easier when the drawing construction system is visible.

We knit the third row.

Next are rows 4 and 5.

In the same way we knit all subsequent rows according to the pattern.


So, the number of rows in the drawing (rapports) depends on the volume of your child’s head and the desired length. I got about 16 rows. For a girl of two or three years old.

Fasten the white thread. We cut it off. Add blue. Now we tie the edges of the product according to the pattern. Although, you can perform tying using any technique, it is a matter of taste.

To make the product look more openwork, it is better to make arches of three air loops in every second loop of the previous row in the last row of the binding.

The central part of the scarf can be tied simply with arches of air loops.