DIY postcard as a gift. How to make a three-dimensional postcard from paper. The process of making a simple Happy Birthday card
Many people think that it is impossible to create a beautiful card at home without expensive materials and tools, but this is far from the case. Knowing the basic principles of cardmaking and scrapbooking, you can make original Happy Birthday cards with your own hands from scrap materials that are found in almost every home.
What will you need to create a Happy Birthday card?
- First of all, you need to prepare the base of the postcard. It is best if it is cardboard or whatman paper. The base color is any, preferably monochromatic.
- You will need two types of scissors - some large ones to cut out the base of the card, others - small ones for manicure. The latter are convenient for cutting out miniature applications or pictures.
- A ruler and pencil are needed to correctly mark the length and width of the card on the cardboard.
- With colored pens, especially gel pens with glitter, you can make beautiful inscriptions and drawings on postcards.
- A glue stick will help you make beautiful paper appliqués on postcards without smudges or stains. For attaching fabric, lace, felt, it is better to use PVA glue, and for more “serious” decorations, such as buttons, rhinestones, sequins, etc., using universal Moment glue or a glue gun will help avoid troubles associated with postcard parts falling off the most inopportune moment.
- Anything can become a decoration for postcards: colored paper, felt, pictures from old magazines and newspapers, beads, rhinestones, sequins, beads, coffee, pasta, cereals, old twine, threads and much, much more. In general, anything that is in every home.
The process of making a simple Happy Birthday card
Making any postcard, no matter how simple or complex, begins with preparing the base. Postcards can be single or double, of different formats, configurations and sizes.
The simplest postcard is, of course, a single one, when a square or rectangle of the required size is cut out with scissors. If you need a double postcard, the cardboard is folded in half, the desired size of the postcard is marked out and the part is cut out along the contours.
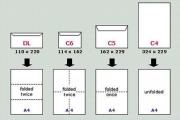
The size of the base can be any. However, if you are going to send the card by mail, it is best to make it under an envelope.
Envelope sizes:

The same applies to the configuration of the postcard - it can also be varied: in the form of any shape - round, square, rectangular, oval with smooth or fancy-cut edges.
When the base is prepared, move on to preparing decorations for the card. The simplest thing is, of course, applique, when the parts are glued to the base. For example, this postcard with a balloon glued to it is made very simply and quickly, the whole secret is in the selected materials:

You don’t even need to use glue, but sew on the necessary elements using a sewing machine:

For universal birthday cards that will suit anyone, flowers are best. The parts can be cut out using templates or you can come up with something of your own.


The edges of the card can be decorated with ribbons, lace, beads, etc. 
And the finishing touch is the inscription. You can sign with a colored pen, a felt-tip pen, or you can use beautiful inscriptions for cards “Happy Birthday!” and “Congratulations!”, made using scrapbooking technique, print on the printer:

Creative ideas: how to make original DIY birthday cards
- Using different types of unusual bases. For example, watercolor paper for the background. Or apply a stamped design onto tracing paper, and use bright decorative paper as a backing for it.
- A correctly chosen color scheme will make the simplest composition original. It is enough to use three colors - two contrasting and one neutral.
- Using different options for folding cards that break symmetry.
- For inscriptions and postcard signatures, use calligraphic outlines of letters and apply them with silver or gold paint.
- Using scrapbooking technique. The base of the postcard is made of colored cardboard. Decorative elements and backgrounds for them are selected, combining texture and color. Each background with decorative elements is glued layer by layer (using gel-based glue).
- Using quilling technique. These are three-dimensional drawings made from folded strips of double-sided colored paper. Figures are made (spirals, leaves, flower petals are rolled up) and glued to the base.
- Using decoupage technique. Select a napkin with the appropriate pattern, remove the top layer and carefully stick it with PVA glue diluted with water onto the base of the card, avoiding the appearance of wrinkled folds.
As you can see, making a quick, simple and creative card is not that difficult. If you spend a little more time on production, you can make more original cards with your own hands.
Original DIY birthday card made from watercolor paper
Making a birthday card using watercolor or ink on watercolor paper doesn't take long.

Materials:
- watercolor, ink, ink;
- watercolor paper;
- aqua brush;
- colored cardboard for the base;
- themed sets of stamps for drawing.
Manufacturing
- If you are making a square card, then the length of the cardboard should be twice the width. To fold the workpiece in half, you need to align the upper left corner with the upper right. Do the same with the lower corners, then make an even break in the middle and cover with a weight for a few minutes.
- Watercolor paper should be in the shape of a square, the side of which is commensurate with the width of the cardboard base.
- A design is applied to the paper using flower stamps. Stamping is done in a circle, changing the angle. The image is obtained in the form of a wreath of flowers and leaves directed both inside and outside the circle. Then the drawing is painted with watercolors or ink using an aqua brush. It is recommended to practice choosing colors for the wreath on a separate sheet.
- When the drawing is dry, it needs to be trimmed (the sides of the square of the watercolor sheet should become slightly smaller than the sides of the base). The glue should be applied in dots in several places, or double-sided tape should be used. The picture is placed in the center. If you wish, you can make the inscription “Happy Birthday!” in ink.
The next craft is more difficult to make, but very beautiful.
Volumetric birthday card
An original option could be a voluminous postcard, made with your own hands according to the principle of children's books. When the postcard is opened, three-dimensional compositions with elements on different planes are formed.
You will need:
- thick decorative paper;
- white cardboard;
- curly and regular scissors;
- PVA glue or pencil;
- colored paper;
- colored pens.
Manufacturing
- You need to take rectangular shaped decorative paper and fold it in half. This will be the cover for a future postcard.
- For the “filling” you should cut cardboard to the appropriate size and also fold it in half.
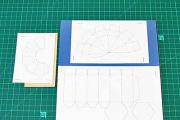
- An outline drawing of the image is made in the center (using a stencil or patterns). It is enough to draw one large flower or, as an idea, use the following templates for three-dimensional cards - from simple to complex:
- You can make an applique on the flower from bright colored paper or leave it white and use a colored pen to highlight the details of the image.
- Using curly scissors, cut the cardboard along the edge.
- You should glue the cardboard with the flower to the cover and place it under the weight.
- Write your congratulations and wishes near the flower.
- On the outside of the card you can stick palettes, a ribbon, and write “Happy Birthday!”
A beautiful handmade greeting card will delight your loved ones for a long time.
How can you surprise and amaze a loved one? A gift made with your own hands. It doesn't have to be a big, bulky thing. Make a postcard using the cardmaking technique. You can get inspiration by looking at photos of voluminous postcards; your imagination will tell you the rest.
Postcard using cardmaking technique
The technique of making postcards with your own hands has been known since Ancient China, and in the 15th century the first postcards appeared in Europe. Until recently, the tradition of giving cards for the holidays was widespread. Alas, in the age of computer technology, we often limit ourselves to a short SMS or email.
However, the popularity of handmade products is growing and original ideas for voluminous postcards are of interest to many. This is not just a craft - it is a piece of the master’s soul brought to life.
What you will need to make a postcard:
- cardstock for the base (you can use watercolor paper);
- scrap paper (buy a small set in the desired theme: this will be enough for one postcard);
- decorative elements, ribbons, voluminous flowers.
Important! Scrap paper has two important qualities: it does not fade or fade, and it has the required density. Therefore, it is recommended to choose it for creating crafts in the style of scrapbooking and cardmaking.
Two main rules for a good postcard:
- multi-layering: the more layers are applied, the more interesting and voluminous it will be;
- correctly selected composition.
Don’t turn the postcard into a child’s applique: every element in the composition must be thought out. Arrange them around the central, main detail that creates the plot.
How to make a voluminous postcard with your own hands:
- determine the theme and main element of the postcard;
- match it with backgrounds and decorative elements.
Glue the background onto the cardstock blank. It should be no more than 2 mm less than the base on each side. To make the card look more impressive, the edges of the background can be treated with a colored stamp pad, slightly tinted.
For shabby chic style cards, you can artificially age the edges by going over them with scissors or a special aging tool.
Another option for edge design is to sew around the perimeter using a sewing machine. Moreover, accuracy is not so important in this case as decorativeness.
Important! You need to glue the elements of the postcard with “Moment” glue or similar. PVA will turn yellow over time, and not a trace of beauty will remain.
The following layers are applied to the background. They should not repeat the shape of the postcard; you can use horizontal and vertical elements that match the color and style. Before gluing them, assemble the entire composition.
For beginners, it is best to use templates - sketches that give an idea of the correct distribution of parts to create a balanced composition.
Now gradually, layer by layer, attach the parts using decorative elements:
- chipboards (cardboard parts);
- paper cutting;
- flat and voluminous flowers;
- chips and buttons;
- ribbons (try not to use satin ribbons - they reduce the cost of the appearance of the work);
- rhinestones and tops (enamel drops).
Having finished designing the outer side of the card, you can decorate the inner side if you wish, write a beautiful congratulation and give it to a loved one.
Postcard in pop art style
This is the name for the technique of creating postcards with three-dimensional elements inside. Can you imagine the surprise and delight of the recipient when, when opening a postcard, a voluminous bouquet or a lock appears?

Such work requires painstakingness and some skills; a master class on voluminous postcards in the pop art style can be found on the Internet. They look incredibly impressive.
But even without any special skills you can create an unusual gift. We offer step-by-step instructions for making simple postcards with three-dimensional elements inside.
For the work you will need the same materials and tools as indicated above, but stock up on flat decorative elements (images of flowers, animals, any figures on the chosen topic).
You need to start working by designing the inside of the postcard. The simplest option:
- glue the background inside the workpiece (don’t forget: it should be 2 mm smaller on each side than the base);
- On a sheet of paper slightly smaller than a postcard, print out the diagram and use a sharp stationery knife to cut out all the elements indicated by solid lines. Bend the dotted lines toward you, and the dotted lines away from you;
- carefully glue the sheet inside the card onto the background, not forgetting to check whether it closes and opens well;
- decorate the outside of the card.
You will find various types of voluminous postcards on sites dedicated to the fascinating art of scrapbooking. Get inspired by ideas and create unique gifts for your loved ones.
Photos of three-dimensional postcards

Elizaveta Sklyarova
Beautiful and original postcard 3-D will be a great gift for the upcoming holiday on March 8th. like this postcard It will be useful to do with children over 6 years old. Of course, children will need the help of an adult, but they will be able to do all the preparation of the parts on their own. The manufacturing process is like this postcards develops fine motor skills, spatial thinking, logic, and also teaches children perseverance and accuracy.
Do three-dimensional 3-D postcard incredibly interesting, because in the process of making it, real miracles happen to paper.
Required materials:
- colored printer paper
Glue stick, PVA or double-sided tape
Scissors
- felt-tip pens or markers
Bird pattern
Openwork napkin
Printed congratulations for mom

Move work:
1. On sheets of paper of any kind colors measure out 10*10 squares. You need 7 such squares.


2. Fold our squares into triangles three times.

3. Cut out the petals.


4. Expand the petals and get flowers.

5. One segment cut off the flower.

6. Let's start coloring our colors(I have a black marker)

7. Leave one petal unpainted, glue it with tape or apply glue and glue it to the adjacent petal, creating volume.

8. Fold flowers in half and begin to collect the bouquet. To the first flower We glue the blanks on the right and left sides, leaving the central petal free.

9. Place one blank on the three central petals.

10. Again we apply two petals on the left and right sides.

11. Glue the last piece onto the three central petals.

Important: glue only the edges of the petals!
12. I decided to make leaves.


13. Let's start the design postcards.

Fold a sheet of thick paper in half, glue the leaves and attach the bouquet to postcard as shown in the photo.


14. We design the title page at our discretion. I glued an openwork napkin, a cardboard bird on top, a wing and a congratulation to mom in the right corner.


At first glance it seems that postcard very difficult to do, but it's not. It’s worth trying and everything becomes clear. My seven year old son squealed with delight as he helped me glue and saw the magical results. Good luck to everyone!
Publications on the topic:
Teacher of the second early age group: Neklyudova Darina Sergeevna Purpose of the master class: Formation of teachers’ skills to create a product.
Here he enters the clearing Straight to the ocean-sea; Lying across it is Chudo-Yudo the Whale Fish. Which fairy tale did you learn these lines from? That’s right, from the fairy tale.
Master class “Volume Snowflake” New Year is approaching! This means that it’s time to think about decoration, which few people can do without.
Master class "Volume snowflake". After the autumn slush, dampness and rain, winter has come - the most fabulous time of all seasons. AND.
Soon, very soon, the long-awaited and beloved holiday, New Year! It's time for the New Year holidays, time for a beautiful, kind fairy tale, which...
Volumetric snowflake made of paper. New Year is a time of magic and fairy tales, when each of us hopes for a small miracle. Therefore, preparation for...
Cardmaking, or the art of making cards with your own hands, arose not so long ago, but, undoubtedly, it has already become a favorite among many lovers of handicrafts and creativity. After all, you can embody the most daring and original ideas in them, transferring your energy to the future gift during creation. It is this warmth of your soul that will be felt in all sincere wishes and kind words of congratulations. A handmade postcard will be a wonderful and very valuable gift.
Moreover, there are plenty of reasons to give it as a gift. With the arrival of spring comes a touching holiday - International Women's Day. On March 8th, you need a lot of gifts to congratulate all women from the bottom of your heart: why not make beautiful cards for them that are perfect for your mother, grandmother, sister, teacher, and girlfriend. In the same way, you can congratulate your loved ones on their birthday, and on Angel’s Day, and on any other holiday (for example, on Mother’s Day or on September 1).
Postcards are different...
First of all, you need to decide what kind of postcard you want to make:
- the product can be ordinary (flat) or three-dimensional (including 3D modeling);
- single-layer or multi-layer;
- made using quilling or scrapbooking techniques;
- made in a specific style (for example, shabby chic);
- have a standard look and shape or be made in the form of a silhouette - a butterfly, a heart, a basket of flowers, a dress, etc.;
- contain a lot of different decorations and decor or not.

Of course, the general appearance, format, color, and theme of the future product will entirely depend on who it is intended for. If you are going to make cards for March 8th with your own hands, then you can focus on spring floral motifs: a bouquet of flowers in a vase or a whole basket of them, decorated with birds and butterflies using the quilling technique, will be suitable for both mother and sister, and to congratulate the teacher on on the afternoon of September 1st you can send a beautiful card in shabby chic style. Any woman will be pleased to receive a luxurious card-dress or a stylish or elegant handbag as a birthday gift.
As you can see, the choice is very large, but the main thing is not to get lost in its diversity and settle on the most optimal option.
Such beautiful curls or good old quilling
If someone close to you has a birthday soon, or urgently needs gifts for March 8th, try making a beautiful and simple spring card using the quilling technique.
To do this, stock up on paper of different colors (take either one designed specifically for quilling, or just colored double-sided paper) and prepare the most necessary tools for the job: good scissors (you can use curly ones, if you have them), glue, tape (preferably double-sided), cardboard for blanks, quilling stick, decorations.


Here's another interesting idea for a postcard using the quilling technique.

Scrapbooking, shabby chic style and other interesting ideas
On your mother's birthday, you can present a beautiful and original dress card. It can be made using the origami technique, or in the shabby chic style using scrapbooking elements. If you chose the first option, then you will simply need to cut out and make a model of the dress according to the template and attach it to the card base, adding additional decorations.
With the second option you will have to tinker a little longer.
- There are several types of such products. You can take a cardboard dress template and decorate it. That is, glue this blank to the front side of the postcard.
 Then make a fluffy skirt (you can take lace, cut it into small pieces and glue it to the base with an overlap), and corrugated paper folded in several layers is perfect for the top.
  Add a pretty belt and decorate your dress and the area around it with beads, rhinestones and organza ribbon.

- You can also make an original dress from paper napkins. Here, too, you will first need to cut out a blank - a template for the future outfit.
 Then take two types of napkins - regular white and colored. The skirt will be made from them. Cut them into halves, put them together and form a skirt, making it like an accordion.


 Apply the gathered napkins to the waist of the pattern of your dress (only the white background should be facing the dress).
 Then beautifully turn the skirt down and straighten it. Turn over and tie a ribbon at the waist.
  Glue the dress to the card and decorate it to your taste with rhinestones, beads, and sparkles.
- In the same way, you can make a handbag for your mother, and a cute apron for your grandmother for March 8th. It is also easy to cut it out according to a template, decorate it with ruffles, braid and ribbons, and put cardboard kitchen utensils in the pocket.
Paper napkins can also make a very beautiful, elegant umbrella with flowers or butterflies, which can be given to both mother and teacher on September 1st.

On the occasion of Knowledge Day (the first of September) or Teacher's Day, voluminous postcards are well suited. The inner part of the product can be made using the kirigami technique (for example, with a butterfly pattern), or using a combination of different postcard making techniques (quilling, scrapbooking, origami).
Whatever you choose, let this handmade product embody the warmth of your soul, sincerity and love. And your loved one who receives such a postcard as a gift will definitely appreciate all your efforts.
Chic three-dimensional cards for mom with the inscriptions “Mom” and “I Love You”, made using the scrapbooking technique, look amazing! Especially if they are made by yourself. And here it is not necessary to spend money and shell out a certain amount of money to purchase them. Just take a few sheets of colored and white paper, print out the templates, spend a little time making them - and the cards are ready!
Tools and materials Time: 1 hour Difficulty: 3/10
- scrap paper, plain or with a pattern, for the inscription “I Love You”, dimensions 14x21.5 cm, for “Mom” - 18x25 cm;
- printed templates, for the inscription “I Love You” - 12.5x19 cm, for “Mom” - 17x22.5 cm;
- scissors or paper cutter;
- glue stick, PVA or double-sided tape.
Congratulate your beloved mother by giving her these charming three-dimensional cards with the inscription “Mom, I Love You”, made using the scrapbooking technique!
Of course, it is not necessary to make both such voluminous cards, because they can be used separately. And if the first inscription “Mom” is suitable only for congratulating the mother, then the second inscription “I Love You” is useful for all occasions.
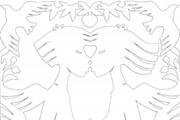
To make a three-dimensional postcard, you do not need any special tools. You just need to print the templates (presented below), cut and bend the paper along the indicated lines. The finished three-dimensional inscriptions then need to be glued onto colored plain or patterned paper.
Templates
Step-by-step master class
So, let's start making voluminous cards.
Step 1: Cut out the templates
Using scissors or a cutter, carefully make cuts along the solid lines on the templates. Remove unnecessary parts. Bend the letters along the dotted lines as shown in the photo. The folds should be neat and precise, so that the card can be folded in half along the center line.
Step 2: Glue the Lettering
Using glue or double-sided tape, glue the three-dimensional inscriptions into the middle of the colored scrap paper. Make sure that all parts are placed symmetrically and freely.
If you wish, you can use colored paper for inscriptions rather than white. Just make sure that the colors of the cover and interior text are in harmony with each other.

