Star news


 Models of fashionable dresses and patterns for them")


How to make a voluminous pencil. And again children's boxes: miniature “Pencils. DIY paper pencil
Hello friends!
I have a new portion of positive packaging for you - miniature ones children's boxes "Pencils". To be honest, I really like all kinds of handmade pencils. Somehow they turn out to be touching, so childish. :) At one time I even came up with my own version of soap pencils (by the way, ordinary cardboard also helped me in making them). Children are always delighted with such a gift!
And now it’s time for the “pencil” boxes.
To make a “Pencil” you need to prepare:
- 2 sheets of colored paper, one of which is a “wood” color (I used paper for pastels with a density of 160 g/m², but in general you can take paper with a density of up to 230 g/m²),
— 1 sheet of regular office paper (A4 format),
- stationery knife and scissors,
- scoring tool and ruler,
- double sided tape.
Before you begin, download the templates:
Now let's get started.
Since all the templates in the file are placed on 1 sheet, and the parts of the box will be of different colors, we will print the templates on a sheet of regular office paper. Let's cut them out (with an allowance) and fasten each template with a stapler with fragments of thick paper of the desired color. We already used this method last time, when making the “Eskimo” bonbonniere. It takes a little more work, but the scans turn out completely “clean”, without marking lines.
Let me remind you that first the details need to be punched, and then cut along the contour, starting with the shortest lines.

We bend the cut parts along the corresponding lines.

Then we glue pieces of double-sided tape as shown in the photo:


Glue it inside detail 2-2. For convenience, you can take a regular pencil or the same breadboard knife with a piece of double-sided tape glued to the end and lightly stick the inner bottom to it.

Let's place detail 2-2 inward and with a rotational movement we separate the device.

Assembling the lid.

It consists of parts 1-1 and 1-2. To connect them to each other, glue pieces of tape onto 3 (or 6) edges details 1-2.

The lid is ready.

Don't forget to glue the top flaps of the base ( part 2-1) inside.

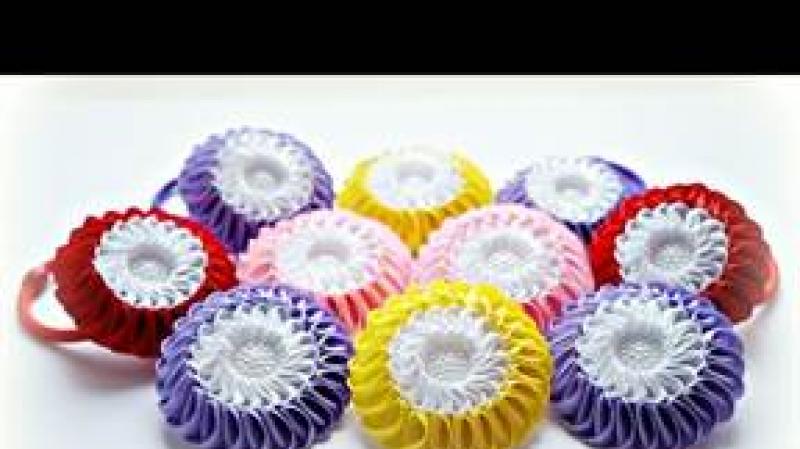
In general, “Pencil” is ready:

But best of all are thesebaby boxeslook in a multi-colored set:

You can even give gifts, decorate the New Year tree (a look at the future, so to speak :)), or even play games - I’m sure that children’s imagination will quickly find a use for paper pencils.
Of course, the gifts hidden inside will match the “pencils” themselves - just as miniature. But the main task of children's gift packaging is to give joy, and it seems to me that our boxes will do a great job with this. In addition, for especially important occasions they have a “big brother” - a capacious “Pencil”, almost a pencil case... for sweets and chocolates =). You will soon be able to get acquainted with it, just like with the rest of the boxes from "Children's collection", the preparation of which is nearing completion (I advise you to subscribe to site updates to be among the first to know about the release of the collection).
Since the new collection is dedicated to children, I tried to select and come up with models of boxes that could be used both as packaging and as toys. Moreover, many of them (such as “Pencils”) are quite accessible for joint production with preschool children and practical learning of the basics of paper modeling.
And after practicing on toy boxes and achieving the first successes, you and your child can move on to a more complex and very exciting level - paper modeling of animals and flowers, creating colorful compositions with scenes from the world of wildlife. The site team will help you with this "Paper Magic", where entire sets of sheets of thick environmentally friendly paper with instructions and colored patterns, designed for ages 3+, have been prepared.
Good luck to you and have a great mood!
But, by the way, for the mood... A very funny cartoon :)
See you again at KARTONKINO!
Bookmarks often help us out during school lessons. They can be either purchased or made with your own hands. Bookmarks can also be made from paper using the origami technique. We use colored paper, colored on one side only. The other side will be white. So in a short time we will get one pencil-shaped bookmark for ourselves and several for our beloved friends in our class.
Necessary materials:
- single-sided colored paper;
- pencil;
- ruler;
- scissors.
Bookmark a pencil from paper step by step
1. Prepare a sheet of single-sided paper, which will have dimensions of 18 x 6 cm. Draw lines with a ruler and pencil and cut out the desired shape with scissors to get a blank for a future bookmark for school.

2. Turn the workpiece over with the colored side facing the work area. Bend the top edge down approximately 1 cm.

3. Create the desired triangular pencil shape on the top of the workpiece using folds. So we bend the sides towards the center.

4. Once again bend the sides towards the center to make the pencil even thinner.

5. Turn the workpiece over. At the top you can see a colored pencil tip on a white background.

6. Bend the bottom of the workpiece up to a certain point to leave the white part of the pencil 3-4 cm.

7. Turn over the future pencil, which will serve as a bookmark for textbooks for the student.

8. Bend the right side of the pencil to the side to form the desired even vertical contour of the object.

9. We also bend the left side of the bookmark to the opposite side. It will be a little longer.

10. We open the bent parts and in the lower left corner there is a “pocket” into which we thread the right part of the craft. The upper corner of the left side of the pencil can be glued for better fixation.

Age: from 7 years, difficulty: medium difficulty.
But wherever we are,
We haven't forgotten you
How a mother is not forgotten by her sons...
Simple and heartfelt,
You are our eternal youth,
My first teacher!
(“School Waltz” lyrics by M. Matusovsky, music by I. Dunaevsky)
For more than forty years, since 1965, schools at the beginning of October are especially noisy and solemn - Teacher's Day is coming soon.
Much, of course, has been forgotten, but it is safe to say that most of the students remember the name of the first teacher.
The work of a teacher requires enormous patience and constant professional improvement; its importance for the formation and development of society cannot be overestimated.
The work of teachers and educators deserves deep recognition and gratitude.
So we want to sincerely congratulate all teachers on their professional holiday and make a craft for this wonderful holiday.
How to make a pencil from cardboard with your own hands...
Materials and tools:
- striped cardboard (A4),
- sheet of yellow colored paper (cardboard) (A4),
- piece (5*5 cm) of orange paper,
- compass,
- scissors,
- pencil,
- eraser,
- ruler,
- glue,
- small pieces of wrapping/dressing paper,
- big crystal,
- narrow ribbon 30-40cm.
It's good to have a dull knife or some kind of device for bending cardboard, but if you don't have them, then a metal ruler or the same scissors will do just fine.
Step 1. Let's make the “body” of the pencil
We take striped cardboard - sheet A4. We take cardboard because the product will be more stable. Fold the cardboard in half. Then we bend each half in half again. Then we bend each part in half. And so we continue until we get the thickness of each strip 1.5-2 cm. This blank will become the basis of the pencil figure.


Step 2. Making the “head” of a pencil.
Take yellow colored A4 paper. We measure the middle horizontally. Take a compass and draw a circle. Then we cut out a 120 degree sector from the circle + allowance for gluing. Then we glue this part onto a regular sheet of A4 paper (so that the part is stronger, but softer than cardboard).


Step 3. We glue our parts and connect them, inserting the “head” into the “torso”. Then carefully glue the teeth.
A good gift option is a handmade paper pencil. The finished souvenir can be used not only as a gift, but also to decorate the room.
- Pencil made of paper or cardboard.
- Volumetric pencil.
- Bookmark in pencil shape.
- Paper pencil using origami technique.
- Making panels from paper pencils.
Pencil made of paper or cardboard
For the craft you will need:
- a tube made of cardboard or thick paper (you can replace it with a base for towels);
- paper for tips;
- bright wrapping paper;
- duct tape;
- black felt-tip pen;
- tube of PVA glue;
- scissors and gift stuffing.
Gift filling can include hair ties, stationery, candy, and key chains.
The souvenir is made as follows:
- To make the case, cut a circle out of paper. The circle can be divided into several parts that will be used in the work. To obtain the body, glue the edges of the segment.
- The resulting cone is placed on the prepared cylinder. To create a cylinder, glue a tube of paper or cardboard. The diameter of the tube must be selected taking into account the dimensions of the cone.
- Having placed the cone on the cylinder, you should glue it.
- Paint the tip black.
- Wrap the cylinder with a piece of wrapping paper and glue it.
- Place a gift inside.
- You need to cut a circle out of a piece of paper. Make cuts around the entire circumference. Wrap one of the free edges of the cylinder around and secure it with adhesive tape.
If desired, you can decorate the finished craft with decorative elements or ribbon. Another option is to come up with original packaging for pencils.
Volumetric pencil
Alternatively, you can make a voluminous pencil. It is suitable for decorating a room. To make it you will need:
- product pattern;
- a sheet of colored paper or cardboard;
- white coated cardboard;
- glue;
- narrow tape;
- light brown or beige gouache (with its help, white paper will be tinted to resemble wood).
The craft is made like this:
- Draw a pattern on a piece of colored paper and cut it out. At the same time, we must not forget about allowances.
- The edges will bend well if you go over them with the sharp edges of scissors. Next, the edges need to be bent.
- The pencil should begin to be glued from the tip.
- After gluing the tip to the pencil, you need to glue both parts together using double-sided tape.
- Taking white coated cardboard, you should cut out the base and “skirt” from it.
- For tinting wood-like details, gouache or dry pastel is suitable. Having crushed the pastel, you need to apply it to paper or cardboard using a damp cloth. When applying, move from the middle to the edges.
- Glue the finished parts together.
When assembling the pencil, the base should be glued to the bottom, and the “skirt” to the tip.
Bookmark in pencil shape
A bookmark in the form of a pencil can be used for textbooks. You can also give it to friends who like to read books.

To make this craft you will need:
- colored paper;
- office glue;
- black gouache or pastel paint.
The bookmark is made as follows:
- Having cut out a rectangle from paper, you need to bend it at the sides and glue it together, leaving free space at the top.
- The second piece of paper is used to cut out a large square. Having coated the upper corners with glue, you need to bend them.
- The lower part must be placed in a rectangular base and all the parts must be glued together.
To make the tip of the pencil look believable, you need to paint it with black gouache or pastel. If you don't have them, you can use a black felt-tip pen for coloring.
Paper pencil using origami technique
A paper pencil made using the origami technique cannot be used for drawing. But it looks attractive and original if double-sided paper is used for its production.
It is made as follows:
- Initially, you need to prepare a square of colored paper (it can be any shade). The side length of such a square is arbitrary.
- The first fold is made through the center of the opposite edges.
- Having returned the square to its original position, you need to make a fold (a couple of other sides should be involved).
- Having unfolded the part, you need to measure a quarter from the side of the paper square and make another fold (transverse). To ensure accurate measurements, you can use a pre-prepared ironed strip.
- Having straightened the square, you need to similarly determine another bend point. In this case, you should focus on the new strip.
- Moving towards the edges, you need to bend the square again. He must remain in this position.
- The square must be finally bent through the opposite edges (perpendicular to the strips that have been previously ironed).
- The marked strips will make subsequent operations easier. The upper ends should be bent towards you.
By bending the corners for fastening, you should form a figure resembling a pencil. The paper must be fixed in this position.
Making panels from paper pencils
Finally, you can make a panel from paper pencils.
For this you will need:
- colored cardboard or paper;
- pencil;
- glue;
- scissors;
- ruler.

A panel of paper pencils is made as follows:
- To make a pencil, you need to take a sheet of colored cardboard or paper. Fold the paper in half and cut it along the line.
- Having folded the edge of the resulting rectangle by a centimeter, you should turn the workpiece with its front side and fold it inward (along its entire length).
- Having unfolded the workpiece and bending the extreme corners to the line outlined in advance, you need to turn the paper pencil with the wrong side.
- Having folded the resulting workpiece in half widthwise (a triangle-shaped spot should remain), you need to turn it again.
- Having folded the bottom edge towards the middle, you need to do the same with the other edge.
- To connect the valves, you need to insert the corners into the resulting pocket.
- To “sharpen” the pencil, bend the edge of the white canvas towards the middle. The valves must be connected with a drop of glue (for strength).
The rest of the paper pencils are made in the same way. By gluing them together, you can decorate the resulting panel with flowers or paper leaves.
There are various ways to make a pencil from paper. The finished craft can be used as a bookmark or decoration for a room. If you wish, you can involve your child in making such a souvenir.
So that these office supplies are always in place. Today we will make a very simple one colored paper pencil holder. It's very easy and quick to do, so you can do it with your kids.
For work we will need:
- Colored paper (5 sheets);
- Scissors;
- Glue.
DIY paper pencil
It is better to use thicker paper. This way it won’t tear from the weight of pens and pencils in the finished product.
To make such a product, it is not necessary to have double-sided paper. You can also take one-sided one. During operation, the white side will not be visible.
The organizer will consist of identical modules. They are all made according to the same principle. Now we will make one of them.
To begin, cut out a square from a sheet of colored paper. It must be of maximum size.
Take a square sheet of colored paper and fold it in half.
Unfold and turn so that the fold is vertical. If the paper is single-sided, then it is very important that the sheet lies with the white side up. Otherwise, the module will turn out not colored, but white.
Now we bend the upper corners to this fold, forming 2 identical triangles.
Photo 1
 We lift the lower part of the workpiece up to the corners. We get a rectangle. Iron the fold thoroughly.
Photo 2
 Now we raise the sides to the middle. Iron out the folds.
Photo 3, 4

 We got 2 pockets on each side. We thread 1 side into 2 until it stops. The module will take the desired shape.
Photo 5
 To make it stick better, you can coat one side with glue and lightly glue it inside the pocket.
1 module is ready. We just have to do the rest. They all work exactly the same way. It is important that they are all the same size. You can make all the modules the same color, or you can make them different. Then the finished pencil holder will look brighter and more interesting.
Photo 6
 Now that all the modules are ready, all we have to do is glue them together. Take 2 parts and coat 1 side with glue. Glue them to each other.
Photo 7

Next, take the next module and glue it. So we must glue all the modules, forming a circle. Please note that there should be no space in the center. All modules must touch each other tightly.
We will get 5 compartments for storing office supplies.
ready! Children will really like this work.
Stationery organizer made from cardboard boxes “Owl”
Ordinary small cardboard boxes can become the basis for a bright organizer. It is suitable for children's and school office. Everyone can make an unusual and useful craft without any special expenses. Elena Nikolaeva's master class shows how to make an organizer using two tea boxes and colored paper. The work of turning waste material into such a useful craft will be relevant in the summer, before the start of the school year, and at any time of the year, when you want to make something useful with your own hands.

Materials for creating an organizer:
- 2 cardboard tea packages;
- glue and stapler optional;
- colored paper;
- a simple pencil;
- scissors;
- ruler;
- pen;
- a piece of bright glitter foamiran, if desired;
- white acrylic paint or corrector.
How to make an organizer step by step
Take two tea cardboard boxes of the same size and glue them together, coat the wide sides with glue. You can also use a stapler for secure fastening.

Leave the lower part of the resulting structure unchanged, cut off the upper part. First, you will open the inside of the container, it will be divided by a partition into two compartments, pens and pencils will be inserted into them. Secondly, cut the paper so as to highlight a semicircle in the center - the head of an owl, and two sharp ears at the edges.

Cover the sides on both sides with cardboard. In the future, you will have to cover it with thin paper, and if you lay thick cardboard, you won’t be able to see the joints between the boxes.

Choose bright paper of any color for the base of the craft. Cover the box. It is advisable to do this inside too.

From a small piece of a contrasting color, cut out half an oval and glue it to the central part as the apron of a wise bird.

Cut out huge round eyes from yellow or any other paper, glue them in the center, add pupils. Use white acrylic paint to paint highlights. Add an orange beak.

Draw a mesh pattern on the apron using a ruler and pen. Cut out two bright droplets and glue them as wings. Add eyebrows using bright glitter foamiran. Cut these pieces into fringe. An interesting organizer in the shape of an owl is ready. It turned out to have two compartments. In one of them you can store pens, in the other - pencils or any other stationery at your request.


More interesting:
See also:
Wool painting “Golden Autumn”
Master class in the “Autumn Mood” category. Author Alina Fedotova, 11 years old Municipal Educational Establishment of Children's Educational Institution Central Children's Theater of Kamensk...