Star news


Buffs on pillows and bedspreads: patterns for beginners. DIY handmade puffs. Master class with photos and diagrams Light puffs
Puffs are a special type of drapery that can be used to decorate a product with a pattern of fabric folds. This technique requires accuracy and patience, but the result will not disappoint you!
Our master class will tell you in detail how to sew puffs with your own hands.
Puffs: theory and nuances of work
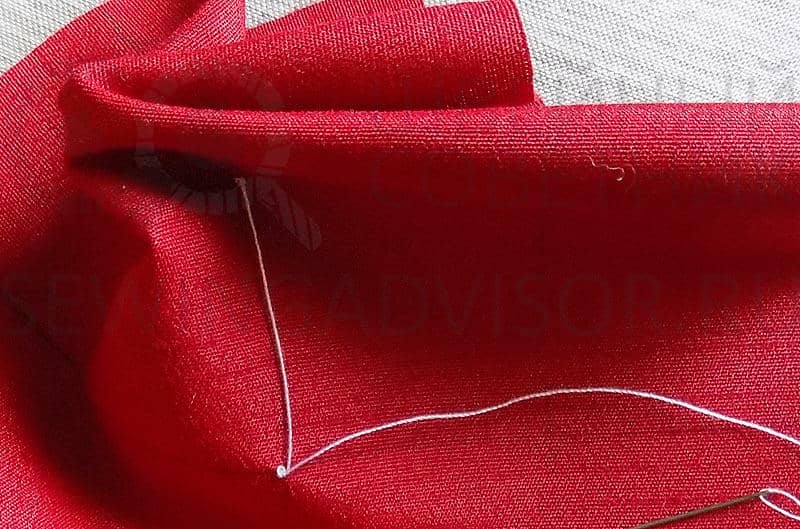
How to sew puffs with your own hands? It's not difficult, but there's a fair bit of prep work that needs to be done first. Puffs are folds tied together with threads according to a certain pattern. The threads pass through points located in a special order, which must first be marked on the fabric. To mark, use sharpened soap or chalk, or a special fabric marker.You should not mark the diagram with a marker that disappears in the air, because if the points disappear before the end of assembly, it will be very difficult to restore the markings.
The puffs can be pulled together from both the front and back sides. If the markings are applied to the wrong side, you can use a simple pencil for it (especially if you are sewing interior textiles). Puffs gathered on the front side are often decorated with beads or seed beads, thus masking the gathering stitches. In addition to the points, we recommend marking the tightening lines, since during work the fabric is greatly deformed, and it can be difficult to find the required point.
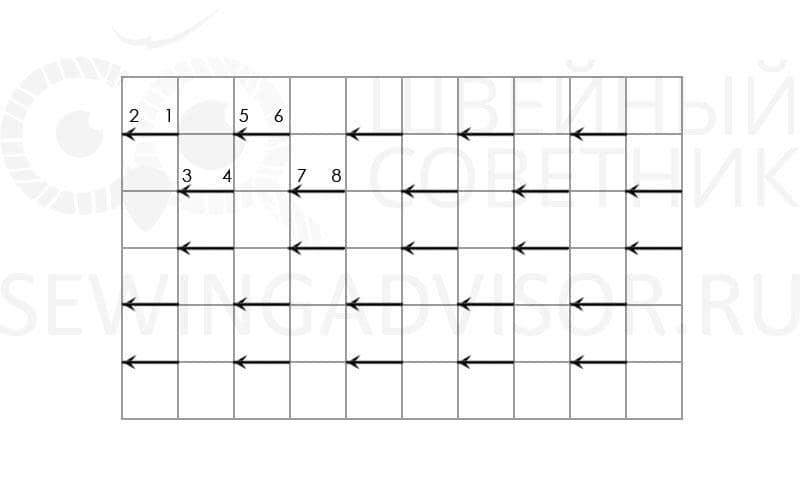
The puff pattern is a grid with points marked on it and the direction of the stitches that need to be tightened. The distance between the lines of this grid varies depending on the type of fabric. Typically for thick fabrics this size is about 2 cm, and for thin fabrics it is about 1.5 cm.
To make stitches, use threads that best match the fabric, both in color, thickness and shine. Our tutorial uses colored threads to make the stitches visible in the photo.
To ensure that the folds lie as evenly and neatly as possible, place the vertical lines of the mesh along the grain line of the fabric (parallel to the edge). As for fabric consumption, on average you will need to double the cut relative to the required size of the fragment decorated with puffs. To calculate the required amount of fabric, sew a sample pattern. If this is your first time making puffs on this type of fabric, after assembly, soak and dry a sample to see how the puffs on this fabric behave after washing.
So, let's find out how to sew puffs with your own hands!
Puffs on fabric with polka dots
For this type of puff, you don’t have to apply markings and use the polka dots on the fabric to guide you.
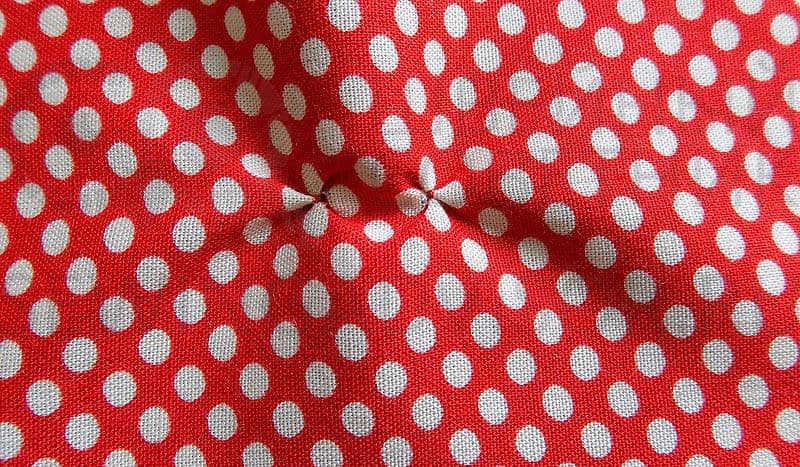
Fasten the thread and sew 4 points at the inner edge of 4 peas, forming a diamond shape. Place the stitches on the right side of the fabric, the needle should capture approximately 2 mm at each point.

Pull the diamond so that the polka dots of fabric meet.

Bring the thread to the wrong side and tie a knot, securing the gathering.
Insert the needle into the nearest pea for the next flower. Tie a knot. Bring the needle to the front side and sew 4 points again with a diamond.
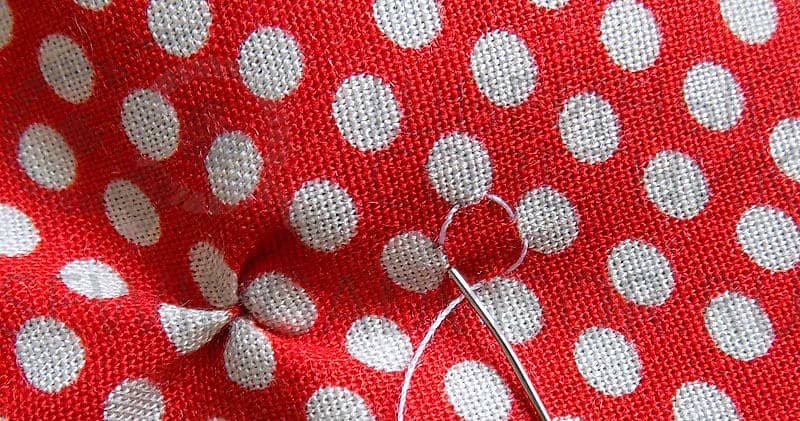
Pull and repeat on the wrong side.


Puffs "Flowers"
Prepare beads or seed beads, 1 for each flower.

Sew square stitches along the front side.

Pull the thread and sew through the tie, inserting a bead.


Bring the thread to the wrong side and tie a knot, securing the gathering. Insert the needle into the closest point for the next flower. Tie a knot.
Bring the needle to the front side and sew the “square” again. Pull and repeat on the wrong side.


Puffs "Pletenka"
Mark the fabric on the wrong side.


Buffs "Pigtail"
Mark the fabric on the wrong side.
Referring to the diagram, assemble along the wrong side, securing each with a knot before and after tightening.


Buffets "Bamboo"
Mark the fabric on the wrong side.
Referring to the diagram, assemble along the wrong side, securing each with a knot before and after tightening.


The word "bouffer" translated from French means "to swell" or "to puff up." In needlework, this term refers to lush, beautiful folds in fabric and drapery. Using puffs, you can decorate clothes, pillows, upholstered furniture and other products with your own hands.
At first glance, such fabric patterns may seem very complex, but they are not. Puffs are sewn according to special patterns that even a beginner can figure out. The fabric consumption for such sewing is on average 2 times the area of the finished product, but depending on the pattern it may vary.
We make a pillow with puffs with our own hands in the “braid” style
Buff braided is one of the most spectacular and popular patterns. For those who want to sew such a pillow with their own hands, we have prepared a step-by-step master class with a detailed description of the work.
For work you will need the following materials:- Template paper, pencil, ruler, scissors and utility knife.
- Fabric for the pillow: preferably plain and wrinkle-resistant.
- Crayons or soap for marking fabric.
- Sewing needle and thread.
- Sewing machine
- At your discretion: zipper, Velcro or buttons for the pillow.
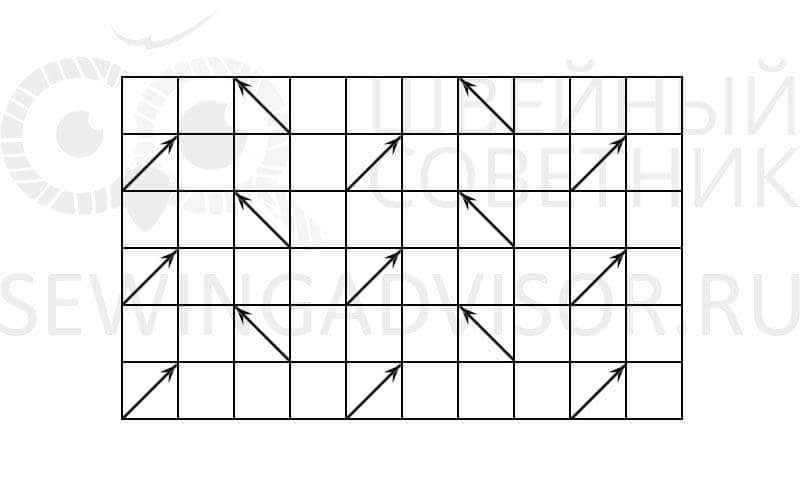
For beginners, it will be more convenient to first make a marking template on paper. To do this, we draw the sheet into squares; the size can be changed as desired; in our example, the squares are 3x3 cm. The number of squares on the sheet is 7x10.
We draw squares diagonally through one, changing the slope in each next row:
To make the pattern easy to transfer to the fabric, first cut out the outer triangles.
Then you need to make internal slits using a utility knife or small scissors:
Then we cut out a square of fabric measuring 0.5 x 0.5 m. Stepping back 8 cm on each side, draw lines. We attach the template to the resulting inner square.
To draw the entire square, you need to move the template, shifting the marks down and to the right.
From the tops of the diagonals we draw lines to the edges of the canvas.
Insert the needle into point 1 on both sides of the diagonal.
We secure the fold with three or four stitches, tie a knot, but do not cut the thread.
We stretch the thread and also sew diagonal number 2. We continue to fasten the diagonals.
This is what the first row will look like.
The pattern will be clearly visible after the second row. We fasten all the marked rows in a similar way.
As a result, the size will decrease to 35x35 cm.
We cut out a square of appropriate size from any fabric for the base of the pattern and baste it to the drapery.
The back side of the pillow can be decorated in different ways - with a zipper, Velcro, buttons, or simply sewing up the hole after inserting the pillow.
In this example, we used a zipper that needs to be basted and sewn on a machine.
Having opened the zipper, we baste and sew both parts of the pillow to each other. We process the cuts with an overlocker or by hand.
Turn the product inside out. The finished pillow can be decorated with elegant braid. You can sew it on by hand using small stitches.
Puffs sewn using similar patterns can often be found on beautiful curtains.
How to make a lambrequin from a braided pouf?
To calculate fabric consumption, the length of the cornice must be multiplied by 2.5 (this is the assembly factor). In this case, all squares must fit completely into the resulting length. If the calculations do not result in an integer, then the size of the canvas needs to be increased slightly so that the last square fits.
In our example, the side length of the square is 18 cm, and there are 19 pieces.
The pattern on paper is made in the same way as in the previous example, only the size and number of squares change. Using the template we mark the fabric.
We assemble the buffs in the same way as described above.
The finished lambrequin needs to be pulled to the desired size, hung on the cornice and straightened out the folds:

This unique and very beautiful technique will look great, for example, on a dress or bedspread.
To work, you will need suitable fabric, a sewing needle and thread, as well as beads or seed beads (1 piece for each flower).
Description of the operating technique:The fabric on the wrong side must be marked as shown in the diagram:

First, a “square” is made on the front side with stitches.
Then you need to tighten the thread, sew through the tie and insert the bead.
After this, the thread is brought out to the wrong side, a knot is tied and the needle is stuck into the place for the next flower, the knot is tied again.
Then on the front side you need to sew the square again, repeat the tie as in the previous flower and fasten it on the back side.
We repeat the pattern until all the “flowers” are ready.

Such puffs will look great both on the hem of the dress and on the sleeves.
Now let’s look at the photo with explanations for those who want to decorate the bedspread in an original way with puffs.
How to make diamond-shaped puffs in a step-by-step tutorial?
Let's take a closer look at the patterns of the puff for the bedspread. This blanket is made from a single piece of fabric. You need to work from the front side, pulling the thread from the wrong side.
- We fold the fabric in the form of bows, secure it with pins and iron it in this form with an iron. We leave room for frills along the edges. We fasten adjacent edges together with the first row of stitches.
- We perform the second row in a checkerboard pattern, retreating the width of the fold. We lift the edges of one fold and connect them.
- The next row and then all odd ones are performed similarly to the first
- Net rows are performed in the same way as the second
You can make such a heart-shaped pillow by mastering the technique of working with puffs.

In addition to what we have already discussed, patterns with puffs can be made using the knitting technique.
Let's consider the technique of knitting puffs with knitting needles, which will look original on clothes for both children and adults.
The pattern looks like this:

Pattern report 4 loops. On the knitting needles we cast on the number of loops required for repeats + 3 loops for symmetry and 2 edge loops. We knit four rows in stockinette stitch. In the fifth row, unravel the loops indicated in the diagram, pick up the unraveling and the loop and knit a knit stitch.
Video on the topic of the article
For everyone, we have prepared a selection of video lessons on the topic of the article:
Drapery on fabric in the form of beautiful folds is called puffs. Puffs are lush, voluminous folds in fabric that are laid in a certain way. With their help, the canvas is transformed into a completely new and original material. They are often used to decorate different parts of clothing, sleeves, hems or sides of skirts, dresses, as well as textiles - pillows, bedspreads, curtains and even furniture.
Folding technique
Thanks to a simple technique, puffs look original and beautiful on fabric. The stitches secure the fabric and create voluminous folds. The technique is performed according to the diagrams. At first it seems that they are complicated, but in fact the patterns are simple and are quite suitable for beginners who love needlework.
To make stitches and folds of figured puffs, dots are placed in parallel rows on the wrong side of the fabric at a distance equidistant from each other.
The rows with dots should run parallel to the weft and warp threads of the fabric, then the finished gathers will be smooth and beautiful.
Marking and assembling the puffs is done manually; marking is best done with a special marker, which can be used to draw on the fabric in order to easily remove the markings at the end. Fabric consumption depends on the pattern; it is better to take fabric twice the size of the area on which the finished folds will be located.
The marking can be on the back or front of the material, it depends on the pattern of the puff.
Suitable materials include silk, pile, and thick gabardine. If you do it on the front side, you need to be careful. The seams in this case must be perfect. You can sew beads or seed beads at the connection points; if the finish is in harmony with the design, then it will turn out more original. Schemes can be marked not only with dots, you can mark the direction of the line so as not to get confused. The scale of marking will depend on the area of the product; it is better to make a layout.
For example, the “Flowers” drawing looks like this; the photo shows the step-by-step technique.
DIY puffs for beginners: step-by-step instructions
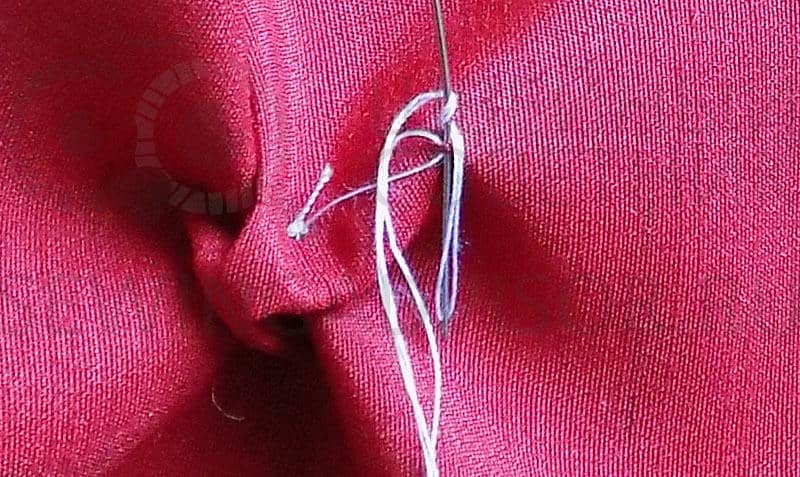
For assembly you need to use a strong thread, its color should match the tone of the material. The needle must be inserted and removed so that the point remains in the middle.
Next, you need to pull the thread tightly so that the folds “stand” and at the same time they can be moved to the center. Each two ends of the thread are tied into a strong knot. Then the next puncture is made under the starting point. The rows are made zigzag. The thread is tightened again and knots are made.
The beginning of the second row is shown in the picture, the next steps are the same as in the first row. This is what you get on the back and front sides in finished form.
Assembly diagrams for making puffs with your own hands, various options
For example, you can make a pillow with a Braided pattern in the following way:
- The points are marked from the inside out, the seams are also made from this side;
- Each line is sewn from left to right, secured with knots at the end. If the fabric is thin, the distance between the points should be 1.5 cm, if dense, then 2 cm;
- 1st row: connect points 1 and 2 with a small tack (a few stitches will be enough), then connect 3 and 4 points, without needing to tighten points 2 and 3;
- 2nd row: Do as shown in the diagram, connect the dots to make a chess move relative to the connections of the dots in the top row.
Handmade buffalo pillows, stylish and beautiful interior decor
Interior decor plays an important role in the design of a room, adding style, grace, beauty, romance, and individuality to any room. Handmade decorative pillows are a real art. They will decorate any sofa in the living room, bed in the bedroom, armchair, chair, and such products will definitely not be found anywhere else. They look impressive, stylish and beautiful.
Puff pillows can be made from any fabric and with different patterns, you just need to be patient and have the necessary tools (thread, needle, scissors). An example of a pillow with a “Chess” pattern. The scheme is simple, the drawing is original and beautiful.
Take a thick, plain fabric that doesn’t wrinkle, it could be gabardine for curtains. Make a square with dimensions of 52x52 cm, add 1 cm allowances on all sides. From the inside, mark lines, 5 and 2.5 cm, alternating them. The result should be 7 squares of 5 cm and 6 strips of 2.5 cm.
I decided to find out what it is puffs? After looking at a bunch of material, I found out that puffs are called drapery or, more simply, various beautiful folds in the fabric. If translated literally from French, the word bouffer means “to swell” :)
It turns out that you can decorate a lot of things using puffs! Pillows, bedspreads, curtains and even clothes!


Marking and assembling buffs
Puffs are sewn mainly by hand according to special patterns. The fabric consumption for assembling the puff will vary depending on the pattern. It is recommended to take fabrics approximately 2 times larger than the area of the area with the puffs in finished form.

In order to accurately and correctly assemble the puff, it is better to transfer the design or marking directly onto the fabric. It is better to do this with a marking marker so that you can easily remove the marks later.

Collect puff from the wrong side means making all seams inside out. In this case, it’s not so scary if the markings remain or if the seams are imperfect in some places.

If the bouffant is assembled from the front side, then you have to be extremely careful! All seams must be perfect; beads or seed beads can be sewn into the joints.
As an example, I will give a step-by-step assembly of the “Flowers” buffet.


Then from the collected flowers you can sew, for example, a pillow! Isn't it beautiful?

Types of buff assembly
Now watch the video and learn a lot of interesting things about the existing types of puff assembly.
Master Class
The decor of clothing in the form of folds arranged in rows is called puffs. The word “bouffe” itself, translated from the French “bouffer”, means to puff up.
In the 18th century, women were madly in love with dresses decorated with puffs. Initially, evening dresses and festive costumes made from expensive fabrics, such as velvet or silk, were decorated with such decor. Puffs were often decorated with beads. The result was real splendor, consisting of volumes, shapes and patterns that gave the outfits a truly royal chic.
Dear seamstresses made the puffs with their own hands for these brilliant outfits exclusively according to individual orders and only by hand.
How to make puffs with your own hands
The appearance of hand-made bouquets can be original and varied to suit every taste. The most popular honeycombs are in the shape of diamonds, rectangles and squares.
Of course, the creation of which will require professional skill and handicraft talent. However, there are simple schemes that allow you to independently add such decorations to clothes, such as “waffles”, which, by the way, are back in fashion today.
Hand puffs in the shape of diamonds and squares
Diamond puffs can be made from any type of fabric. The material consumption for making the trim is twice or three times more than the finished finish - it is determined by the type of puff, the depth of the folds and the type of material.
In this article I want to present one of the basic schemes for classic waffles.
The manual bouffant pattern is very simple. First, markings are made on paper, which is then transferred to the fabric from the wrong side.
To form a diamond-shaped puffed finish, mark the honeycomb locations on the back of the fabric - they must be located in a certain order.
Start by drawing a grid. Honeycomb buffs are marked using a grid of dotted lines. Place the dots at a distance of, for example, 4 cm from each other and 4 cm between rows. Connect the points together with straight segments according to a checkerboard pattern - these are the finishing connection lines.
Buffer assembly After this, the fabric is basted, and it is captured only at the points marked in the diagram.
At the starting point of the first puff, place a bartack, then insert a needle into the end point of the line and pull the fabric together. It is important to make a high-quality fastening - to do this, stick a needle into the fabric and wrap it with thread twice.
Attach the lining to the wrong side of the trim, then the honeycomb puffs will not warp and the folds will not move.
Scheme for honeycomb buffers

Assembled honeycomb buffs

Ready-made honeycomb buffs
Puffs with buttons
To make this unusual type of puff, small, fairly durable plastic circles or buttons with a diameter of 6-8 mm are used.
On the wrong side of the fabric, mark the pattern of hand puffs using dots arranged in a checkerboard pattern. The distance between the points depends on the properties of the fabric and model.

Around each designated point, draw a circle with a diameter twice the size of the circle or button. Place a series of small hand stitches around the circumference, place a button in the middle and pull the thread. Finally, secure the stitching.
After this, carefully pull the thread and pull the material together so that an even “accordion” appears. Then turn the fabric right side out and fasten the resulting edges of the fabric in a checkerboard pattern. If desired, they can be decorated with beads at the same time.